Beans and Sardines

  • Home
  • About
  • Recipe of the week
  • Recipes
  • Wines
  • Contact

German style Preserved Fruit in Rum (Rumtopf) Recipe

Beans and Sardines
October 04, 2023 by tina oblak in Adriatic Recipe, Austrian inspired dishes, celebratory desserts, Central European recipes, dessert, Easy recipe, festive dessert, festive sweet things, Istrian cuisine, Istrian food, Istrian gastronomy, Mitteleuropean recipes, simple recipe, Slovenian cuisine, Slovenian food, Slovenian gastronomy, Sweet Things

Rum-soaked fruit originated in Germany, where it is known as Rumtopf. It is a very simple recipe that consists in preserving seasonal fruit in sugar and rum, leaving it to mature for a few weeks, and then it is ready to be enjoyed.

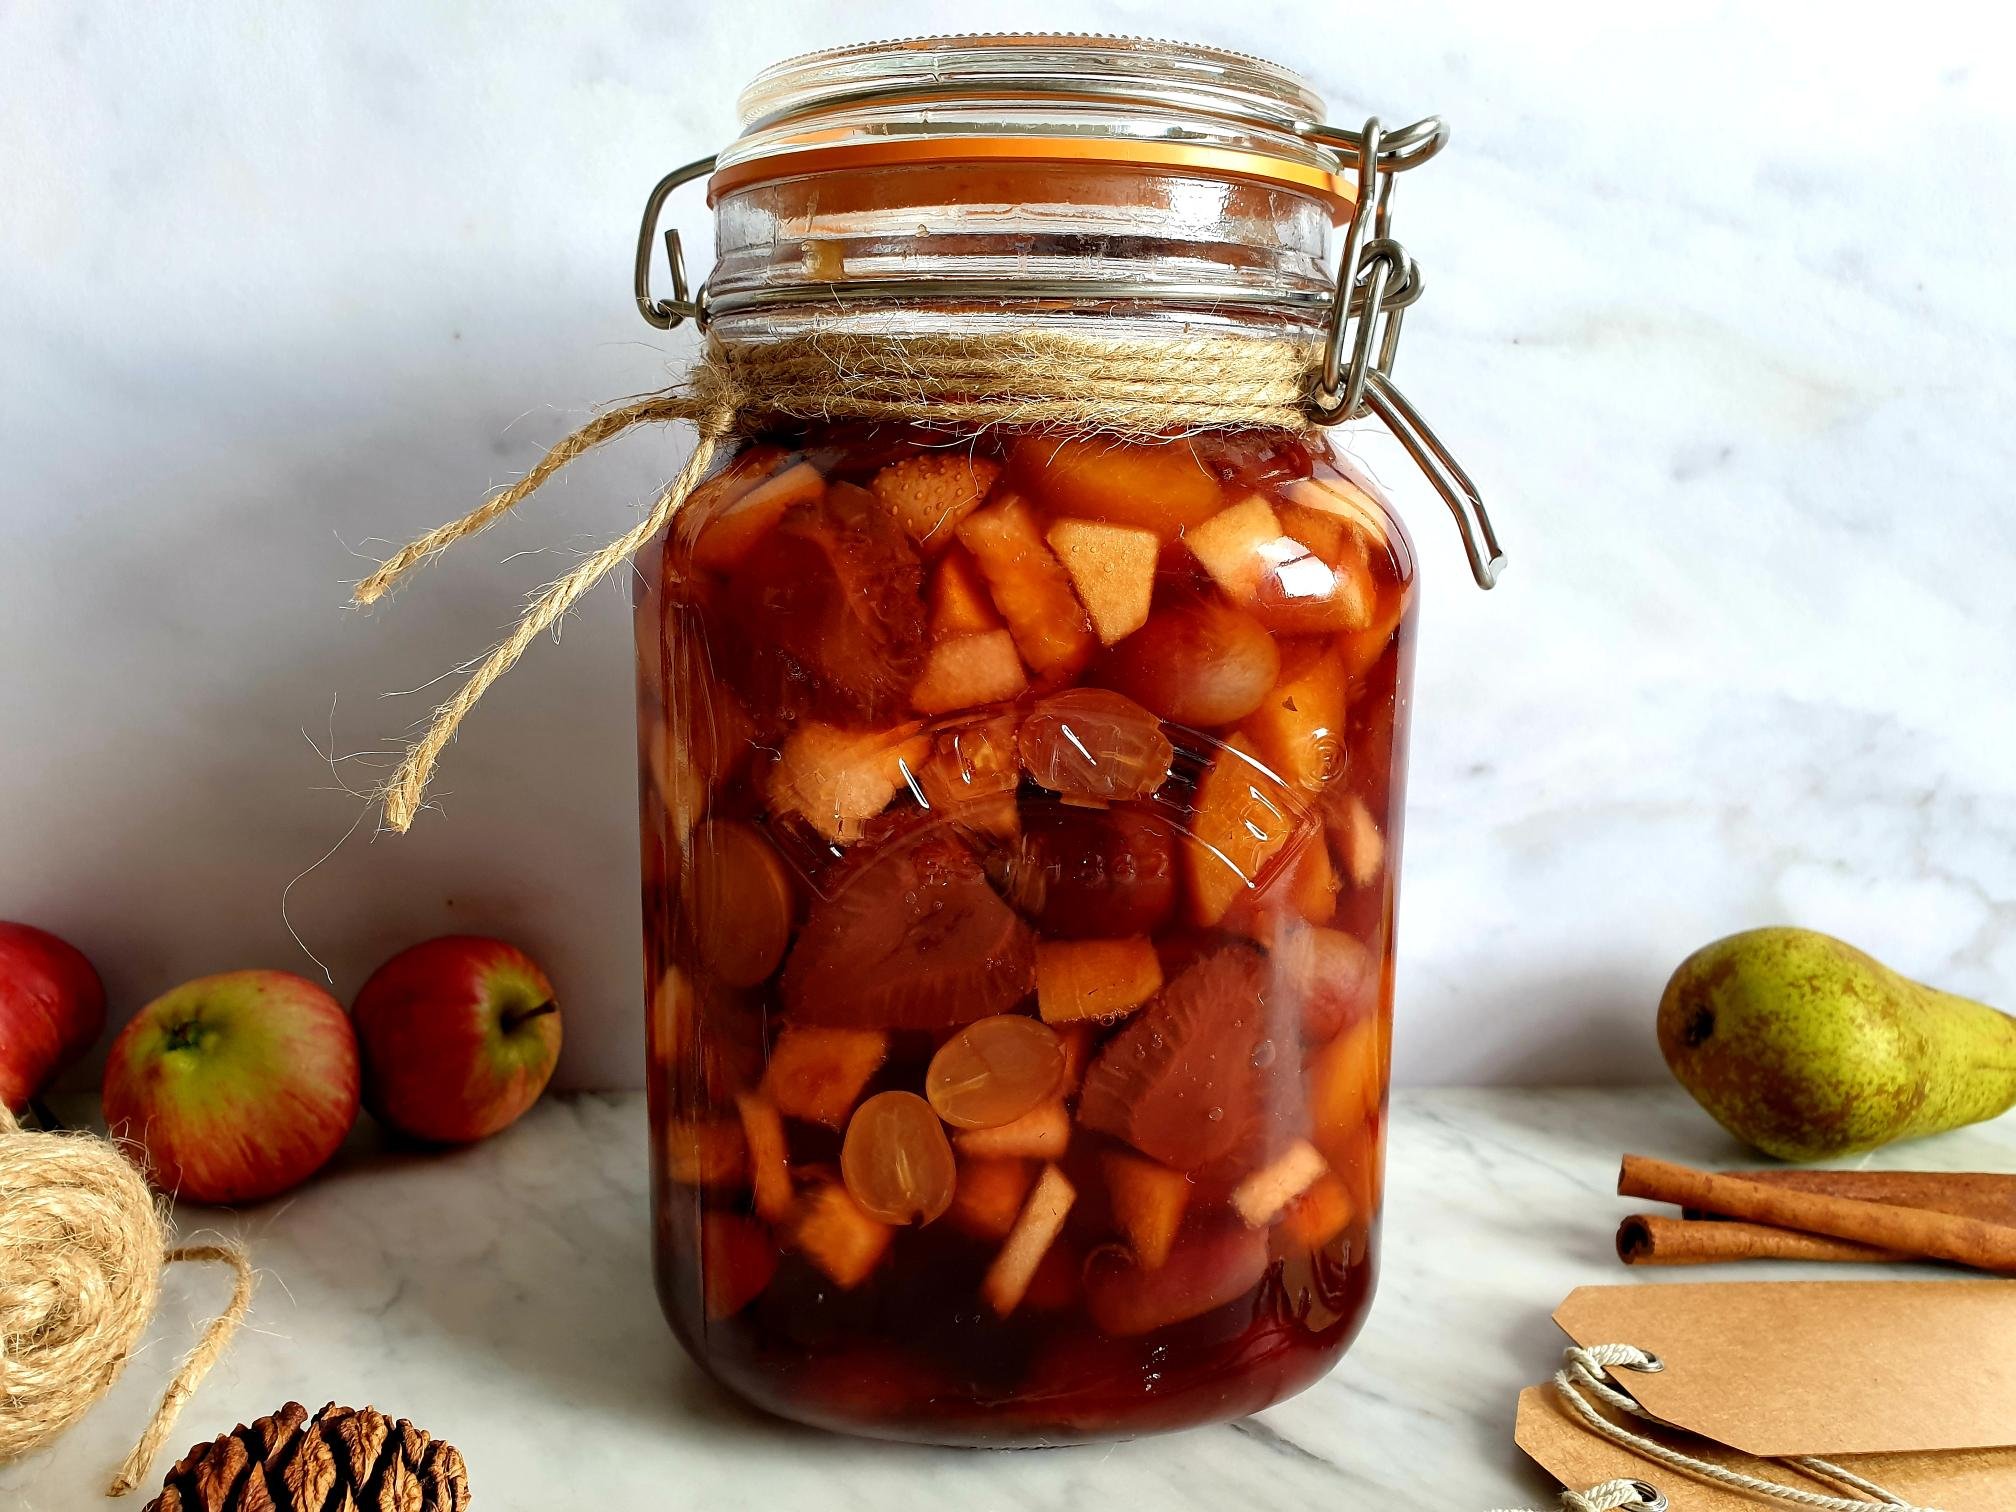
Specialized ceramic rum pots (if keen to have one, they are available in specialized kitchen shops or online) are used to make this alcoholic dessert in countries with a strong Rumtopf making tradition, alternatively glass jars are used.

You can have rum soaked fruit on its own or create a more “sophisticated” dessert by serving rum preserved fruit with vanilla ice cream, whipped cream or custard, you can also pair it with a piece of cake or other sweet treats like pancakes or waffles.

You can also divide rum soaked fruit into smaller glass jars which makes a lovely foodie Christmas gift for your friends, family, work colleagues or neighbours.

It is believed that rum was imported to Europe, more specifically to Germany, in 18th century by a West Indies fleet, which traded with Virgin Islands, and was based in the German city of Flensburg, bordering with Denmark, and from here rum travelled to other European countries.

Together with rum, tropical fruit was also transported, but did not travel very well. Apparently, some of the fruit ended up by accident into the rum filled barrels, the fruit remained well preserved and perfectly edible, and this is how the Rumtopf was born.

This German style of preserving fruit in rum also spread to other European countries, among which Austria and Italy. In the latter it is also very common to soak the fruit in grappa (an Italian style grape based pomace brandy) rather then in rum.

This delightful liquor-based dessert became also very popular in Slovenia, where it is known as Rumov Lonec, meaning literally Rum Pot, and this comes as no surprise as Slovenia is geographically bordering with Italy and Austria, and was also ruled by the Austro-Hungarian Empire, the gastronomic influence is therefore inevitable.

As a child I have very vivid memories of my mother preparing Rumtopf every year, it used to be very in “fashion”. I am bringing it back as this rum-based dessert is delicious, very easy to make, and it will be ready to use when you are.

This recipe starts at the beginning of the summer and is finished by late September, or early October, traditionally is then enjoyed for the very first time when the Advent begins, and it is offered all the way through the entire holiday season.

Fruits during this period have time to mingle and develop their flavour, they soak up the rum, and the rum also absorbs all the fruity flavours, losing their previous sharp, alcoholic flavour, and start to taste more like a fruity liquor.

For this alcoholic treat I chose the type of fruits that my mother used for her Rumtopf. The idea behind this recipe is to use seasonal fruit that you can buy in the store, farmer's market, or pick from your garden or orchard. These days, of course, things are a bit different, you and can just walk to the supermarket any time of the year and find all types of fruits all year round from around the world, sometimes with little idea what it is in season and what isn't.

If you want to impress yourself and your guests this holiday season, give this recipe a go, and since it is prepared ahead of time it will take away all the stress. However, do remember that as much as the sugary fruit is tempting, this is not a child-friendly dessert, and avoid offering it to people that need to abstain from any alcohol consumption.

Recipe

Ingredients

Makes 1.5 litre jar

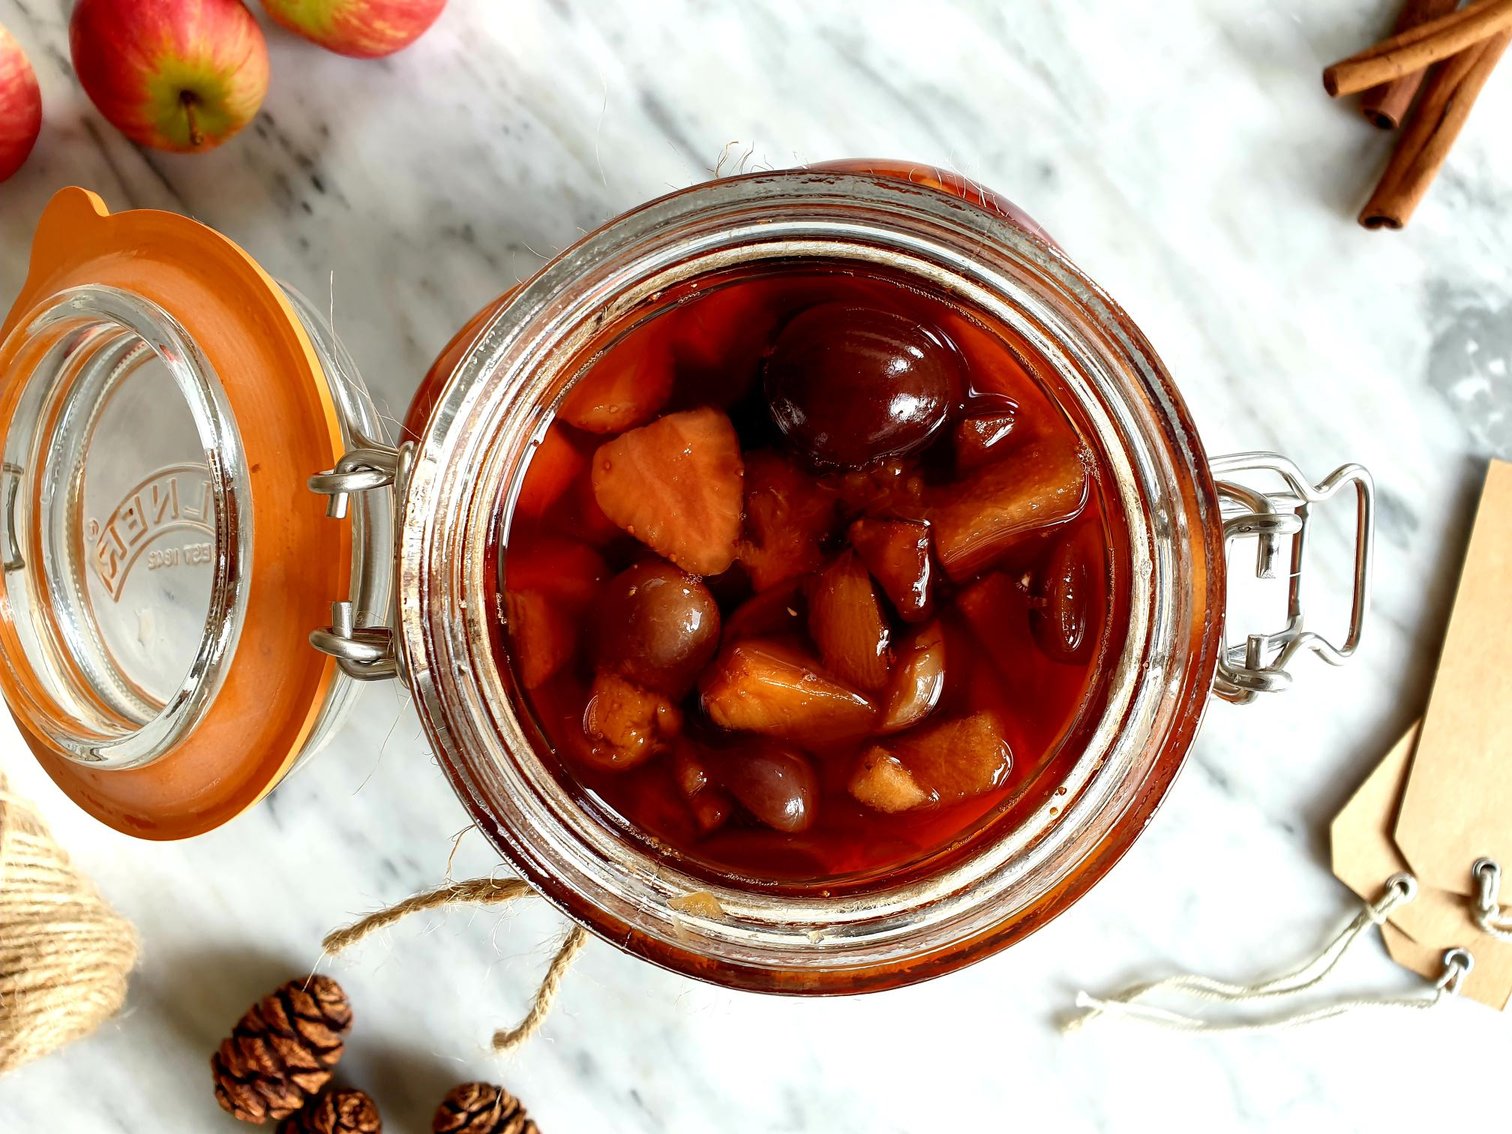
  • 1 kg fruit (I used strawberries, cherries, peaches, nectarines, red grapes, pears and apples)

Whatever fruit you choose make sure it is fresh, seasonal, undamaged with no rot or mould and nicely ripe but equally not overripe.

You can choose more exotic varieties of fruit like kiwi, mango, papaya and pineapple, and go for a tropical theme (try to avoid bananas and maybe raspberries and melons or other fruits that could go a bit mushy, and oranges and lemons as too acidic).

Just to give you an idea, here is the list of fruits you can use according to different months of the year.

May, June, July

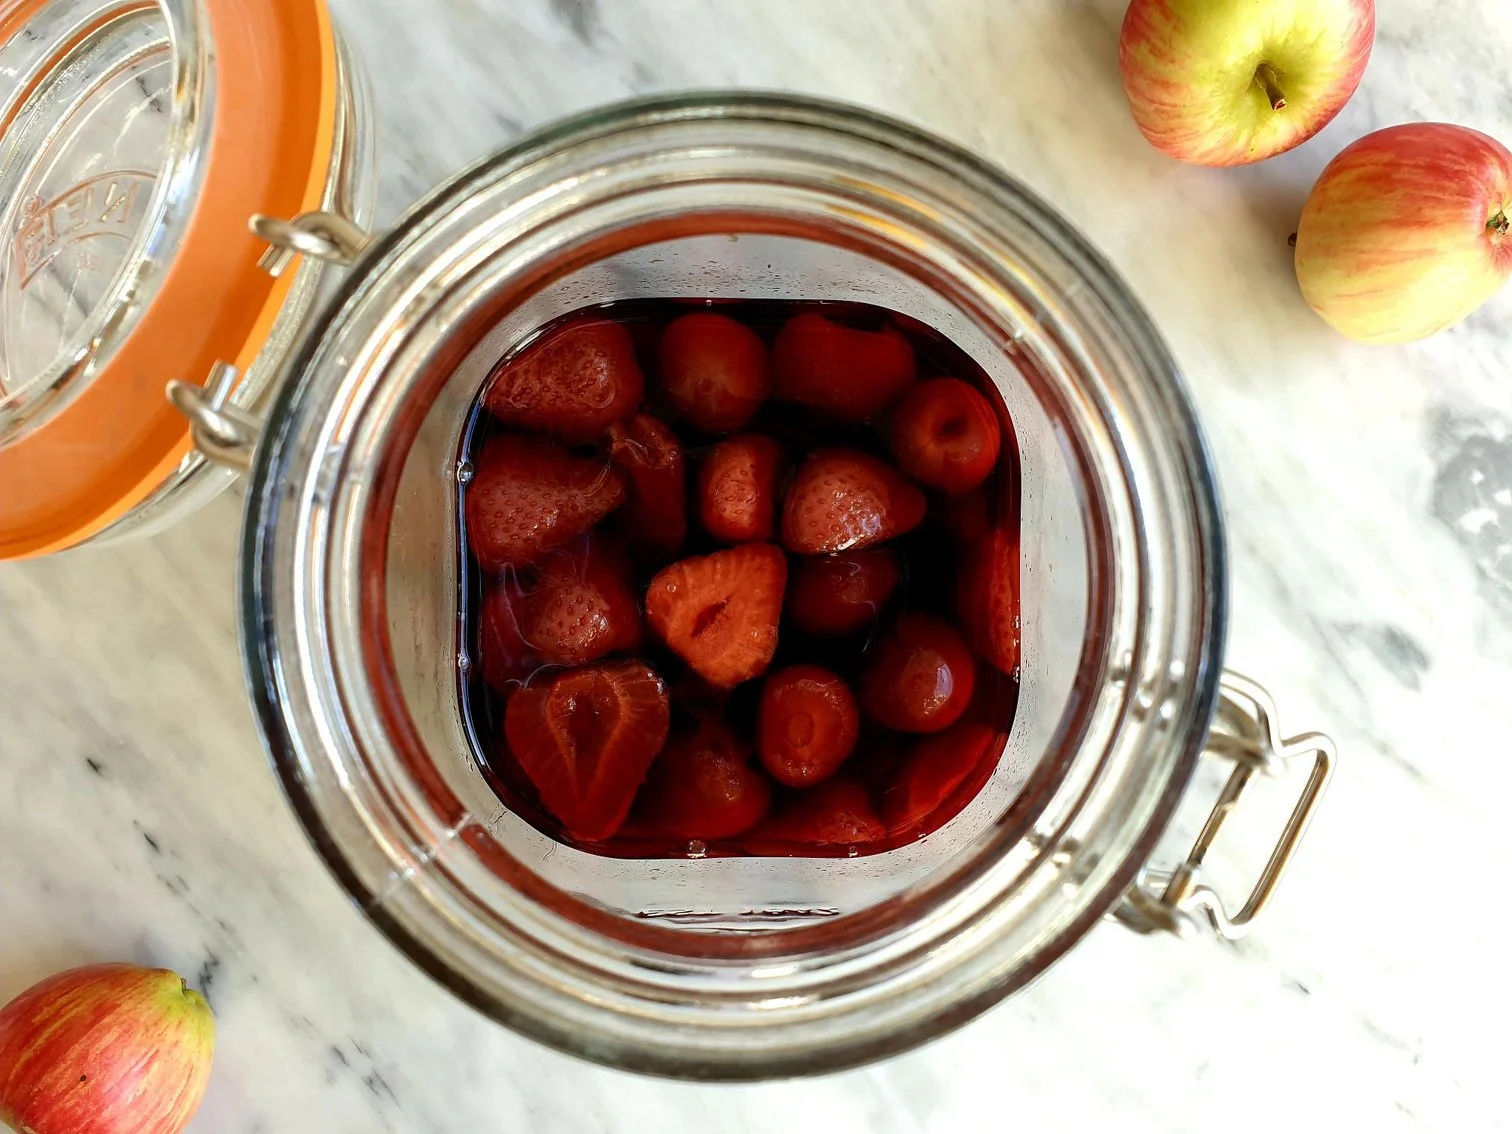
  • strawberries (wash, remove stems and leaves, pat dry with kitchen paper and cut in half bigger berries)

  • cherries with pits (wash and pat dry)

  • peaches, nectarines and apricots (wash, blanch, peel and cut into bite size pieces)

August, September, October

  • blueberries (wash and pat dry)

  • plums with pits (wash and pat dry)

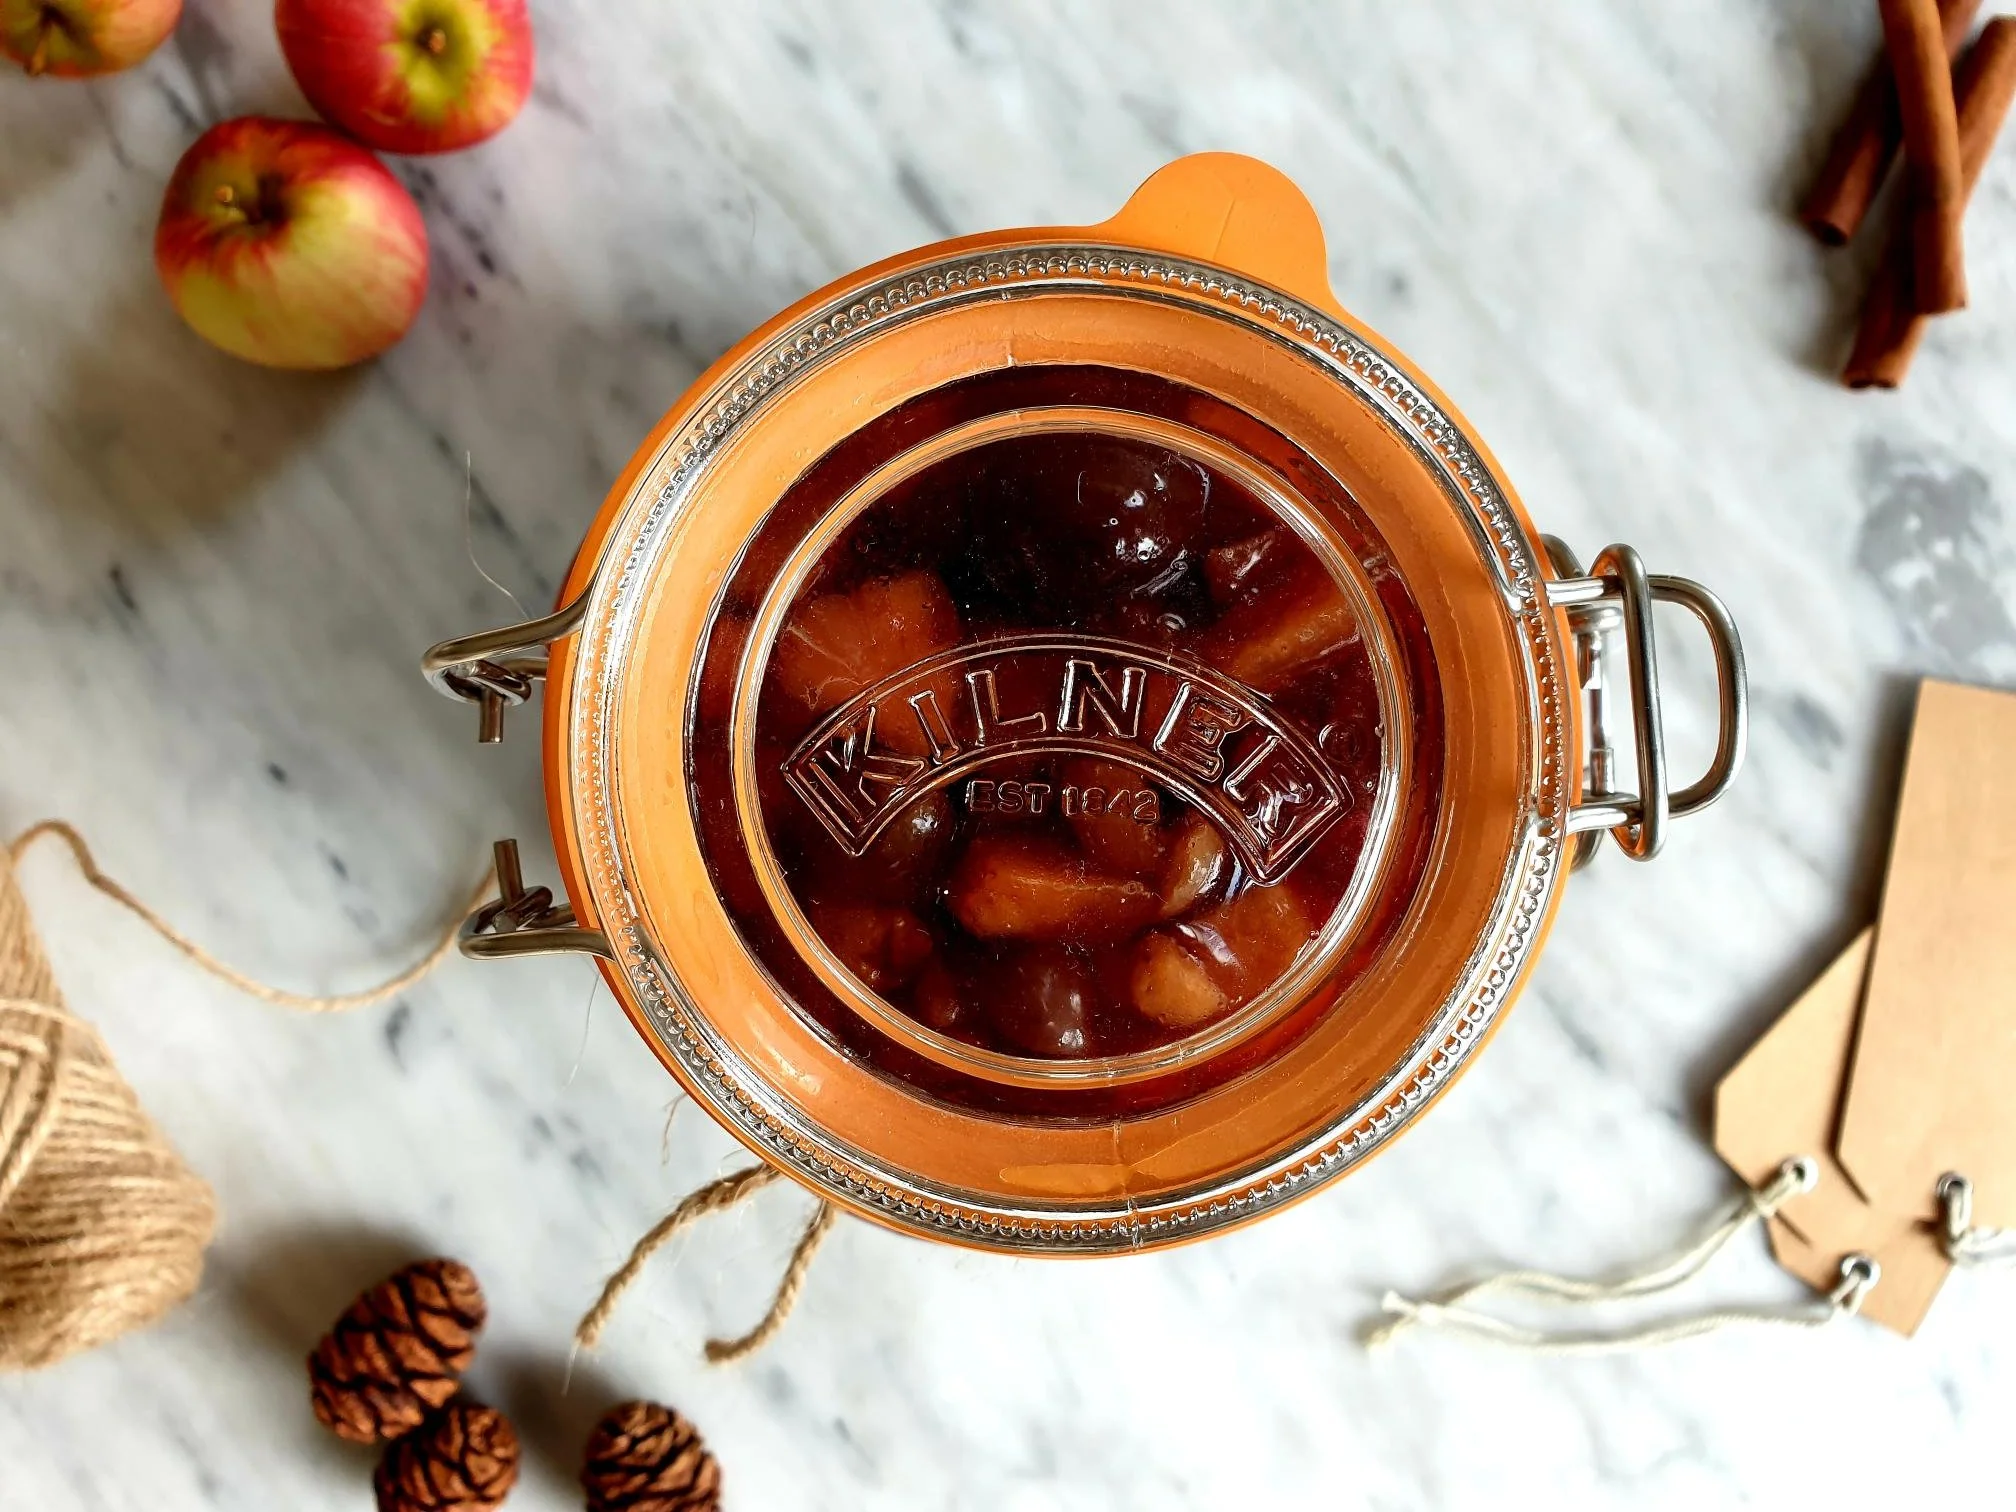
  • apples (wash, pat dry, peel, core and cut into bite size pieces)

  • pears (wash, pat dry, peel and cut into bite size pieces)

  • white or red seedless grapes (wash, pat dry, remove stems and cut in half)

  • pineapple, peeled and cut into bite size chunks (you can use canned pineapple)

  • 200-250g granulated sugar (a general rule in terms of sugar quantity used for a rum pot would be half the amount of sugar compared to the total amount of fruit used, I however used a lot less sugar as the fruit was nicely ripe and sweet enough for my taste).

  • about 1 bottle (750ml) Dark rum (I used 37.5% alcohol) you might need a bit more

If using more fruit to make a bigger Rum Pot, make sure you adjust the quantity of sugar and rum.

Method

For the rum pot you would use the fruits according to the seasons, starting with first strawberries and cherries following with other fruits.

Wash, pat dry and cut the fruits of your choice.

Place prepared fruit into a bowl, sprinkle with a bit of sugar and let it sit for about 30 minutes. This will allow the fruits to release its own juices.

View fullsize Rum Pot 3.jpg
View fullsize Rum Pot 6.jpg

Place the layer of sugared fruit into a jar and pour the rum over in order to completely cover the fruit. Continue to add a layer of sugared fruit and each time pour enough rum to completely cover the fruit.

(alternatively you can add a layer of prepared fruit directly into a rum pot or glass jar, add a bit of sugar and fill the jar with rum to completely cover the fruit. Continue to add a layer of fruit and sugar and each time pour enough rum to completely cover the fruit).

View fullsize Rum Pot 7.jpg
View fullsize Rum Pot 8.jpg

Close the jar with the lid.

Leave the flavours to mature and mingle for 6 to 8 weeks, or longer, in dark and cool place with no source of heat or light (pantry, cellar, garage).

Make sure the fruit is submerged in rum at all times, check now and again and top up with rum as necessary. Wait at least 2-3 weeks after the last fruit was added to be able to enjoy it.

You can have rum soaked fruit on its own or create a more “sophisticated” dessert by serving rum preserved fruit with vanilla ice cream, whipped cream or custard, you can also pair it with a piece of cake or other sweet treats like pancakes or waffles.

You can also divide rum soaked fruit into smaller glass jars which would make a lovely foodie Christmas gift for your friends, family, work colleagues or neighbours.

October 04, 2023 /tina oblak
preserved fruit in rum, Rumtopf, Rum-soaked fruit, Rumov Lonec, dark rum, rum, seasonal fruit, Rum Pot
Adriatic Recipe, Austrian inspired dishes, celebratory desserts, Central European recipes, dessert, Easy recipe, festive dessert, festive sweet things, Istrian cuisine, Istrian food, Istrian gastronomy, Mitteleuropean recipes, simple recipe, Slovenian cuisine, Slovenian food, Slovenian gastronomy, Sweet Things
1 Comment

Venetian style Rice and Peas Recipe (Risi e Bisi)

Beans and Sradines
September 20, 2023 by tina oblak in Adriatic Recipe, All year round recipe, Central European recipes, child friendly dish, child friendly meal, dinner, Easter, Easter dish, Easter recipes, Easy recipe, entrée course, family friendly dish, family friendly meal, festive dish, first course, first course dish, first course meal, healthy mael, hearty dish, Istrian cuisine, Istrian dish, Istrian food, Istrian gastronomy, main course, main dish, one pot meal, one pot meat recipe, recipe from Northern Ital, Risotti, Risotto, Rustic dish, simple recipe, Slovenian cuisine, Slovenian food, Slovenian gastronomy, Starters, supper, Vegetables, Venetian dish

This springtime speciality dish Risi e Bisi, meaning rice and peas in Venetian dialect, originated in the north-eastern region of Veneto in Italy. It is a dish that has been long disputed in the culinary world whether it is a very ‘runny’ risotto or a very ‘thick’ soup, and hence whether you should eat it with the fork or with a spoonBeing a risotto or a soup, this dish is absolutely delicious, incredibly satisfying and deeply rooted in the history of the region. It has such a profound cultural significance to the point of being celebrated by the Venetian poet Domenico Varagnolo:

To bless the holy spring,

which makes a garden a paradise,

all I need is a soup bowl,

a soup bowl of our own risi e bisi...

There, in hundreds of tiny little globes,

I savour a tender green jewel of the earth

scattered in a white sea of tender smiles.

Risi e Bisi was one of the key dishes, among a menu of more sophisticated foods and fine wines, that used to be served at the Doge's banquet (Doge is the highest official of the republic of Venice for more than 1,000 years, from the 8th to the 18th century, and symbol of the sovereignty of the Venetian state) on April 25th to mark and celebrate Venice's patron Saint, St. Mark, the Evangelist, since he is the saint who evangelised the people of the Veneto.

This traditional dish served on a feast day also marked the period approaching Easter, the end of winter, and the arrival of Spring, which provided the very first peas in the new season, renowned for being small, sweet and tender.

This dish has been very popular and very much loved along the Slovenian coastline where it is known as Rizi e Bizi. This should come as no surprise since this area is bordering with Italy and was once dominated and ruled by the majestic La Serenissima (‘The most Serene Republic of Venice’) which left behind a significant “foodprint” in the region.

A pea and rice dish is a very family friendly meal and was cooked by my mother on a regular basis when the peas where in season and at their best. Shelling the peas was worth the effort since the final dish is divine in its simplicity and humbleness.

This recipe has remained one of the top favourites among family and friends. Try to make it and you will understand what the fuss is all about and why the Doge requested it every year at his palace...

This is not the dish I would normally cook in springtime as peas are a long way off in the UK where I currently live, but are widely available a bit later in the season. It is well worth waiting for them, and you will end up with unbeatable (late) summer or early autumn supper!

Recipe

Ingredients

Serves 4

  • 1 kg fresh young peas in their pods, shelled (can use 400g of frozen petits pois)

  • 1.2 litres good vegetable, chicken or beef stock

  • 4 Tbsp olive oil

  • 1 small onion (about 100g), peeled and finely chopped

  • 50-100g pancetta (salt-cured pork belly) or ham, cubed

  • 250g risotto rice like Vialone Nano, Arborio or Carnaroli

  • 40-50g Parmiggiano Reggiano or Grana Padano cheese, freshly finely grated

  • small handful of fresh flat leaf parsley leaves (about 15g), finely chopped and some extra for garnish

  • a knob of butter, optional

  • sea salt

  • black pepper

Method

Before starting to make the risotto have your boiling hot stock ready to hand for later.

Pour the oil in a low-sided pan, add finely chopped onions and cubed pancetta.

Cook for a few minutes until the onions become soft and translucent and the pancetta begins to release its fat.

View fullsize Risi e Bisi 5.jpg
View fullsize Risi e Bisi 6.jpg

Add the peas and the chopped parsley, sauté for a few minutes, stirring constantly and making sure that the mixture does not start to stick to the bottom of the pan.

Season with black pepper and add roughly a glass of stock.

Cook the mixture over a fairly high heat so that the liquid evaporates quickly.

View fullsize Risi e Bisi 8.jpg
View fullsize Risi e Bisi 9.jpg

Add more stock and the rice. Cook, stirring constantly to prevent sticking to the pan, until the first amount of liquid is absorbed.

Start gradually adding ladles of hot stock, one at a time, allowing the liquid to be absorbed before adding more.

View fullsize Risi e Bisi 10.jpg
View fullsize Risi e Bisi 11.jpg

Cook on a medium heat, stirring almost constantly, until the rice is cooked and ready, and the mixture has a distinctly runny consistency.

Finish the dish with a typical Italian “mantecare phase” (when the rice is cooked, remove the saucepan from the heat, add a knob of butter (if using), and finely grated Parmiggiano Reggiano or Grana Padano cheese. Stir quite vigorously with a wooden spoon to obtain a creamy consistency).

Taste and adjust the seasoning with black pepper (if using) and the sea salt, but the latter might not be necessary since the stocks from the stores, generally speaking, pancetta and the cheese contain salt already.

View fullsize Risi e Bisi 13.jpg
View fullsize Risi e Bisi 14.jpg

Serve immediately while still hot and distinctly runny in consistency.

Ladle onto the plates and sprinkle with some roughly chopped fresh parsley to garnish (optional).

Just a thought

A variation of this recipe, which further refines the dish, involves the use of the empty pea pods which get washed, placed in pan with a plenty of cold water and boiled for roughly an hour.

Then they get drained in a colander and the inside of the shells get scraped with the spoon obtaining the green paste which is added to the onion, pancetta, pea and parsley mixture.

I have not been familiar with this process and made aware that this is only done if the peas are organically produced.

Apparently, all the pesticides residues concentrate on the inside of the pea shell and the farmers are very keen on the use of the chemicals as peas are particularly susceptible to pests.

Wine suggestion

Soave Classico DOC "Vin Soave" 2022 - Inama

September 20, 2023 /tina oblak
Risi e bisi, Rizi in bizi, Rice and Peas, fresh young peas, peas in pods, frozen petits pois, pancetta, salt-cured pork belly, ham, risotto, risotto rice, pea risotto, Vialone Nano rice, Arborio rice, Carnaroli rice, Parmiggiano Reggiano cheese, Grana Padano cheese
Adriatic Recipe, All year round recipe, Central European recipes, child friendly dish, child friendly meal, dinner, Easter, Easter dish, Easter recipes, Easy recipe, entrée course, family friendly dish, family friendly meal, festive dish, first course, first course dish, first course meal, healthy mael, hearty dish, Istrian cuisine, Istrian dish, Istrian food, Istrian gastronomy, main course, main dish, one pot meal, one pot meat recipe, recipe from Northern Ital, Risotti, Risotto, Rustic dish, simple recipe, Slovenian cuisine, Slovenian food, Slovenian gastronomy, Starters, supper, Vegetables, Venetian dish
Comment

Classic Tomato, Cucumber, Pepper and Onion Summer Salad Istrian Recipe

Beans and Sardines
July 20, 2023 by tina oblak in Adriatic Recipe, dinner, healthy mael, Istrian cuisine, Istrian dish, Istrian food, light meal, main course, main dish, main vegetarian course, main vegetarian dish, main vegetarian meal, Nutritious, Nutritious dish, Salads, Side Dishes, simple recipe, Slovenian cuisine, Slovenian food, Slovenian gastronomy, summer dish, summer recipe, supper, Vegetable side dish, Vegetables, Vegetarian

This colourful cucumber, tomato, pepper and onion salad is very refreshing, and it is made during the summer when the vegetables are at their best and in abundance.

It is absolutely delicious, so easy to make, it hardly takes any effort.

It is traditionally served as a side dish to accompany grilled meats, but can be enjoyed as a main meal on a hot summer's day when you want to keep things easy.

To make it more substantial, I simply toast a piece bread, cut it into cubes and mix it into the salad (resembling a concept of Italian, Tuscan, Panzanella salad).

If you ever had a chance to travel along the Istrian coast or Dalmatia (in Croatia) and asked in the restaurant for a side salad, it is most likely that you were brought this one. It is an absolute classic during the summer season as the vegetables in this salad have a very high content of water and therefore the salad is very cooling.

This type of salad has been on the dinner tables of the locals – well, since forever, during the summer months almost on a daily basis.

Recipe

Ingredients

Serves 4 (as a side salad)

  • 1 yellow bell pepper (can use orange, red or green bell pepper)

  • 1 medium-large cucumber

  • 2-4 tomatoes (depending on the size, I used vine tomatoes each weighing roughly 170g) Make sure you use in season, ripe and juicy tomatoes (can use San Marzano tomatoes, cherry tomatoes, beef tomatoes, grape tomatoes or a variety of your preference).

  • red onion or salad onion (about 40g), sliced

  • a few fresh basil leaves, torn, or dry oregano (optional)

    For the dressing

  • extra virgin olive oil, generous drizzle

  • red or white wine vinegar, a drizzle

  • sea salt, to taste

  • black pepper, to taste

Method

Peel and slice the cucumber into coins and place into a big salad bowl.

Cut the tomatoes into wedges and add to the bowl.

Slice the bell pepper and the onions and put into the bowl.

Mix gently all the vegetables.

Add a generous drizzle of olive oil, a drizzle of vinegar, season with sea salt and black pepper.

For extra dimension, in terms of flavour, sprinkle the salad with a bit of dried oregano or with a few freshly torn basil leaves.

Toss and serve.

July 20, 2023 /tina oblak
fresh tomatoes, bell peppers, cucumber, red onions, salad onions, fresh basil leaves, dried origano, red wine vinegar, white whine vinegar, Istrian summer salad, Croatian summer salad
Adriatic Recipe, dinner, healthy mael, Istrian cuisine, Istrian dish, Istrian food, light meal, main course, main dish, main vegetarian course, main vegetarian dish, main vegetarian meal, Nutritious, Nutritious dish, Salads, Side Dishes, simple recipe, Slovenian cuisine, Slovenian food, Slovenian gastronomy, summer dish, summer recipe, supper, Vegetable side dish, Vegetables, Vegetarian
Comment

My Mother's Marble Chocolate and Vanilla Ring Cake Recipe

Beans and Sardines
July 06, 2023 by tina oblak in Adriatic Recipe, All year round recipe, baking, breakfast, brunch, Central Europe cakes, Central European recipes, dessert, Eastern Europe cakes, Eastern European recipes, easy baking, easy cakes, Easy recipe, home baking, Istrian cuisine, Istrian dish, Istrian food, Istrian gastronomy, Mitteleuropean cuisine, Mitteleuropean recipes, Mitteleuropean food, pudding, Rustic dish, simple recipe, Slovenian cuisine, Slovenian food, Slovenian gastronomy, Snacks, Sweet Things

Perhaps, you know the old adage, which actually goes back to Tudor times, ‘You can’t have your cake and eat it (too)?’ Well, with this recipe – you can! All your baking dilemmas, should I go for a chocolate cake this time, or for a vanilla one, are solved with this one recipe – you can have both in one cake!

This chocolate and vanilla sponge cake is a classic childhood sweet treat. It is moist with a soft and fluffy texture, it looks pretty, and is still elegant, since the light and dark batter is blended lightly together giving it a marble appearance, and so, hence its name, marble cake, or it is sometimes called a zebra cake, due to its zebra-striped pattern (skunks are also striped, but I supposed that isn’t a very appealing name for a cake). It is also known as a ring cake or a Bundt cake, especially in the United States.

So, this cake delivers on appearance and flavour every single time, and if you want to impress your family and friends, this is the cake to go for. It is very easy to make and you can whizz it up in no time.

It originated in Germany, where it is still very popular, from a Kugelhopf, a two-coloured sweet yeast bread.

This impressive cake has been frequently baked in Austrian households and other European countries, including in Slovenia (Šarkelj) where it represents one of the most frequently baked weekend sweet treats and it is enjoyed for breakfast as well, there is no wrong time to eat it!

This was a regular bake in my house when I was a small girl, all you need is a few simple ingredients and a few simple steps to follow, I promise you, you will think twice before reaching out for the store-bought version, and here it is, my mother's recipe.

Recipe

Ingredients

  • 4 medium eggs, room temperature

  • 250g caster sugar

  • 1 Tsp vanilla extract

  • 100ml milk, room temperature

  • 100ml sunflower oil, room temperature

  • 250g all purpose white flour (plain flour), sifted

  • 16g baking powder

  • 2 Tbsp cocoa powder, sifted

  • dusting sugar/vanilla powder sugar for dusting, optional

Method

Preheat the oven to 180°C static or equivalent.

Grease well with butter or oil a ring mould or a bundt cake tin. Make sure you cover every nook and cranny (alternatively you can use a 20cm cake tin or a 900g loaf tin, grease and line with baking parchment)

Dust with flour, shake off and tip out the excess.

View fullsize Marble Cake 2.jpg
View fullsize Marble Cake 4.jpg

Put in the mixing bowl the eggs and the sugar, and beat well until the mixture becomes golden pale in colour.

Add the milk, oil and vanilla extract, mix well.

View fullsize Marble Cake 5.jpg
View fullsize Marble Cake 6.jpg

Start adding, one spoonful at the time of sifted flour together with the baking powder.

View fullsize Marble Cake 7.jpg
View fullsize Marble Cake 8.jpg

Divide the batter, spoon half of the batter in a separate bowl.

Add in one half of the batter sifted cocoa and mix well.

View fullsize Marble Cake 10.jpg
View fullsize Marble Cake 11.jpg

Pour the white mixture into the base of the prepared ring mould first. Then pour the chocolate mixture on top.

View fullsize Marble Cake 12.jpg
View fullsize Marble Cake 13.jpg

Gently swirl a little with the knife.

Bake for about 35 minutes or until the cake has shrunk from the sides of the tin and is well risen, the top of the cake should ‘spring back’ when lightly pressed with your fingertips.

Leave to cool in the tin for a few minutes.

Turn out the cake and finish cooling on a wire rack.

Dust with icing sugar or vanilla icing sugar and serve.

July 06, 2023 /tina oblak
chocolate and vanilla ring cake, marble chocolate and vanilla cake, marble cake, zebra cake, Bundt cake, chocolate and vanilla Bundt cake, chocolate and vanilla zebra cake
Adriatic Recipe, All year round recipe, baking, breakfast, brunch, Central Europe cakes, Central European recipes, dessert, Eastern Europe cakes, Eastern European recipes, easy baking, easy cakes, Easy recipe, home baking, Istrian cuisine, Istrian dish, Istrian food, Istrian gastronomy, Mitteleuropean cuisine, Mitteleuropean recipes, Mitteleuropean food, pudding, Rustic dish, simple recipe, Slovenian cuisine, Slovenian food, Slovenian gastronomy, Snacks, Sweet Things
Comment

Summer Risotto with Fresh Tomatoes Istrian Recipe

Beans and Sardines
June 21, 2023 by tina oblak in Adriatic Recipe, Appetizers, child friendly dish, child friendly meal, dinner, Easy recipe, family friendly dish, family friendly meal, first course, first course dish, first course meal, Healthy, healthy mael, Istrian cuisine, Istrian dish, Istrian food, Istrian gastronomy, light meal, main course, main dish, main vegetarian course, main vegetarian dish, main vegetarian meal, Nutritious, Nutritious dish, one pot meal, recipe from Northern Ital, Risotti, Risotto, Rustic dish, simple recipe, Slovenian cuisine, Slovenian food, Slovenian gastronomy, Starters, summer dish, summer recipe, supper, Vegan, Vegetables, Vegetarian

This light and fresh summer risotto is made with juicy and ripe tomatoes that are in season, and it is a great alternative to a very much loved and more common pasta with tomatoes sauce.

It is low in budget, healthy, incredibly easy and simple to make, an ideal solution for a midweek lunch or dinner, it can be served as first course or as a main paired with grilled or pan fried fish or meat.

During the whole of the summer season, and especially during the summer holidays, my mother would make this colourful risotto quite often, this is the time of the year when the the tomatoes are at their peak, the ripest and the sweetest, and they are in abundance.

I am sharing here my mother's recipe for this humble and delicious summer tomato risotto served with freshly torn fragrant basil leaves and a drizzle of olive oil, you will come back to this recipe time and time again.

Recipe

Ingredients

  • 4 Tbsp extra virgin olive oil

  • 1 onion (about 100g), peeled and finely chopped

  • 500g vine tomatoes or other variety of ripe and sweet tomatoes, washed and roughly chopped

  • 300g risotto rice (like Vialone Nano, Arborio or Carnaroli)

  • a few fresh basil leaves

  • 1 litre of hot vegetable broth or stock (you can use instant vegetable stock powder)

  • a bit of fresh flat leaf parsley, finely chopped

  • sea salt

  • ground black pepper

  • a handful of Parmiggiano Reggiano or Grana Padano cheese, finely grated, optional

  • a knob of butter, optional

Method

Before starting making risotto have your boiling hot vegetable stock ready to hand for later.

Put extra virgin olive oil in a pan, add finely chopped onions, a pinch of salt, and sauté for a few minutes on a gentle heat until cooked down and soft.

View fullsize Tomato Risotto 3.jpg
View fullsize Tomato Risotto 7.jpg

Add roughly chopped tomatoes, a few basil leaves, put the lid on and cook for about 10-15 minutes stirring occasionally. The tomatoes should be fully cooked and broken down.

View fullsize Tomato Risotto 4.jpg
View fullsize Tomato Risotto 6.jpg
View fullsize Tomato Risotto 9.jpg
View fullsize Tomato Risotto 10.jpg

Add the rice and toast it for a few minutes, stirring constantly to avoid sticking to the bottom of the pan.

View fullsize Tomato Risotto 11.jpg
View fullsize Tomato Risotto 12.jpg

Pour or ladle a bit of hot vegetable stock and cook until the first amount of liquid is absorbed.

Start gradually adding ladles of hot stock, one at a time, allowing the liquid to be absorbed before adding more (you might not need all the stock).

There should be enough liquid just to cover the risotto, the Italians say that a risotto should be smooth and runny enough to be described as all'onda, on the wave.

Cook on a medium heat, siring almost constantly, until the rice is cooked al dente (meaning fully cooked but still a bit firm when bitten).

It should roughly take between 15-18 minutes for a risotto to be cooked.

Taste and adjust the seasoning with black pepper (if using) and sea salt, but this might not be necessary since the stocks from the stores generally speaking contain salt already.

Stir in finely chopped fresh leaf parsley.

For even creamier texture and a slightly richer flavour you can finish cooking the tomato risotto with a typical Italian mantecare phase (as soon as the risotto is cooked, remove the saucepan from the heat, add grated cheese and a knob of cold butter to the risotto, and stir with a wooden spoon quite vigorously).

Serve immediately while the risotto is still hot and a bit runny in consistency.

Ladle the risotto onto the plates and sprinkle with some roughly chopped fresh parsley and a few basil leaves for garnish and drizzle with extra virgin olive oil.

Wine suggestion

Alto Adige Valle Isarco Müller Thurgau DOC "Sass Rigais" 2021 - Manni Nössing

June 21, 2023 /tina oblak
fresh tomatoes, ripe tomatoes, sweet tomatoes, San Marzano tomatoes, fresh vine tomatoes, risotto rice, Arborio rice, Carnaroli rice, light risotto, tomato risotto
Adriatic Recipe, Appetizers, child friendly dish, child friendly meal, dinner, Easy recipe, family friendly dish, family friendly meal, first course, first course dish, first course meal, Healthy, healthy mael, Istrian cuisine, Istrian dish, Istrian food, Istrian gastronomy, light meal, main course, main dish, main vegetarian course, main vegetarian dish, main vegetarian meal, Nutritious, Nutritious dish, one pot meal, recipe from Northern Ital, Risotti, Risotto, Rustic dish, simple recipe, Slovenian cuisine, Slovenian food, Slovenian gastronomy, Starters, summer dish, summer recipe, supper, Vegan, Vegetables, Vegetarian
Comment

Sweet Dough Yeasted Rings (Busolai) Recipe

Beans and Sardines
May 31, 2023 by tina oblak in All year round recipe, baked dish, baking, biscuits, breakfast, brunch, celebratory desserts, Celebratory dish, cookies, dessert, Easter, Easter recipes, easy baking, Easy recipe, Enriched dough, festive bakes, festive dessert, festive sweet things, home baking, Istrian cuisine, Istrian food, Istrian gastronomy, recipe from Northern Ital, simple recipe, Slovenian cuisine, Slovenian Easter Sweet Br, Slovenian food, Slovenian gastronomy, Snacks, Sweet bread, sweet course, sweet nibbles, Sweet Things

Busolai (also spelled Bussolai or Buzolai) are sweet treats that originate in the region of Veneto in north-east Italy. They are characteristic of Venice, and in particular on the fishermen island of Burano, hence these baked delights are also called Buranei (Burano buiscuits).

They are known as biscuits as they have the consistency of a biscuit, the dough does not contain the yeast, and it can be shaped into a ring or like the letter “S” (not a coincidence, since the S-shaped form of the biscuits makes it easier to dunk into milk or sweet wines).

They used to be only prepared and enjoyed during Easter festivities but nowadays almost every bakery on the island of Burano and in Venice sells them all year round.

Apparently, the letter from the Government of Venice, which still exists, has been found in the national archives of Italy, warning the nuns of the convent of St. Matthew on an island in the Venetian Lagoon that they should cut the number of Bussolai enjoyed during Easter festivities or otherwise they would encounter financial troubles.

The recipe for these biscuits, however, travelled further east, through the region of Friuli, and reached the city of Trieste (in Italy), and the land of Slovenian Istria across the “border”, where the recipe took a slightly different turn

The yeast was added to the dough making these baked goodies resemble more like soft doughnuts than the cookies, in fact, in the area they are described by the locals as sweet bread rings (obročki iz sladkega kruha).

As soon as they were freshly baked, it was a custom of some locals to spoon a bit of rum or grappa over them and sprinkle them with extra sugar.

Being like biscuits or doughnuts, they have one unmistakable characteristic in common, they have a hole in the centre, called “busa” in Venetian dialect”, hence their name, Busolai.

To make things more confusing in terms of naming this sweet treat, busolai are sometimes known as “kolach”, name originated from Old Slavonic word kolo meaning “wheel” or “circle”.

Once again, they were baked during festivities, especially during Easter since a great percentage of eggs are used in the recipe (egg representing the symbol of rebirth and resurrection).

These sweet baked rings were traditionally very popular during Confirmation (a rite in the Christian Church, at which baptized persons affirm their Christian belief, and are admitted as a full member of the Church).

Busolai were made into a garland with the use of a simple string and the godfather would gift these to his god child. This is described by a very well know and famous proverb in local dialect “Chi ga santoli ga buzzolai” (only the one who has a godfather will get busolai).

This tradition would be furthermore highlighted by another proverb in the local dialect “Bezi, basi e bussolai no i xe boni se no I xe assai,” which translates in standard Italian as (Soldi, baci e bussolai non sono buoni se non sono assai), and in English means that money, kisses and bussolai are no good if not given in abundance.

My husband’s uncle (known as zio Livio) with a garland of bussolai received on his Confirmation day by his godfather

This custom used to be very popular in Slovenian Istra, and almost each village would have a slightly different recipe for it. I am sharing with you my nona's recipe from the village of Marezige, a few kilometres from a coastal town of Koper where there used to be only one baker in town, at the time when my nona was a little girl, selling busolai, run by a family of Venetian origin.

Very sadly, there are no bakers selling busolai anymore, moreover, the custom of godfathers gifting the children with busolai has completely died out, and younger generations have never seen or heard of busolai.

Only a bunch of elderly people still alive today will tell you, with nostalgic voices and tearful eyes, with touching and emotional stories about their Confirmation Day, and they very much anticipated sugar coated busola, the only gift they received, if they were lucky enough.

Recipe

Ingredients

  • 500g regular plain flour

  • 1 cube of fresh (brewer's) yeast 42g or 14g of dry yeast

  • 100g unsalted butter, melted

  • 150g sugar

  • 2 medium eggs, lightly beaten

  • 2 egg yolks, lightly beaten

  • 100ml tepid lukewarm milk (semi skimmed or full fat)

  • 2 Tbsp dark rum or grappa (alcoholic, fragrant grape-based pomace brandy of Italian origin)

  • finely grated lemon zest of 1 unwaxed lemon

  • pinch of sea salt

  • 1 small egg, lightly beaten, for glazing (can use lightly beaten egg whites, the busolai will result lighter in colour after baking)

Method

In a small bowl place dry or fresh yeast (if using fresh yeast slightly brake it down into smaller pieces with your fingers).

Add 100ml of lukewarm milk and ¼ tsp of caster sugar.

Gently stir and leave for about 20 minutes or until gentle bubbles form on the surface.

In a separate mixing bowl put the eggs, egg yolks and beat them gently.

Add melted butter, sugar, rum or grappa, grated lemon zest and a pinch of sea salt, and with the fork mix well all the ingredients.

In a large mixing bowl put the flour, add egg mixture and the yeast mixture.

Combine well all the ingredients with the wooden spoon or spatula to start with. When all the ingredients are well combined transfer the mixture onto a clean, floured surface.

Work with your hands and knead the dough for about 10-15 minutes, stretching it and folding it, adding a little flour at the time if the dough is too sticky.

Knead the dough until it becomes smooth, soft, shiny and elastic (the dough should not stick to the surface or your hands).

Shape the dough in a ball, place it back into a previously oiled mixing bowl.

Cover tightly with cling film, leave to rest and prove in a draft free space at a room temperature for 3 hours.

After this time your dough should be at least double in size.

Line 2 large flat baking trays with baking parchment.

Take the dough out of the mixing bowl, place it on a working surface, knock the air out of the dough and shape it into a log.

View fullsize Busolai 3.jpg
View fullsize Busolai 4.jpg

Divide the dough into more or less equal parts (10-12 parts each weighting roughly 100g).

Shape each piece of the dough into a sausage and form a ring, pinching the ends together (make sure you are generous with the size of the ring, during the baking the busalai rise and stretch quite a bit, if the whole is too small, after the baking you will end up with busolai that have almost a non-existing hole, not that this is really a problem).

View fullsize Busolai 5.jpg
View fullsize Busolai 6.jpg

Place your ring-shaped sweet dough onto a tray.

Cover with clean tea towel and leave to prove for the second time for about 30 minutes.

Gently brush the sweet dough rings with lightly beaten egg or egg whites and sprinkle the top of the rings with sugar.

View fullsize Busolai 9.jpg
View fullsize Busolai 12.jpg

Preheat the oven to 180°C and bake for 20 to25 minutes or until well risen and deep golden brown (they will be slightly lighter in colour if you brush them with egg whites).

Remove from the oven and transfer the busolai to a wire rack to cool completely.

Busolai are best eaten within a few hours.

You can easily freeze them, just make sure you freeze them as soon as they are completely cool.

Wine suggestion

Vin Santo di Torgiano DOC 2010 - Lungarotti

May 31, 2023 /tina oblak
sweet dough yeasted rings, Busolai, Bussolai, Buzolai, Istrian Busolai, obročki iz sladkega kruha, Buranei, Buranei buiscuits, Venitian Buiscuits, sweet dough, sweet bread, Cinfirmation sweet treats
All year round recipe, baked dish, baking, biscuits, breakfast, brunch, celebratory desserts, Celebratory dish, cookies, dessert, Easter, Easter recipes, easy baking, Easy recipe, Enriched dough, festive bakes, festive dessert, festive sweet things, home baking, Istrian cuisine, Istrian food, Istrian gastronomy, recipe from Northern Ital, simple recipe, Slovenian cuisine, Slovenian Easter Sweet Br, Slovenian food, Slovenian gastronomy, Snacks, Sweet bread, sweet course, sweet nibbles, Sweet Things
Comment

Austrian Style (no mayo) Potato Salad Recipe

Beans and Sardines
May 24, 2023 by tina oblak in Adriatic Recipe, All year round recipe, Appetizers, Austrian inspired dishes, Central European recipes, child friendly dish, child friendly meal, dinner, Eastern European dishes, Eastern European recipes, Easy recipe, family friendly dish, family friendly meal, Healthy, healthy mael, Istrian cuisine, Istrian dish, Istrian food, Istrian gastronomy, main vegetarian course, main vegetarian dish, main vegetarian meal, Mitteleuropean cuisine, Mitteleuropean dish, Mitteleuropean food, Mitteleuropean recipes, Root vegetables, Rustic dish, Salads, Side Dishes, simple recipe, Slovenian cuisine, Slovenian food, Slovenian gastronomy, supper, Vegan, Vegetable side dish, Vegetables, Vegetarian

This recipe for Austrian style potato salad uses sliced boiled potatoes and a simple dressing made with olive oil and vinegar and no use of mayonnaise, which makes it very light and fresh.

It can be enjoyed as a main dish and it is most commonly pared with a famous Wiener schnitzel and breaded fillets of fish.

Great dish to add into your picnic baskets and great side dish to barbecued meat, fish and vegetables, and a great addition to any selection on a buffet table.

This potato salad is best made ahead allowing the potatoes to soak and absorb the light vinaigrette, this makes it very juicy and succulent.

The beauty of this salad is that it can be enjoyed and eaten warm, at a room temperature or chilled in the fridge (perfect for hot summer days).

In Slovenia, up and down the country this is a dish (Krompirjeva Solata) that is prepared in the households and canteen on a regular basis and sometimes found in local family run restaurants.

I am sharing here the recipe for this humble and very tasty potato salad that has been prepared and enjoyed for generations in my family.

To this basic potato salad you can add hard boiled eggs and other types of raw vegetables, this is not however the way it is traditionally eaten.

Recipe

Ingredients

  • 500g waxy potatoes (like new or baby potatoes, Jersey Royal, Charlotte and similar, they have smooth and dense flesh that holds its shape when cooked; for this recipe I used miniature potatoes)

  • 2 Tbsp extra virgin olive oil

  • 50ml white wine vinegar (can use cider vinegar)

  • onion (about 30g or to taste), peeled and finely chopped, optional

  • fresh flat leaf parsley, chopped roughly or finely to your preference

  • 100ml cold water

  • sea salt

  • black pepper

Method

Wash the potatoes, place them into a saucepan and cover with cold water. Bring to boil, cover with a lid and simmer until the potatoes are fully cooked and tender (for small, baby potatoes it should take between 8-12 minutes).

Alternatively, you can cook the potatoes with your preferred method like steaming or microwaving.

Drain well and peel the potatoes when still warm (as soon as you can handle them).

Slice them and transfer into a serving salad dish.

Pour over cold water and let the potatoes cool completely (pouring cold water over warm potatoes stops the potatoes absorb too much dressing, therefore the potato salad stays nice and moist).

View fullsize Austrian Style potato salad 2.jpg
View fullsize Austrian Style potato salad 3.jpg

While the potatoes are cooling, prepare the dressing.

In a small bowl pour olive oil, vinegar, sea salt, black pepper and whisk well. Add finely chopped onions.

Pour the dressing over sliced potatoes and mix very gently so the potatoes do not break completely (some will break, and this is normal).

View fullsize Austrian Style potato salad 4.jpg
View fullsize Austrian Style potato salad 5.jpg

Taste and adjust the seasoning, sprinkle with fresh parsley and serve.

May 24, 2023 /tina oblak
Potato Salad, potatoes, potato salad with simple dressing, potato salad with simple vinaigrette, Krompirjeva solata, Insalata di patate, boiled potatoes, baby potatoes, Jersey Royal potatoes, Charlotte potatoes
Adriatic Recipe, All year round recipe, Appetizers, Austrian inspired dishes, Central European recipes, child friendly dish, child friendly meal, dinner, Eastern European dishes, Eastern European recipes, Easy recipe, family friendly dish, family friendly meal, Healthy, healthy mael, Istrian cuisine, Istrian dish, Istrian food, Istrian gastronomy, main vegetarian course, main vegetarian dish, main vegetarian meal, Mitteleuropean cuisine, Mitteleuropean dish, Mitteleuropean food, Mitteleuropean recipes, Root vegetables, Rustic dish, Salads, Side Dishes, simple recipe, Slovenian cuisine, Slovenian food, Slovenian gastronomy, supper, Vegan, Vegetable side dish, Vegetables, Vegetarian
Comment

Mackerel in a Pan with Olive oil, Lemon juice and Fresh parsley Recipe

Beans and Sardines
May 11, 2023 by tina oblak in Adriatic Recipe, All year round recipe, Appetizers, brunch, child friendly dish, child friendly meal, dinner, family friendly dish, family friendly meal, Fish & Seefood, fish starter, Healthy, healthy mael, Istrian cuisine, Istrian dish, Istrian food, Istrian gastronomy, light fish course, light meal, main course, main dish, main fish course, main fish meal, Nutritious, Nutritious dish, one pot meal, simple recipe, Slovenian cuisine, Slovenian food, Slovenian gastronomy, supper

Mackerel, or any other type of fish, cooked in a pan with olive oil, fresh parsley, lemon juice and a splash of water is probably the simplest fish-based recipe, and it is absolutely perfect for all of those who are slightly intimidated and generally not too confident cooking with fish.

It is a no-fuss dish and a great choice for a quick and uncomplicated rustic lunch or dinner, it is very nutritious and healthy as it contains beneficial fats (omega-3 fatty acids).

This dish is of Venetian influence and the success of it lies in seasoning well the fish and using the freshest and best quality ingredients you can find and afford to buy.

Mackerel is an inexpensive, affordable, massively underrated fish, and far too often overlooked by the shoppers, maybe perhaps it is an oily fish that carries a slightly stronger and distinctive flavours compared to some other fish.

In this one pan recipe the fresh and citrusy ingredients like parsley and lemon juice, cut through the richness, “oiliness” and “fishiness” of the mackerel, and when combined with the juices released from the fish during the cooking process. This combination of the flavours produces the most stunning plate of food.

I am sharing here this very simple family recipe, which is an absolute winner. Fish cooked this way has been prepared and loved in my family for generations using different types of fish depending on what was found fresh in the fish market on the day.

Recipe

Ingredients

Serves 4

  • 1kg fresh mackerel, gutted, cleaned, washed, and dried (the fishmonger will be happy to do this for you, alternatively you can use the fillets).

    For this recipe you can easily replace mackerel for other types of fish or fillets of your choice like sea bream, sea bass, sardines, trout, and monkfish to name just a few.

  • 4 Tbsp extra virgin olive oil

  • a handful of fresh flat leaf parsley (about10g, plus some extra for serving), finely chopped

  • lemon juice of ½ lemon or to taste

  • sea salt

  • black pepper

Method

Season the outside and the inside (the cavity) of the mackerel with sea salt.

Put the olive oil in a pan (big enough to accommodate the mackerel).

Place the whole fish or the fillets in a pan in a single layer.

Sprinkle with fresh parsley, add the lemon juice, a splash of water and black pepper to taste (optional).

Cover with the lid and cook the fish on a gentle heat for about 25 minutes (if using the fillets cooking time will reduce to about 15 minutes).

View fullsize Mackerel with lemon juice, olive oil and parsley 2.jpg
View fullsize Mackerel with lemon juice, olive oil and parsley 3.jpg

To serve, lay the whole mackerel, or the fillets, on a plate and pour the juices they have released during the cooking process, over them.

Best enjoyed warm with some crunchy rustic bread, boiled potatoes, cooked rice, grilled polenta, and a side salad of your choice.

Wine suggestion

Venezia Giulia Bianco Sivi IGT 2018 - Dario Princic

May 11, 2023 /tina oblak
whole mackerel, whole fresh mackerel, fresk mackerel fillets, trout, sea bass, sea bream, monkfish, lemon juice, fresh parsley, skuša
Adriatic Recipe, All year round recipe, Appetizers, brunch, child friendly dish, child friendly meal, dinner, family friendly dish, family friendly meal, Fish & Seefood, fish starter, Healthy, healthy mael, Istrian cuisine, Istrian dish, Istrian food, Istrian gastronomy, light fish course, light meal, main course, main dish, main fish course, main fish meal, Nutritious, Nutritious dish, one pot meal, simple recipe, Slovenian cuisine, Slovenian food, Slovenian gastronomy, supper
Comment

Grilled Polenta Recipe

Beans and Sardines
May 04, 2023 by tina oblak in Adriatic Recipe, All year round recipe, Appetizers, bite-sized nibbles, breakfast, brunch, Canapés, child friendly dish, child friendly meal, dinner, Easy recipe, family friendly dish, family friendly meal, Finger food, Healthy, healthy mael, hearty dish, Istrian cuisine, Istrian dish, Istrian food, Istrian gastronomy, light meal, Nutritious, Nutritious dish, recipe from Northern Ital, Rustic dish, savory nibbles, Side Dishes, simple recipe, Slovenian cuisine, Slovenian food, Slovenian gastronomy, Small bites, Snacks, supper, Vegan, Vegetarian, Venetian dish

Polenta, despite being offered and marketed as one of the fairly recent gastronomic fashions in high end restaurants around the world, has incredibly humble origins, it represents a staple peasant food that fed the poorest of the poor.

Grilled polenta slices taste great, they are crispy on the outside, soft on the inside, and will have a very light smoky flavour when barbecued, they are very easy to make and incredibly practical and convenient, as polenta mixture can be prepared ahead of time.

Polenta is incredibly versatile, in fact, there is nothing really that does not go with grilled polenta, it is one of the best side dishes you can pick to go with your grilled or barbecued meat, fish or vegetables.

Grilled polenta slices topped with vegetables (sautéed mushrooms, peppers, courgettes), different types of cheeses, cured meats and spreads make the most sophisticated appetizers and finger food to be served with drinks.

Polenta in Slovenin Istra is traditionally enjoyed with different meat, fish or bean stews, and Venetian style liver. What is wonderful is polenta with creamed salted cod, and even a simple fried egg can accompany humble polenta.

Polenta used to be also eaten for breakfast, however, this gastronomic ritual from the past has nowadays almost disappeared. Only a handful of elderly people would still have it as the first meal of the day, perhaps as a nostalgic reminder of their youth.

My nona told me that cooled and set polenta would be cut into smaller pieces, put into a bowl, then some milk would be added, and a pinch of sea salt to counterpart the natural sweetness of the milk. This provided a very nourishing morning meal. I guess it was like an old-fashioned concept of bowl of cereal with milk.

Polenta is also incredibly popular in the neighbouring region of Friuli, in Italy, where maize flour cooked in milk, speciality from the region called Suf, used to be eaten either for breakfast or as an evening meal, this dish provided a nutritious and easily digested plate of food.

Nowadays, polenta, being soft cooked, hard cooked or grilled, it is still very much loved and is a recurrently cooked dish in almost every household for unpretentious mid-week meals, or during festivities. Its popularity has never decreased and reflects a true identity of the local people and is deeply rooted in the gastronomic traditions of the area.

I am sharing here the recipe for this polenta dish where hot cooked runny polenta would be traditionally poured on round wooden boards, and not into loaf tins like I do for practical reasons. When polenta was completely cooled and set so it becomes firm it would then be cut into strips or random shaped chunks, and then quickly pan fried (only left over polenta used to be grilled).

Recipe

Ingredients

  • 250g yellow or white polenta (instant polenta) maize flour

  • 1 litre of water

  • sea salt

Method

Before you start cooking the polenta prepare the loaf tin. With a brush (or just with your hands and fingers) slightly oil the loaf tin, this will prevent polenta from sticking.

Pour the water into a pan and bring to boil (to speed up the process you can use hot boiling water directly from the kettle).

View fullsize Grilled polenta 2.jpg
View fullsize Grilled polenta 4.jpg

Lower the heat and gradually start slowly pouring the polenta into a hot water, whisk constantly.

Cook and whisk until the mixture begins to thicken and becomes smooth in consistency with no lumps. Follow the instruction how long to cook the polenta (timing may vary a bit, mine took about 10 minutes).

During the cooking process polenta mixture will create air bubbles that will pop (a bit like tiny volcanos erupting, be careful not to burn yourself).

Taste and adjust the seasoning with sea salt.

View fullsize Grilled polenta 6.jpg
View fullsize Grilled polenta 9.jpg

Pour cooked polenta into a loaf tin, smooth the top with the back of the spatula or a wooden spoon. (you can pour the cooked polenta into a baking tray, previously lined with backing parchment, spread it and flatten it, when the polenta is completely cooled, cut it in whatever shape you like, strips, triangles, rounds or use cookie cutters of your choice).

Allow the polenta to set and cool completely at a room temperature or put it in the fridge to speed up the process.

View fullsize Grilled polenta 10.jpg
View fullsize Grilled polenta 11.jpg

Tip the polenta onto a chopping board (it should be completely moulded into the shape of your loaf tin).

Cut the polenta loaf into 1-1.5cm (about ½ inch) slices.

View fullsize Grilled polenta 12.jpg
View fullsize Grilled polenta 13.jpg

Preheat a non-stick griddled pan (indoor grill pan) or a regular non-stick frying pan over a medium high heat for a few minutes.Place polenta slices in the griddled pan and charcoal grill on a fairly high heat for a few minutes. Do not move the polenta around., let the polenta slices sizzle in the pan undisturbed (do not overcrowd the pan and work in batches).

Turn the slices the other side and grill for another few minutes. Be patient with this process, only turn and flip the slices after you have tested the edges, flip the slices when the polenta easily lifts off the grill pan.

Polenta slices should have grill marks when fully grilled and have crispy outside layer.

Serve hot immediately.

View fullsize Grilled polenta 14.jpg
View fullsize Grilled polenta 18.jpg

Just a thought

This is a very convenient dish, you can make polenta mixture about up to two days before you actually need to grill it.

Although not done traditionally, you can cook the polenta with a stock of your choice for extra flavour and you can also add some grated cheese of your choice to a hot polenta mixture.

May 04, 2023 /tina oblak
polenta grigliata, polenta, pan fried polenta, barbecued polenta, maize flour, white polenta, instant polenta, cucina povera
Adriatic Recipe, All year round recipe, Appetizers, bite-sized nibbles, breakfast, brunch, Canapés, child friendly dish, child friendly meal, dinner, Easy recipe, family friendly dish, family friendly meal, Finger food, Healthy, healthy mael, hearty dish, Istrian cuisine, Istrian dish, Istrian food, Istrian gastronomy, light meal, Nutritious, Nutritious dish, recipe from Northern Ital, Rustic dish, savory nibbles, Side Dishes, simple recipe, Slovenian cuisine, Slovenian food, Slovenian gastronomy, Small bites, Snacks, supper, Vegan, Vegetarian, Venetian dish
Comment

Chicken Stew with Simple Dumplings (Obara) Istrian Style Recipe

Beans and Srdines
April 26, 2023 by tina oblak in Adriatic Recipe, All year round recipe, Austrian inspired dishes, casserole, child friendly dish, child friendly meal, dinner, Dumplings, Easy recipe, family friendly dish, family friendly meal, first course, first course dish, first course meal, Gnocchi, hearty dish, Hearty soups, Istrian cuisine, Istrian dish, Istrian food, Istrian gastronomy, main course, main dish, Meat, Mitteleuropean cuisine, Mitteleuropean dish, Mitteleuropean food, Mitteleuropean recipes, no egg fresh pasta, one pot meal, one pot meat recipe, Pasta, Rustic dish, simple recipe, Slovenian cuisine, Slovenian food, Slovenian gastronomy, Soups, stew

This dish must be one of the most comforting foods ever. It is rustic, homely, authentic, it showcases true simplicity at its best, and best of all it is incredibly easy to make.

Onions, celery, carrots, and pieces or chunks of chicken are slowly cooked until the vegetables are completely soft and the chicken slightly browned. Then the water, fresh marjoram, and the seasoning are added, and the stew is then gently boiled for less than an hour. The simple dumplings are then cooked in the hot stew giving it a slightly thicker and velvety consistency.

This dish is part of the traditional Slovenian cuisine (known as Piščančja or Kokošja obara or simply known as Obara) and is very popular up and down the country, with a different regional variations along the way. An array of vegetables (peas, celeriac, cauliflower, leeks etc.) and herbs (thyme, bay leaf, parsley) can be added to the stew. It is cooked in households on a regular basis and can sometimes be found in rustic style restaurants, and then it is eaten as independent meal (main dish).

My paternal grandmother (nona Nada) and my maternal grandfather (deda Anton) made the very best, and they always took a great care and pride to cook one of the humblest peasant dishes.

They both told me that this stew was made from the old chickens that no longer laid the eggs – so everything was used, and nothing was wasted. The meat was quite hard, and tuff and it needed hours of cooking in order to become more tender, but it did provide a very flavoursome and tasty stew. It was then served with simple flour dumplings floating elegantly on top, and sometimes an egg would be added to the basic flour batter for extra richness (one of the variations on the dumplings recipe calls for semolina flour).

This stew is one of the top favourite dishes in the family, and here I am sharing the recipe of my grandparents from Slovenian Istra.

The recipe for the dumplings used for this stew are inspired and originated from Austrian style gnocchi called Nockerel (the batter is made with eggs and flour, then they are cooked in hot boiling water and eaten as a main dish with different sauces, beef goulash being the most common one).

This gastronomic influence will come as no surprise as Slovenia is geographically very close to Austria and was once also ruled by the Austro- Hungarian Empire.

Recipe

Ingredients for the stew

Serves 4-6

  • 1 big onion (about 220g), peeled and finely chopped

  • 1 carrot (about 100g), peeled and finely chopped or finely grated

  • 1 celery stick (about 40g), finely chopped

  • 2 Tbsp olive oil

  • 700g roughly of chicken meat like tights, drumsticks, wings, breast

    (chicken pieces that you choose can be on the bone or without, with the skin or skinless, bear in mind that the skin will give the stew more flavour but can also make it too oily and greasy and potentially unpleasant to eat).

    For this recipe I used ½ of the whole chicken and cut it in smaller random sized chunks and removed most of the skin.

  • 1 generous Tbsp fresh marjoram, very finely chopped (you can also use dry marjoram)

  • 1 Tbsp white flour

  • 2 litres of water

  • sea salt

  • black pepper

    Ingredients for the dumplings

  • 200g white plain flour

  • 150ml roughly water

  • sea salt

Method

Place the olive oil in a stewing pan and add finely chopped onions, celery, finely grated carrots, and the chicken meat.

Season with sea salt and black pepper and cook altogether, very slowly on gentle heat, stirring quite frequently until the vegetables cook down completely and become soft and the chicken is lightly brown and caramelized on the outside. This could take up to 45 minutes, but it is crucial for the success of the dish.

View fullsize Obara 2.jpg
View fullsize Obara 4.jpg

Sprinkle with flour and stir, then add the water, chopped marjoram, and bring to boil.

Turn the heat down, partially cover with the lid, and cook gently for about 45 minutes.

While the stew is cooking prepare the batter for the dumplings.

Put the flour in a bowl and add a pinch of sea salt.

Gradually start pouring the water and mix with the fork until you get the consistency of a quite thick pancake batter. Beat the batter until it gets quite stiff and lump free. Set aside and leave to rest until the chicken stew is cooked.

View fullsize Obara 6.jpg
View fullsize Obara 7.jpg

Taste the stew and adjust the seasoning with sea salt and black pepper.

Remove the chicken pieces form the stew. Remove the skin and the bones.

To make the dumplings dip the spoon into the gentle boiling chicken stew (this should prevent the batter sticking to the spoon).

Simply scoop up with a side of a teaspoon a bit of batter and gently drop it in the stew (dipping the teaspoon into the hot stew will help the batter just slide off the spoon, if it does not, help yourself with another spoon).

View fullsize Obara 8.jpg
View fullsize Obara 9.jpg

Repeat the process and drop the dumplings into the hot stew one by one until you finish all the batter.

Cook the dumplings for about 5 minutes in gently boiling stew (do not boil the stew aggressively).

Put back in the stew the pieces of chicken (free of bones and skin) and serve hot immediately.

Just a thought

This stew, like most stew and soups, is best made in advance.

You can keep cooked chicken stew in the fridge in an airtight container for about two days.

This dish freezes very well.

Dumplings can be made using buckwheat flour instead of white plain flour and the amount of water needs to be adjusted accordingly (different types of flour absorb different quantities of liquid).

Dumplings can also be made using the eggs. Crack one egg into a bowl and whisk gently. Add a pinch of sea salt, plain white flour and water as needed to obtain a fairly thick batter.

You can also use two eggs and white flour without the addition of water.

Wine suggestion

Alto Adige Pinot Grigio DOC "Porer" 2021 - Alois Lageder

April 26, 2023 /tina oblak
Obara, Piščančja obara, Kokošja obara, Chicken stew, Obara Istrian style, chicken meat, chicken tights, chicken drumsticks, flour dumplings, made ahead, chicken wings, chicken breast, plain flour dumplings, buckwheat flour, buckwheat dumplings, Nockerel, Austrian style gnocchi, fresh marjoram, root vegetables
Adriatic Recipe, All year round recipe, Austrian inspired dishes, casserole, child friendly dish, child friendly meal, dinner, Dumplings, Easy recipe, family friendly dish, family friendly meal, first course, first course dish, first course meal, Gnocchi, hearty dish, Hearty soups, Istrian cuisine, Istrian dish, Istrian food, Istrian gastronomy, main course, main dish, Meat, Mitteleuropean cuisine, Mitteleuropean dish, Mitteleuropean food, Mitteleuropean recipes, no egg fresh pasta, one pot meal, one pot meat recipe, Pasta, Rustic dish, simple recipe, Slovenian cuisine, Slovenian food, Slovenian gastronomy, Soups, stew
Comment

Meat Patties Istrian Style Recipe

Beans and Sardines
April 19, 2023 by tina oblak in Adriatic Recipe, All year round recipe, Appetizers, bite-sized nibbles, brunch, Canapés, Central European recipes, child friendly dish, child friendly meal, dinner, Easy recipe, entrée course, family friendly dish, family friendly meal, Finger food, hearty dish, Istrian cuisine, Istrian dish, Istrian food, Istrian gastronomy, main course, main dish, main meat course, Meat, Mitteleuropean cuisine, Mitteleuropean dish, Rustic dish, savory nibbles, simple recipe, Slovenian cuisine, Slovenian food, Slovenian gastronomy, Small bites, Snacks, Starters, supper

These comforting, satisfying and sinfully delicious meat patties are a real crowd pleaser; they are crunchy on the outside, moist, tender and juicy on the inside.

They have a rustic appearance and are made with minced beef and pork combined with stale pieces of bread previously soaked and softened in milk, and fresh parsley, marjoram, onions, garlic, sea salt and black pepper are added to flavour and season the meat mixture which is then shaped into patties and shallow fried.

These meat patties can be served as a starter or as a main meal, great as a sandwich filler and brilliant to take on picnics.

This recipe represents one of the most popular family dishes in Slovenia, made and enjoyed on a regular basis as a midweek meal or a weekend lunch or dinner and it is particularly loved by the children.

This is a staple dish along the coast of Slovenian Istra, it is called by the locals Polpete, a dialect word very clearly influenced by the neighbouring Italian Polpette, that have some regional variations from North to South of Italy (the meat mixture would almost always include some kind of grated cheese, Parmiggiano Reggiano and Grana Padano are the two types of cheeses most frequently used).

Istrian polpete distinguish themselves from other variations by using fresh or dry marjoram, a herb that very commonly grows and thrives along the Slovenian coast with its mild Mediterranean climate, and characterizes quite specifically many savoury dishes in Istrian cooking, offering distinctive flavour.

I am sharing here this simple but special recipe for this scrumptious meat polpete that have been made and enjoyed in my family for generations, as a child I could never had enough of them.

Some things in my family just never change...

Recipe

Ingredients

Serves 4

  • 250g minced beef

  • 250g minced pork

  • 2 soft white baps or some stale bread (roughly 130g)

  • 150ml milk

  • 1 Tbsp fresh marjoram, finely chopped (can use dry marjoram)

  • a handful of fresh flat leaf parsley (about 15g), finely chopped

  • 1 onion (about 100g), peeled and very finely chopped

  • 1 clove of garlic, peeled and pressed

  • 1 medium egg

  • sea salt

  • black pepper

  • white dry breadcrumbs for coating the patties (roughly 150-200g)

  • oil for frying

Method

Cut or tear with your hands white baps (or any other type of stale bread you are using) into small pieces and put them into a bowl.

Pour over the milk, mix well and leave to soak for a few minutes until the bread is completely softened (if necessary, squeeze out gently with your hands excessive milk).

While the bread is soaking in milk, prepare the meat mixture.

View fullsize Polpete 2.jpg
View fullsize Polpete 3.jpg

Put both minced beef and minced pork in a fairly large bowl. Add finely chopped onions, crushed garlic, finely chopped fresh parsley and marjoram, egg, generous pinch of sea salt, black pepper and softened pieces of bread.

With your hand mix very well all the ingredients, almost using a squeezing action, to thoroughly combine the mixture (if you end up with bigger bread pieces just break them with your fingers).

View fullsize Polpete 4.jpg
View fullsize Polpete 5.jpg

Shape the mixture into patties (I ended up with thirteen meat patties).

Coat in breadcrumbs and press a bit so the breadcrumbs adhere well, shake off gently any excessive breadcrumbs.

Repeat the process until you have used all the meat patties.

View fullsize Polpete 6.jpg
View fullsize Polpete 7.jpg

Pour the oil into a large frying pan, about 1 cm, enough to cover the bottom of the pan and heat it over a medium heat (how much oil you need will depend on how big your frying pan is).Cook breaded patties over a medium heat, turning once or twice, until crisp and golden brown.

View fullsize Polpete 8.jpg
View fullsize Polpete 9.jpg

Transfer fried meat patties into a dish lined with kitchen paper to allow excess oil to be absorbed.

If the patties are lined in a layer, make sure you put a kitchen paper between each layer.

Serve hot, warm, at room temperature or cold with mashed or oven roasted potatoes, a side salad or a side vegetable dish of your choice.

Just a thought

You can store cooked patties in an airtight container in the fridge for about two days.

If you wish to prepare this dish in advance, it is a good idea to store the uncooked and not fried breaded meat patties in an airtight container in the fridge, and just before frying, “refresh” the breadcrumbs coating by covering the patties in breadcrumbs once again, this will give you a crunchy coating.

If you are not in a rush, it is a good idea to chill the meat mixture in the fridge for a bit, (about 30 minutes or more) this will make it easier to handle and to shape the patties.

Meat mixture or raw, uncooked breaded patties are suitable for freezing (safely defrost and refresh the breadcrumbs coating before shallow frying, this is done because the breadcrumb coating gets a bit wet and soggy when you defrost the patties).

Wine suggestion

Dolcetto d'Alba DOC "Barturot" 2021 - Ca' Viola

April 19, 2023 /tina oblak
meat patties, shallow fried meat patties, breaded meat patties, minced meat, minced beef, minced pork, fresh herbs, fresh flat leaf parsley, fresh marjoram, dry marjoram, stale bread, meat mixture for patties, polpete, Italian polpette, Istrian Polpete, Istrian meat polpete, Istrian style polpete, Istrian style meat polpete
Adriatic Recipe, All year round recipe, Appetizers, bite-sized nibbles, brunch, Canapés, Central European recipes, child friendly dish, child friendly meal, dinner, Easy recipe, entrée course, family friendly dish, family friendly meal, Finger food, hearty dish, Istrian cuisine, Istrian dish, Istrian food, Istrian gastronomy, main course, main dish, main meat course, Meat, Mitteleuropean cuisine, Mitteleuropean dish, Rustic dish, savory nibbles, simple recipe, Slovenian cuisine, Slovenian food, Slovenian gastronomy, Small bites, Snacks, Starters, supper
Comment

Easter Sweet Plaited Bread (Tičice) Istrian Recipe

Beans and Sardines
April 07, 2023 by tina oblak in Adriatic Recipe, baking, breakfast, brunch, celebratory desserts, Celebratory dish, child friendly dish, dessert, Easter, Easter recipes, Easter treats, easy baking, Easy recipe, Enriched dough, festive bakes, festive dessert, festive sweet things, home baking, Istrian cuisine, Istrian food, Istrian gastronomy, Rustic dish, Slovenian cuisine, Slovenian Easter Sweet Br, Slovenian food, Slovenian gastronomy, Spring recipe, Sweet bread, sweet course, sweet finger food, sweet nibbles, Sweet Things

This celebratory sweet bread is similar to Jewish Challah, and is very flavoursome, soft and fluffy. It is made with yeasted enriched dough, and is shaped into a plait (or braid), and decorated with hard boiled eggs. It is very popular and traditionally baked during Easter festivities in Slovenian and Croatian Istra, Dalmatia (in Croatia) and in neighbouring Trieste in Italy and its surrounding areas.

It is best eaten fresh straight away, on its own with tea, coffee, or sweet wine, or paired with, as is traditionally the case, with cooked ham, and a selection of cheeses or cold dry cured meats. It is equally very delicious toasted the following day with some butter or jam.

This traditional recipe for sweet bread can be distinguished from other recipes for sweet bread across Europe by the addition of dark rum or grappa in the dough for extra flavour, and by the quantity of eggs used. This makes the bread have a heavier and slightly denser texture and richer taste, but this also means that it also requires a longer proofing time.

The eggs in the bread have symbolic significance in Christianity. Eggs represent new birth, new life, and are a reminder of the Passion and Resurrection of Christ. Traditionally, new converts to Christianity were baptised on Easter Sunday, representing their new birth in the faith, and new life in the Church. During the Middle Ages eggs were also a real treat to eat on Easter Sunday since they were forbidden during Lent, the 40 days of fasting before Easter.

Most of the time every household back home would bake two kinds of bread: the dough would be divided in half, and one kind is pinca bread, and is shaped like a regular round type of bread, but with cross-shaped incision on the top (representing Christ’s Crucifixion), and the other kind of bread, using the other half of the dough, is tičice, the braided variation with a hard boiled egg.

I am sharing here the recipe for this very traditional Easter sweet bread that has been made in my family for generations, it will make your holiday even more special!

Recipe

Method

This recipe will make 2 braided breads.

To make sweet bread plait, follow the recipe for basic sweet bread (pinca).

After the dough has risen and doubled in volume, remove it from the bowl.

Tip it onto a lightly floured surface and divide the dough in half.

Divide one half of the dough into 3 equal parts (cover the other half of the dough with the tea towel to prevent it from drying).

Roll each piece of the dough into 3 logs.

View fullsize Ticice 1.jpg
View fullsize Ticice 2.jpg

Join and pinch the ends of all 3 logs together to start shaping them into a braid.

View fullsize Ticice 3.jpg
View fullsize Ticice 4.jpg

Pinch the opposite end of the braided dough together.

View fullsize Ticice 5.jpg
View fullsize Ticice 6.jpg

Place it on a baking tray previously lined with baking parchment.

Repeat the process with the other half of the dough.

Decorate the plait with hard boiled eggs (you can use the eggs previously decorated and dyed, see my recipe how to decorate and dye the eggs, Easter Eggs Dyed with Onion Skins Recipe). Place hard boiled eggs at the end part of the braid, pressing down a bit, almost creating a little nest where the egg can sit.

Brush both plaits with the egg whites.

Allow braided loaf to rise in warm, draft free, room for about 1 hour.

View fullsize Ticice 7.jpg
View fullsize Ticice 8.jpg

Bake in the preheated oven at 180C for about 30 minutes, tent it with the aluminium foil halfway through if the top starts browning too much.

Once baked, take from the oven.

Transfer on a cooling rack and let it cool a bit.

Best served fresh still a bit warm.

Just a thought

Best eaten freshly baked on the same day.

Store leftover sweet bread in an airtight container for up to three-four days.

You can toast the slices and enjoy them with butter, jam, peanut or almond butter or use it to make French toast or bread and butter pudding, delicious!

Wine suggestion

Fior d'arancio Colli Euganei Spumante Dolce DOCG 2021 - Alla Costiera

April 07, 2023 /tina oblak
Braided sweet bread, plaited sweet bread, Easter sweet bread, Easter sweet braided bread, Easter sweet plaited bread, Tičice, celebratory sweet bread, yeasted dough, enriched dough
Adriatic Recipe, baking, breakfast, brunch, celebratory desserts, Celebratory dish, child friendly dish, dessert, Easter, Easter recipes, Easter treats, easy baking, Easy recipe, Enriched dough, festive bakes, festive dessert, festive sweet things, home baking, Istrian cuisine, Istrian food, Istrian gastronomy, Rustic dish, Slovenian cuisine, Slovenian Easter Sweet Br, Slovenian food, Slovenian gastronomy, Spring recipe, Sweet bread, sweet course, sweet finger food, sweet nibbles, Sweet Things
Comment

Easter Eggs Dyed with Onion Skins Recipe

Beans and Sardines
March 29, 2023 by tina oblak in Adriatic Recipe, breakfast, brunch, Canapés, Celebratory dish, Easter, Easter recipes, Easter treats, Easy recipe, foraging, Fresh herbs, Istrian cuisine, Istrian gastronomy, Rustic dish, savory nibbles, simple recipe, Slovenian cuisine, Slovenian food, Slovenian gastronomy, Small bites, Snacks, Spring recipe, Starters

The tradition and the roots of dyeing the eggs over the Easter Period of celebrations now might be linked by many to modern and commercial aspect of Easter, but as a matter of fact, it takes us back to the history of the celebration of these events. It is believed that the custom of dying or colouring Easter Eggs started with the early Christians in Mesopotamia.

The eggs were dyed in various colours to represent and symbolise different aspects of the Easter story, yellow represents the resurrection, blue represents love and red represents the blood of Jesus Christ that was shed on the Cross for the sins of the world.

This tradition would spread over time through Catholic and Protestant churches in Europe, even though in pagan cultures eggs were a symbol of rebirth and fertility, and the arrival of Spring. It is another example of the early Church adapting, transforming existing pagan rites, and rituals to the Christian story and its message for the world.

In Slovenian Istra, where I come from, and all the regions of Slovenia, dying eggs during the Easter festivities is a deeply rooted tradition and has passed, luckily, the tests of modern times; Christians and non-Christians can get involved with this fun and family friendly activity. One of the most popular and inexpensive way to colour the eggs is using onion skins.

I am sharing here how the eggs have been decorated with fresh herbs leaves and flowers and dyed with onion skins in my family for generations.

The beautifully decorated and dyed eggs would be put in a wicker basket together with cooked ham, sweet Easter Bread (Pinca) and taken to Mass on Holy Saturday or early on Easter Sunday to be blessed, and only after being blessed, the food was taken from the basket, shared and enjoyed.

Recipe

In this recipe I am using different types of leaves from fresh herbs to decorate the eggs before dying them. If you are short of time however, or not feeling up to the task, you can easily skip the step of decorating the eggs and just colour them, and they will be equally beautiful.

Ingredients

  • 12 eggs at room temperature (white or brown shell eggs or a mixture of both). You can easily change the quantity of the eggs used according to your needs.

  • big mixing bowl full of dry onion skins (from yellow or red onions or a mixture of both), roughly 3-4 handfuls

  • 2 Tbsp white vinegar

  • 1 egg white

  • a selection of fresh herbs and flowers (from the garden or a meadow)

You will also need

  • some old ladies’ nylon tights (quite thin,15 Denier or less)

  • scissors

  • cotton thread or thin string

  • paint brush

  • a big pot

  • vegetable oil

Method

Cut the tights into 10-15cm wide strips (this size of the “pocket” should accommodate nicely the egg)

Lightly brush the inside of the herb leaf or flower with a paint brush dipped in egg white.

Gently place it on the egg, press it lightly to help it stick.

Brush the edges of the herb leaf or flower with the egg white so it adheres better to the egg (preventing the herb or flower moving around). Leave to dry just for a few minutes.

View fullsize Easter Eggs Dyed with Onion Skins Recipe 7.jpg
View fullsize Easter Eggs Dyed with Onion Skins Recipe 8.jpg

Carry on with the process until you decorate all the eggs with herb leaves or flowers.

Place the decorated egg inside the tights strip, wrap it tightly around the egg, this will allow the decoration to stay in place and not move around (you will need to stretch it a bit and adjust the strip of tights).

Tie the end with a thread or a thin string, or stretch the tights pocket a bit and make a knot.

View fullsize Easter Eggs Dyed with Onion Skins Recipe 13.jpg
View fullsize Easter Eggs Dyed with Onion Skins Recipe 14.jpg

Put half of the onion skins in the pot.

Place decorated and prepared eggs into a pot on top of the onion skins.

View fullsize Easter Eggs Dyed with Onion Skins Recipe 16.jpg
View fullsize Easter Eggs Dyed with Onion Skins Recipe 17.jpg

Cover the eggs with the remaining onion skins.

Add cold water so the eggs are completely covered and submerged in water.

Pour two tablespoons of white vinegar.

Bring to boil.

Turn the heat down and gently simmer for about 30 minutes.

View fullsize Easter Eggs Dyed with Onion Skins Recipe 18.jpg
View fullsize Easter Eggs Dyed with Onion Skins Recipe 19.jpg

Turn the heat off and leave the eggs to cool completely.

Allow the eggs to soak (check the eggs for desired colour).

You can leave the eggs to colour for about 4-6 hours, you can leave them to colour for longer or overnight (I leave mine overnight for practical reasons). The longer you leave them to soak, the darker they will get. You can also remove half of the eggs after a few hours and the rest of the eggs the following day (in this case you will end up with some eggs being lighter in colour compared to the ones that were left to soak for longer).

Remove the eggs form the pot.

Cut off the tights with the scissors, remove decorative herbs with the help of some kitchen paper.

View fullsize Easter Eggs Dyed with Onion Skins Recipe 21.jpg
View fullsize Easter Eggs Dyed with Onion Skins Recipe 22.jpg

Dry the eggs with kitchen paper.

If desired, wipe gently the eggs with a bit of vegetable oil. This will give them a beautiful shine.

Display the eggs in the basket.

March 29, 2023 /tina oblak
onion skins, onion peel, natural egg dyes, dyed Easter eggs, fresh eggs, white shell eggs, brown shell eggs, dry onion skins, make ahead, make in advance, family activity, chiled friendly cooking, child friendly cooking, fresh meadow herbs, fresh garden herbs, Easter eggs, Decorating easter eggs, colouring easter eggs, Easter festivity, Easter celebration, Easter traditions
Adriatic Recipe, breakfast, brunch, Canapés, Celebratory dish, Easter, Easter recipes, Easter treats, Easy recipe, foraging, Fresh herbs, Istrian cuisine, Istrian gastronomy, Rustic dish, savory nibbles, simple recipe, Slovenian cuisine, Slovenian food, Slovenian gastronomy, Small bites, Snacks, Spring recipe, Starters
Comment

Sautéed Leeks Istrian Recipe

Beans and Sardines
March 23, 2023 by tina oblak in Adriatic Recipe, Appetizers, Autumnal dish, Autumnal recipe, dinner, Easy recipe, family friendly dish, family friendly meal, Healthy, healthy mael, Istrian cuisine, Istrian dish, Istrian food, Istrian gastronomy, Nutritious, Nutritious dish, Rustic dish, Side Dishes, simple recipe, Slovenian cuisine, Slovenian food, Slovenian gastronomy, Vegetable side dish, Vegetables, Vegetarian, Winter dish, Winter recipe

This dish is simple and rustic, and is made with humble leeks, a vegetable that is very often overlooked, but in this recipe they proudly take central stage, and take no time or trouble to cook.

Raw leeks are almost inedible but when cooked they become sweet, mellow, and taste delicious on i their own as a side dish or used as a base for risotti or soups. Sautéed leeks are also fantastic as a filling, together with some cheese, for a grilled sandwich.

Leeks are omnipresent at vegetable markets but they are at their best during the coldest months of the year, October through May, and better yet, they are packed with nutrients and antioxidants.

I am sharing here my mother's recipe for this incredibly easy way of cooking the leeks. This vegetable side dish would be on our dinner table quite often during colder month when perhaps the range of vegetables on offer to buy was slightly more limited compared to the variety you can find during warmer months of spring and summer.

Try to make it, you might start reaching out for this humble and inexpensive vegetable a bit more often, if you are not doing that already...

Recipe

Ingredients

Serves 4 as a side dish

  • 900g - 1kg leeks, cleaned and chopped or sliced

  • 2 Tbsp extra virgin olive oil

  • 1 Tbsp butter

  • sea salt

  • black pepper

Method

Rinse the leeks under cold running water and pat dry with a paper or clean kitchen towel.

Place the leeks on a chopping board and with a sharp knife cut off the dark green leaf ends of the leek and the muddy tip of the roots (keep the green ends for the stock if you wish or discard).

Cut each leek in half from top to bottom and slice further into thin stripes.

Place sliced leeks into a colander and wash thoroughly under the cold running water. Leeks need a good cleaning before using, as dirt often gets stuck between the layers of leaves as they grow.

View fullsize Sauteed Leeks 3.jpg
View fullsize Sauteed Leeks 4.jpg

Put the butter and the oil in a frying pan, heat it up a bit and allowing the butter to melt.

Transfer the leeks into a pan, add sea salt and black pepper .

Cook on a medium heat, stirring now and again, for about 10-15 minutes, or until the leeks are cooked to a desired consistency (some prefer them very soft and others quite crunchy with a bite).

Taste and adjust the seasoning with sea salt and black pepper.

March 23, 2023 /tina oblak
leeks, make ahead, make in advance, leeks with oilve oil and butter
Adriatic Recipe, Appetizers, Autumnal dish, Autumnal recipe, dinner, Easy recipe, family friendly dish, family friendly meal, Healthy, healthy mael, Istrian cuisine, Istrian dish, Istrian food, Istrian gastronomy, Nutritious, Nutritious dish, Rustic dish, Side Dishes, simple recipe, Slovenian cuisine, Slovenian food, Slovenian gastronomy, Vegetable side dish, Vegetables, Vegetarian, Winter dish, Winter recipe
Comment

Viennese Style Breaded Pork Escalopes Recipe

Beans and sardines
March 15, 2023 by tina oblak in All year round recipe, Austrian inspired dishes, Central European recipes, child friendly dish, child friendly meal, dinner, Easy recipe, family friendly dish, family friendly meal, hearty dish, Istrian cuisine, Istrian dish, Istrian food, Istrian gastronomy, main course, main dish, main meat course, Meat, Mitteleuropean cuisine, Mitteleuropean dish, Mitteleuropean food, Mitteleuropean recipes, Rustic dish, simple recipe, Slovenian cuisine, Slovenian food, Slovenian gastronomy, supper

This dish from Vienna that has conquered the world is a total crowd pleaser, one of the most loved ones, and is an instant hit. It consists of dredging meat escalopes into a flour, then dipping them into whisked eggs, coating them in breadcrumbs and quickly shallow fried them until golden and crispy which makes them utterly scrumptious and irresistible.

Breaded meat escalopes are ideally eaten hot as soon as they are fried with some mashed potatoes, a seasonal salad, or Austrian style potato salad. They can also be served with boiled potatoes and some melted butter, and freshly chopped parsley, and a wedge of a lemon (optionally squeezed on escalope once fried). They are also incredibly delicious at the room temperature and offered as a part of a buffet, and they are also great used as as a filler in a sandwich (add a bit of fresh rocket salad and spread a slice of bread with a bit of mayonnaise, and you have a sandwich that is to die for).

This dish can be made ahead and stored which makes it a an ideal picnic food, and if you bring this dish with you on a picnic, you will stand out from the crowd, and there will be no chance of you bringing back home any leftovers...

This dish is typically found in the territories that once belonged to Austro-Hungarian Empire, including all the regions of Slovenia, where I come from, (referred to as Dunajski Zrezek or Pohani zrezek na dunajski način in standard Slovenian). This dish is so much adored that it is almost classed as a national dish. It is found on the menus in just about every restaurant and is prepared on a weekly basis in many households.

Breaded pork escalopes are also very strongly present among other imperial dishes in the neighbouring city of Trieste in Italy, and the surrounding areas where they are called by the locals Wiener Schnitzel (also spelled Wienerschnitzel, this is, however, a protected term by Austrian law and should be exclusively used when veal is used to make this dish). In the rest of the Italy this dish is known as Bistecca or Cotoletta alla Milanese, and this is where it could potentially get very confusing...

The origin of this gorgeous plate of food is very much disputed, it is believed that Wiener Schnitzel cames from Milan, in northern Italy, very close to Austria (it was part of the Habsburg Austrian Empire in the mid-nineteenth century). However, sometimes the credit for its creation goes to the Spaniards (Wiener Schnitzel was introduced by the Spanish Troops of Charles V to Vienna via Italy), and another fascinating theory suggests a Turkish origin of the dish.

I think I will not enter any more into this dispute regarding the origins of the best known speciality of Viennese cuisine, and one of the national dishes of Austria, and leave it to the expertise of culinary historians.

My mother has made this dish time and time again, the success and excitement are always guaranteed!

Recipe

Ingredients

Serves 4

  • 4 pork escalopes, each weighing roughly 130g (for this recipe you can use different types and cuts of meat, chicken or turkey breasts and lamb cutlets for example work well)

  • all purpose (plain) flour, enough for coating about 100g

  • 2 medium eggs, slightly beaten

  • dry breadcrumbs, enough for coating, about 100g

  • sea salt

  • black pepper, optional

  • 1 lemon, cut in 4 wedges, optional, for serving

  • sunflower oil or other neutral tasting oil for frying

Method

Pound thoroughly the meat cutlets (not too thin) using the flat side of the meat mallet.

Season the meat on both sides with sea salt (and black pepper, optional).

View fullsize Austrian style breaded pork escalopes 2.jpg
View fullsize Austrian style breaded pork escalopes 3.jpg

Prepare three dishes for flour, eggs and breadcrumbs.

Put the flour in a wide shallow bowl, dish or on a large plate (I just use a piece of baking paper, fold it when I finish, and use it the next time).

Put the eggs in another shallow bowl or dish (big enough to accommodate the slice of meat) and whisk lightly.

Put the breadcrumbs in a third shallow bowl, dish or big plate.

Start the breading process.

Dredge each slice of meat into flour making sure everything is coated and gently shake off the excess.

View fullsize Austrian style breaded pork escalopes 5.jpg
View fullsize Austrian style breaded pork escalopes 6.jpg

Dip the floured slice of meat into a whisked egg, turn to coat, make sure all the sides are covered in egg, and let drip off any excessive egg.

View fullsize Austrian style breaded pork escalopes 7.jpg
View fullsize Austrian style breaded pork escalopes 8.jpg

Coat in breadcrumbs and press a bit so the breadcrumbs adhere well and shake off gently any excess breadcrumbs.

View fullsize Austrian style breaded pork escalopes 9.jpg
View fullsize Austrian style breaded pork escalopes 10.jpg

Repeat the process until you have used all the meat slices.

View fullsize Austrian style breaded pork escalopes 12.jpg
View fullsize Austrian style breaded pork escalopes 13.jpg

Pour the oil into a large frying pan, about 1cm, enough to cover the bottom of the pan and heat it over a medium heat (how much oil you need will depend on how big your frying pan is).

Once oil is hot, add breaded meat slices, one or two at the time without overcrowding the pan.

Fry roughly for about 2 minute on each side or until the breadcrumbs turn golden-brown in colour.

Transfer fried escalopes into a dish lined with kitchen paper to allow excess oil to be absorbed.

If the escalopes are lined in a layer, make sure you put a kitchen paper between every layer.

Just a thought

I have shared here the basic recipe for breaded pork escalopes, but if you wish to take this recipe up a notch, you can add some fresh finely chopped flat leaf parsley in whisked egg and some grated Parmiggiano Reggiano cheese or some dried herbs of your choice in the breadcrumbs.

You can store crispy breaded pork escalopes in an airtight container in the fridge for about two days.

This dish is not suitable for freezing.

If you wish to prepare this dish in advance, it is a good idea to store the uncooked and not fried breaded slices of pork in an airtight container in the fridge, and just before frying, “refresh” the breadcrumbs coating by covering the slices in breadcrumbs once again, this will give you a crunchy coating.

A vary tasty variation of this dish that is vegetarian friendly is using mushrooms, aubergines or courgettes instead of the meaty element.

Wine suggestion

Etna Nerello Mascalese DOC "Passorosso" 2020 - Passopisciaro

March 15, 2023 /tina oblak
pork meat, pork escalopes, breaded meat, shallow fried, Pohani zrezek, Pohani zrezek na dunajski način, Wiener Schnitzel, Wienerschnitzel, Bistecca alla Milanese, Cotoletta alla Milanese, chicken breast, turkey breast, lamb cutlets, breaded meat escalopes
All year round recipe, Austrian inspired dishes, Central European recipes, child friendly dish, child friendly meal, dinner, Easy recipe, family friendly dish, family friendly meal, hearty dish, Istrian cuisine, Istrian dish, Istrian food, Istrian gastronomy, main course, main dish, main meat course, Meat, Mitteleuropean cuisine, Mitteleuropean dish, Mitteleuropean food, Mitteleuropean recipes, Rustic dish, simple recipe, Slovenian cuisine, Slovenian food, Slovenian gastronomy, supper
Comment

Austrian Style Sweet Pull Apart Yeast Buns Recipe

Beans and Sardines
March 09, 2023 by tina oblak in Adriatic Recipe, All year round recipe, Austrian inspired dishes, Autumnal dish, Autumnal recipe, baked dish, baking, breakfast, brunch, Central European recipes, child friendly dish, child friendly meal, dessert, Eastern European recipes, easy baking, Easy recipe, Enriched dough, family friendly dish, home baking, Istrian cuisine, Istrian dish, Istrian food, Istrian gastronomy, Mitteleuropean cuisine, Mitteleuropean dish, Mitteleuropean food, Mitteleuropean recipes, pudding, Rustic dish, simple recipe, Slovenian cuisine, Slovenian food, Slovenian gastronomy, Snacks, Sweet bread, sweet course, sweet finger food, sweet nibbles, Sweet Things

These soft, fluffy and airy sweet yeast buns are filled with apricot jam and are simply irresistible. This baked treat is similar to a crown loaf, it breaks into 12 individual rolls which makes it perfect for sharing, and they transport very well to take on a picnic.

As soon as they are baked the outside is lightly golden and slightly crispy but the crust becomes soft when the buns cool down.

They can be enjoyed as a dessert and are perfect for breakfast, great with tea or coffee, and kids love them as a snack, any time of the day, with a glass of milk or hot chocolate.

They are Austrian in origin (Buchteln plural form and Buchtel singular) where they are very commonly served with the vanilla sauce. These sweet buns are unknown to many people, and because they are slightly off the beaten track, this makes them a bit of an undiscovered treasure. However, they are very popular in Slovenia which borders Austria, and was once part of Austro-Hungarian Empire.

I remember that these buns were baked in school for our mid morning snack, accompanied by a hot drink. The aroma of freshly baked buhteljni (this is what they are called in Slovenian) would travel through the corridors into the classrooms – disrupting at times our concentration! Indeed, just before the break we children would get so excited the teachers found it almost impossible to contain us.

Here I am sharing the recipe of my maternal grandmother, stara mama Iva, she baked them often on a regular basis, they went down as a real treat every single time, and she never seemed to bake enough of them...

Recipe

Ingredients

This recipe makes 12 buns

  • 400g all purpose (plain) flour

  • 40g butter, melted and slightly cooled

  • pinch of sea salt

  • finely grated lemon zest of one unwaxed lemon

  • ½ Tsp vanilla extract

  • 2 medium eggs, at room temperature

  • 140ml semi-skimmed or full fat milk, lukewarm

  • 60g caster sugar

  • 5g (1 ½ Tsp) dry fast-action yeast

  • apricot jam or a jam of your preference for the filling

For the glaze

  • 40g melted unsalted butter for the brushing

For serving

  • icing sugar or vanilla icing sugar for dusting

Method

Put the sifted flour in a large mixing bowl and add the sea salt to one side of the bowl.

Make a well, pour in lukewarm milk and add the yeast.

View fullsize Buhteln 1.jpg
View fullsize Buhteln 2.jpg

In a separate smaller bowl, add the eggs and whisk them lightly. Add the sugar, melted and slightly cooled butter, and vanilla extract.

Pour the egg mixture to a big mixing bowl and add finely grated lemon zest.

View fullsize Buhteln 3.jpg
View fullsize Buhteln 4.jpg

Stir the mixture with the fork first so all the ingredients come together, incorporate, and combine well to make a fairly sticky dough.

Tip the dough into a lightly floured working surface and knead by hand for about 10-15 minutes, adding a little extra flour if needed.

The dough should be very soft, shiny and elastic.

View fullsize Buhteln 5.jpg
View fullsize Buhteln 6.jpg

Transfer the dough to a large lightly oiled container or bowl. Cover tightly with cling film and leave to rise in a warm place for about at least 1 hour, or until the dough has doubled in size.

Form into a sausage and divide into 12 equal pieces.

Flatten them to the thickness of about 1cm to obtain mini pizza shaped discs. You can do this by using floured rolling pin or stretch the dough with your hands.

Put one teaspoon of apricot jam in the centre, on top of each circle, and close the ends well. Do not try to be overgenerous with the jam, if the filling gets on the edges of the disc, it is almost impossible to seal them because the dough will stop sticking. Wrap the dough around the filling, pinching and sealing it tightly You should end up with 12 parcels.

View fullsize Buhteln 8.jpg
View fullsize Buhteln 9.jpg

Lightly grease a 23cm round, deep springform cake tin. You can use other shapes of baking trays, just make sure they are greased to prevent the buns from sticking.

Place the parcels, one next to each other, so they are snug and touching with the seam side down in a non stick baking tray. Melt the butter and brush the top and all the sides.

View fullsize Buhteln 10.jpg
View fullsize Buhteln 11.jpg

Leave to proof for a second time, for about 30min, by covering them with a clean kitchen cloth in a warm room with no draft until they are nicely risen and puffed up.

Bake at 180º static in the preheated oven, on the middle shelf, for about 30minutes or until a skewer inserted into the centre comes out clean.

The buns should be lightly golden on top and well risen.

Leave in the tin for about 5 minutes, then release the sides of the tin.

View fullsize Buhteln 13.jpg
View fullsize Buhteln 14.jpg

Remove and place the sweet buns to a wire rack to cool.

Dust the buns with regular or vanilla icing sugar and enjoy.

March 09, 2023 /tina oblak
sweet buns, pull apart sweet buns, jam filled buns, sweet crown bread, Buchteln, Buchtel, buhteljni, yeast buns, sweet dough, make ahead, pick me up treat, picnic food
Adriatic Recipe, All year round recipe, Austrian inspired dishes, Autumnal dish, Autumnal recipe, baked dish, baking, breakfast, brunch, Central European recipes, child friendly dish, child friendly meal, dessert, Eastern European recipes, easy baking, Easy recipe, Enriched dough, family friendly dish, home baking, Istrian cuisine, Istrian dish, Istrian food, Istrian gastronomy, Mitteleuropean cuisine, Mitteleuropean dish, Mitteleuropean food, Mitteleuropean recipes, pudding, Rustic dish, simple recipe, Slovenian cuisine, Slovenian food, Slovenian gastronomy, Snacks, Sweet bread, sweet course, sweet finger food, sweet nibbles, Sweet Things
Comment

Spinach Roll made with Potato Gnocchi Dough Istrian Recipe

March 01, 2023 by tina oblak in Adriatic Recipe, All year round recipe, Appetizers, baked dish, brunch, Celebratory dish, Central European recipes, child friendly dish, child friendly meal, dinner, Easter dish, Easter recipes, Easy recipe, entrée course, family friendly dish, family friendly meal, festive dish, first course, first course dish, first course meal, Gnocchi, hearty dish, Istrian cuisine, Istrian dish, Istrian food, Istrian gastronomy, main course, main dish, main vegetarian course, main vegetarian dish, main vegetarian meal, Mitteleuropean cuisine, Mitteleuropean dish, Mitteleuropean food, Mitteleuropean recipes, recipe from Northern Ital, Rustic dish, simple recipe, Slovenian cuisine, Slovenian food, Slovenian gastronomy, Spring dish, Spring recipe, Starters

This classic dish is absolutely perfect in its simplicity, it is Austro-Hungarian in origin, and it represents a great comfort food. It is also vegetarian friendly, and looks quite impressive, but in reality is not that difficult to make. What you need is a bit of extra time to spare in the kitchen. It is the dish that will with no doubt impress your family and friends, whether you serve it as a warm starter or as a main dish.

Potato gnocchi dough roll is filled with spinach, boiled, sliced and traditionally served with the gravy or the juices left after roasting a piece of meat, different types of meat ragù, sage butter sauce and freshly grated Parmiggiano Reggiano cheese, and it can be served in a less traditional way with a tomato sauce.

This dish is typically found in the territories that once belonged to Austro-Hungarian Empire, including Slovenian Istria, where I come from, neighbouring city of Trieste in Italy and the surrounding areas and it used to be prepared exclusively during the festivities. My nona told me that the characteristic filling for this dish along the Slovenian coast would be caramelized onions and pancetta a no use of ricotta cheese in the spinach filling.

This special plate of food is a perfect example of ‘recipes without the borders’ in terms of the ingredients and the name of the dish itself, a true testimony of a gastronomic osmosis between different border cultures.

The name of the dish in standard Italian is Strucolo, which is the Italianization of the Slovenian word štrukelj, which itself has originated from a German word strudel. In fact, in German this dish is known as savoury Potato and spinach Strudel, and has very often a ricotta cheese and sliced cooked ham as a filling.

What is particular about this dish is the way it is cooked, the roll gets wrapped in an old piece of kitchen cloth “straza in the local dialect” and then gently boiled in hot water, hence its name Strucolo de spinaze in straza (Rotolo di spinaci cotto nel canavoccio in standard Italian).

Sadly this dish is very rarely found in the restaurants and almost exclusively prepared in households with a wide variety of fillings, (sautéed mushrooms and sliced cooked ham) and very often fresh pasta is used instead of potato gnocchi dough, and there are also a number of sweet variations using different types of fruit and nuts.I am sharing here my nona's recipe for this very special and traditional spinach roll made with potato gnocchi dough and simple spinach filling that still today is prepared during festive periods or to mark a special occasion.

Ingredients

Serves 4-6 people

For gnocchi pasta dough

  • 500g floury, yellow fleshed potatoes e.g. King Edward, Maris Piper, red skin potatoes (avoid new potatoes and choose the potatoes that are more or less the same size)

  • 150g all purpose flour, plus some extra

  • 1 small egg (can use just egg yolk of a medium or big egg)

  • sea salt, a pinch

For spinach filling

  • 450-500g fresh baby spinach, thoroughly washed

  • 15g butter

  • 1 Tbsp extra virgin olive oil

  • sea salt

  • nutmeg, grated

For sage butter sauce

  • a few fresh sage leaves, roughly torn

  • 150g butter

  • Parmiggiano Reggiano or Grana Padano cheese, finely grated, for serving

Recipe

Method

Potato gnocchi dough

Wash the potatoes, with the skin on,  under cold running water.

Place the potatoes, with their skin on, in a pot or in a large saucepan, add plenty of water so the potatoes are completely submerged in the water and bring to boil (you can use boiling hot water directly from the kettle to reduce cooking time).

After the water has come to a boil,  cook for about 20-30 minutes or until tender.  Cooking time will obviously vary depending on the size of the potatoes you are using. You  can check that the potatoes are fully cooked by inserting the toothpick into the potato, it should easily enter the pulp of the potato.  Alternatively, you can steam the potatoes or cook them in the microwave oven.

While the potatoes are cooking prepare the spinach filling (see below).

When the potatoes are cooked, drain them in a colander and let them cool enough to handle, then remove the skin.If the potatoes are still quite warm to handle, the best way to remove the skin is to stick the fork through the potato and peel it using a knife.

On a working surface or on a large wooden board (you can use a pasta board if you have one), pass the potatoes through a potato ricer.

Make a well, add the flour and a pinch of sea salt.

Make another well in the middle of the flour and crack the egg in it.

View fullsize Spinach Roll 5.jpg
View fullsize Spinach Roll 6.jpg

With the fork slightly whisk the egg inside the well, and as you do so pick up the flour as you go around the well.

View fullsize Spinach Roll 7.jpg
View fullsize Spinach Roll 8.jpg

Mix together and form a soft dough which should not stick to your fingers or the surface. If this is the case add a little flour at a time.

View fullsize Spinach Roll 9.jpg
View fullsize Spinach Roll 10.jpg

Spinach filling

Put the washed spinach in pot with hot boiling water and blanch it for a few minutes.

Drain in the colander and let it cool down a bit. When cold enough to handle, squeeze out by hand as much as liquid as you can.

Place the spinach on a chopping board and finely chop.

View fullsize Spinach Roll 2.jpg
View fullsize Spinach Roll 3.jpg

Put the butter and olive oil in a non stick frying pan and let the butter melt. Add the spinach, a pinch of sea salt and a good grating of nutmeg.

Sautéed for a few minutes, stirring frequently then turn the heat off and set aside.

Taste and adjust the seasoning.

Allow to cool completely.

Cut a piece of a non stick baking parchment into a 50 x 40cm rectangle and place it on the working surface and sprinkle it lightly with the flour.

Place the gnocchi dough on the baking parchment and, with the help of slightly floured rolling pin, spread out the gnocchi dough roughly in the shape of a rectangle 38 x 29cm.

View fullsize Spinach Roll 11.jpg
View fullsize Spinach Roll 12.jpg

Spoon the spinach mixture over the dough and spread it evenly.

View fullsize Spinach Roll 13.jpg
View fullsize Spinach Roll 14.jpg

With the help of baking parchment start rolling up the dough into the shape of a log from a long end (as if you were making a Swiss roll).

Press down each end to seal, and wrap the paper around the roll.

View fullsize Spinach Roll 15.jpg
View fullsize Spinach Roll 16.jpg

Tight the ends with the kitchen twine, alternatively you can wrap the roll in an aluminium foil to help the roll keep its shape.

Place the roll in a pot, making sure you choose the pot big enough to accommodate the roll sitting horizontally without bending it (use a fish pot if you have one or an oval shape pan).

Fill it with water, can be boiling hot straight from the kettle, so the roll is almost completely submerged, the water should just cover the roll.

View fullsize Spinach Roll 17.jpg
View fullsize Spinach Roll 18.jpg

Bring to boil, turn the heat down, cover with the lid, and gently simmer for 30 minute.

Remove the roll onto a chopping board and allow to cool for a few minutes.

View fullsize Spinach Roll 19.jpg
View fullsize Spinach Roll 20.jpg

Cut the twine, unwrap the roll and remove the baking parchment.

Slice the roll with a very sharp knife (slicing will be easier if you wet the knife with cold water).

View fullsize Spinach Roll 21.jpg
View fullsize Spinach Roll 22.jpg

Place the slices onto serving plates and spoon over a few tablespoons of sage butter and sprinkle with plenty of Parmiggiano Reggiano cheese, and a little bit of finely freshly grated nutmeg, this is optional but it really does enhance the delicate flour of the dish.

Alternatively you can also gratinate the dish. Arrange the slices in a previously buttered baking dish. Sprinkle with plenty of Parmiggiano Reggiano cheese, spoon over a few tablespoons of melted butter and gratin in a previously hot oven at 200C, for about 20 minutes, or until nice golden in colour. This is a great option if you want to make the dish ahead of a time (simmer the roll, wrap it in aluminium foil and keep it in a fridge for up to a day before slicing and baking).

Sage butter

Put the butter in a small saucepan, heat it gently and add the sage leaves. Cook on a gentle heat until the butter begins to colour and the foam has subsided.

Wine suggestione

Colline Pescaresi Passerina IGT "Chronicon" 2021 - Zaccagnini

March 01, 2023 /tina oblak
gnocchi dough, potato gnocchi dough, fresh spinach, blanched spinach, baby spinach, sauteed baby spinach, sage and butter sauce, fresh sage leaves, nutmeg, grated nutmeg, Parmiggiano Reggiano cheese, Grana Padano cheese, Savoury spinach roll, ahead of time, make ahead, make in advance
Adriatic Recipe, All year round recipe, Appetizers, baked dish, brunch, Celebratory dish, Central European recipes, child friendly dish, child friendly meal, dinner, Easter dish, Easter recipes, Easy recipe, entrée course, family friendly dish, family friendly meal, festive dish, first course, first course dish, first course meal, Gnocchi, hearty dish, Istrian cuisine, Istrian dish, Istrian food, Istrian gastronomy, main course, main dish, main vegetarian course, main vegetarian dish, main vegetarian meal, Mitteleuropean cuisine, Mitteleuropean dish, Mitteleuropean food, Mitteleuropean recipes, recipe from Northern Ital, Rustic dish, simple recipe, Slovenian cuisine, Slovenian food, Slovenian gastronomy, Spring dish, Spring recipe, Starters
Comment

Carnival Sweet Crackers Istrian Recipe

Beans and Sardines
February 15, 2023 by tina oblak in Adriatic Recipe, baking, bite-sized nibbles, breakfast, celebratory desserts, Celebratory dish, dessert, Easy recipe, Enriched dough, festive bakes, festive dessert, festive dish, festive sweet things, Finger food, Istrian gastronomy, Pastry, pudding, Rustic dish, simple recipe, Slovenian cuisine, Slovenian gastronomy, Small bites, Snacks, sweet finger food, sweet nibbles, Sweet Things

These delicate, fragile, irresistible and crispy pastries are traditionally associated with Carnival (Pust in Slovenian), and they are super tasty, so light and flaky that they just simply melt in your mouth.

They have a deep connection with Christian, especially Catholic, liturgical festivities like the Carnival season, the time of the year in which eating in excess, and gastronomic indulgence was allowed by the Church before the start of fasting and austerity during Lent, culminating with the Easter celebrations.

To make this crumbly sweet dessert is very easy, sweet dough is rolled out very thinly, it then gets very quickly fried, and it is during the frying process that this wafer thin rectangles of pastry contort into the strangest shapes. When they cool down completely they get covered in a generous dusting of icing sugar to delight children and grown-ups alike.

Together with fritole and jam filled doughnuts they are a very common sight in the pastry shop windows offering to by-passers a very cheerful Carnival atmosphere.

There are many different names for these sweet wafer-like treats throughout Italy, bugie in Piedmont, frappe or sfrappole in Emilia, cenci and donzelle in Tuscany, chiacchiere and lattughe in Lombardy to name just a few.

It is believed that they originated in the region of Veneto, where they are known as Galani or Crostoli, although their origin is being disputed and other Italian regions have claimed the credit for them.

On the coastal part of Slovenian Istra, once being part of what was called, “The most Serene Republic of Venice,” these sinfully delicious and and fragrant little delights are almost a symbol of the Carnival season, and are called, and known by the locals as hroštole, hroštule or krhki flancati in standard Slovenian.

Traditionally, they are made in quite large quantities as they are meant to last for the whole period of Lent, you will find them in rectangular shapes, but the strips of dough can be cut in different shapes like diamonds or squares, you can cut thinner strips and make knots (bows) or create rafioi (or rafioji) folded like ravioli biscuits that use jam or preserve as a filling.

These sweet Carnival temptations have been part of my life. My nona used to make them every year in huge quantities, and I am sharing here her recipe, and her little secret, she adds a bit of single cream to the dough mixture...

Recipe

Ingredients

  • 250g all purpose flour (white plain flour)

  • 3 egg yolks (room temperature), lightly beaten

  • 2 Tbsp milk

  • 3 Tbsp dark rum or grappa (can use Marsala, brandy or similar)

  • finely grated lemon zest of 1 unwaxed lemon

  • 2Tbsp lemon juice

  • 50g sugar (caster or granulated)

  • pinch of sea salt

  • vanilla icing sugar or plain icing sugar, for dusting, to serve

  • oil for frying

Method

Sift the flour in a fairly large mixing bowl and add lightly beaten egg yolks, milk, rum or grappa, finely grated lemon zest, lemon juice, sugar and a pinch of sea salt.

View fullsize Crostoli 1.jpg
View fullsize Crostoli 2.jpg

Mix well with the fork to incorporate all the ingredients, then gather with your hands to form a fairly firm dough.

Adjust the wetness of the dough by either adding a little flour at the time if the dough is too wet, and on the contrary, gradually adding a bit of milk if the dough is too dry.

View fullsize Crostoli 3.jpg
View fullsize Crostoli 4.jpg

Transfer the dough onto a working surface and work the pastry mix quite intensely for about 10-15 minutes. You should end up with a smooth and elastic dough that does not stick to your hands or the surface, it should be firm, bur fairly soft to the touch.

Shape it into a ball and wrap in cling film and leave it to rest at room temperature for at least 30 minutes, ideally about 1 hour.

Divide the dough into smaller portions (about 150g).

If you have a pasta machine, this is the time to use it, alternatively a rolling pin will do the job just fine.

With the palm of your hand flatten slightly the first portion of the dough.

Sprinkle with a little bit of flour and roll it out with the pasta machine to the widest thickness.

View fullsize Crostoli 6.jpg
View fullsize Crostoli 7.jpg

Fold the short sides of the sheet of dough towards the centre.

View fullsize Crostoli 9.jpg
View fullsize Crostoli 10.jpg

Continue to roll the sheet of dough using an increasingly thinner setting on the pasta machine each time.

Stop rolling when you reach the last and the thinnest setting, and the dough sheet reaches the thickness of about 2mm.

Repeat the process with the remaining portions of the dough.

If you are using rolling pin, roll each portion of the dough to the thickness of a coin, roughly 2mm.

Using a knife or a pastry (cutting) wheel, cut the rolled sheets of dough into rectangles (about 5 x 10 or 2-inch x 4-inch).

Make a couple of incisions in the middle of each strip (parallel to the long side on each one).

This will help the sweet crackers to expand during frying.

View fullsize Crostoli 12.jpg
View fullsize Crostoli 13.jpg

Strips of dough can be cut in different shapes, you can cut thinner strips and make knots (bows).

View fullsize Crostoli 18.jpg
View fullsize Crostoli 19.jpg

You can also create rafioi (or rafioji) folded like ravioli biscuits (to make these, you do not want your pastry to be rolled out too thin). Cut out circles (size of your preference). Place a dab of jam or preserve of your choice in the centre of each circle, fold in half. Pinch well to close and fry.

View fullsize Crostoli 14.jpg
View fullsize Crostoli 15.jpg
View fullsize Crostoli 16.jpg
View fullsize Crostoli 17.jpg

Heat the oil in a frying pan, bring it to the temperature of 170° C.

When the oil reaches the right temperature, place 2-3 (this will depend on the size of your frying pan) rectangles of the dough into the oil.

Fry them turning them on both sides until they are golden brown.

View fullsize Crostoli 24.jpg
View fullsize Crostoli 25.jpg

With the help of slotted spoon or a skimmer remove the crackers.

Place them on a tray or a big plate previously lined with kitchen paper allowing to drain.

View fullsize Crostoli 27.jpg
View fullsize Crostoli 28.jpg

Allow to cool completely, sprinkle with plenty of icing sugar.

Pile them in criss-cross layers on a plate and serve.

They are very fragile so be careful not to break them.

And be mindful of the fact that when you eat them you will be, almost inevitably, covered slightly in a bit of crumbs and icing sugar, is all part of the experience, it is Carnival after all!

Just a thought

These sweet Carnival crackers are best enjoyed as soon as they are made.

They can be stored for about 2-3 days in an airtight containers.

February 15, 2023 /tina oblak
Carnival sweet crackers, Pust, Carnevale, Carnival, Carnival sweet treats, fried sweet pastry, bugie, frappe, sfrappole, cenci, donzelle, chiacchiere, lattughe, hroštoli, hroštule, krhki flancati, rafioi, rafioji, Carnival season sweets
Adriatic Recipe, baking, bite-sized nibbles, breakfast, celebratory desserts, Celebratory dish, dessert, Easy recipe, Enriched dough, festive bakes, festive dessert, festive dish, festive sweet things, Finger food, Istrian gastronomy, Pastry, pudding, Rustic dish, simple recipe, Slovenian cuisine, Slovenian gastronomy, Small bites, Snacks, sweet finger food, sweet nibbles, Sweet Things
Comment

Istrian Pesto Recipe

Beans and Sardines
February 01, 2023 by tina oblak in Adriatic Recipe, All year round recipe, Appetizers, bite-sized nibbles, brunch, Canapés, Fresh herbs, Istrian cuisine, Istrian food, Istrian gastronomy, simple recipe, Slovenian cuisine, Slovenian food, Slovenian gastronomy, Small bites, Snacks, Starters

This quintessentially Istrian Pesto, is a paste like mixture, made with cured pork fat or pancetta, garlic, fresh flat leaf parsley, and sea salt, it is used for adding extra flavour and aroma to the dishes, but equally delicious spread on a slice of fresh or toasted bread.

Istrian food and dishes are quite poor, born out of necessity, and were made from what was available and seasonal.

In the past, people of this land had to be very resourceful and creative with the ingredients they had, and think of ways to enrich poor peasant food, and they came up with ways to flavour what could potentially be bland tasting stews and soups. So, a taca or pest, as locals call it in dialect, was created.

Istrian pesto has very little in common with the Italian styles of pesto sauces used as condiments for pasta, except for the name pesto, which originates from the Italian word pestare (to pound or to crush).

My nona told me that taca (as she refers to it) was used instead of precious cuts of various meats, that would otherwise give the most wonderful taste, but was reserved for special occasions and most certainly not added to everyday meals. 

She went on to tell me that this Istrian paste was exclusively made in the households, done by hand using a very sharp knife with which you could cut this fairly soft cured slab of fat, made from the back fat of the pigs. These delicate slabs of fat were then cured in sea salt for a few months, and the fully cured piece of fat, which is predominantly whitish in colour has a hint of pink, and is rather “sweet” in flavour since fresh pig meat does not absorb salt.

There always has been a strong connection in the region, reminiscent in this country, to the rural life described in many of Thomas Hardy’s novels, to the kind of local culture that comes with a life of hard labour on the farms and fields. Farmers would eat the cured fat either for lunch or as a snack, it would be very thinly sliced on a piece of rustic bread and accompanied by fresh tomatoes, and by a bicerin (a dialect word of Italian origin, indicating a small glass) of red wine. This type of eating kept them strong and fit.My nona also explain to me that there have been times when families kept their own pigs, and nearly everyone in the region was curing the fat in their typical Istrian cellars, which provided the right temperature, and the level of the humidity for the optimum results of the curing process. I very clearly remember my grandfather (nono as I used to call him), curing the fat and hanging it on big metal hooks to dry.

This Istrain taca is not available in the food stores to buy, and these days it is very rarely made with home cured fat. This is why I am sharing here the family recipe for pešt, made with pancetta (as alternative to cured fat) to enrich your stews and soups.

Make sure you always add this flavoursome mixture into cold water at the very beginning of cooking, as the fat will gradually dissolve into the dish (without making it fat or greasy!) and it will eventually completely disappear.

When you add the paste to the cold water it will at first most probably float, do not worry since this is quite normal. You can just take a fork and break the lump of paste pressing it against the wall of the pan until you break it completely and give a good stir.

Recipe

Ingredients

  • 100g pancetta or cured lard in one piece (can use already sliced pancetta)

  • 2-3 cloves of garlic, peeled and pressed 

  • a handful of fresh flat leaf parsley (about 7g), finely chopped 

  • sea salt

  • black pepper

Method

Cut the pancetta into small pieces.

Transfer into a small food processor, add crushed garlic, finely chopped fresh flat leaf parsley, and a pinch of sea salt.

Blitz all the ingredients together until you obtain a paste like consistency. 

View fullsize Istrian Pesto 3.jpg
View fullsize Istrian Pesto 4.jpg

Enjoy spread on a slice of fresh or toasted bread, or add to dishes to enrich the flavour.

February 01, 2023 /tina oblak
fresh flat leaf parsley, sea salt, black pepper, cured lard, pancetta, smoked pancetta, garlic, make ahead
Adriatic Recipe, All year round recipe, Appetizers, bite-sized nibbles, brunch, Canapés, Fresh herbs, Istrian cuisine, Istrian food, Istrian gastronomy, simple recipe, Slovenian cuisine, Slovenian food, Slovenian gastronomy, Small bites, Snacks, Starters
Comment

Ricotta or Curd Cheese Strudel Recipe

Beans and Sardines
January 25, 2023 by tina oblak in Adriatic Recipe, breakfast, Central European recipes, dessert, Eastern European recipes, easy baking, Easy recipe, Istrian cuisine, Istrian food, Istrian gastronomy, Mitteleuropean cuisine, Mitteleuropean food, Mitteleuropean recipes, pudding, Slovenian cuisine, Slovenian food, Slovenian gastronomy, Snacks, sweet course, sweet finger food, sweet nibbles, Sweet Things

Ricotta cheese strudel is a variation of a traditional, well known and quintessentially Viennese Apple Strudel, it is a very scrumptious dessert, made with very thin, elastic pastry, and the filling contains ricotta or curd cheese, sugar, vanilla bean extract, eggs yolks, grated lemon zest and raisins soaked in dark rum, grappa or just lukewarm water.

Apple strudel was first mentioned in 1696, and later conquered all the countries that were once ruled by the Austro-Hungarian Empire, and curd cheese strudel is as popular and traditional in Austria as the famous Apple strudel.

All three types of strudels (apple, curd cheese and cherry) are very much loved in the North Adriatic, in Slovenian Istra, where I come from, and in the neighbouring city of Trieste, in Italy, and part of its province.

Ricotta strudel is regularly and traditionally baked with curd cheese (called skuta in Slovenian) in local households, and sometimes, if you are lucky enough, you might find it in more informal family run restaurants (skutin štrudelj or skutin zavitek).

This very delicious sweet treat really takes me back to my childhood, not only my mother frequently baked it, we also had it for school dinner as a pudding, and it did go down a treat.

I am sharing here my mother's recipe for ricotta strudel, this slightly off the beaten track recipe, made with home made pastry, but if you are too daunted by the idea of making your own dough, or simply do not have time to make it, you can still indulge yourself, and cut corners a bit by using store bought ready made pastry.

Recipe

Ingredients

Will make two separate strudels.

You can use store bought ready made puff pastry, shortcrust or filo pastry.

Ingredients for home-made strudel dough

  • 250g all purpose flour

  • 1 egg, lightly beaten

  • 3 Tbsp neutral tasting vegetable oil (I used sunflower oil)

  • 2 Tbsp white wine vinegar or lemon juice

  • sea salt, a pinch

  • 60ml lukewarm water, or as needed

Ingredients for ricotta or curd cheese filling

  • 500g ricotta or curd cheese

  • 100g raisins

  • 2 egg yolks

  • 80g caster sugar (I recommend 100g of sugar if using curd cheese as more acidic compared to ricotta)

  • 1 ½ vanilla bean extract

  • 1 unwaxed lemon, finely grated zest

  • 3 Tbsp dark rum, grappa or lukewarm water (for soaking the raisins)

  • generous knob of butter, melted (for brushing the strudels before baking them)

Method

Before starting with the recipe, place the raisins in a small bowl, pour dark rum, grappa or lukewarm water over them, and let them soak and plump up for about 30 minutes (you can leave them to soak for longer or overnight).

To make the dough

Sift the flour in a big mixing bowl and make a well.

In a separate, smaller bowl, mix slightly beaten egg, oil, vinegar or lemon juice, (the acidity will help to relax gluten in the flour making the dough more stretchy) a pinch of sea salt, and lukewarm water. Pour the mixture into a flour well.

With the fork, stir the mixture with the flour until well combined. Only if the mixture is very wet and sticky, add a little bit of flour at a time, until the dough comes nicely together, then work the dough with your hands.

Transfer the dough on a lightly floured working surface and knead the dough for about 10 minutes or until nice and smooth.

After this time, the dough should be moist and elastic and not sticky. Add a little more flour if the dough is too sticky to knead.

In order to further encourage the development of the gluten, resulting in a very elastic dough, slam the dough onto the working surface a few times.

Shape the dough into a smooth ball and place it in a clean bowl, previously brushed with oil.

Cover the bowl with cling film and let the dough rest for about 30-60 minutes at room temperature (strudel dough has no yeast, so do not expect the dough to rise or double in size, it needs to rest for gluten to relax).

View fullsize Apple Strudel 4.jpg
View fullsize Apple Strudel 5.jpg

To make the filling

Place ricotta or curd cheese in a fairly large bowl and stir.

Add caster sugar, vanilla bean extract, egg yolks, grated lemon zest and mix well all the ingredients.

View fullsize Ricotta strudel 1.jpg
View fullsize Ricotta strudel 2.jpg

Drain the raisins, remove excess liquid, add to the mixture.

Set aside for later use.

Preheat the oven to 190C static or equivalent.

View fullsize Ricotta strudel 3.jpg
View fullsize Ricotta strudel 4.jpg

Divide the dough in half to make two separate strudels (easier to work with).

Place half of the dough on a clean and lightly floured table cloth. Flour the rolling pin and start rolling out the dough. While rolling, to prevent sticking, flour the dough and the surface every now and then.

When the dough reaches about 20 cm in diameter pick it up and keep stretching it. The best way to do so is to use the back of your hands, and in particular the knuckles, but make sure you remove any sharp jewellery first.

When the dough becomes difficult to handle as it becomes bigger and thinner, place it on a lightly floured tablecloth.

With your hands (tip of the fingers) keep stretching gently the dough on the tablecloth to paper thin consistency, from the inside to the outside working your way round the sheet of dough.Keep stretching until the sheet of dough starts to look almost translucent and you will be able to see a pattern of your tablecloth through it.You should end up with a thin sheet of dough stretched more or less into a rectangular shape with a diameter of approximately 40 cm which will fit into a standard 40 cm baking tray.

If you notice that the edges are still a bit thick, stretch them further very gently, or cut them off. If you leave the edges thick, when rolling the strudel, they will form quite a thick layer at the very centre of the strudel risking to remain slightly underbaked.

View fullsize Ricotta strudel 5.jpg
View fullsize Ricotta strudel 6.jpg

Place and spoon evenly half of the ricotta mixture (you will use the other half of the mixture to make a second strudel) over ¾ of the dough sheet leaving about 2-3cm to the edge.

View fullsize Ricotta strudel 8.jpg
View fullsize Ricotta strudel 9.jpg

Fold in the side ends of the sheet to prevent filling coming out during rolling.

Fold in the side ends of the sheet to prevent filling coming out during rolling.

Using the tablecloth to help you, roll the dough all the way and roll it directly onto a sheet of baking parchment, seam side down.Transfer very gently the baking parchment with the rolled strudel on a baking tray.

Repeat the process with the other half of the dough to make a second strudel.

View fullsize Ricotta strudel 10.jpg
View fullsize Ricotta strudel 11.jpg

Brush both strudels with a bit of melted butter.

View fullsize Ricotta strudel 12.jpg
View fullsize Ricotta strudel 13.jpg

Bake in the preheated oven on the middle shelf for about 40-45 minutes, or until the strudel crust turns nice golden in colour.

Take it out of the oven and let it cool a bit.

Serve it slightly warm or at room temperature.

Dust with regular icing sugar or vanilla icing sugar, cut into slices and serve it on its own or with custard.

Just a thought

You can make the strudel dough ahead and keep it refrigerated in an airtight container for up to two days. Before using the dough take it out of the fridge allowing it to come to a room temperature.

Ricotta strudel is best eaten the day is made. You can keep it in an airtight container in the fridge for 3-4 days or overnight on the counter.

You can make a less traditional version of this strudel and replace raisins for chocolate chips in the ricotta filling.

Wine suggestion

Colli Orientali del Friuli Verduzzo Sottozona Cialla DOC “Verduzzo di Cialla” 2017 - Ronchi di Cialla

January 25, 2023 /tina oblak
strudel pastry, home made strudel pastry, filo pastry, shortcrust pastry, ready made puff pastry, ricotta, ricotta cheese, curd cheese, raisins
Adriatic Recipe, breakfast, Central European recipes, dessert, Eastern European recipes, easy baking, Easy recipe, Istrian cuisine, Istrian food, Istrian gastronomy, Mitteleuropean cuisine, Mitteleuropean food, Mitteleuropean recipes, pudding, Slovenian cuisine, Slovenian food, Slovenian gastronomy, Snacks, sweet course, sweet finger food, sweet nibbles, Sweet Things
Comment
  • Newer
  • Older