Beans and Sardines

  • Home
  • About
  • Recipe of the week
  • Recipes
  • Wines
  • Contact

Easter Eggs Dyed with Onion Skins Recipe

Beans and Sardines
March 29, 2023 by tina oblak in Adriatic Recipe, breakfast, brunch, Canapés, Celebratory dish, Easter, Easter recipes, Easter treats, Easy recipe, foraging, Fresh herbs, Istrian cuisine, Istrian gastronomy, Rustic dish, savory nibbles, simple recipe, Slovenian cuisine, Slovenian food, Slovenian gastronomy, Small bites, Snacks, Spring recipe, Starters

The tradition and the roots of dyeing the eggs over the Easter Period of celebrations now might be linked by many to modern and commercial aspect of Easter, but as a matter of fact, it takes us back to the history of the celebration of these events. It is believed that the custom of dying or colouring Easter Eggs started with the early Christians in Mesopotamia.

The eggs were dyed in various colours to represent and symbolise different aspects of the Easter story, yellow represents the resurrection, blue represents love and red represents the blood of Jesus Christ that was shed on the Cross for the sins of the world.

This tradition would spread over time through Catholic and Protestant churches in Europe, even though in pagan cultures eggs were a symbol of rebirth and fertility, and the arrival of Spring. It is another example of the early Church adapting, transforming existing pagan rites, and rituals to the Christian story and its message for the world.

In Slovenian Istra, where I come from, and all the regions of Slovenia, dying eggs during the Easter festivities is a deeply rooted tradition and has passed, luckily, the tests of modern times; Christians and non-Christians can get involved with this fun and family friendly activity. One of the most popular and inexpensive way to colour the eggs is using onion skins.

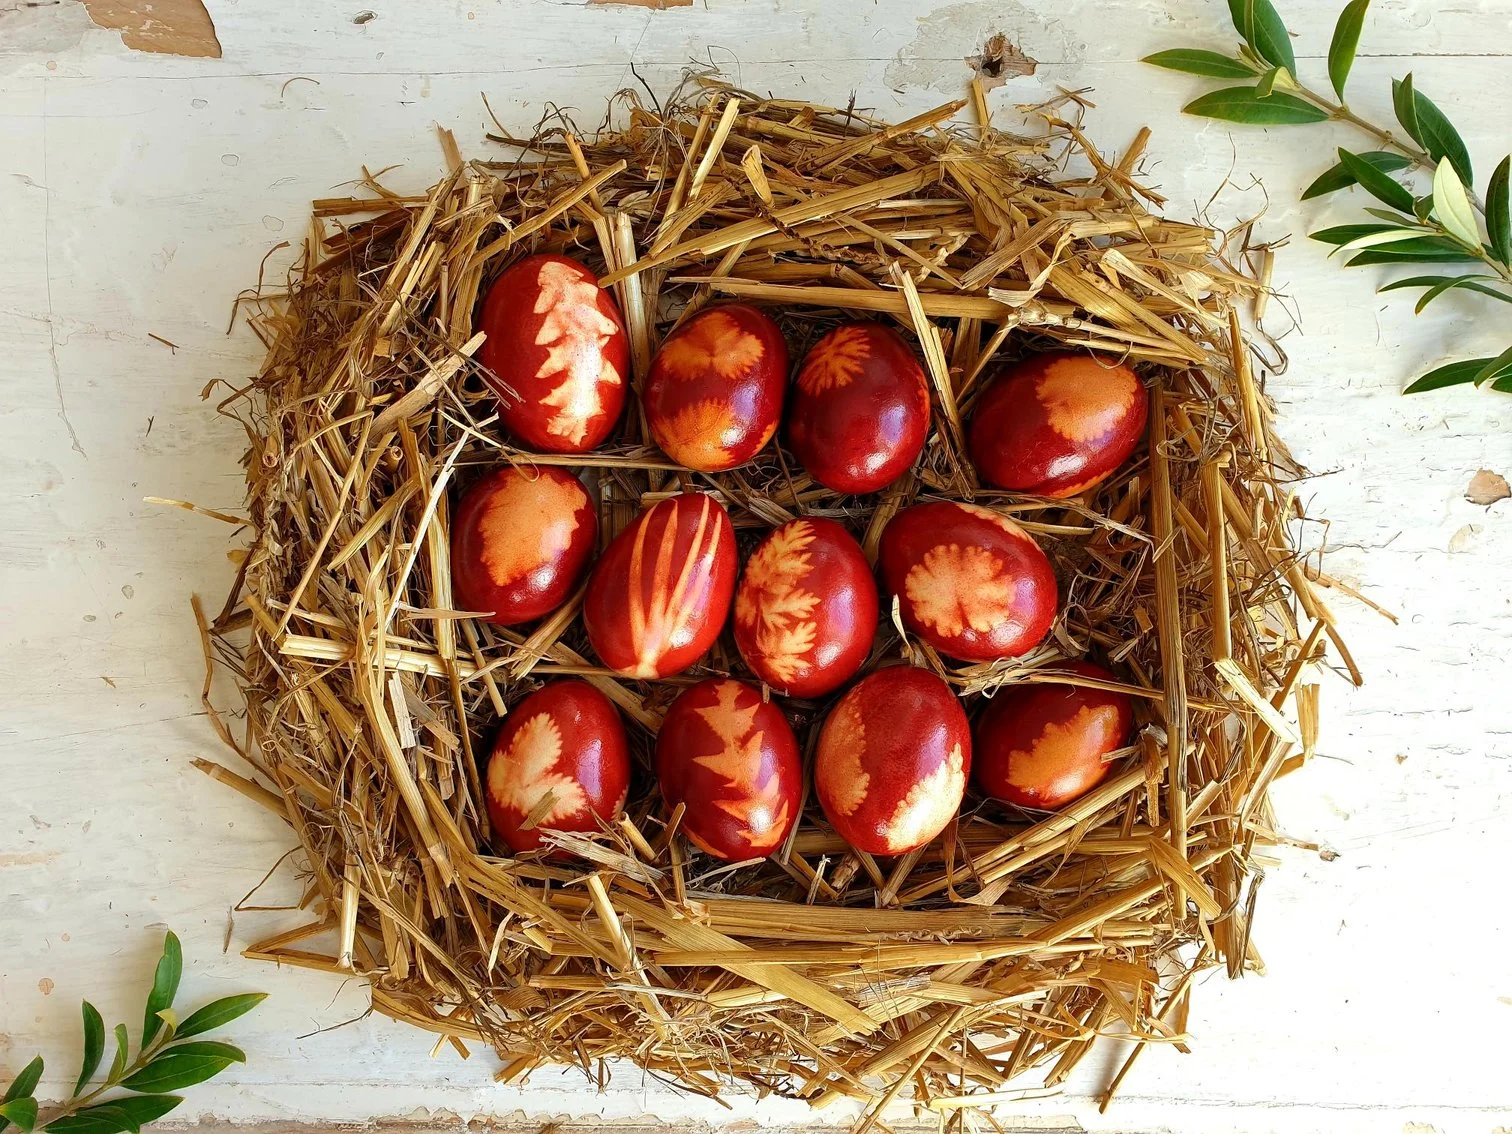
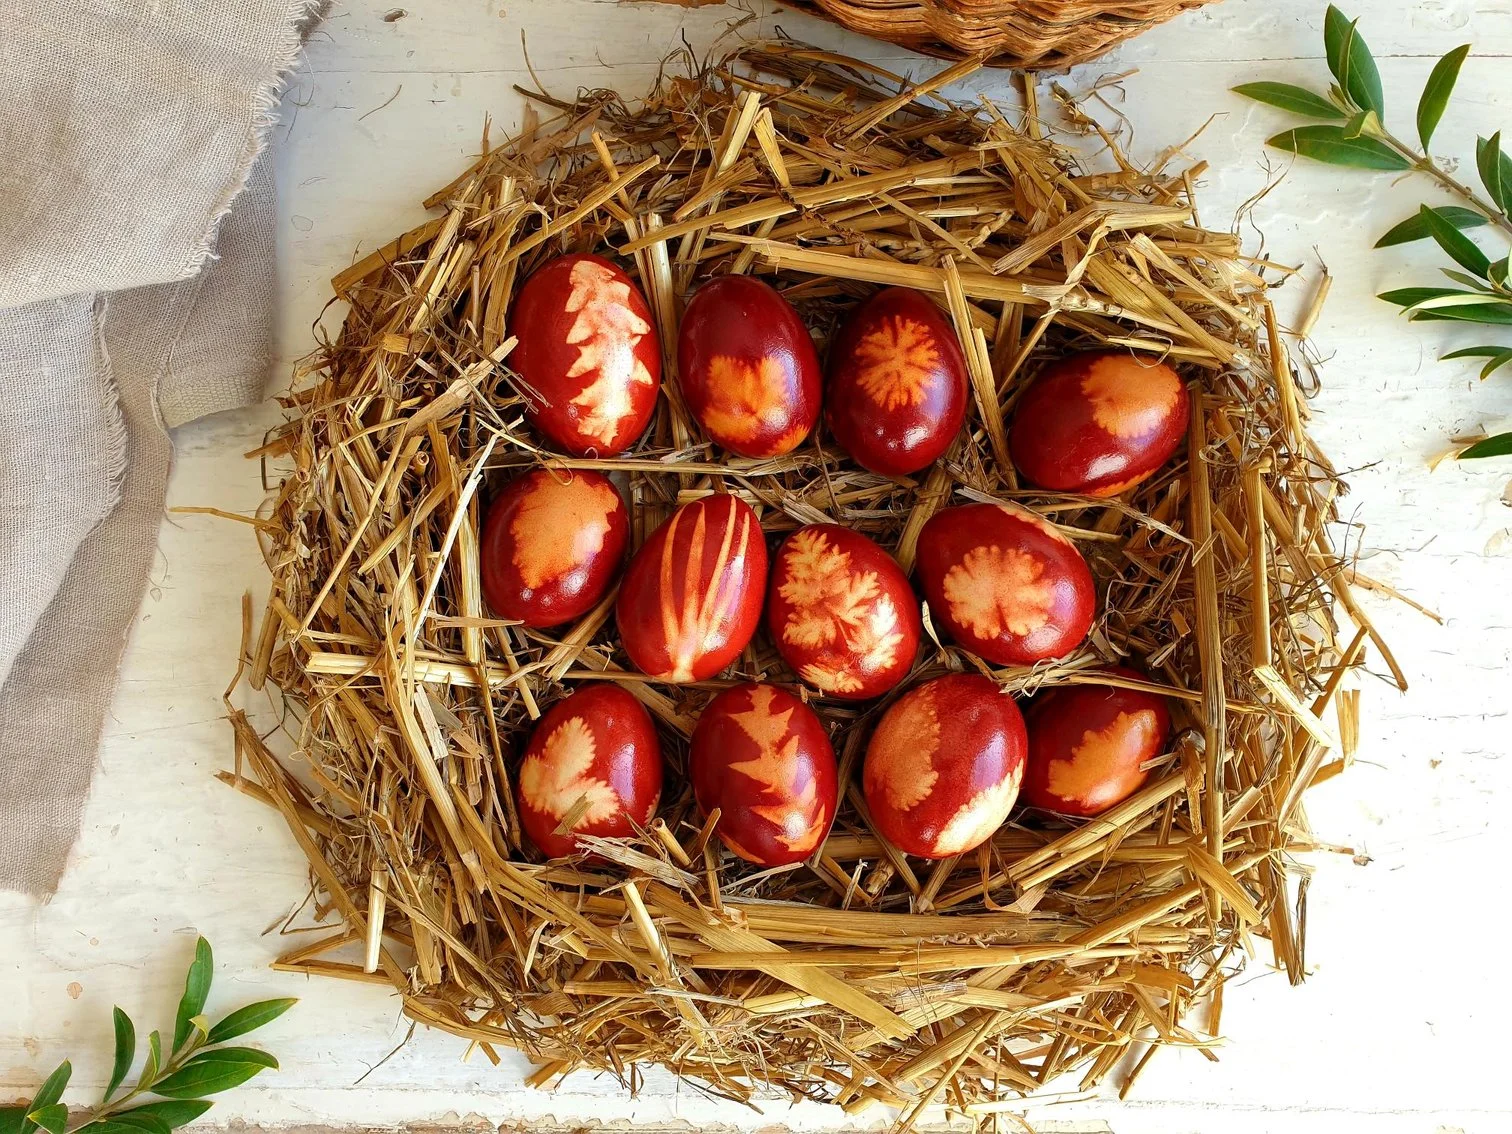
I am sharing here how the eggs have been decorated with fresh herbs leaves and flowers and dyed with onion skins in my family for generations.

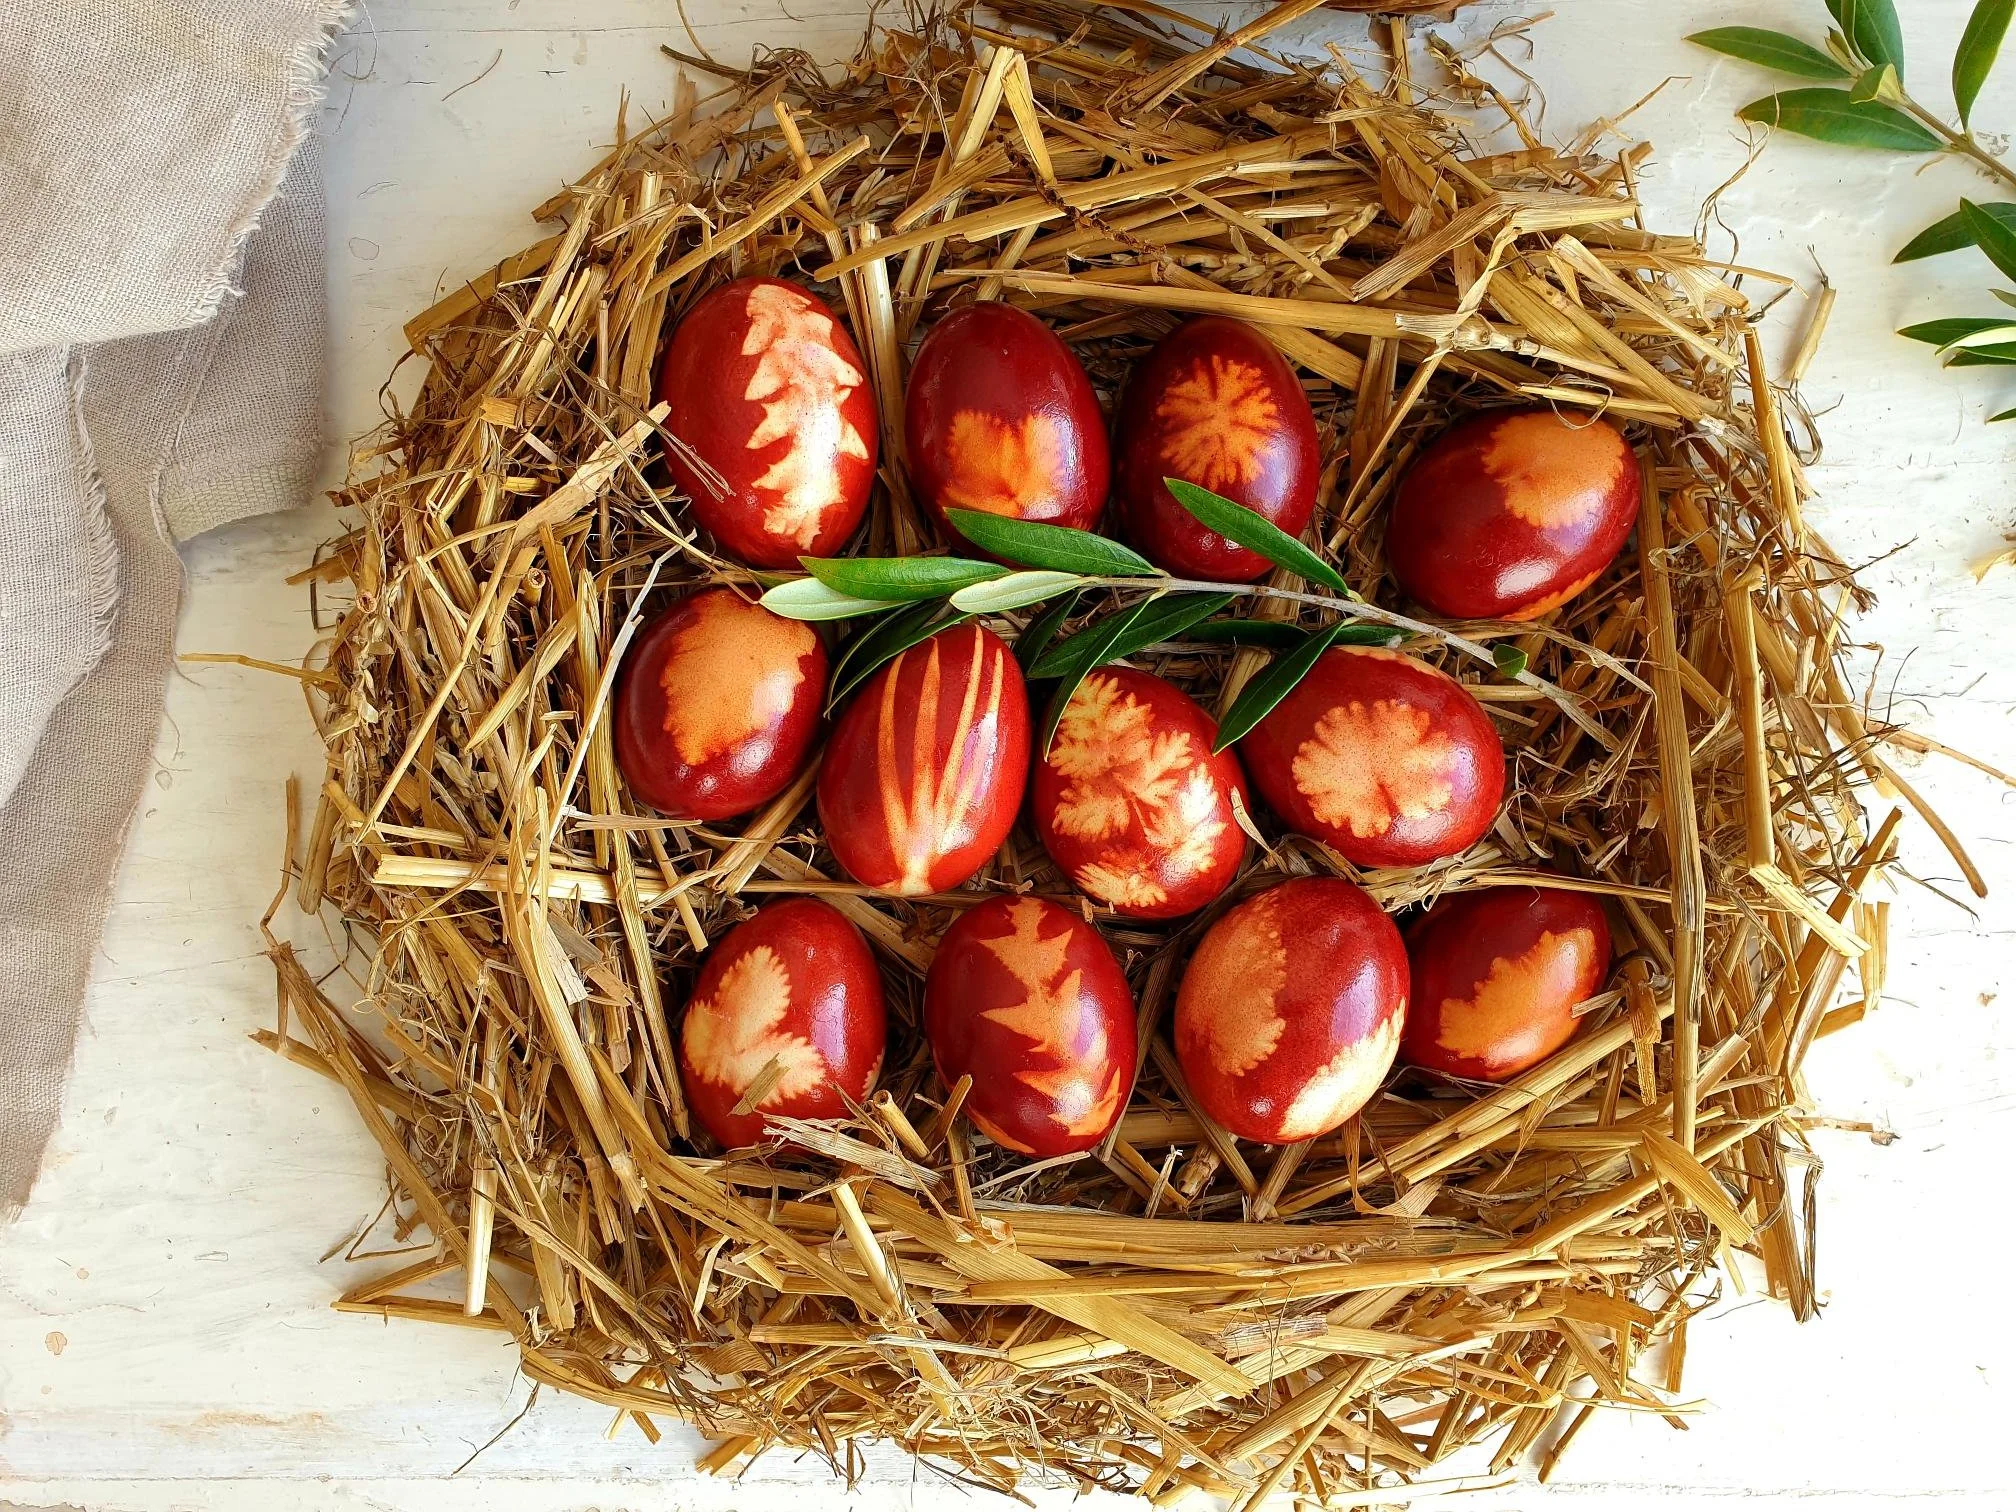
The beautifully decorated and dyed eggs would be put in a wicker basket together with cooked ham, sweet Easter Bread (Pinca) and taken to Mass on Holy Saturday or early on Easter Sunday to be blessed, and only after being blessed, the food was taken from the basket, shared and enjoyed.

Recipe

In this recipe I am using different types of leaves from fresh herbs to decorate the eggs before dying them. If you are short of time however, or not feeling up to the task, you can easily skip the step of decorating the eggs and just colour them, and they will be equally beautiful.

Ingredients

  • 12 eggs at room temperature (white or brown shell eggs or a mixture of both). You can easily change the quantity of the eggs used according to your needs.

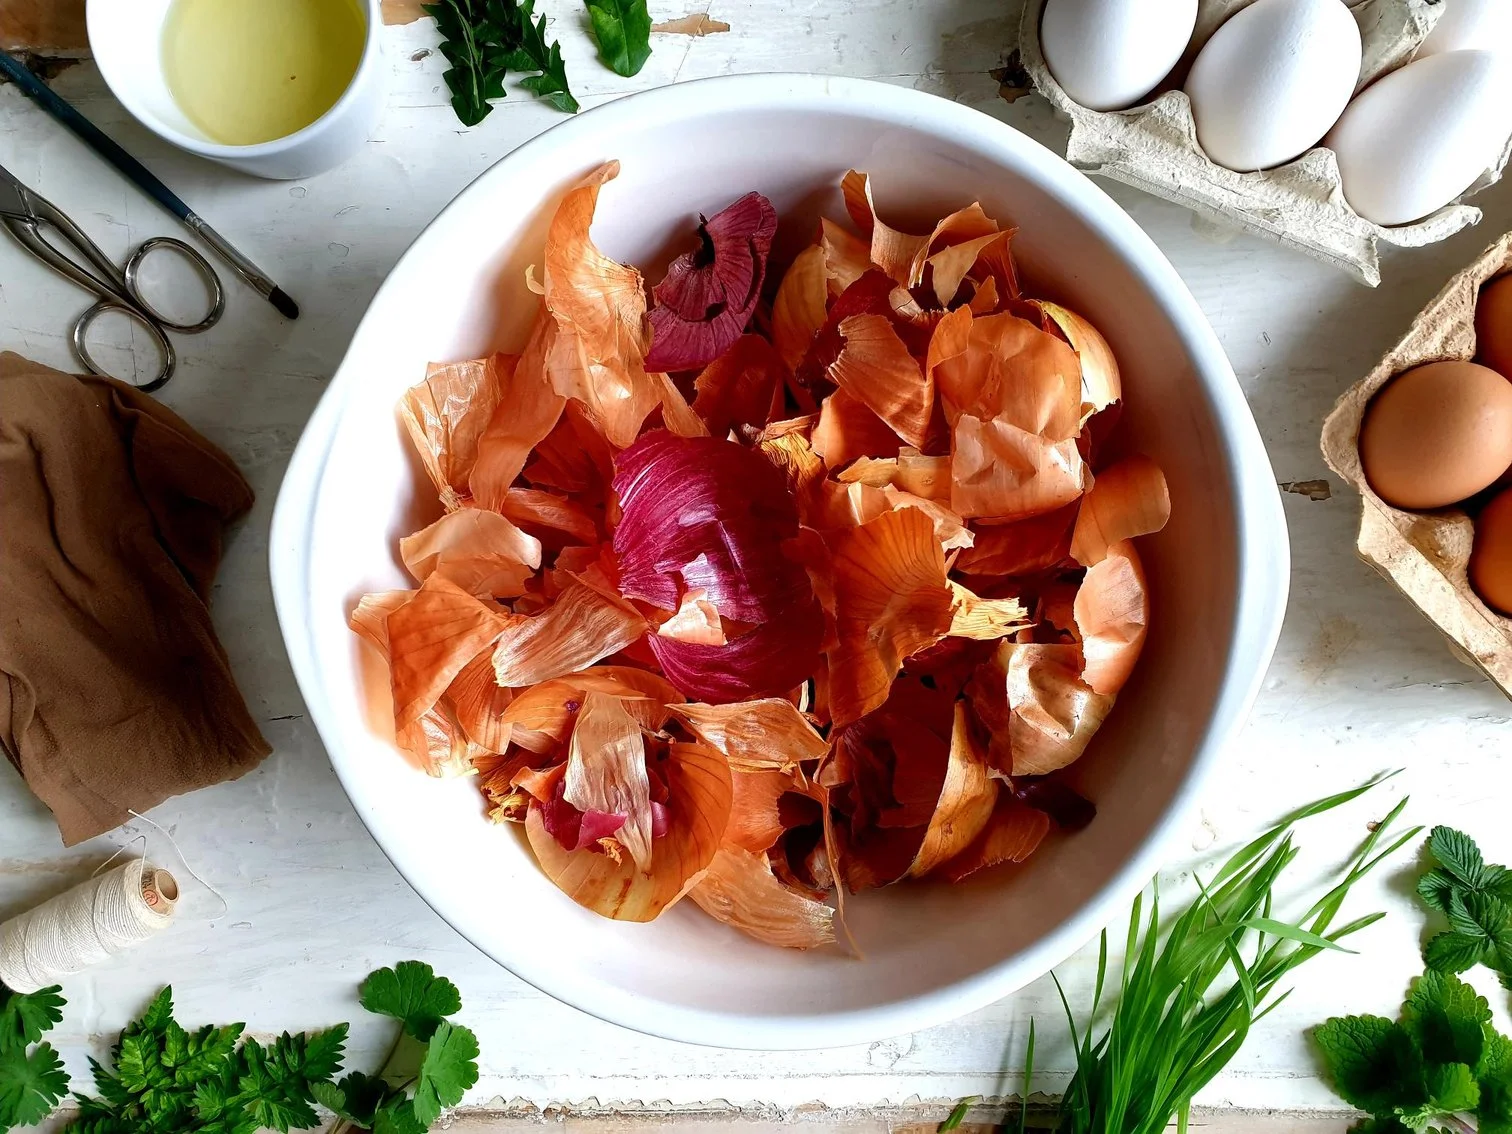
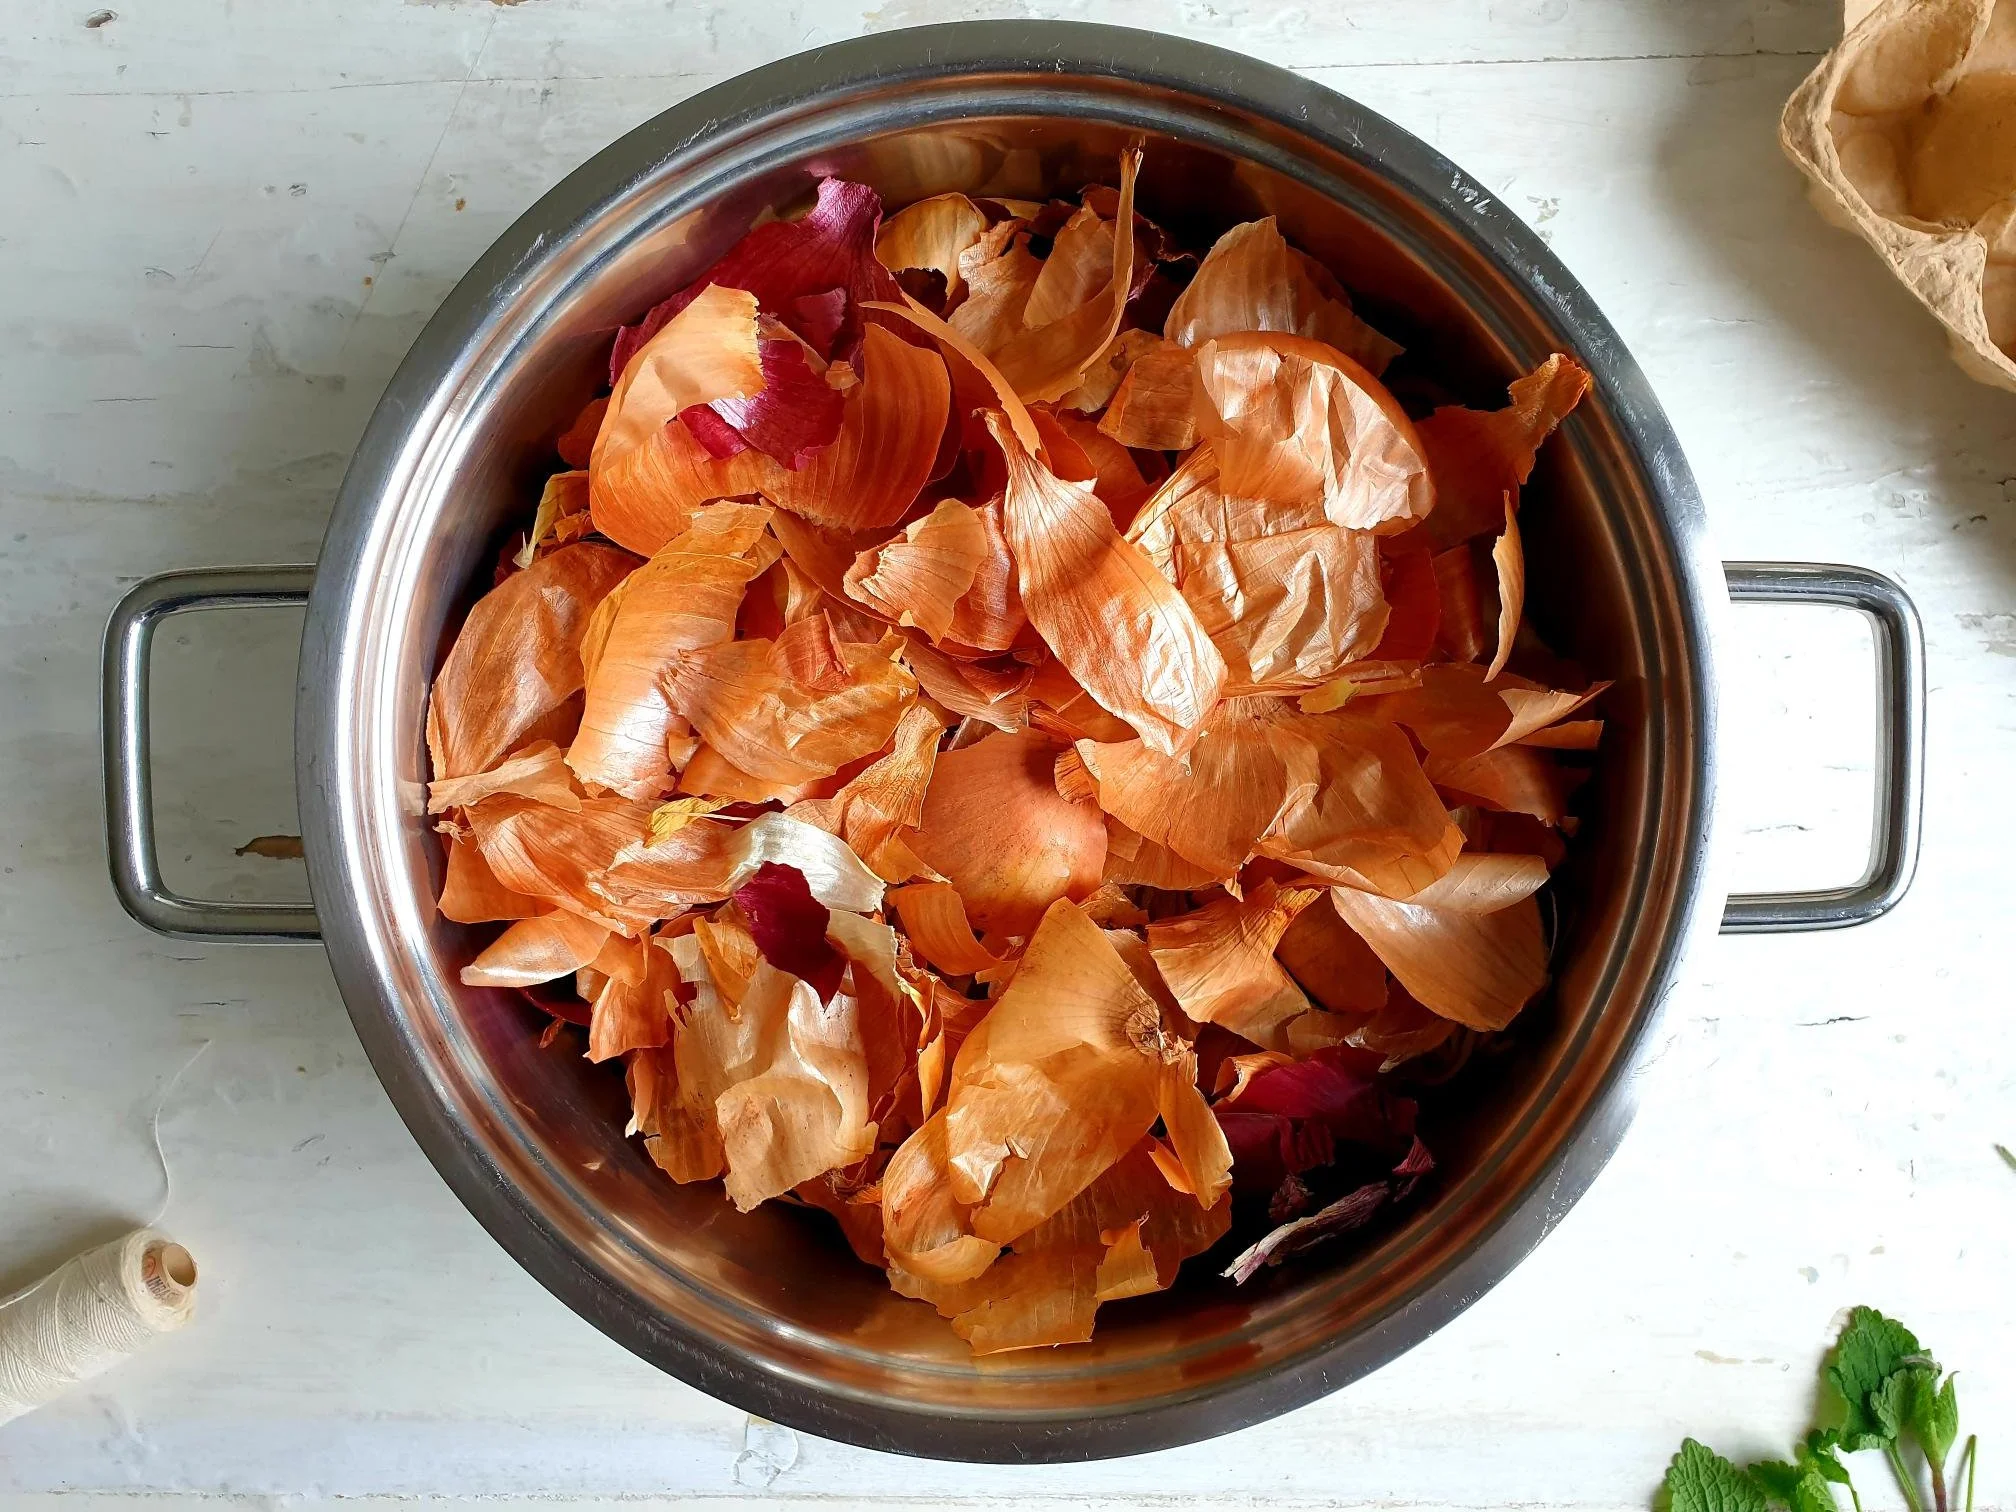
  • big mixing bowl full of dry onion skins (from yellow or red onions or a mixture of both), roughly 3-4 handfuls

  • 2 Tbsp white vinegar

  • 1 egg white

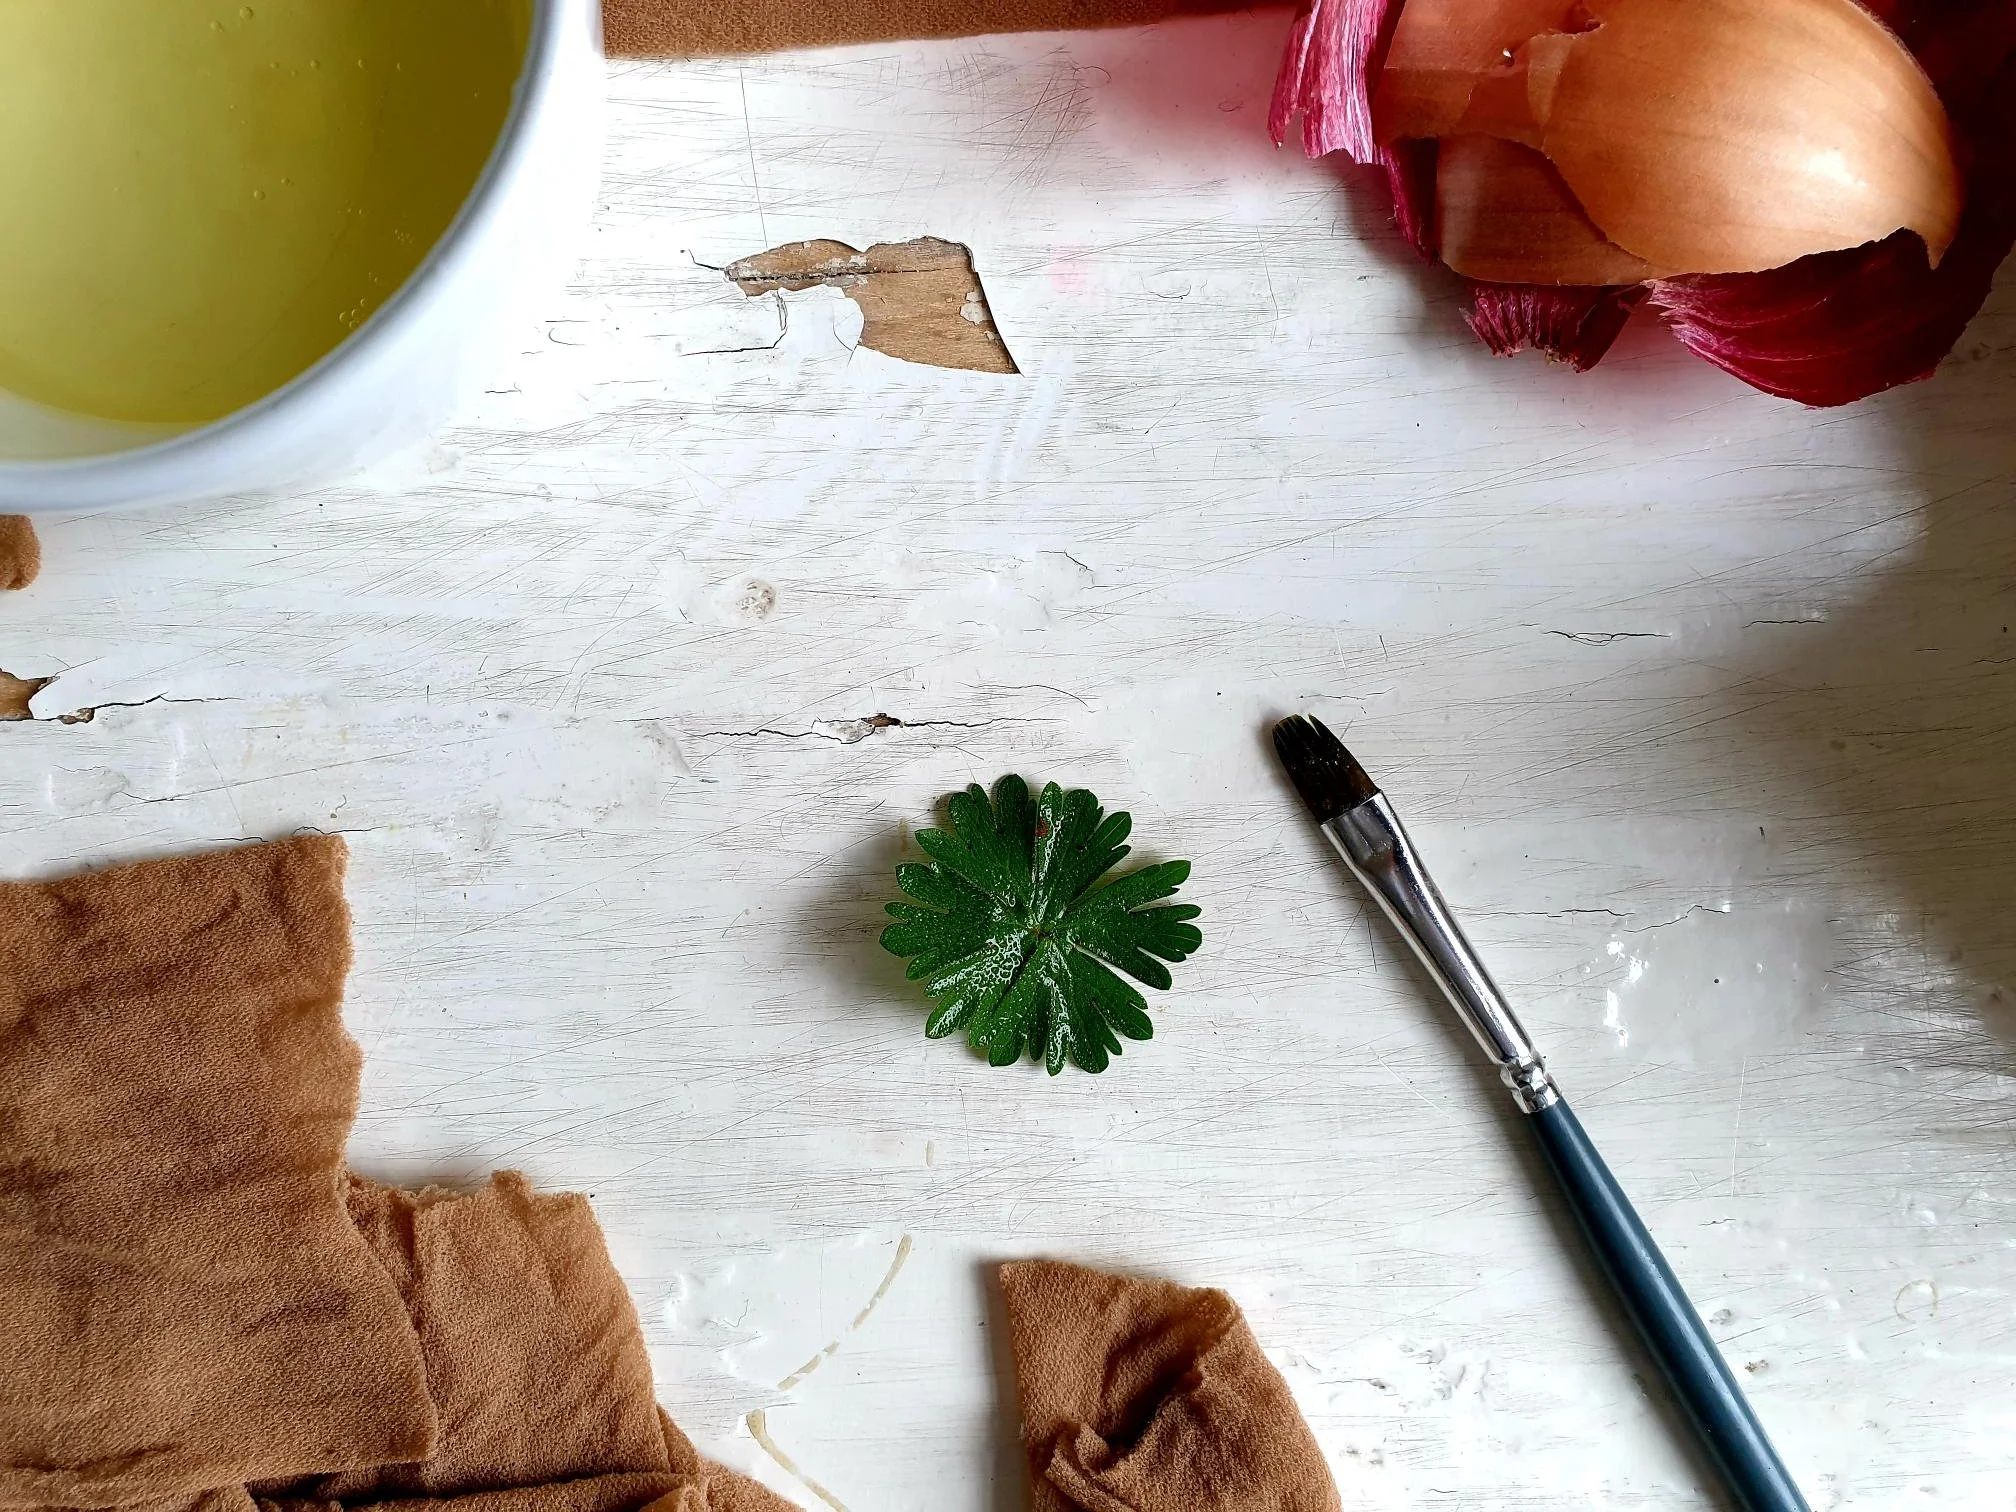
  • a selection of fresh herbs and flowers (from the garden or a meadow)

You will also need

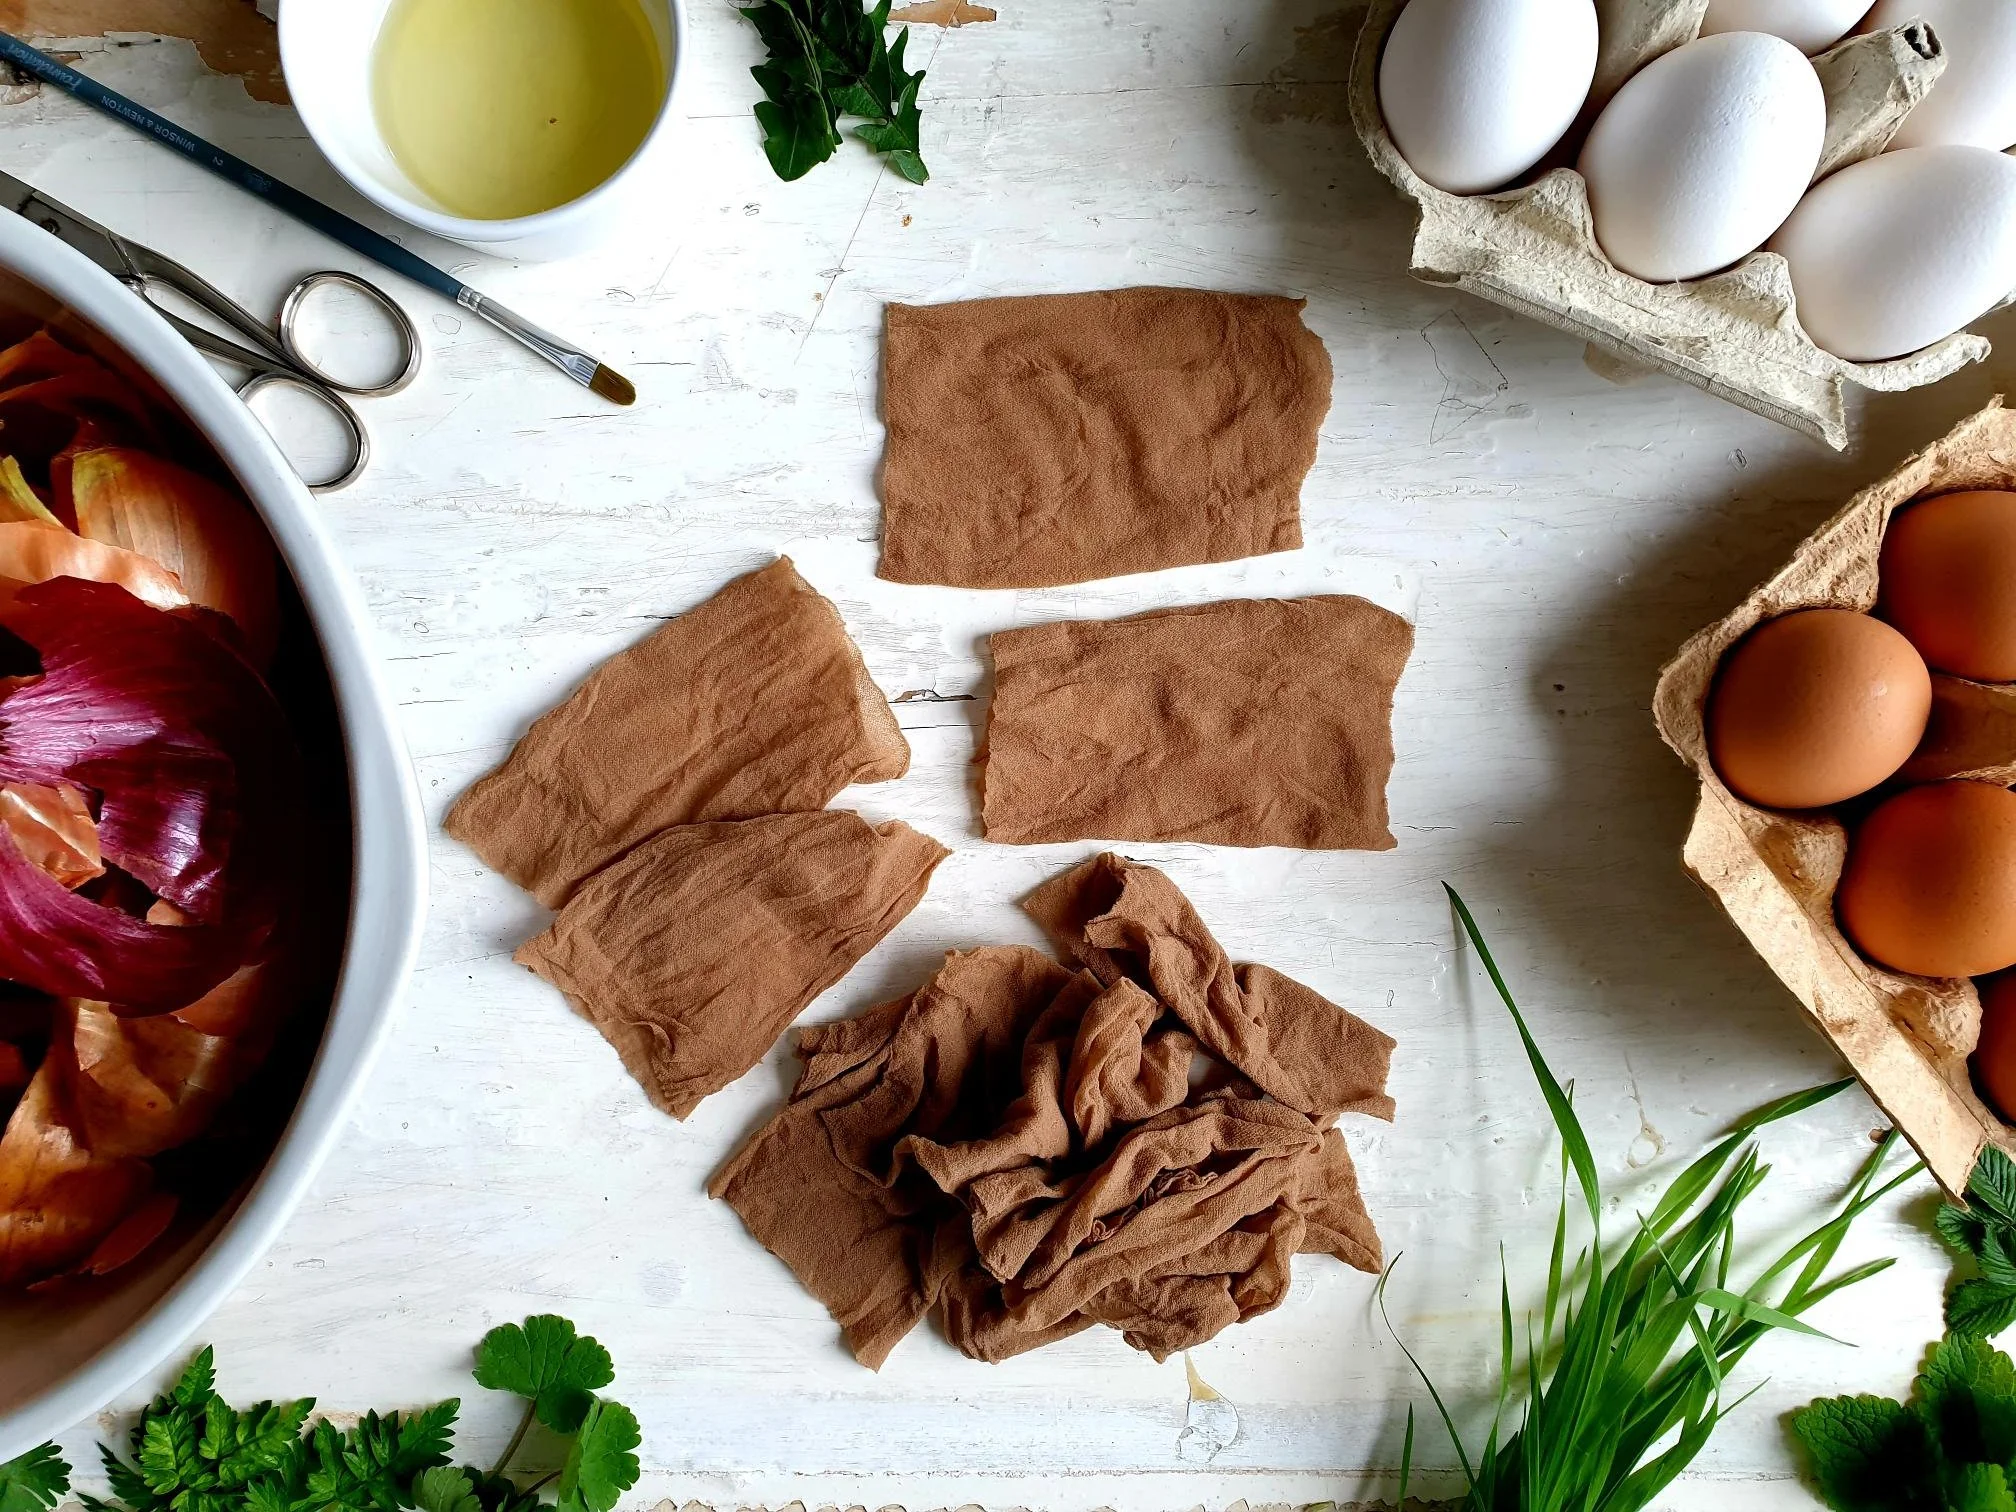
  • some old ladies’ nylon tights (quite thin,15 Denier or less)

  • scissors

  • cotton thread or thin string

  • paint brush

  • a big pot

  • vegetable oil

Method

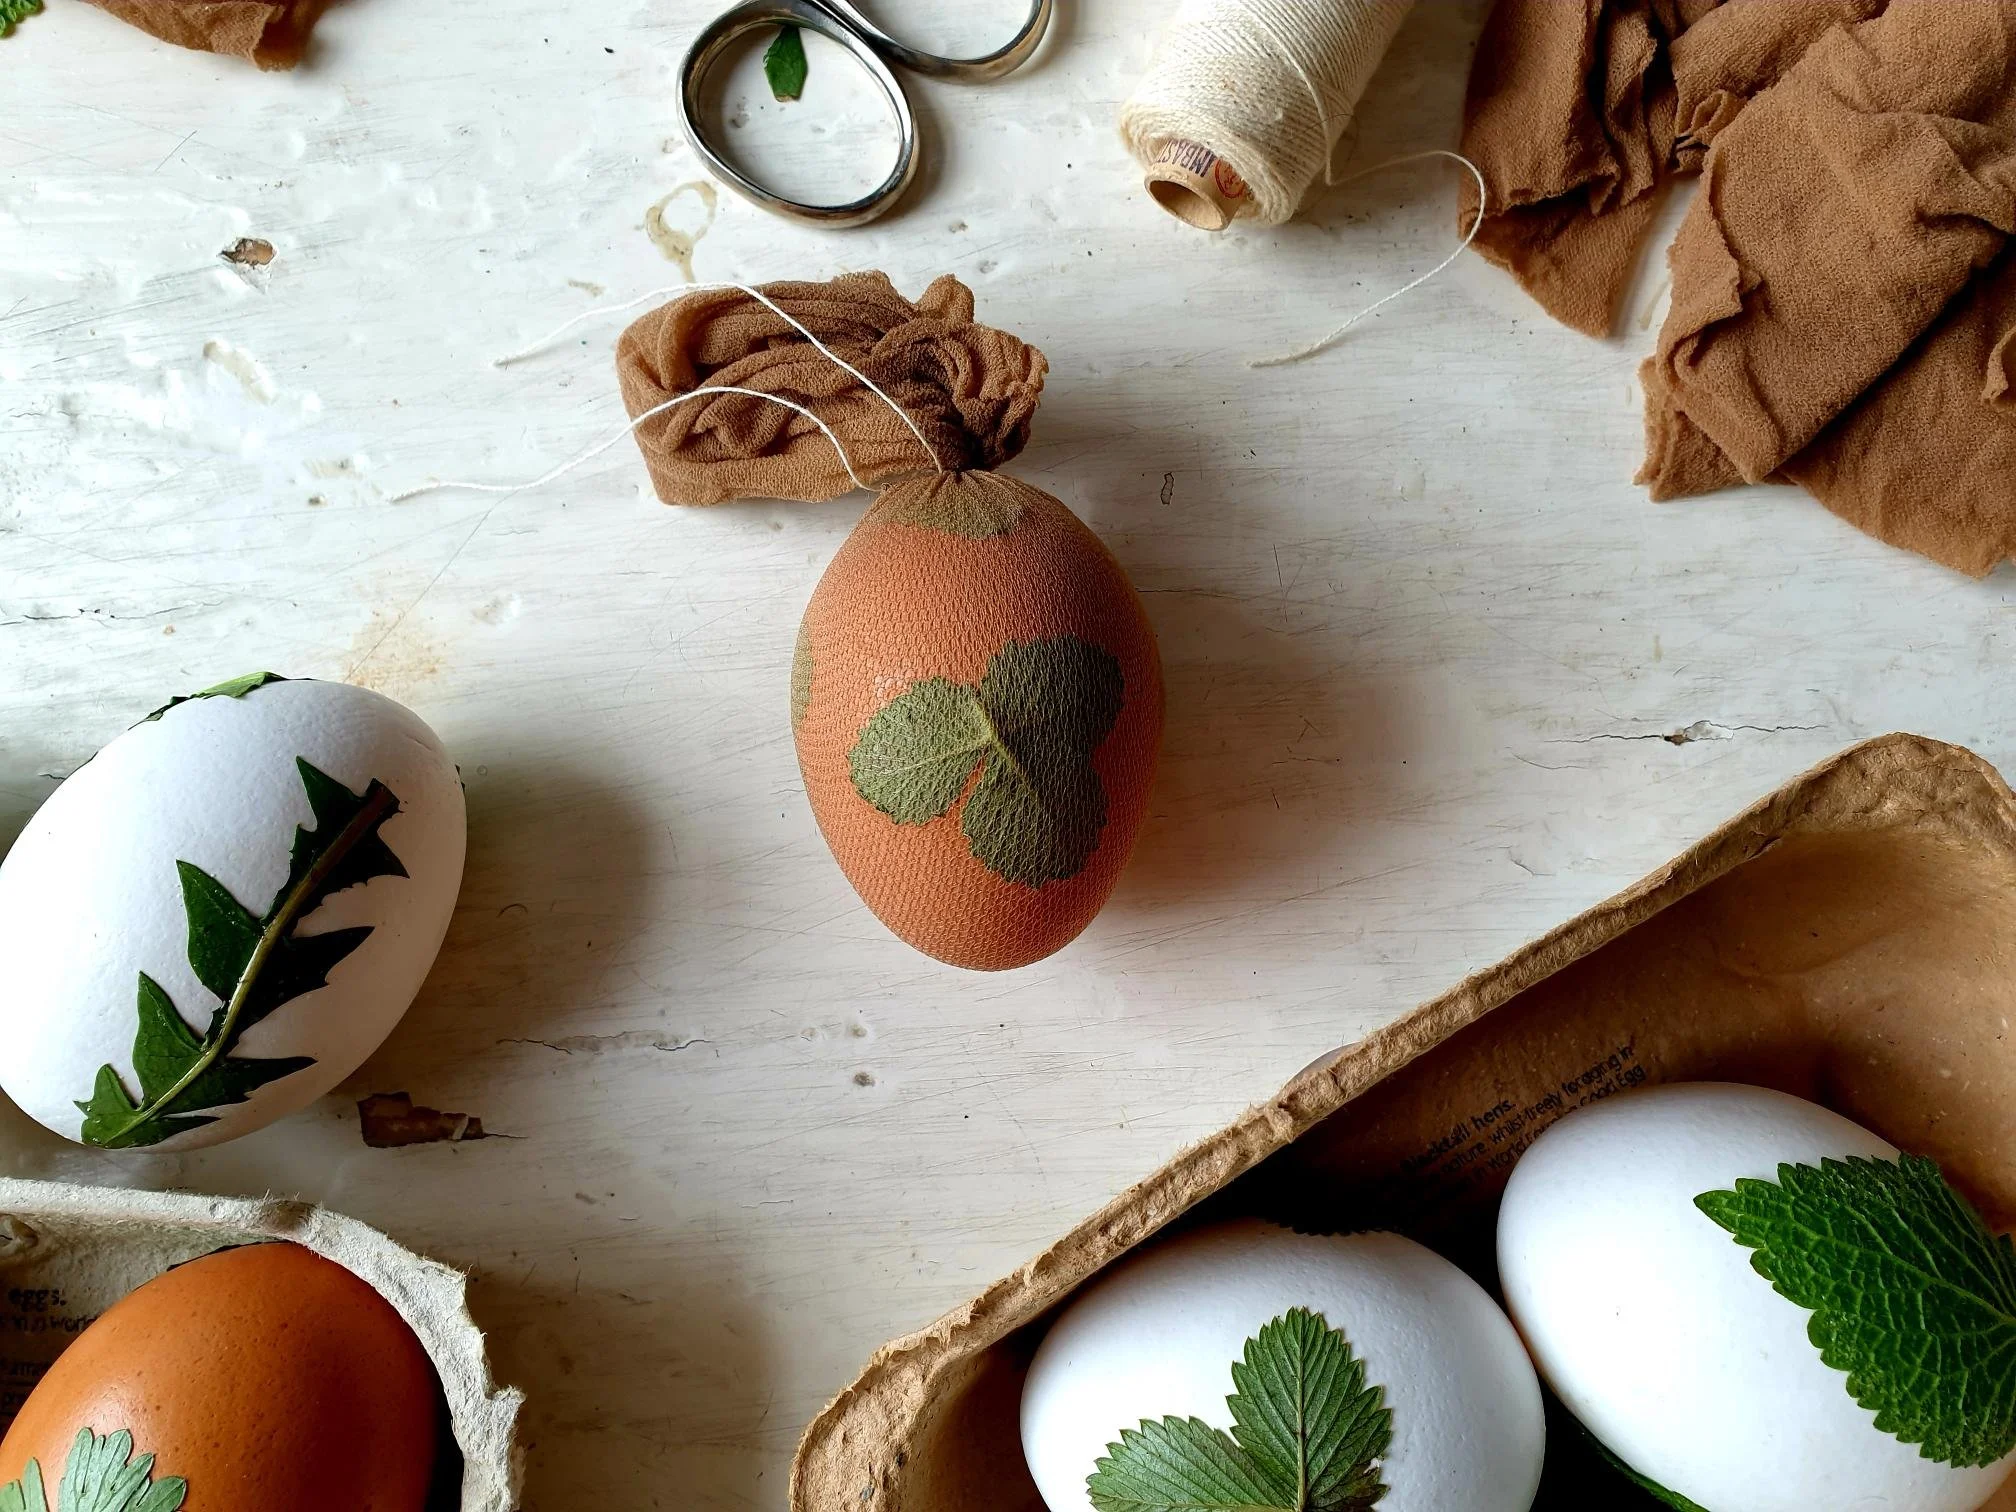
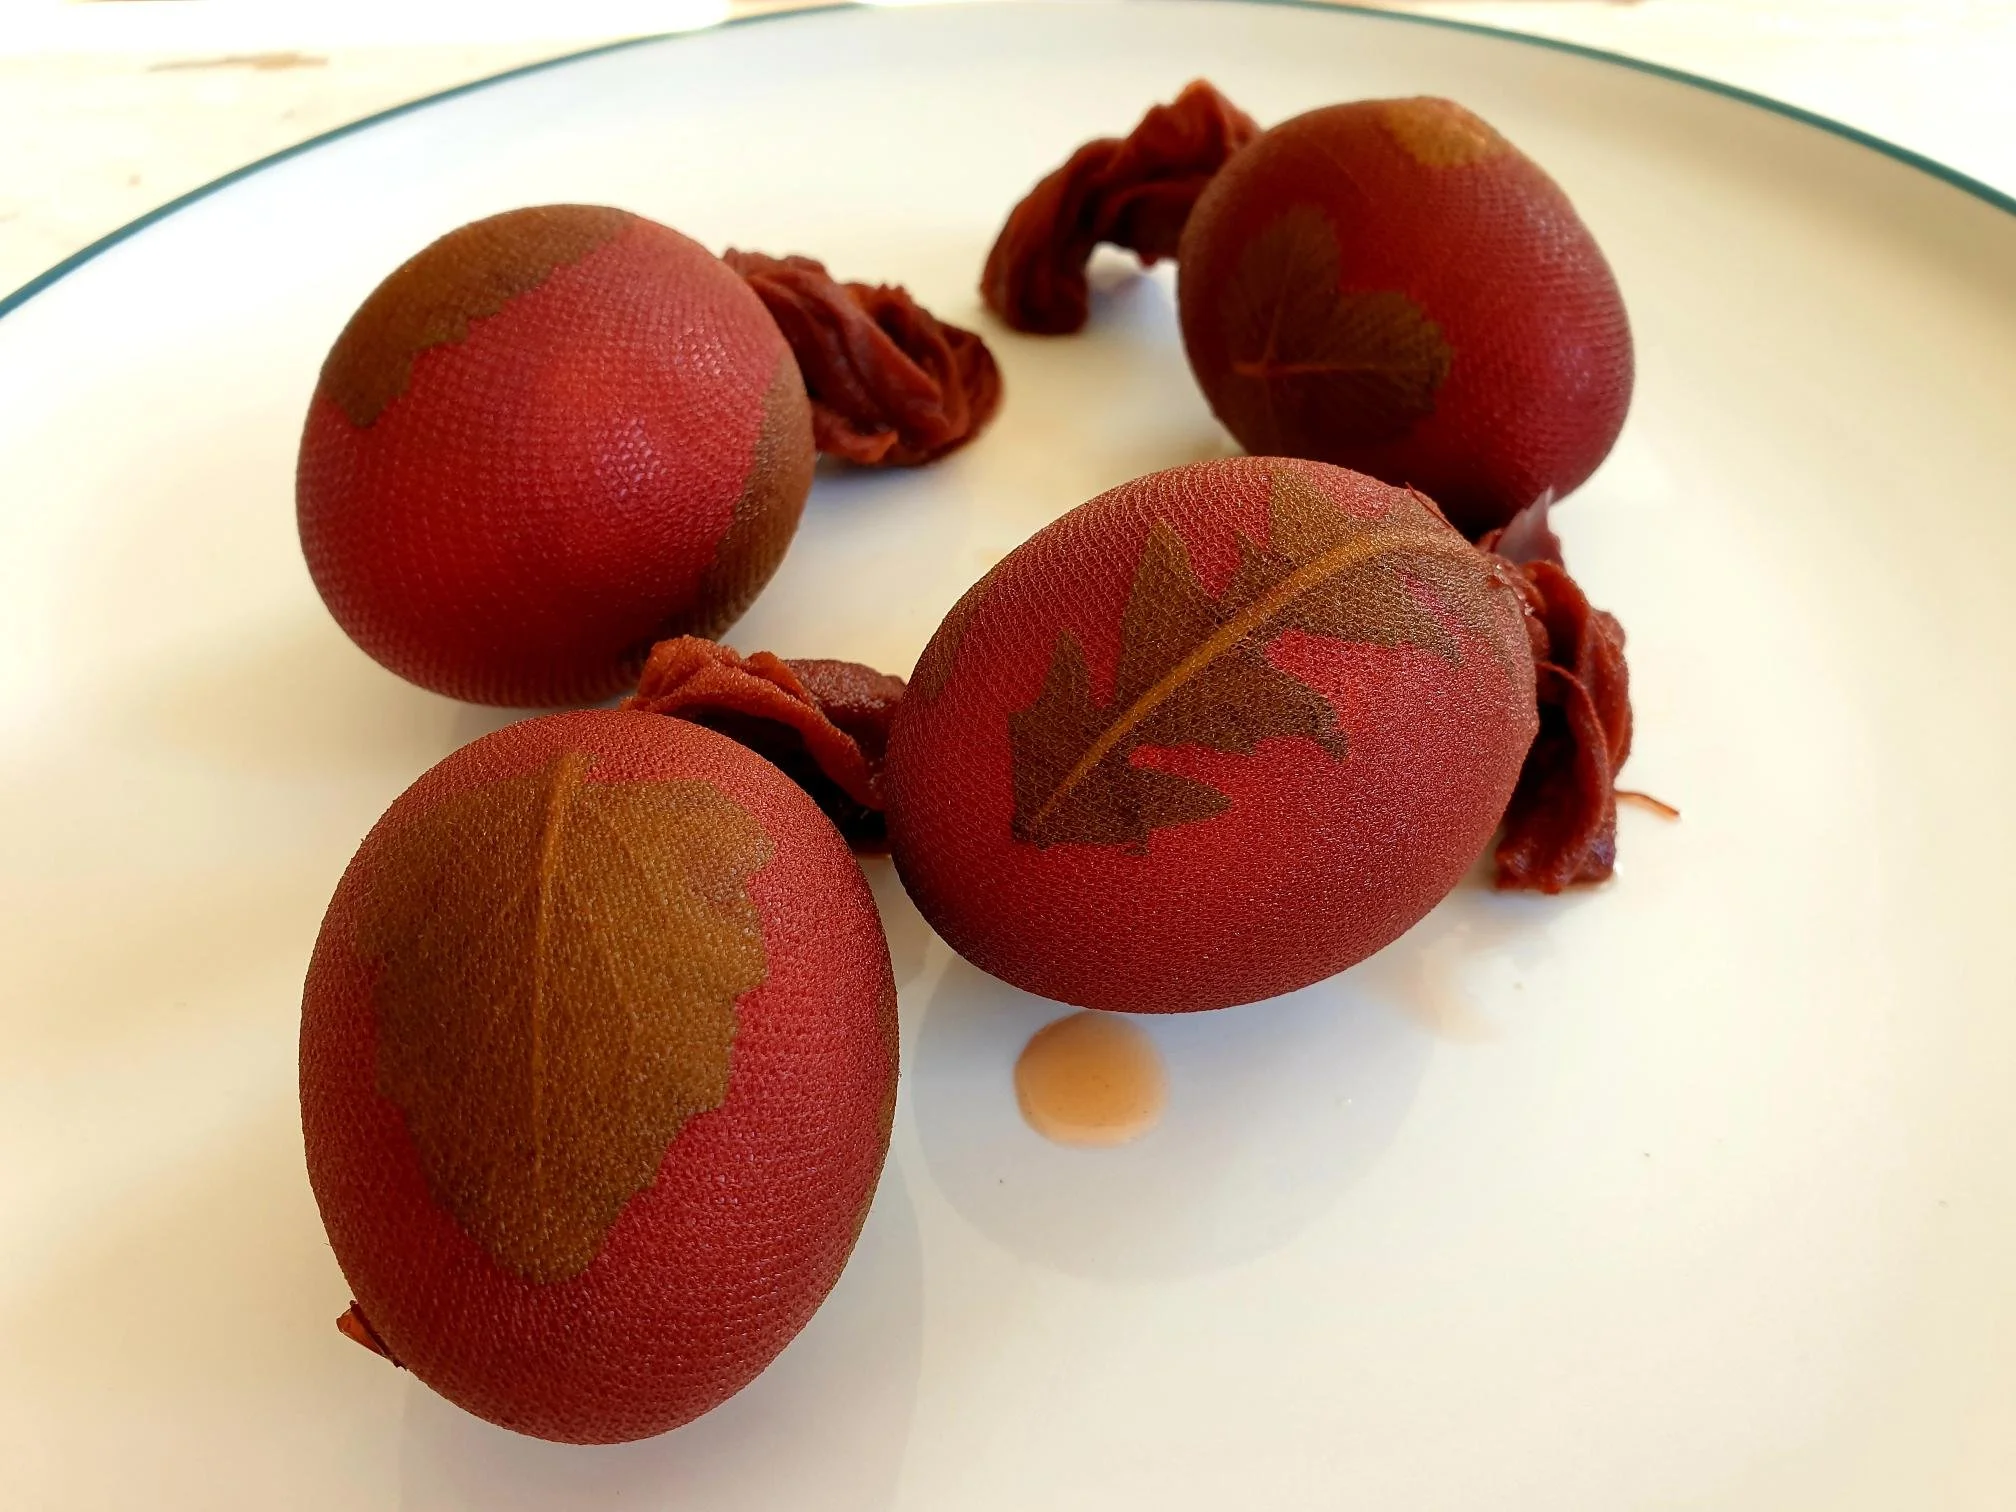
Cut the tights into 10-15cm wide strips (this size of the “pocket” should accommodate nicely the egg)

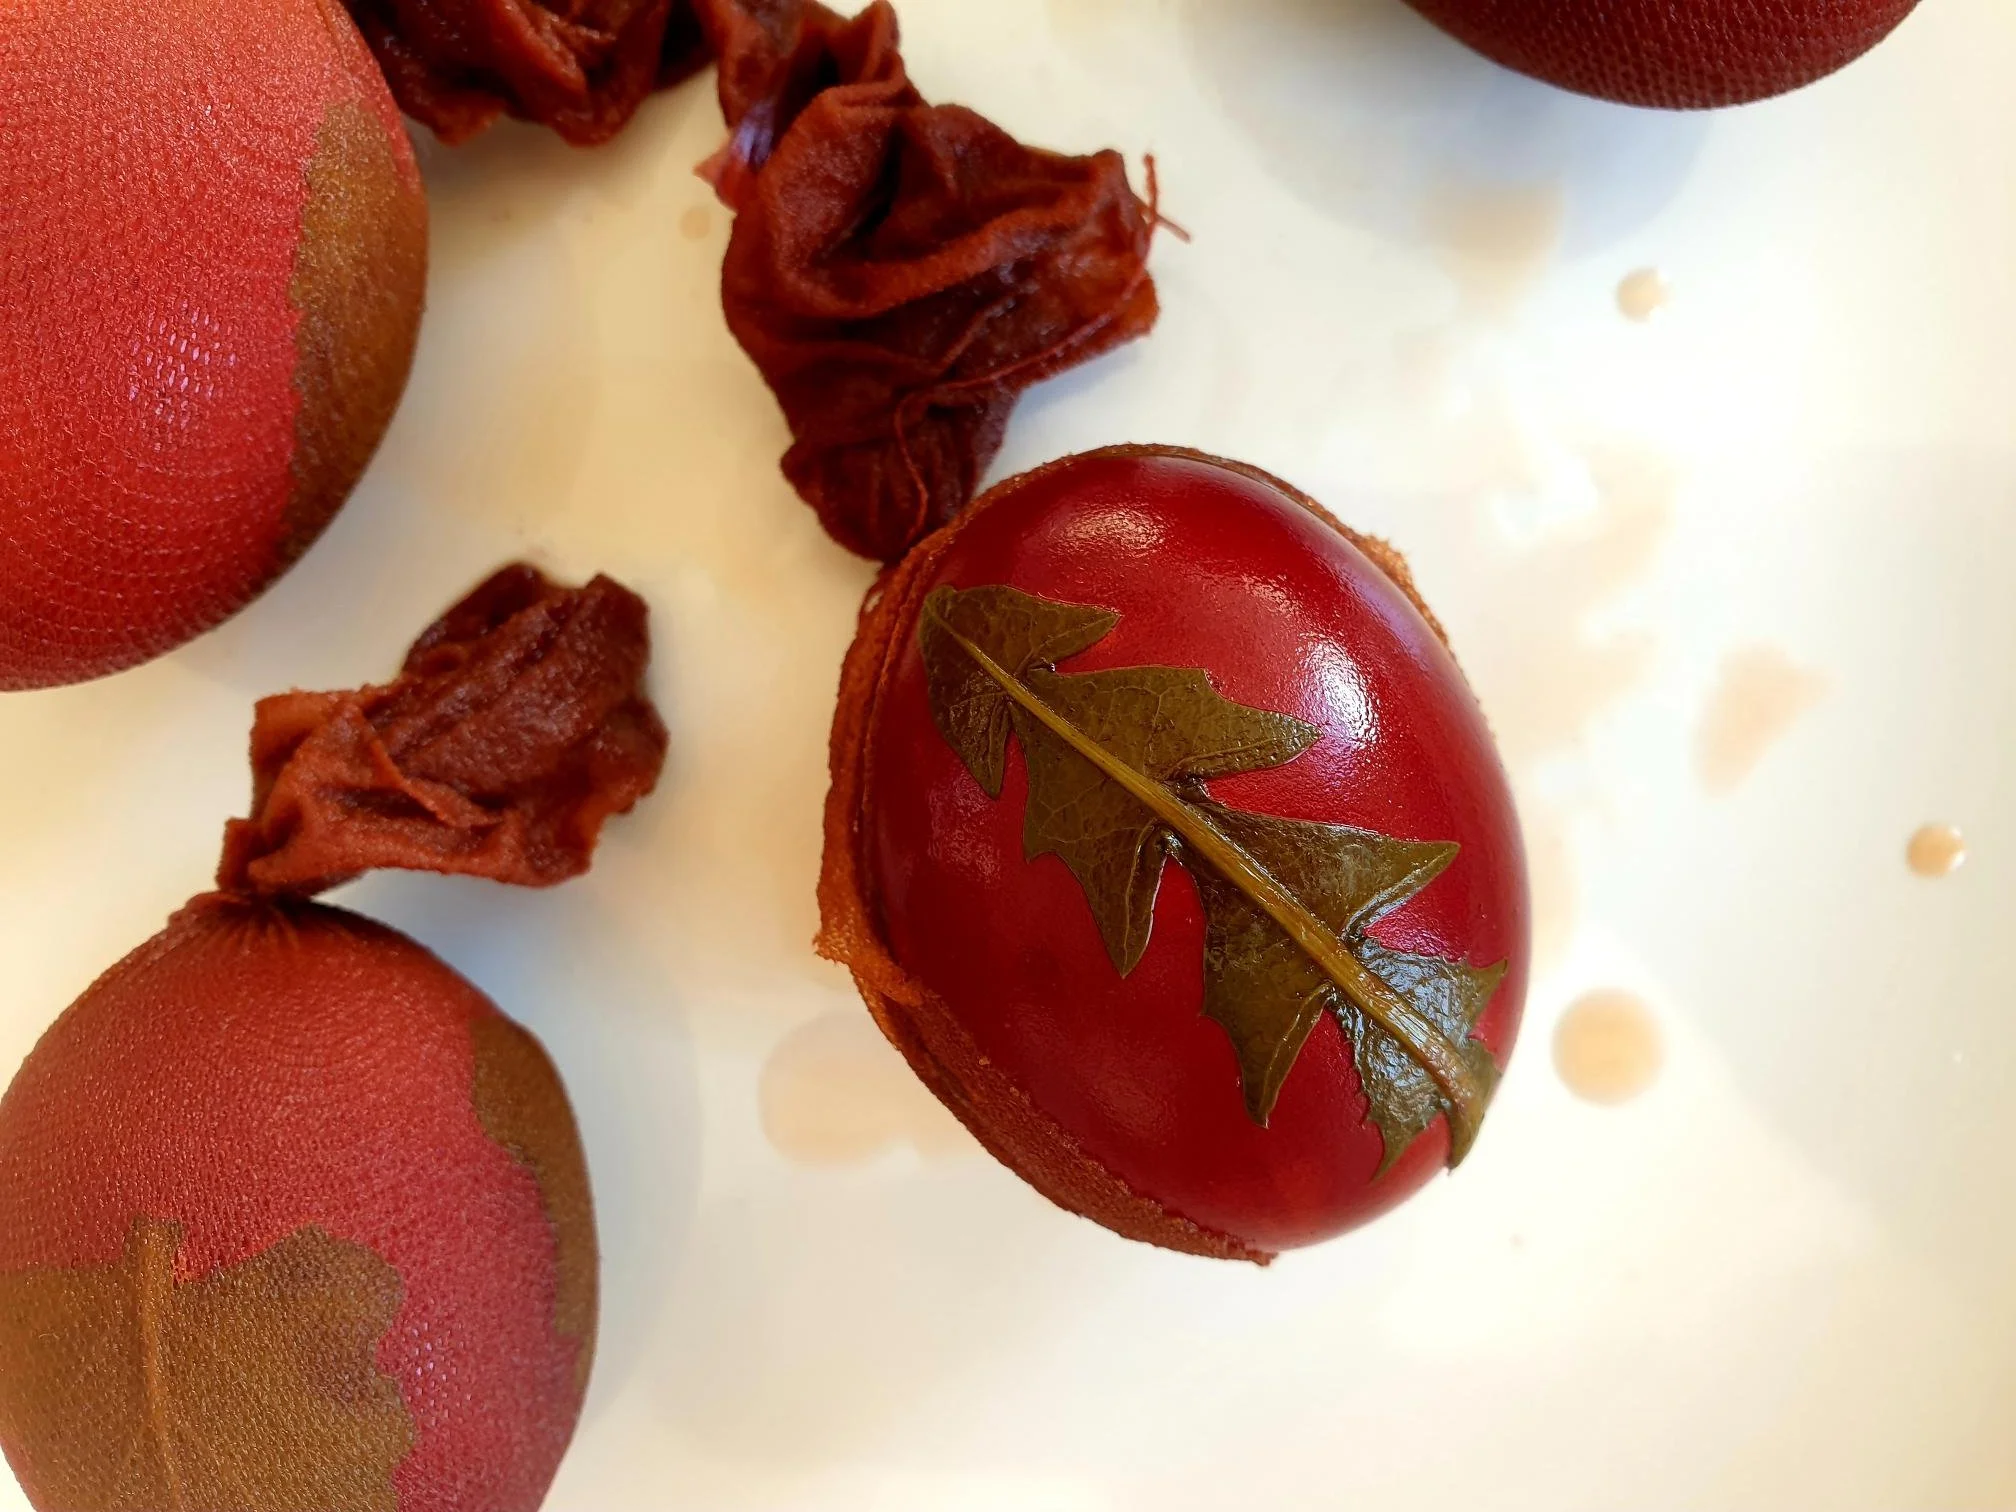
Lightly brush the inside of the herb leaf or flower with a paint brush dipped in egg white.

Gently place it on the egg, press it lightly to help it stick.

Brush the edges of the herb leaf or flower with the egg white so it adheres better to the egg (preventing the herb or flower moving around). Leave to dry just for a few minutes.

View fullsize Easter Eggs Dyed with Onion Skins Recipe 7.jpg
View fullsize Easter Eggs Dyed with Onion Skins Recipe 8.jpg

Carry on with the process until you decorate all the eggs with herb leaves or flowers.

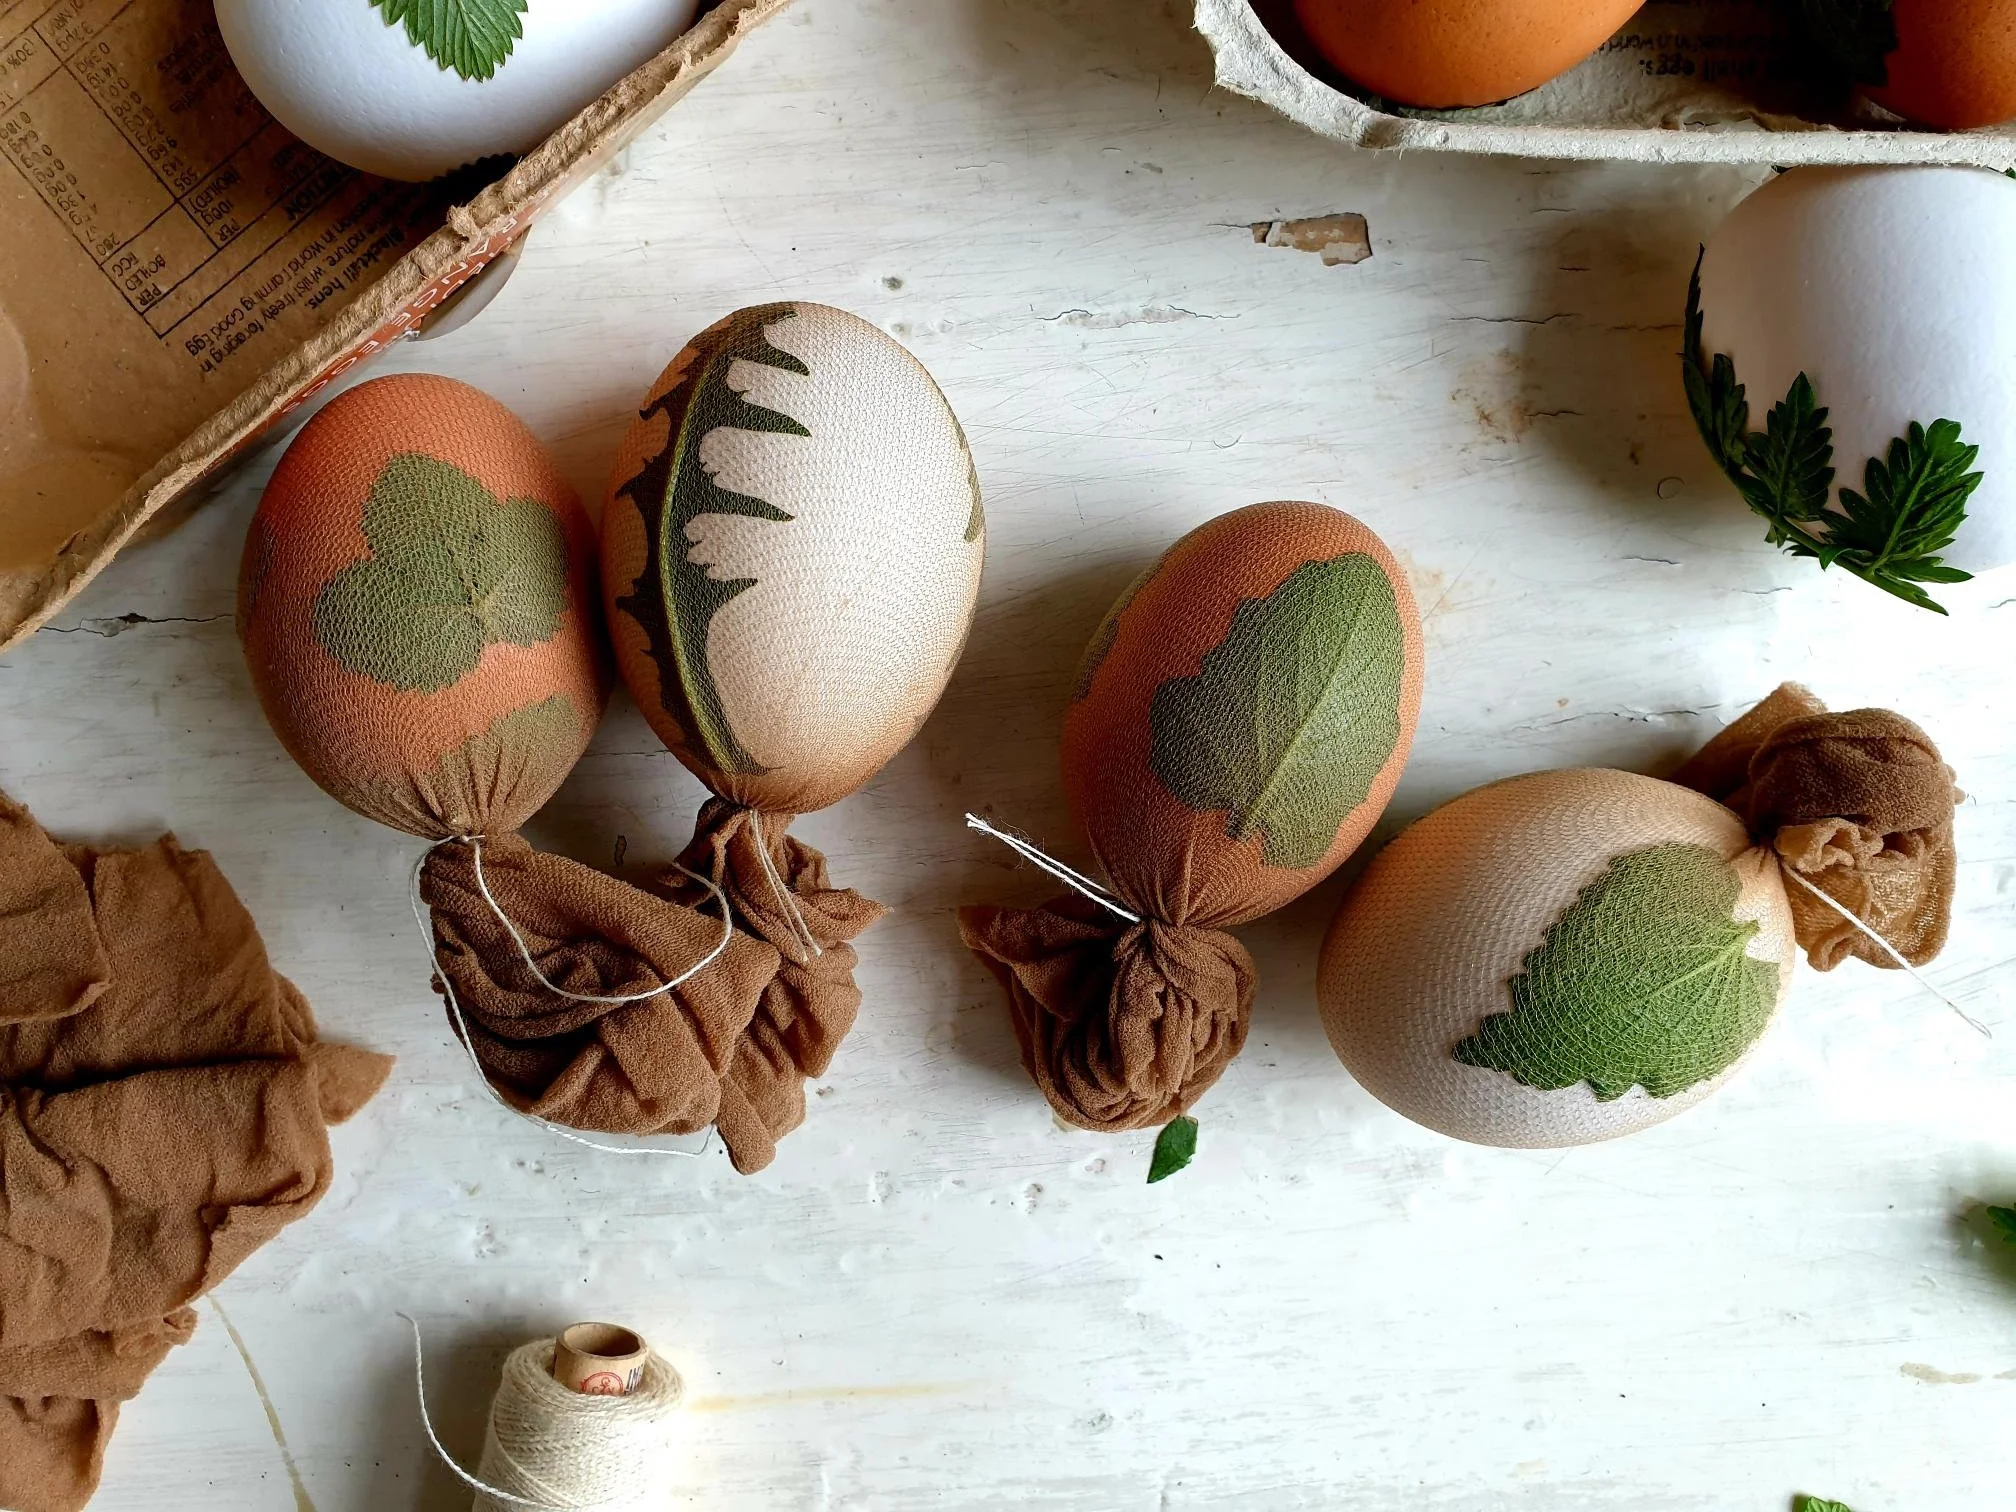
Place the decorated egg inside the tights strip, wrap it tightly around the egg, this will allow the decoration to stay in place and not move around (you will need to stretch it a bit and adjust the strip of tights).

Tie the end with a thread or a thin string, or stretch the tights pocket a bit and make a knot.

View fullsize Easter Eggs Dyed with Onion Skins Recipe 13.jpg
View fullsize Easter Eggs Dyed with Onion Skins Recipe 14.jpg

Put half of the onion skins in the pot.

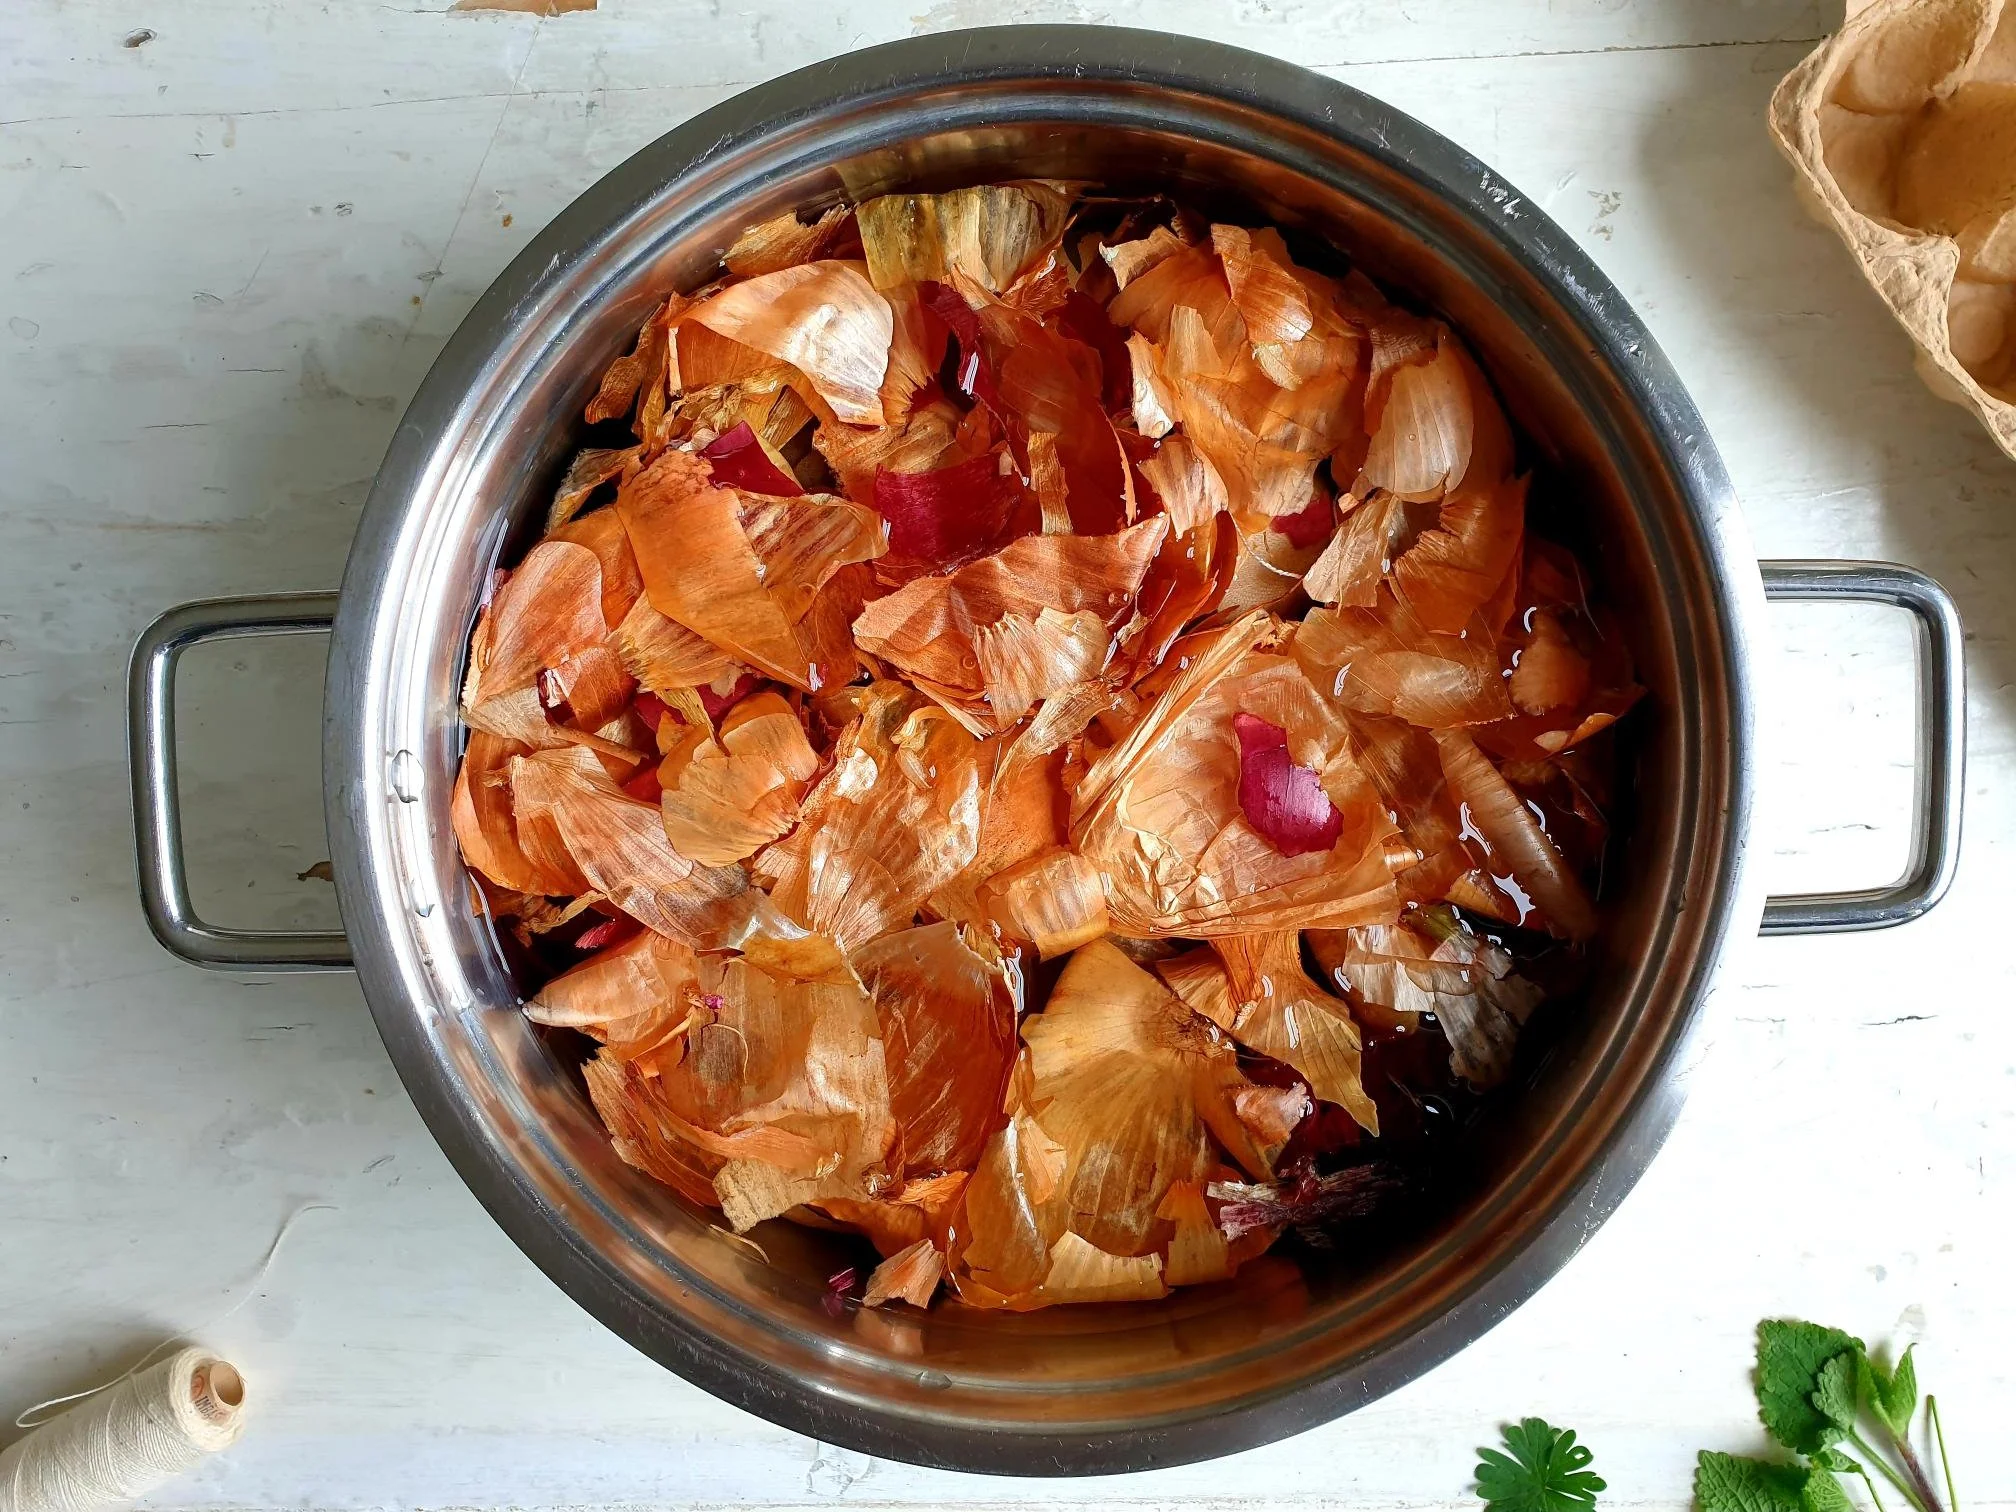
Place decorated and prepared eggs into a pot on top of the onion skins.

View fullsize Easter Eggs Dyed with Onion Skins Recipe 16.jpg
View fullsize Easter Eggs Dyed with Onion Skins Recipe 17.jpg

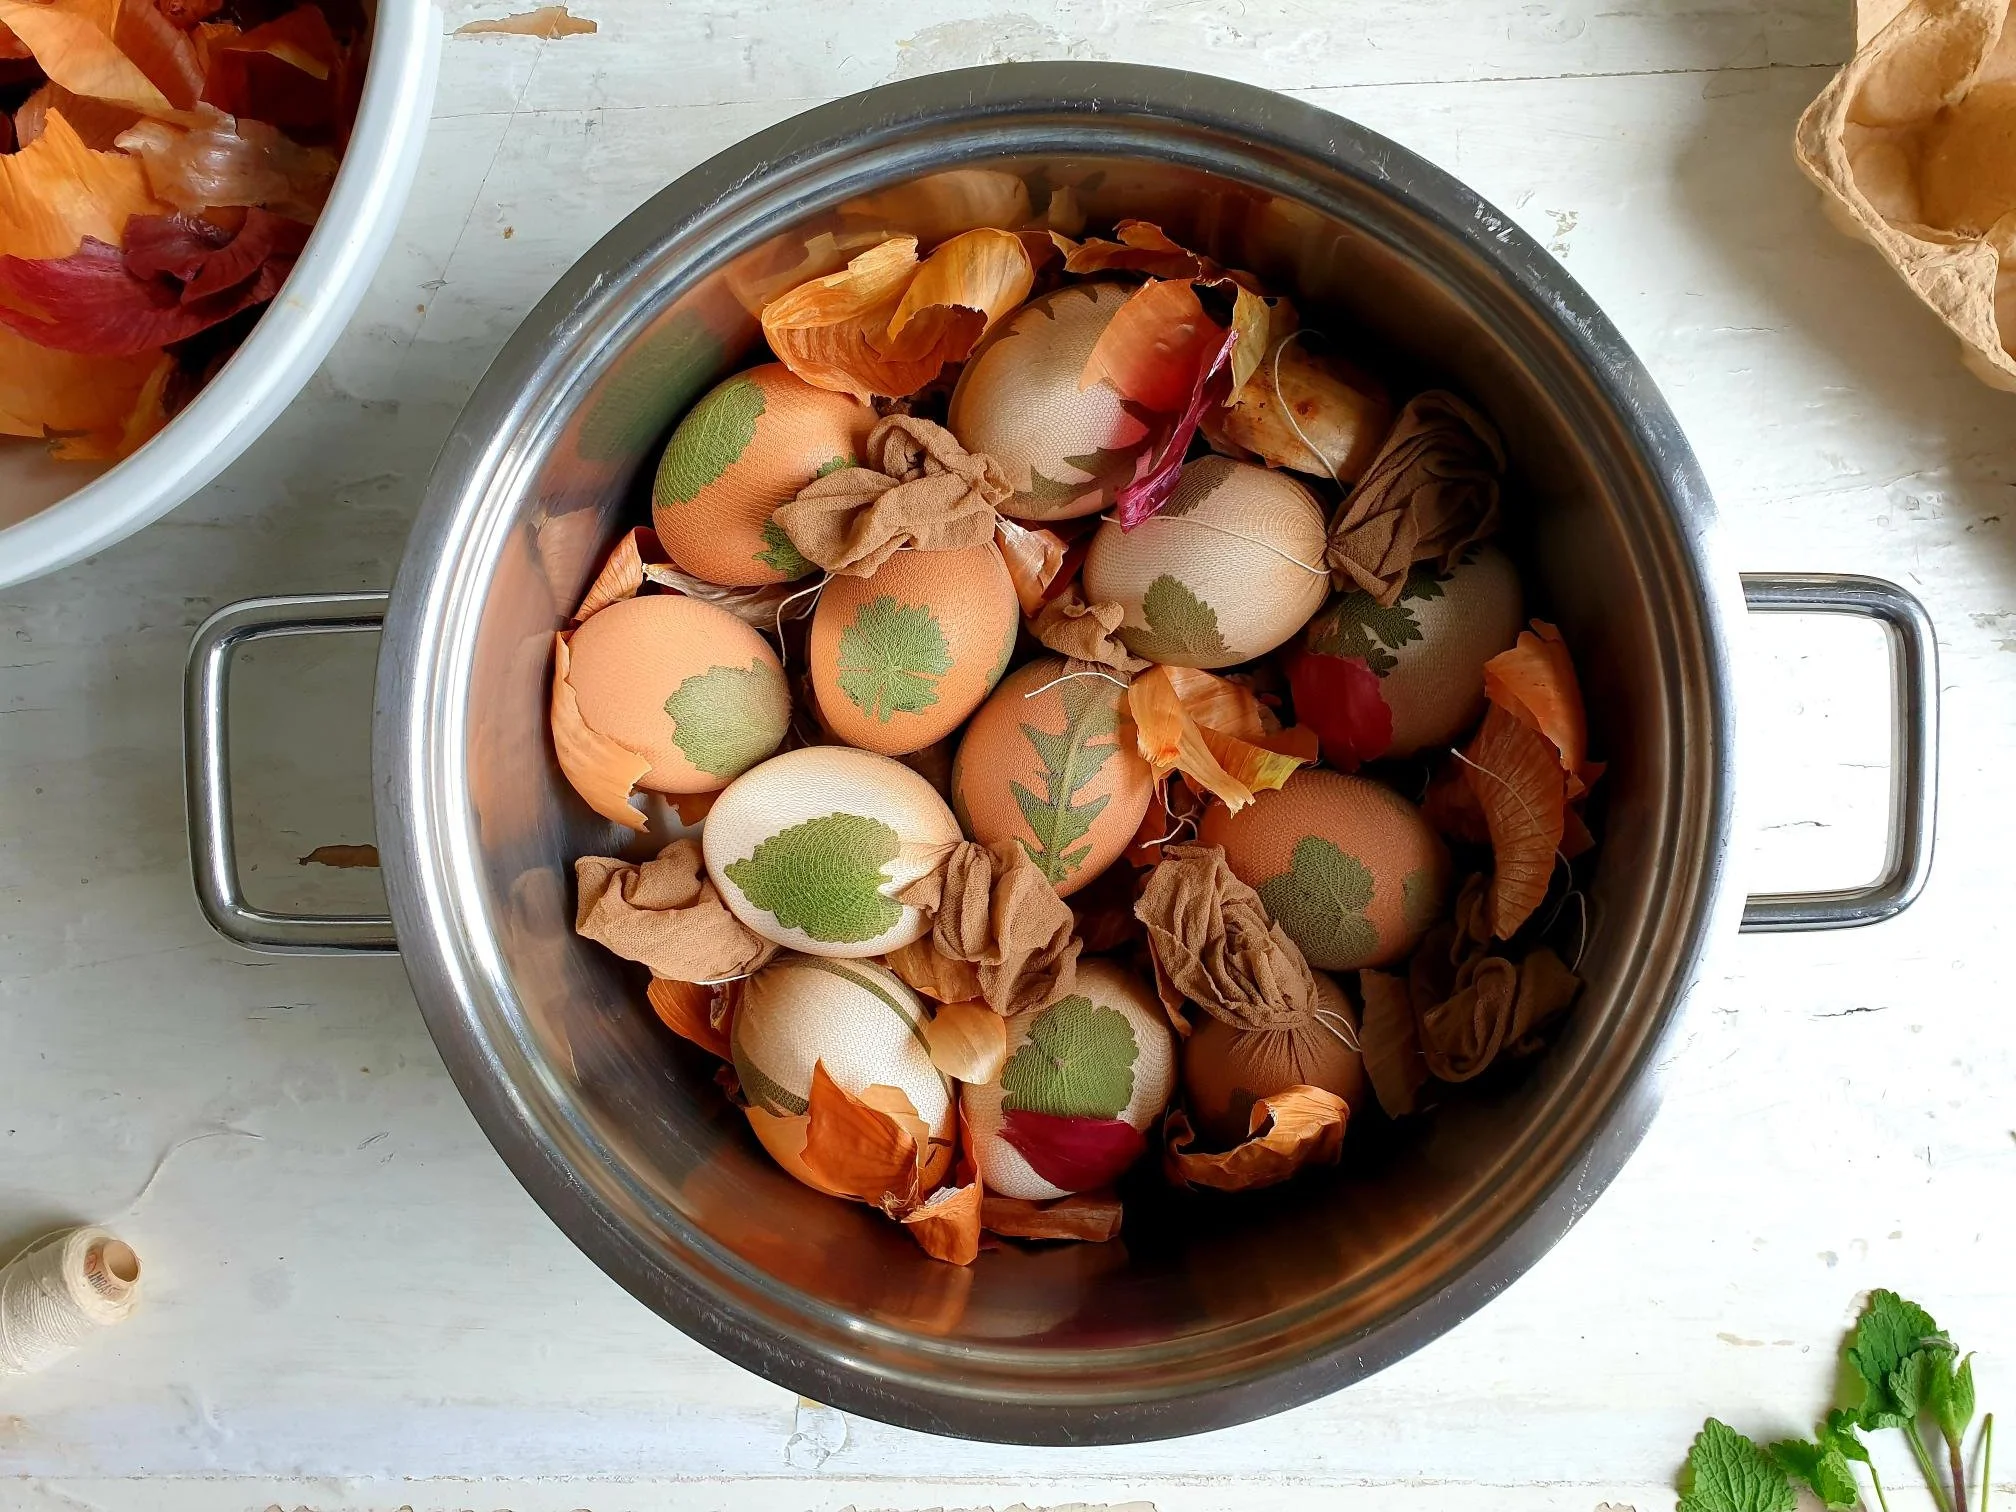
Cover the eggs with the remaining onion skins.

Add cold water so the eggs are completely covered and submerged in water.

Pour two tablespoons of white vinegar.

Bring to boil.

Turn the heat down and gently simmer for about 30 minutes.

View fullsize Easter Eggs Dyed with Onion Skins Recipe 18.jpg
View fullsize Easter Eggs Dyed with Onion Skins Recipe 19.jpg

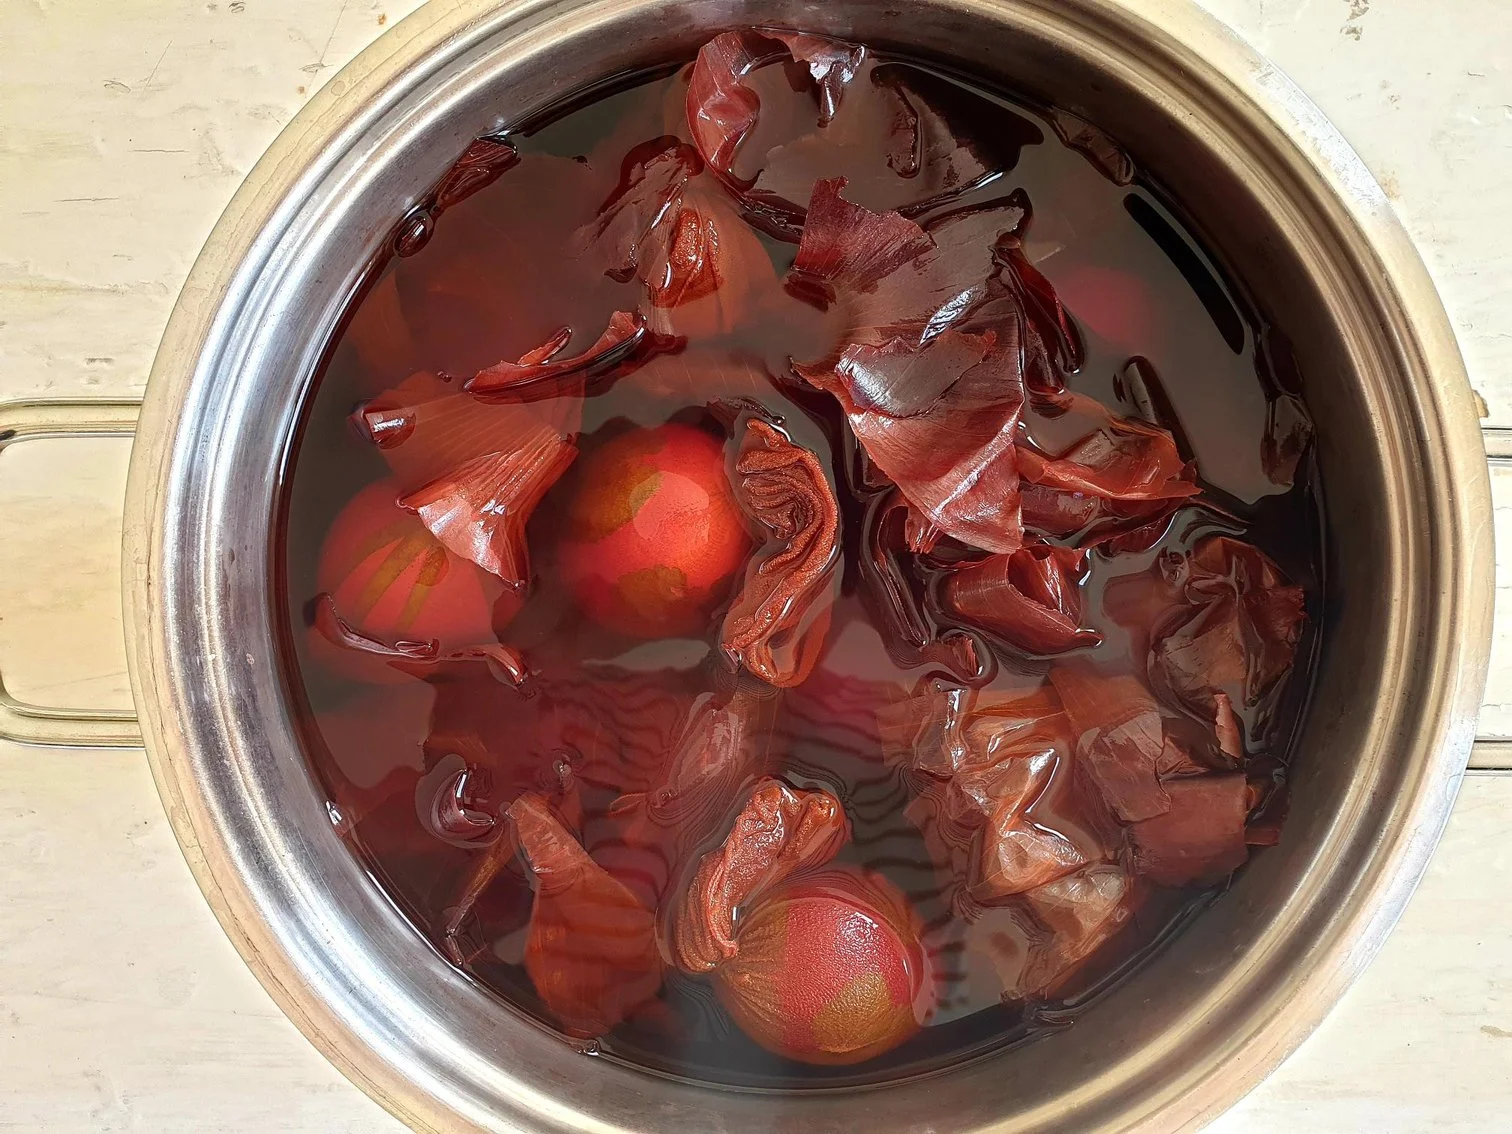
Turn the heat off and leave the eggs to cool completely.

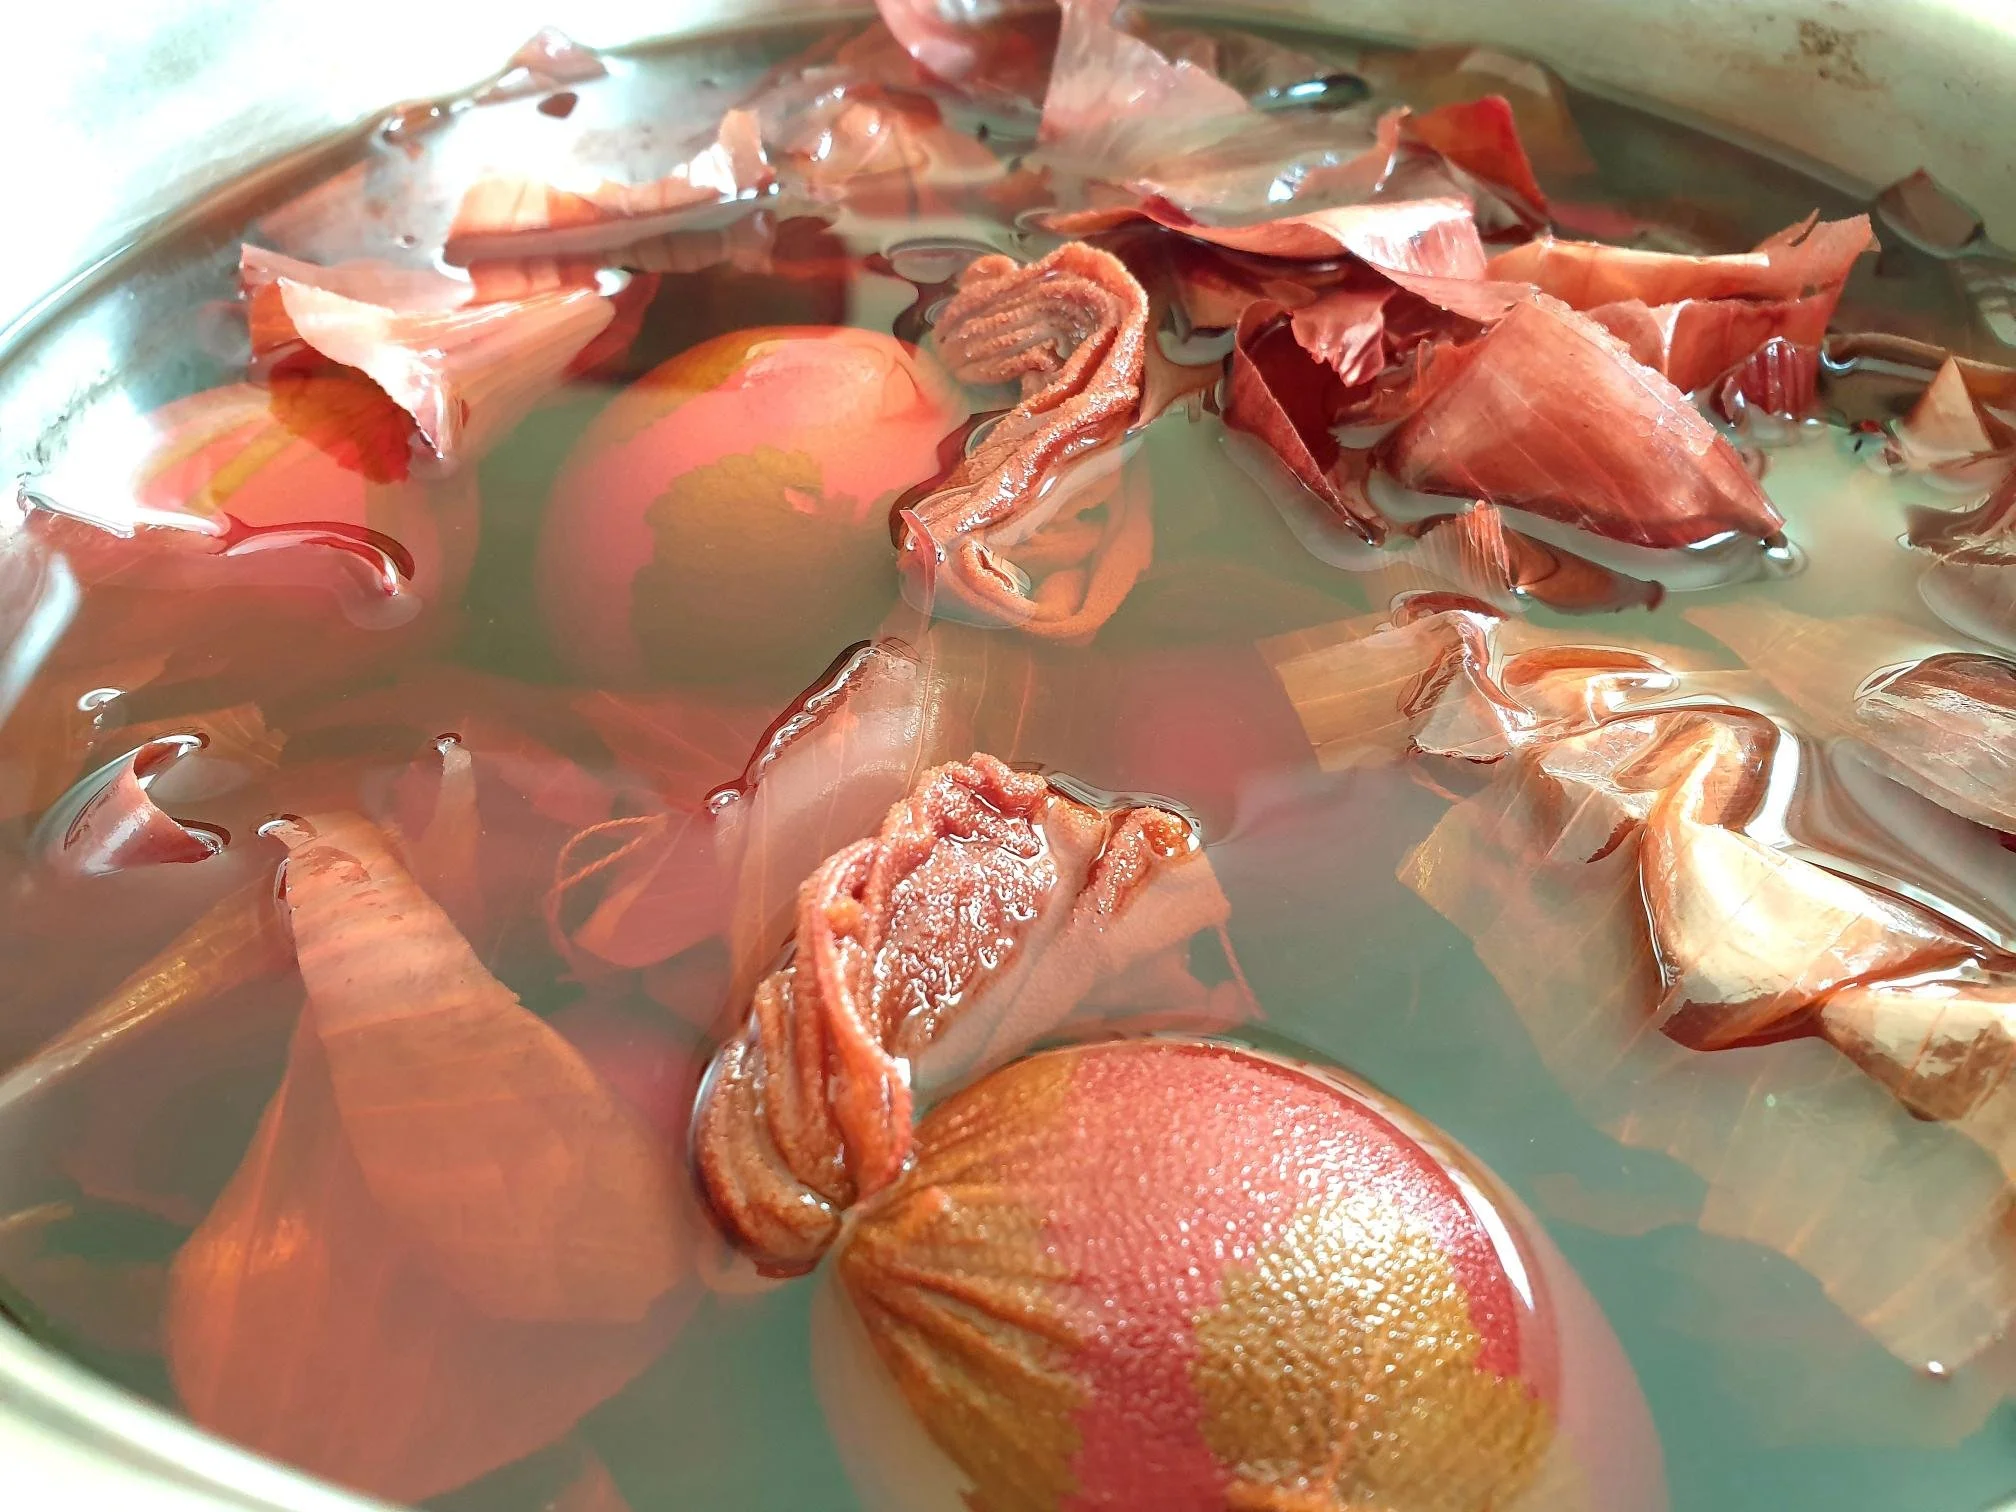
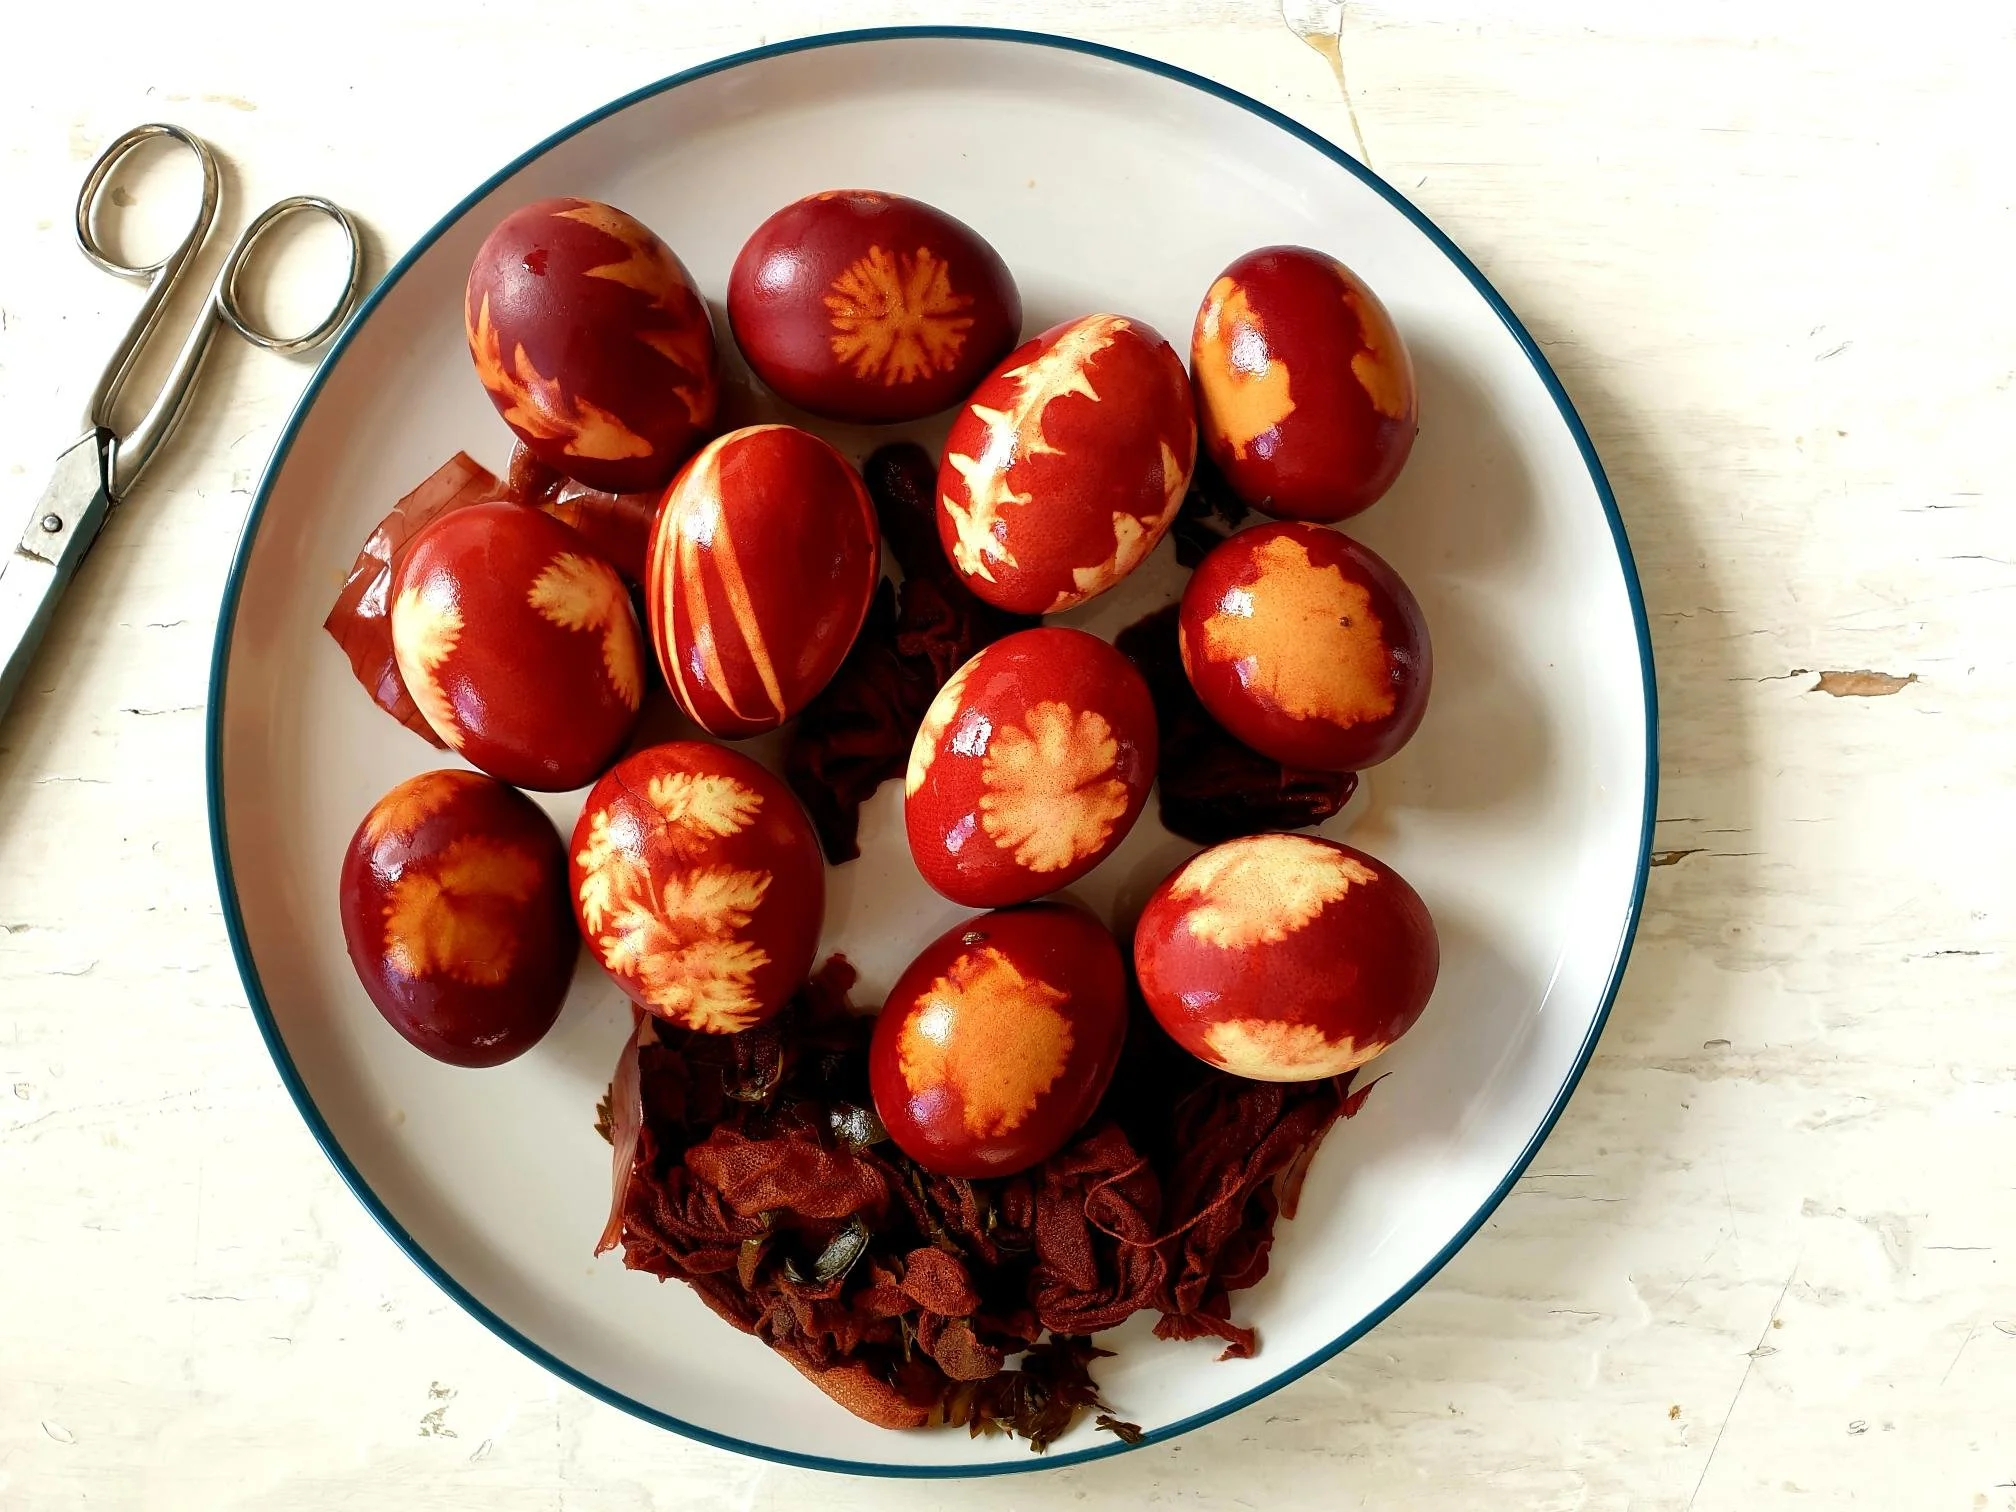
Allow the eggs to soak (check the eggs for desired colour).

You can leave the eggs to colour for about 4-6 hours, you can leave them to colour for longer or overnight (I leave mine overnight for practical reasons). The longer you leave them to soak, the darker they will get. You can also remove half of the eggs after a few hours and the rest of the eggs the following day (in this case you will end up with some eggs being lighter in colour compared to the ones that were left to soak for longer).

Remove the eggs form the pot.

Cut off the tights with the scissors, remove decorative herbs with the help of some kitchen paper.

View fullsize Easter Eggs Dyed with Onion Skins Recipe 21.jpg
View fullsize Easter Eggs Dyed with Onion Skins Recipe 22.jpg

Dry the eggs with kitchen paper.

If desired, wipe gently the eggs with a bit of vegetable oil. This will give them a beautiful shine.

Display the eggs in the basket.

March 29, 2023 /tina oblak
onion skins, onion peel, natural egg dyes, dyed Easter eggs, fresh eggs, white shell eggs, brown shell eggs, dry onion skins, make ahead, make in advance, family activity, chiled friendly cooking, child friendly cooking, fresh meadow herbs, fresh garden herbs, Easter eggs, Decorating easter eggs, colouring easter eggs, Easter festivity, Easter celebration, Easter traditions
Adriatic Recipe, breakfast, brunch, Canapés, Celebratory dish, Easter, Easter recipes, Easter treats, Easy recipe, foraging, Fresh herbs, Istrian cuisine, Istrian gastronomy, Rustic dish, savory nibbles, simple recipe, Slovenian cuisine, Slovenian food, Slovenian gastronomy, Small bites, Snacks, Spring recipe, Starters
Comment

Sautéed Leeks Istrian Recipe

Beans and Sardines
March 23, 2023 by tina oblak in Adriatic Recipe, Appetizers, Autumnal dish, Autumnal recipe, dinner, Easy recipe, family friendly dish, family friendly meal, Healthy, healthy mael, Istrian cuisine, Istrian dish, Istrian food, Istrian gastronomy, Nutritious, Nutritious dish, Rustic dish, Side Dishes, simple recipe, Slovenian cuisine, Slovenian food, Slovenian gastronomy, Vegetable side dish, Vegetables, Vegetarian, Winter dish, Winter recipe

This dish is simple and rustic, and is made with humble leeks, a vegetable that is very often overlooked, but in this recipe they proudly take central stage, and take no time or trouble to cook.

Raw leeks are almost inedible but when cooked they become sweet, mellow, and taste delicious on i their own as a side dish or used as a base for risotti or soups. Sautéed leeks are also fantastic as a filling, together with some cheese, for a grilled sandwich.

Leeks are omnipresent at vegetable markets but they are at their best during the coldest months of the year, October through May, and better yet, they are packed with nutrients and antioxidants.

I am sharing here my mother's recipe for this incredibly easy way of cooking the leeks. This vegetable side dish would be on our dinner table quite often during colder month when perhaps the range of vegetables on offer to buy was slightly more limited compared to the variety you can find during warmer months of spring and summer.

Try to make it, you might start reaching out for this humble and inexpensive vegetable a bit more often, if you are not doing that already...

Recipe

Ingredients

Serves 4 as a side dish

  • 900g - 1kg leeks, cleaned and chopped or sliced

  • 2 Tbsp extra virgin olive oil

  • 1 Tbsp butter

  • sea salt

  • black pepper

Method

Rinse the leeks under cold running water and pat dry with a paper or clean kitchen towel.

Place the leeks on a chopping board and with a sharp knife cut off the dark green leaf ends of the leek and the muddy tip of the roots (keep the green ends for the stock if you wish or discard).

Cut each leek in half from top to bottom and slice further into thin stripes.

Place sliced leeks into a colander and wash thoroughly under the cold running water. Leeks need a good cleaning before using, as dirt often gets stuck between the layers of leaves as they grow.

View fullsize Sauteed Leeks 3.jpg
View fullsize Sauteed Leeks 4.jpg

Put the butter and the oil in a frying pan, heat it up a bit and allowing the butter to melt.

Transfer the leeks into a pan, add sea salt and black pepper .

Cook on a medium heat, stirring now and again, for about 10-15 minutes, or until the leeks are cooked to a desired consistency (some prefer them very soft and others quite crunchy with a bite).

Taste and adjust the seasoning with sea salt and black pepper.

March 23, 2023 /tina oblak
leeks, make ahead, make in advance, leeks with oilve oil and butter
Adriatic Recipe, Appetizers, Autumnal dish, Autumnal recipe, dinner, Easy recipe, family friendly dish, family friendly meal, Healthy, healthy mael, Istrian cuisine, Istrian dish, Istrian food, Istrian gastronomy, Nutritious, Nutritious dish, Rustic dish, Side Dishes, simple recipe, Slovenian cuisine, Slovenian food, Slovenian gastronomy, Vegetable side dish, Vegetables, Vegetarian, Winter dish, Winter recipe
Comment

Spinach Roll made with Potato Gnocchi Dough Istrian Recipe

March 01, 2023 by tina oblak in Adriatic Recipe, All year round recipe, Appetizers, baked dish, brunch, Celebratory dish, Central European recipes, child friendly dish, child friendly meal, dinner, Easter dish, Easter recipes, Easy recipe, entrée course, family friendly dish, family friendly meal, festive dish, first course, first course dish, first course meal, Gnocchi, hearty dish, Istrian cuisine, Istrian dish, Istrian food, Istrian gastronomy, main course, main dish, main vegetarian course, main vegetarian dish, main vegetarian meal, Mitteleuropean cuisine, Mitteleuropean dish, Mitteleuropean food, Mitteleuropean recipes, recipe from Northern Ital, Rustic dish, simple recipe, Slovenian cuisine, Slovenian food, Slovenian gastronomy, Spring dish, Spring recipe, Starters

This classic dish is absolutely perfect in its simplicity, it is Austro-Hungarian in origin, and it represents a great comfort food. It is also vegetarian friendly, and looks quite impressive, but in reality is not that difficult to make. What you need is a bit of extra time to spare in the kitchen. It is the dish that will with no doubt impress your family and friends, whether you serve it as a warm starter or as a main dish.

Potato gnocchi dough roll is filled with spinach, boiled, sliced and traditionally served with the gravy or the juices left after roasting a piece of meat, different types of meat ragù, sage butter sauce and freshly grated Parmiggiano Reggiano cheese, and it can be served in a less traditional way with a tomato sauce.

This dish is typically found in the territories that once belonged to Austro-Hungarian Empire, including Slovenian Istria, where I come from, neighbouring city of Trieste in Italy and the surrounding areas and it used to be prepared exclusively during the festivities. My nona told me that the characteristic filling for this dish along the Slovenian coast would be caramelized onions and pancetta a no use of ricotta cheese in the spinach filling.

This special plate of food is a perfect example of ‘recipes without the borders’ in terms of the ingredients and the name of the dish itself, a true testimony of a gastronomic osmosis between different border cultures.

The name of the dish in standard Italian is Strucolo, which is the Italianization of the Slovenian word štrukelj, which itself has originated from a German word strudel. In fact, in German this dish is known as savoury Potato and spinach Strudel, and has very often a ricotta cheese and sliced cooked ham as a filling.

What is particular about this dish is the way it is cooked, the roll gets wrapped in an old piece of kitchen cloth “straza in the local dialect” and then gently boiled in hot water, hence its name Strucolo de spinaze in straza (Rotolo di spinaci cotto nel canavoccio in standard Italian).

Sadly this dish is very rarely found in the restaurants and almost exclusively prepared in households with a wide variety of fillings, (sautéed mushrooms and sliced cooked ham) and very often fresh pasta is used instead of potato gnocchi dough, and there are also a number of sweet variations using different types of fruit and nuts.I am sharing here my nona's recipe for this very special and traditional spinach roll made with potato gnocchi dough and simple spinach filling that still today is prepared during festive periods or to mark a special occasion.

Ingredients

Serves 4-6 people

For gnocchi pasta dough

  • 500g floury, yellow fleshed potatoes e.g. King Edward, Maris Piper, red skin potatoes (avoid new potatoes and choose the potatoes that are more or less the same size)

  • 150g all purpose flour, plus some extra

  • 1 small egg (can use just egg yolk of a medium or big egg)

  • sea salt, a pinch

For spinach filling

  • 450-500g fresh baby spinach, thoroughly washed

  • 15g butter

  • 1 Tbsp extra virgin olive oil

  • sea salt

  • nutmeg, grated

For sage butter sauce

  • a few fresh sage leaves, roughly torn

  • 150g butter

  • Parmiggiano Reggiano or Grana Padano cheese, finely grated, for serving

Recipe

Method

Potato gnocchi dough

Wash the potatoes, with the skin on,  under cold running water.

Place the potatoes, with their skin on, in a pot or in a large saucepan, add plenty of water so the potatoes are completely submerged in the water and bring to boil (you can use boiling hot water directly from the kettle to reduce cooking time).

After the water has come to a boil,  cook for about 20-30 minutes or until tender.  Cooking time will obviously vary depending on the size of the potatoes you are using. You  can check that the potatoes are fully cooked by inserting the toothpick into the potato, it should easily enter the pulp of the potato.  Alternatively, you can steam the potatoes or cook them in the microwave oven.

While the potatoes are cooking prepare the spinach filling (see below).

When the potatoes are cooked, drain them in a colander and let them cool enough to handle, then remove the skin.If the potatoes are still quite warm to handle, the best way to remove the skin is to stick the fork through the potato and peel it using a knife.

On a working surface or on a large wooden board (you can use a pasta board if you have one), pass the potatoes through a potato ricer.

Make a well, add the flour and a pinch of sea salt.

Make another well in the middle of the flour and crack the egg in it.

View fullsize Spinach Roll 5.jpg
View fullsize Spinach Roll 6.jpg

With the fork slightly whisk the egg inside the well, and as you do so pick up the flour as you go around the well.

View fullsize Spinach Roll 7.jpg
View fullsize Spinach Roll 8.jpg

Mix together and form a soft dough which should not stick to your fingers or the surface. If this is the case add a little flour at a time.

View fullsize Spinach Roll 9.jpg
View fullsize Spinach Roll 10.jpg

Spinach filling

Put the washed spinach in pot with hot boiling water and blanch it for a few minutes.

Drain in the colander and let it cool down a bit. When cold enough to handle, squeeze out by hand as much as liquid as you can.

Place the spinach on a chopping board and finely chop.

View fullsize Spinach Roll 2.jpg
View fullsize Spinach Roll 3.jpg

Put the butter and olive oil in a non stick frying pan and let the butter melt. Add the spinach, a pinch of sea salt and a good grating of nutmeg.

Sautéed for a few minutes, stirring frequently then turn the heat off and set aside.

Taste and adjust the seasoning.

Allow to cool completely.

Cut a piece of a non stick baking parchment into a 50 x 40cm rectangle and place it on the working surface and sprinkle it lightly with the flour.

Place the gnocchi dough on the baking parchment and, with the help of slightly floured rolling pin, spread out the gnocchi dough roughly in the shape of a rectangle 38 x 29cm.

View fullsize Spinach Roll 11.jpg
View fullsize Spinach Roll 12.jpg

Spoon the spinach mixture over the dough and spread it evenly.

View fullsize Spinach Roll 13.jpg
View fullsize Spinach Roll 14.jpg

With the help of baking parchment start rolling up the dough into the shape of a log from a long end (as if you were making a Swiss roll).

Press down each end to seal, and wrap the paper around the roll.

View fullsize Spinach Roll 15.jpg
View fullsize Spinach Roll 16.jpg

Tight the ends with the kitchen twine, alternatively you can wrap the roll in an aluminium foil to help the roll keep its shape.

Place the roll in a pot, making sure you choose the pot big enough to accommodate the roll sitting horizontally without bending it (use a fish pot if you have one or an oval shape pan).

Fill it with water, can be boiling hot straight from the kettle, so the roll is almost completely submerged, the water should just cover the roll.

View fullsize Spinach Roll 17.jpg
View fullsize Spinach Roll 18.jpg

Bring to boil, turn the heat down, cover with the lid, and gently simmer for 30 minute.

Remove the roll onto a chopping board and allow to cool for a few minutes.

View fullsize Spinach Roll 19.jpg
View fullsize Spinach Roll 20.jpg

Cut the twine, unwrap the roll and remove the baking parchment.

Slice the roll with a very sharp knife (slicing will be easier if you wet the knife with cold water).

View fullsize Spinach Roll 21.jpg
View fullsize Spinach Roll 22.jpg

Place the slices onto serving plates and spoon over a few tablespoons of sage butter and sprinkle with plenty of Parmiggiano Reggiano cheese, and a little bit of finely freshly grated nutmeg, this is optional but it really does enhance the delicate flour of the dish.

Alternatively you can also gratinate the dish. Arrange the slices in a previously buttered baking dish. Sprinkle with plenty of Parmiggiano Reggiano cheese, spoon over a few tablespoons of melted butter and gratin in a previously hot oven at 200C, for about 20 minutes, or until nice golden in colour. This is a great option if you want to make the dish ahead of a time (simmer the roll, wrap it in aluminium foil and keep it in a fridge for up to a day before slicing and baking).

Sage butter

Put the butter in a small saucepan, heat it gently and add the sage leaves. Cook on a gentle heat until the butter begins to colour and the foam has subsided.

Wine suggestione

Colline Pescaresi Passerina IGT "Chronicon" 2021 - Zaccagnini

March 01, 2023 /tina oblak
gnocchi dough, potato gnocchi dough, fresh spinach, blanched spinach, baby spinach, sauteed baby spinach, sage and butter sauce, fresh sage leaves, nutmeg, grated nutmeg, Parmiggiano Reggiano cheese, Grana Padano cheese, Savoury spinach roll, ahead of time, make ahead, make in advance
Adriatic Recipe, All year round recipe, Appetizers, baked dish, brunch, Celebratory dish, Central European recipes, child friendly dish, child friendly meal, dinner, Easter dish, Easter recipes, Easy recipe, entrée course, family friendly dish, family friendly meal, festive dish, first course, first course dish, first course meal, Gnocchi, hearty dish, Istrian cuisine, Istrian dish, Istrian food, Istrian gastronomy, main course, main dish, main vegetarian course, main vegetarian dish, main vegetarian meal, Mitteleuropean cuisine, Mitteleuropean dish, Mitteleuropean food, Mitteleuropean recipes, recipe from Northern Ital, Rustic dish, simple recipe, Slovenian cuisine, Slovenian food, Slovenian gastronomy, Spring dish, Spring recipe, Starters
Comment

Peas with Ham Istrian Recipe

Beans and Sardines
January 11, 2023 by tina oblak in Adriatic Recipe, All year round recipe, Appetizers, child friendly dish, child friendly meal, dinner, Easy recipe, family friendly dish, family friendly meal, Healthy, healthy mael, hearty dish, Istrian cuisine, Istrian dish, Istrian food, Istrian gastronomy, light meal, main course, main dish, Nutritious, Nutritious dish, one pot meal, recipe from Northern Ital, Rustic dish, Side Dishes, simple recipe, Slovenian cuisine, Slovenian food, Slovenian gastronomy, Spring dish, Spring recipe, stew, supper, Vegetable side dish, Vegetables, Winter dish, Winter recipe

This mouthwatering recipe for peas with ham is easy, uncomplicated and super fast to prepare, as it can be made in no time at all, with fresh or frozen peas.

With this Italian style dish, referred as Piselli con prosciutto cotto, you might win over the most reluctant vegetable eaters.

It can be served as a side dish or as a main with boiled, oven roasted or mashed potatoes, fried or hard boiled eggs, a salad, or simply with plenty of fresh, crunchy rustic bread.

My mother used to make peas with ham very often when I was little, as this vegetable dish is particularly appetizing for small children because of the “sweetness” of the peas and cooked ham.

I am sharing here her recipe with which you can delight all generations around the dinner table with this fresh and very pleasant dish.

Recipe

Ingredients

  • 2 shallots or onions (about 75g), peeled and finely chopped

  • 3 Tbsp extra virgin olive oil

  • 500g fresh or frozen petits pois, defrosted (can use garden peas)

  • 150g thick slice of cooked or roasted ham, diced

  • 200ml vegetable, chicken stock or water

  • handful of fresh flat leaf parsley (about 7g), finely chopped

  • sea salt

  • black pepper

Method

Place the oil in a frying or sauce pan, add the onion, a pinch of sea salt and black pepper.

Cook for a few minutes on a gentle heat until soft and translucent.

View fullsize Peas with Ham 3.jpg
View fullsize Peas with Ham 4.jpg

Add the peas, stock or water, and cubed ham.

View fullsize Peas with Ham 5.jpg
View fullsize Peas with ham 6.jpg
View fullsize Peas with Ham 7.jpg
View fullsize Peas with Ham 8.jpg

Simmer gently for about 10-15 minutes until the peas are tender and almost all of the liquid has evaporated.

Stir in fresh chopped parsley, adjust the seasoning, and serve hot immediately.

View fullsize Peas with Ham 9.jpg
View fullsize Peas with Ham 10.jpg

Just a thought

For this dish you can use pancetta, bacon or lardons instead of cooked or roasted ham, in which case you sauté the meaty element together with the onions first and then follow the other steps of the recipe.

January 11, 2023 /tina oblak
frozen garden peas, fresh garden peas, peas, frozen petits pois, fresh petits pois, early spring peas, peas in pods, make in advance, cooked ham, roasted ham, pancetta, lardons, fresh flat leaf parsley
Adriatic Recipe, All year round recipe, Appetizers, child friendly dish, child friendly meal, dinner, Easy recipe, family friendly dish, family friendly meal, Healthy, healthy mael, hearty dish, Istrian cuisine, Istrian dish, Istrian food, Istrian gastronomy, light meal, main course, main dish, Nutritious, Nutritious dish, one pot meal, recipe from Northern Ital, Rustic dish, Side Dishes, simple recipe, Slovenian cuisine, Slovenian food, Slovenian gastronomy, Spring dish, Spring recipe, stew, supper, Vegetable side dish, Vegetables, Winter dish, Winter recipe
Comment