Beans and Sardines

  • Home
  • About
  • Recipe of the week
  • Recipes
  • Wines
  • Contact

Dry Fig and Almond Slice Istrian Recipe

Beans and Sradines
December 10, 2024 by tina oblak in Adriatic Recipe, Appetizers, Autumnal dish, Autumnal recipe, bite-sized nibbles, Canapés, Christmas, dessert, Easy recipe, festive dessert, festive dish, festive sweet things, Finger food, Healthy, Istrian cuisine, Istrian food, Istrian gastronomy, Rustic dish, simple recipe, Slovenian cuisine, Slovenian food, Slovenian gastronomy, Small bites, Snacks, Starters, sweet finger food, sweet nibbles, Sweet Things, Vegan, Winter recipe

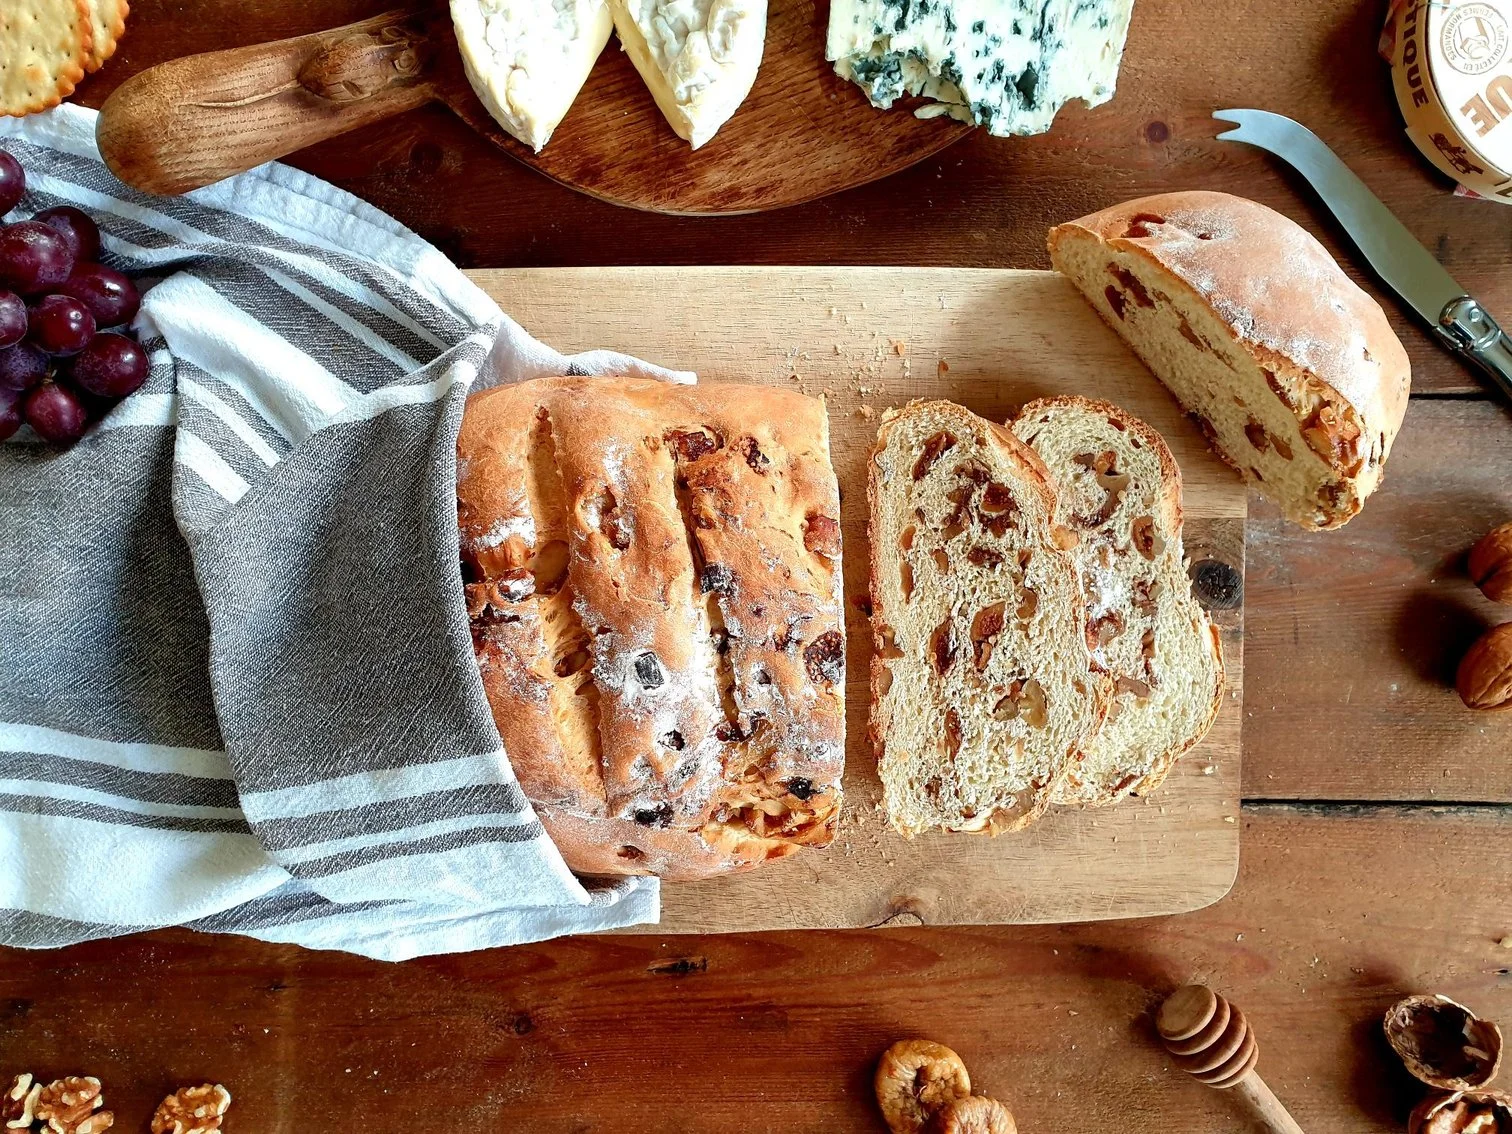
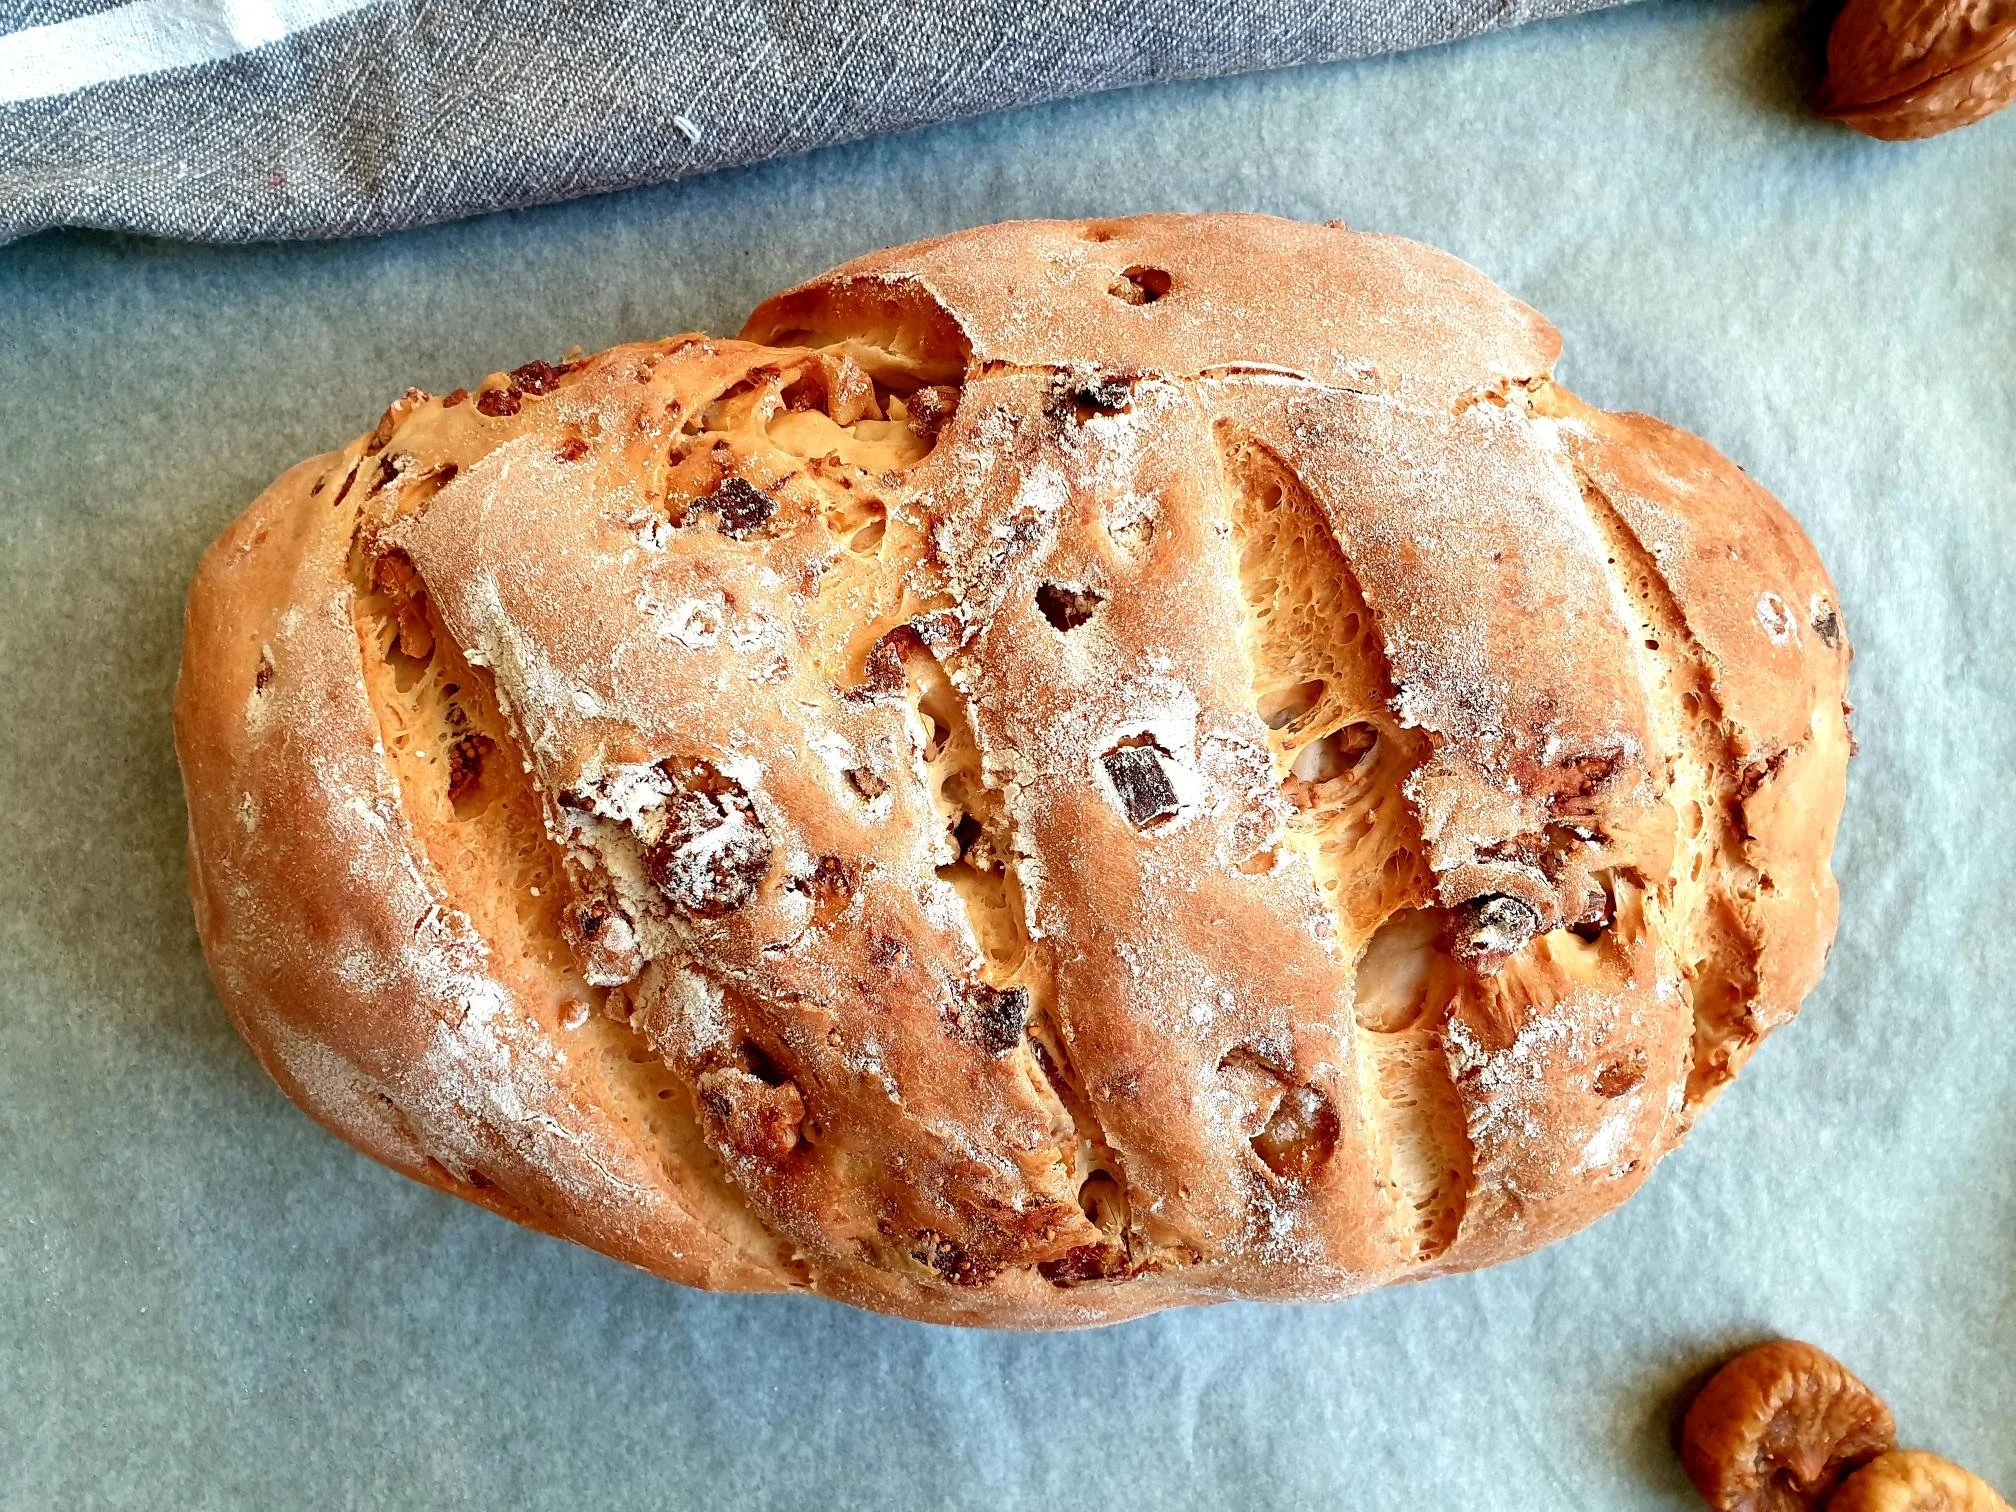
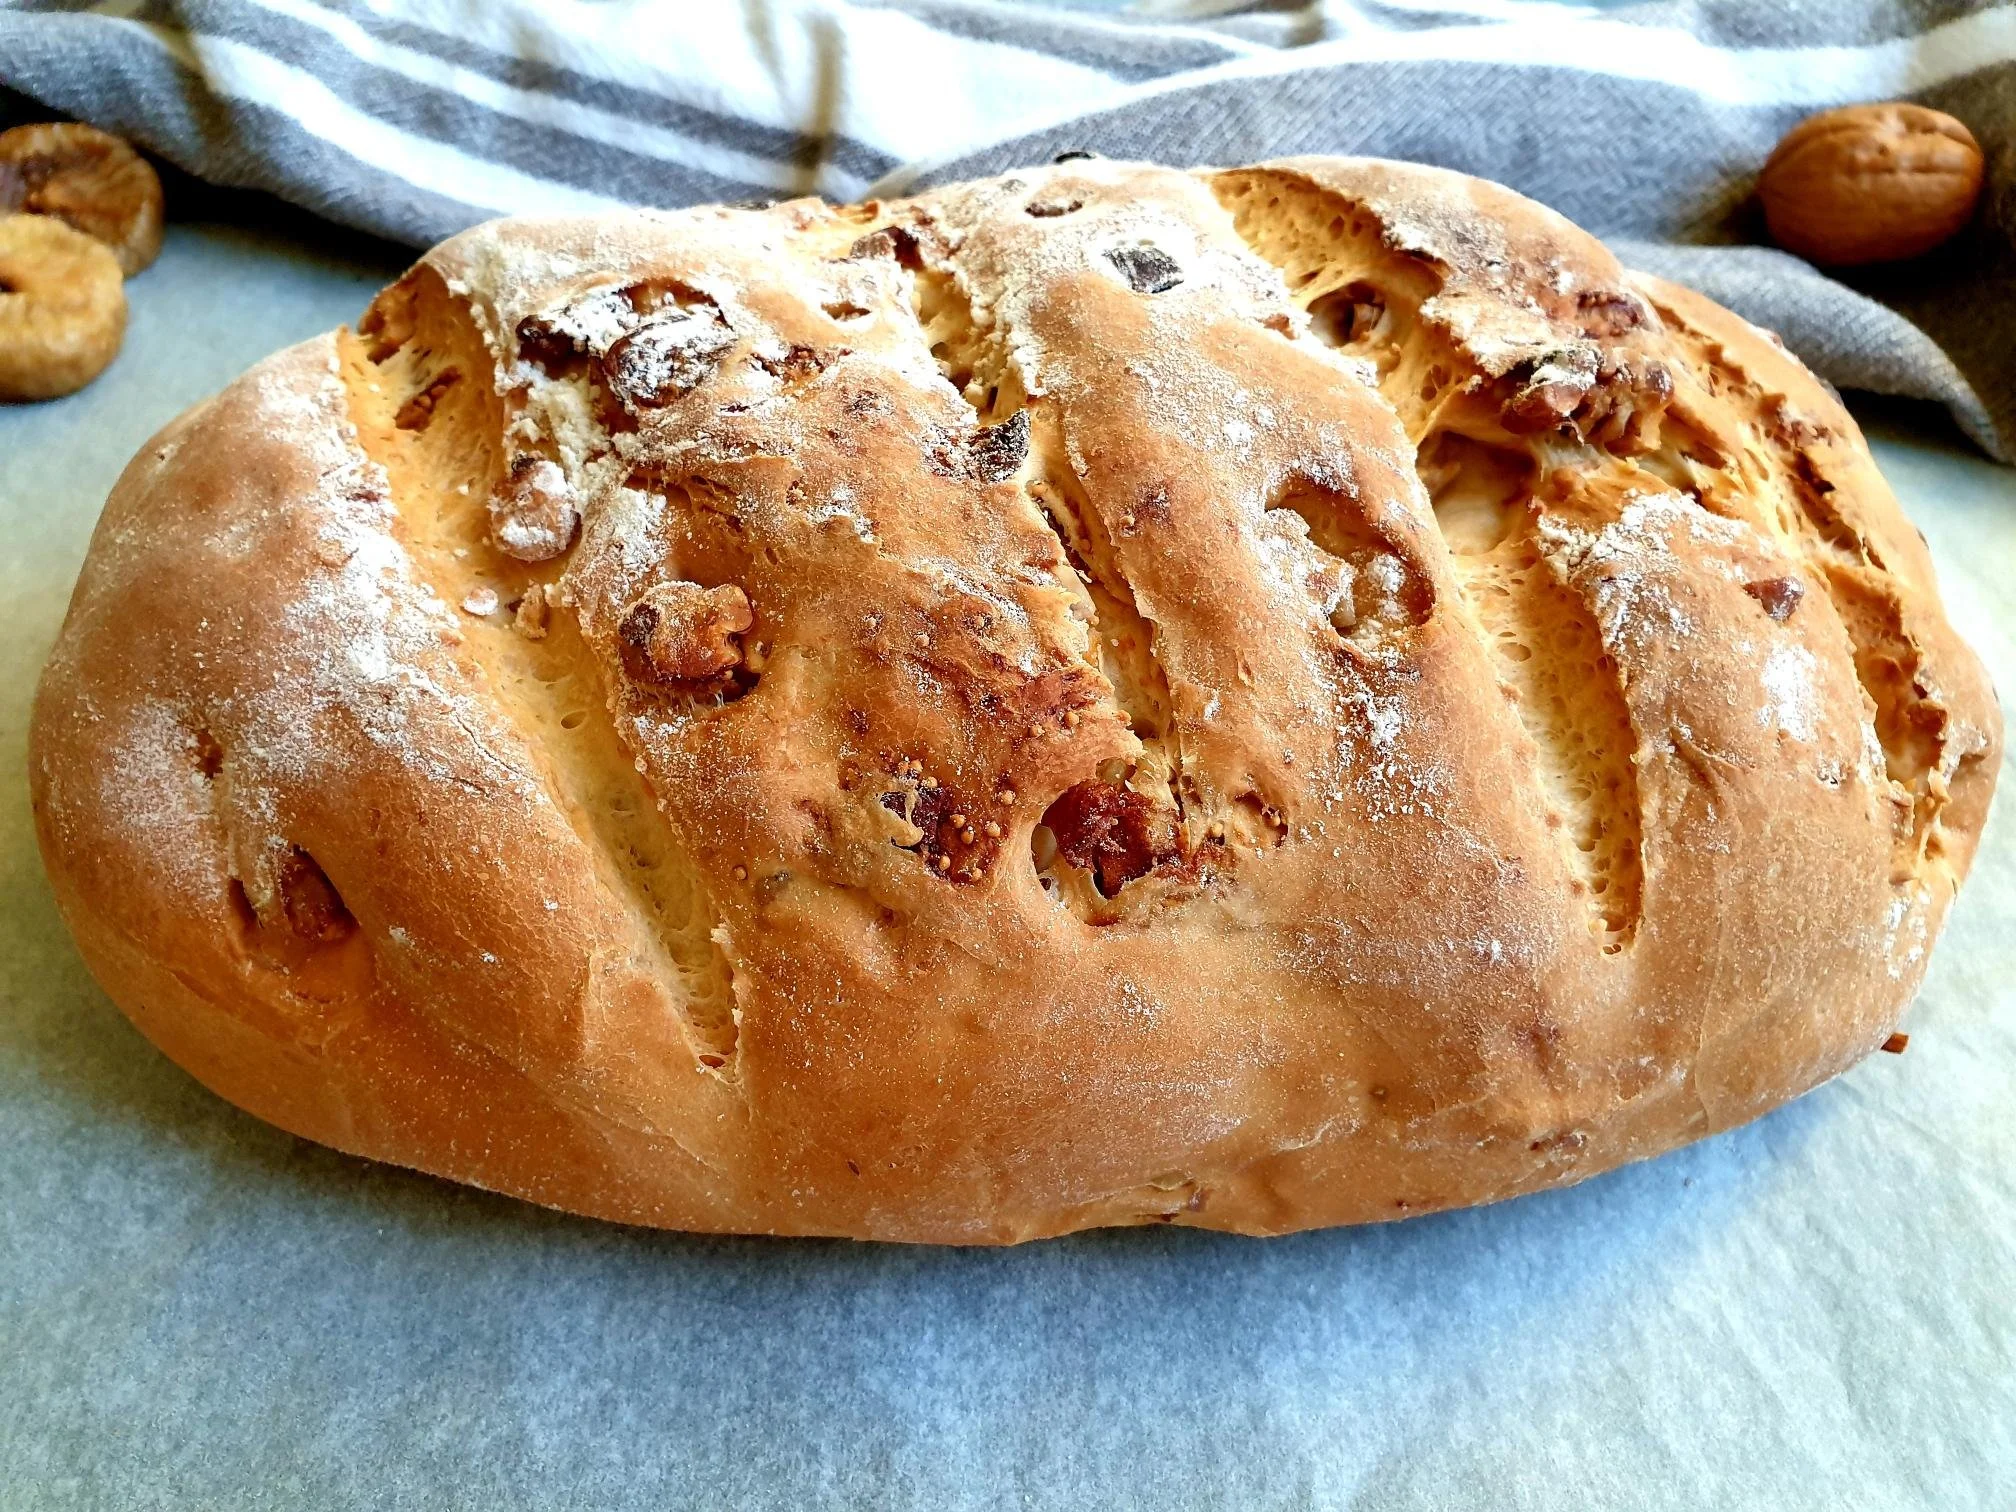
Dry fig and almond slice is a sweet treat made with soft, sticky and delicious dried figs paste mixed with finely chopped nuts that is then formed into a log or oblong shape, and then dried until firm enough to slice.It is perfect to get the festivities rolling, slice it up and serve with assorted cheeses and crackers or as a sweet treat with coffee or tea, Brandy, Dark rum or some kind of sweet wine at the end of the meal. This dried fig delight contains no flour, so it is a fantastic gluten free option.

It is very popular and well known in the South of Italy where it is known as Lonzino di fico (loin of figs for its shape resembling pork loin) or as Salame di fichi (fig “salami”).

It used to be recurrently made in the households in Slovenian Istra where it is referred as Figov Hlebček, literally meaning Fig Loaf, as it is shaped into oblong like a loaf of bread.

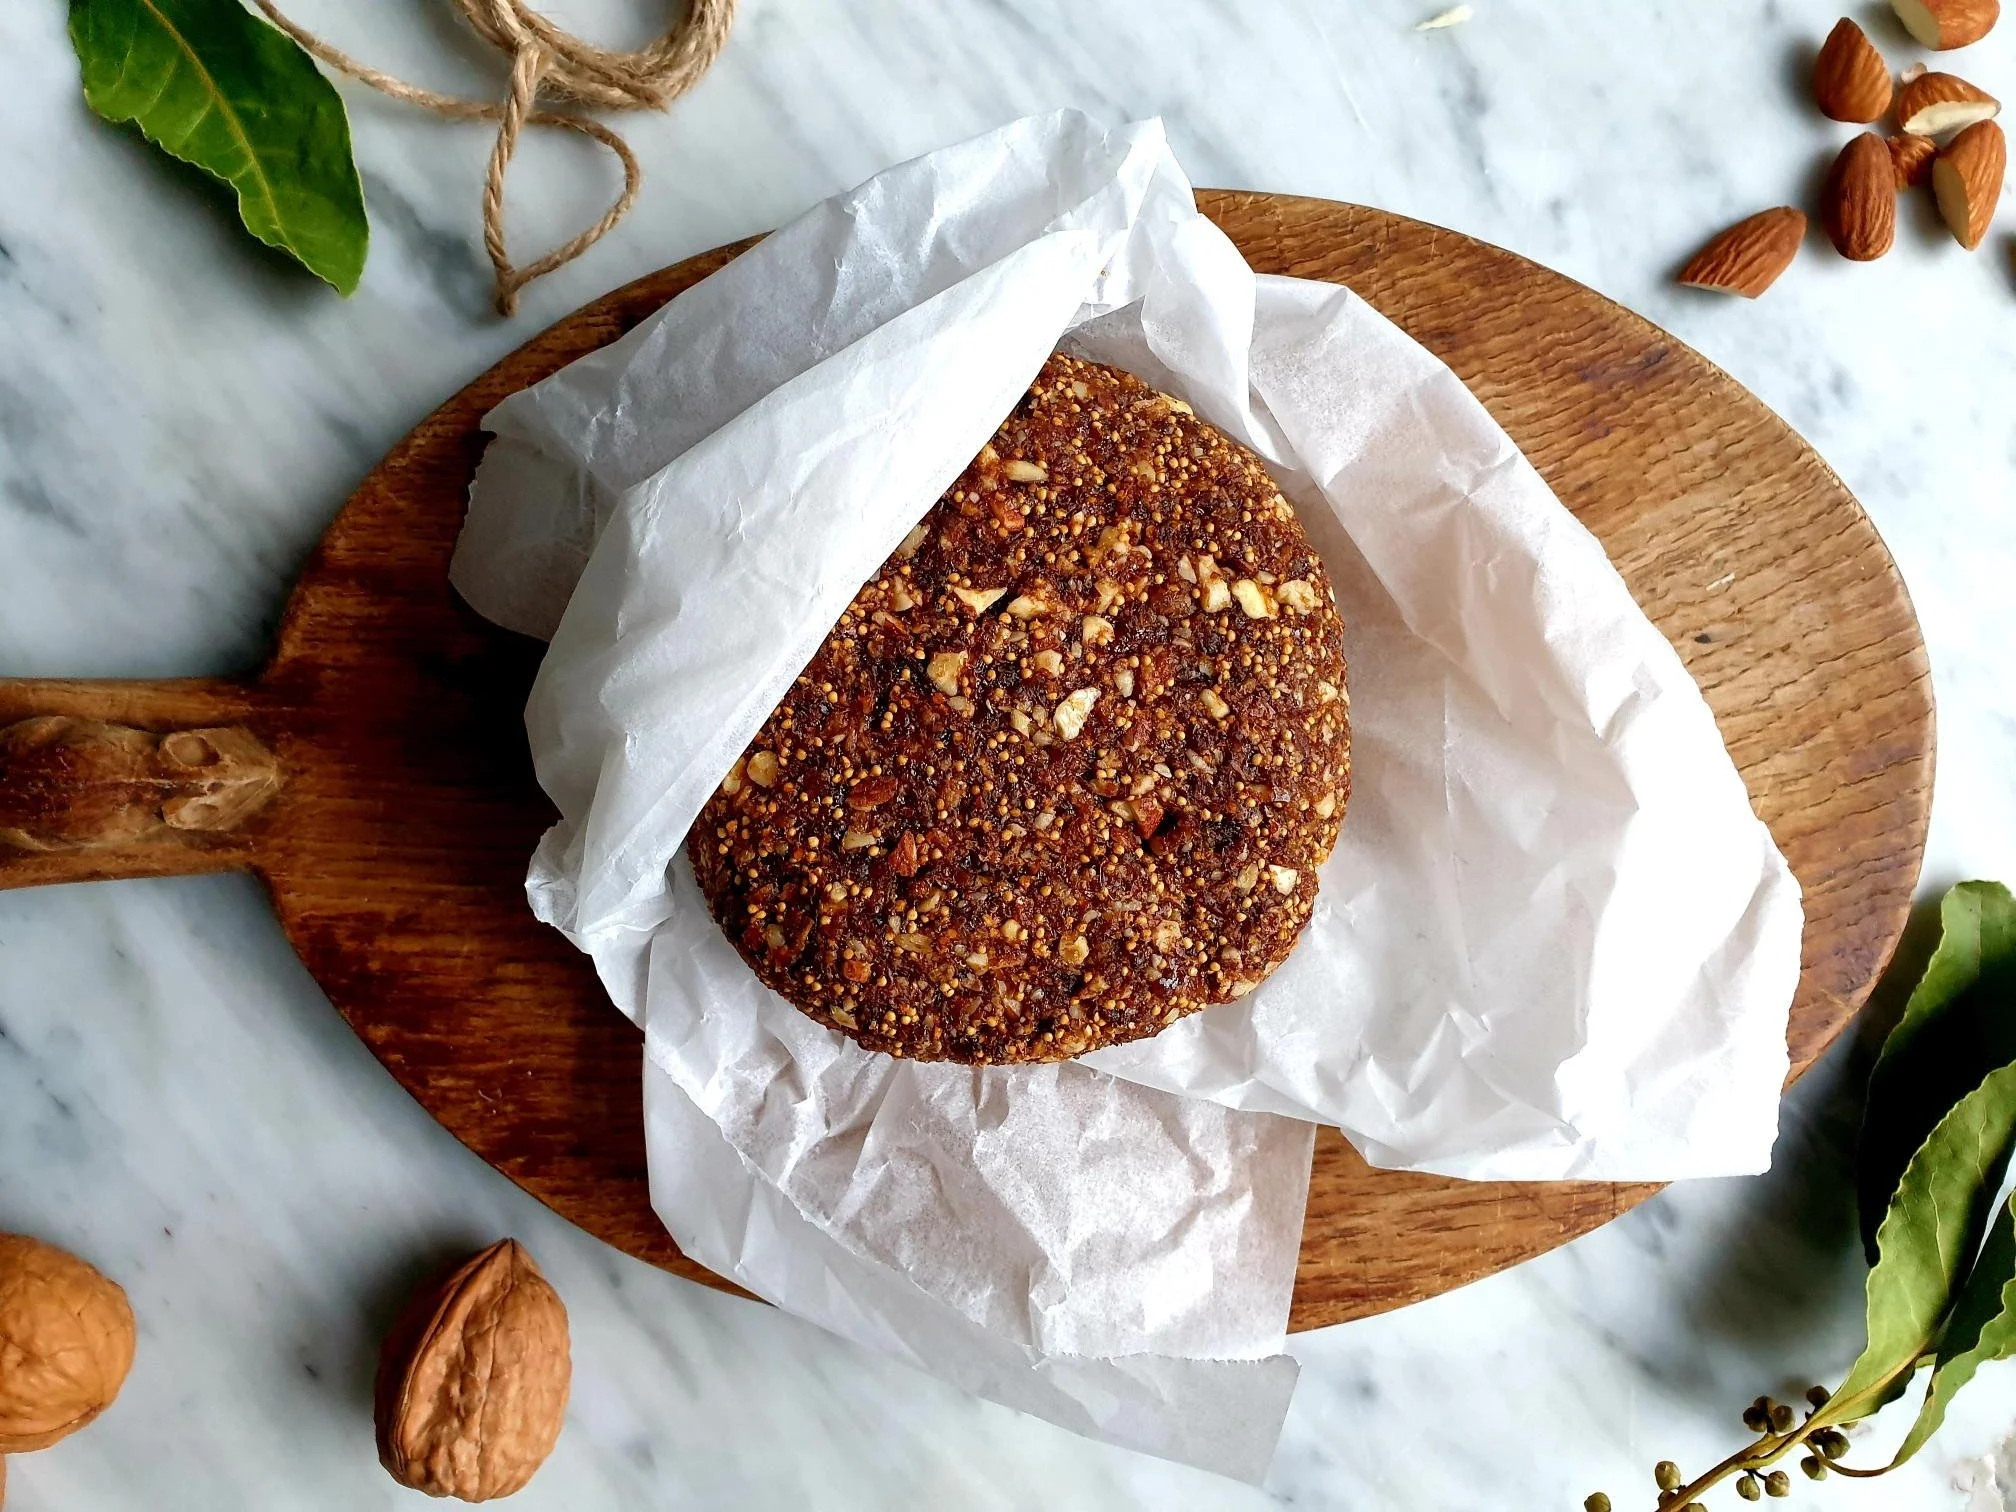
This fig loaf was traditionally wrapped in bay leaves and allow to dry in the sun for at least a week. It used to be made straight after grape picking season using a bit of Must, which is a freshly crushed grape juice (from the Latin vinum mustum, meaning young wine) and a first step in winemaking.

To make this fig loaf Istrian style you would only use dried figs, raisins and almonds. Nothing is stopping you to play with the ingredients and make your own version of it, perhaps using different types of nuts like walnuts, pistachios, and a different variety of dried fruit like dried apricots, dates or similar.

Recipe

Ingredients

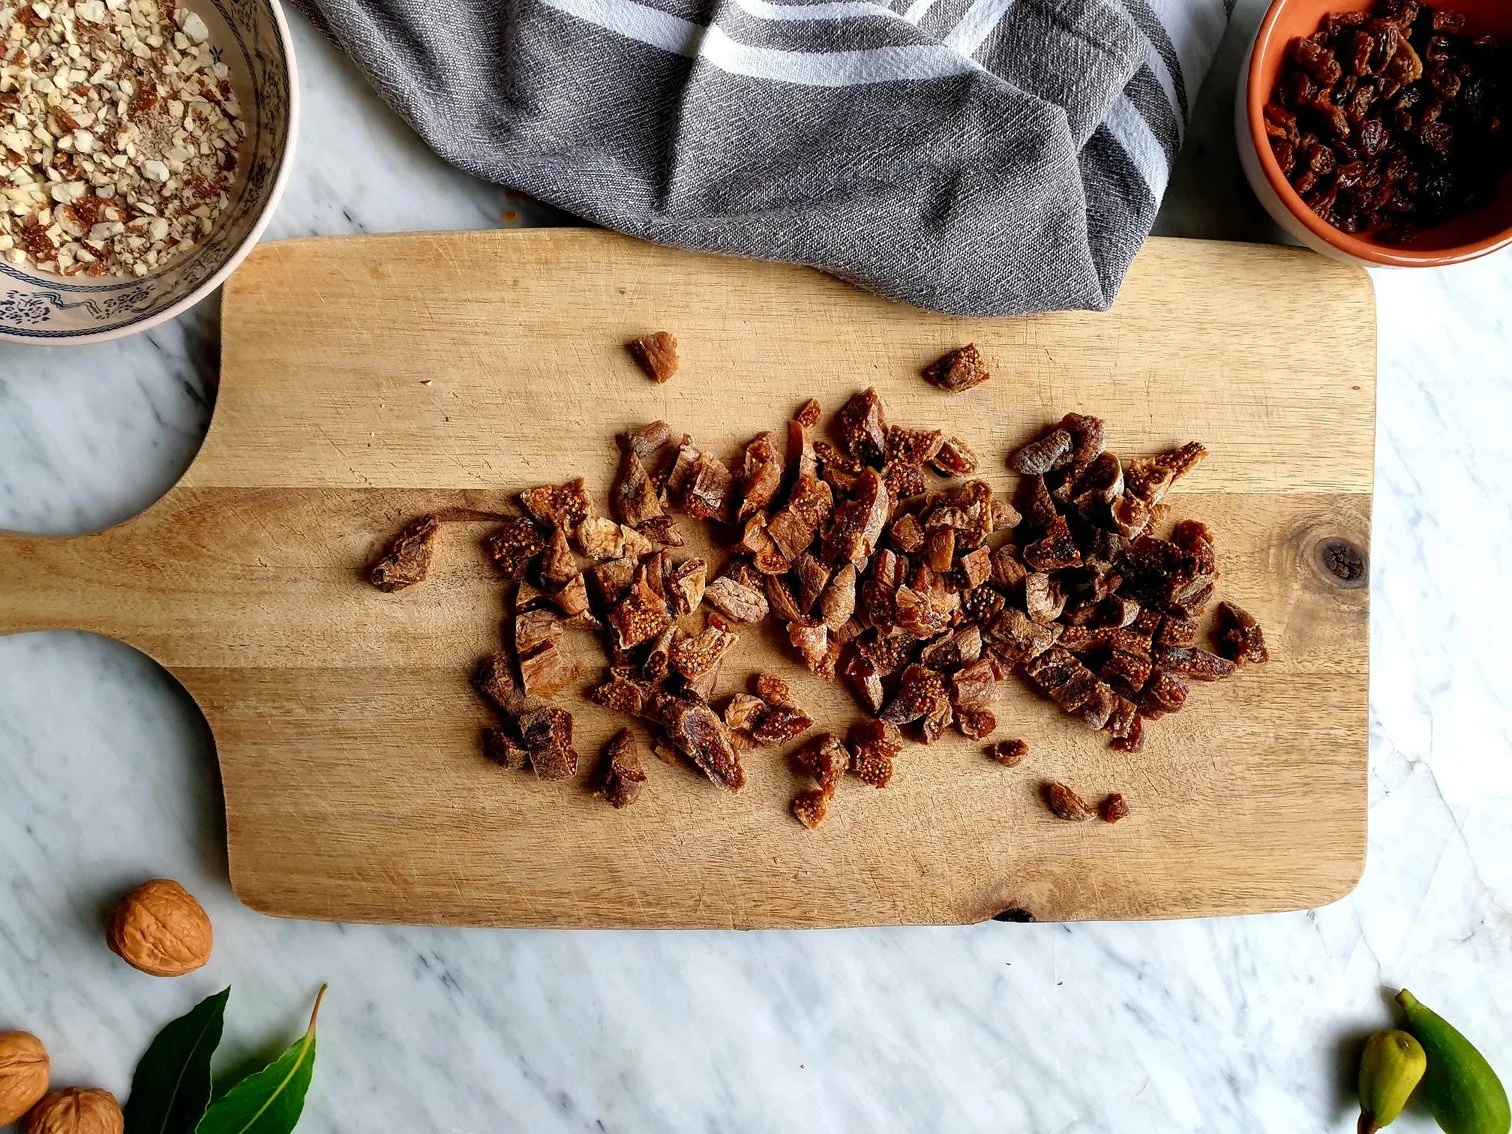
  • 250g dried figs, hard stalk removed, roughly chopped (for this recipe Turkish or Calymirna dried figs are the best)
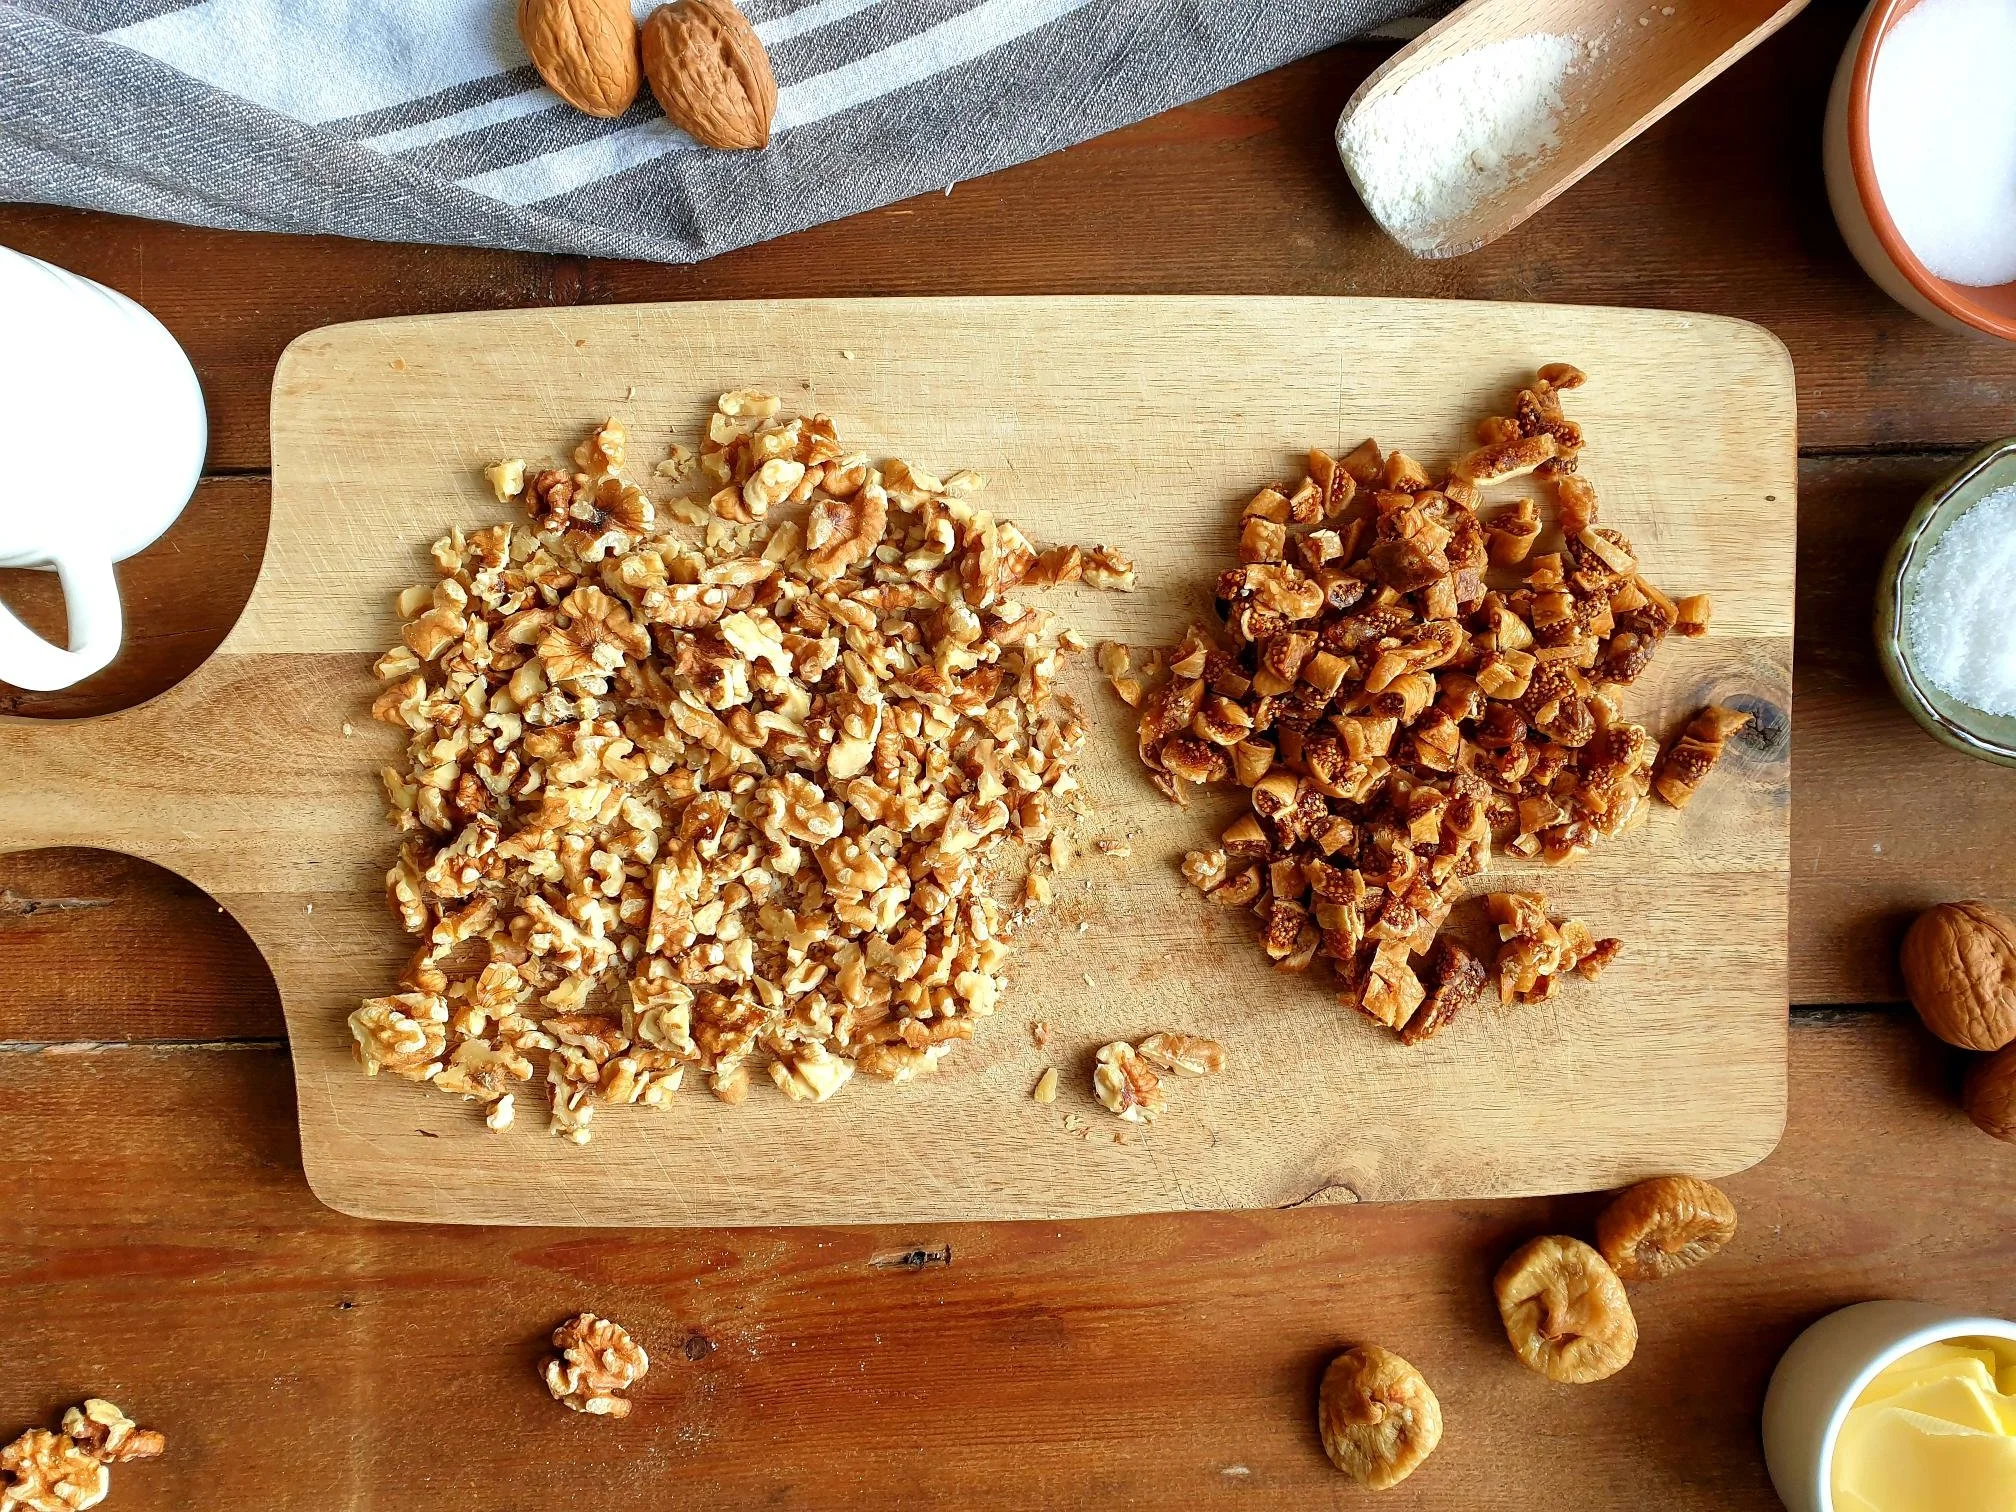
  • 50g raisins

  • 100g peeled or unpeeled almond, (can use walnuts instead)

  • ½ Tbsp dark rum, Brandy, Italian sweet Marsala wine, Muscat sweet wine or other type of sweet wine, optional

Method

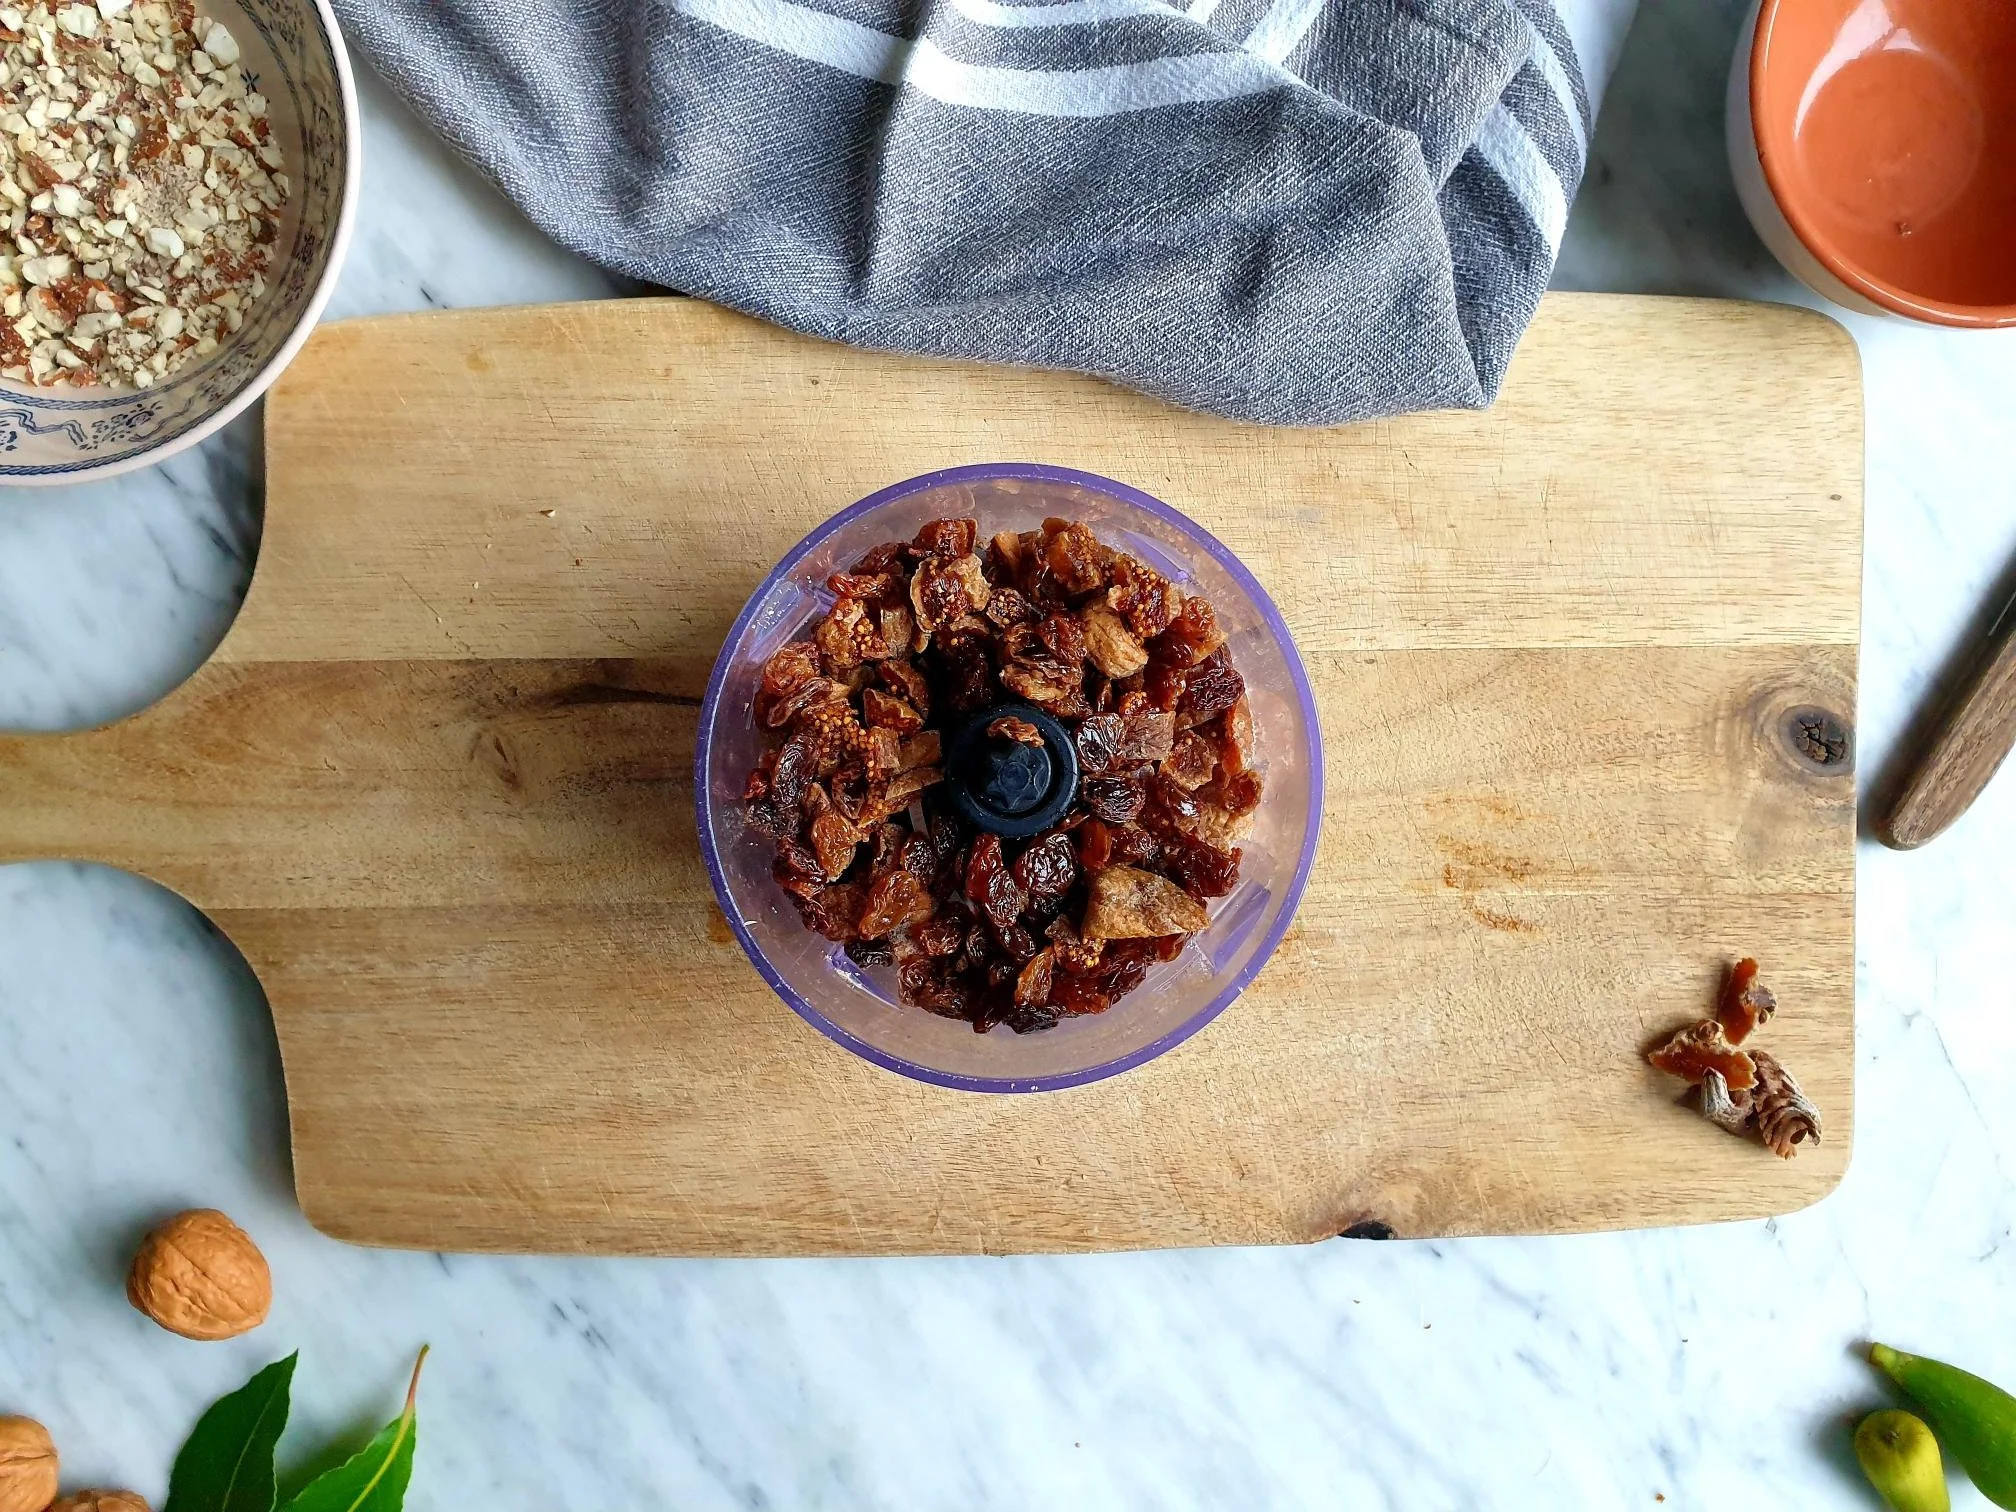
Place raisins in a small bowl and completely cover with warm water.

If you wish, you can add ½ Tbsp of dark rum, Brandy, Marsala or Muscat sweet wine or other type of sweet wine.

Leave to soak and plump up for at least 15 minutes, or until needed.

Place the almonds, or walnuts, in a food processor and pulse until most are finely chopped. Remove and transfer to a mixing bowl.

View fullsize Dried Fig and Almonds Slice Itrsian Recipe 4.jpg
View fullsize Dried Fig and Almonds Slice Itrsian Recipe 5.jpg

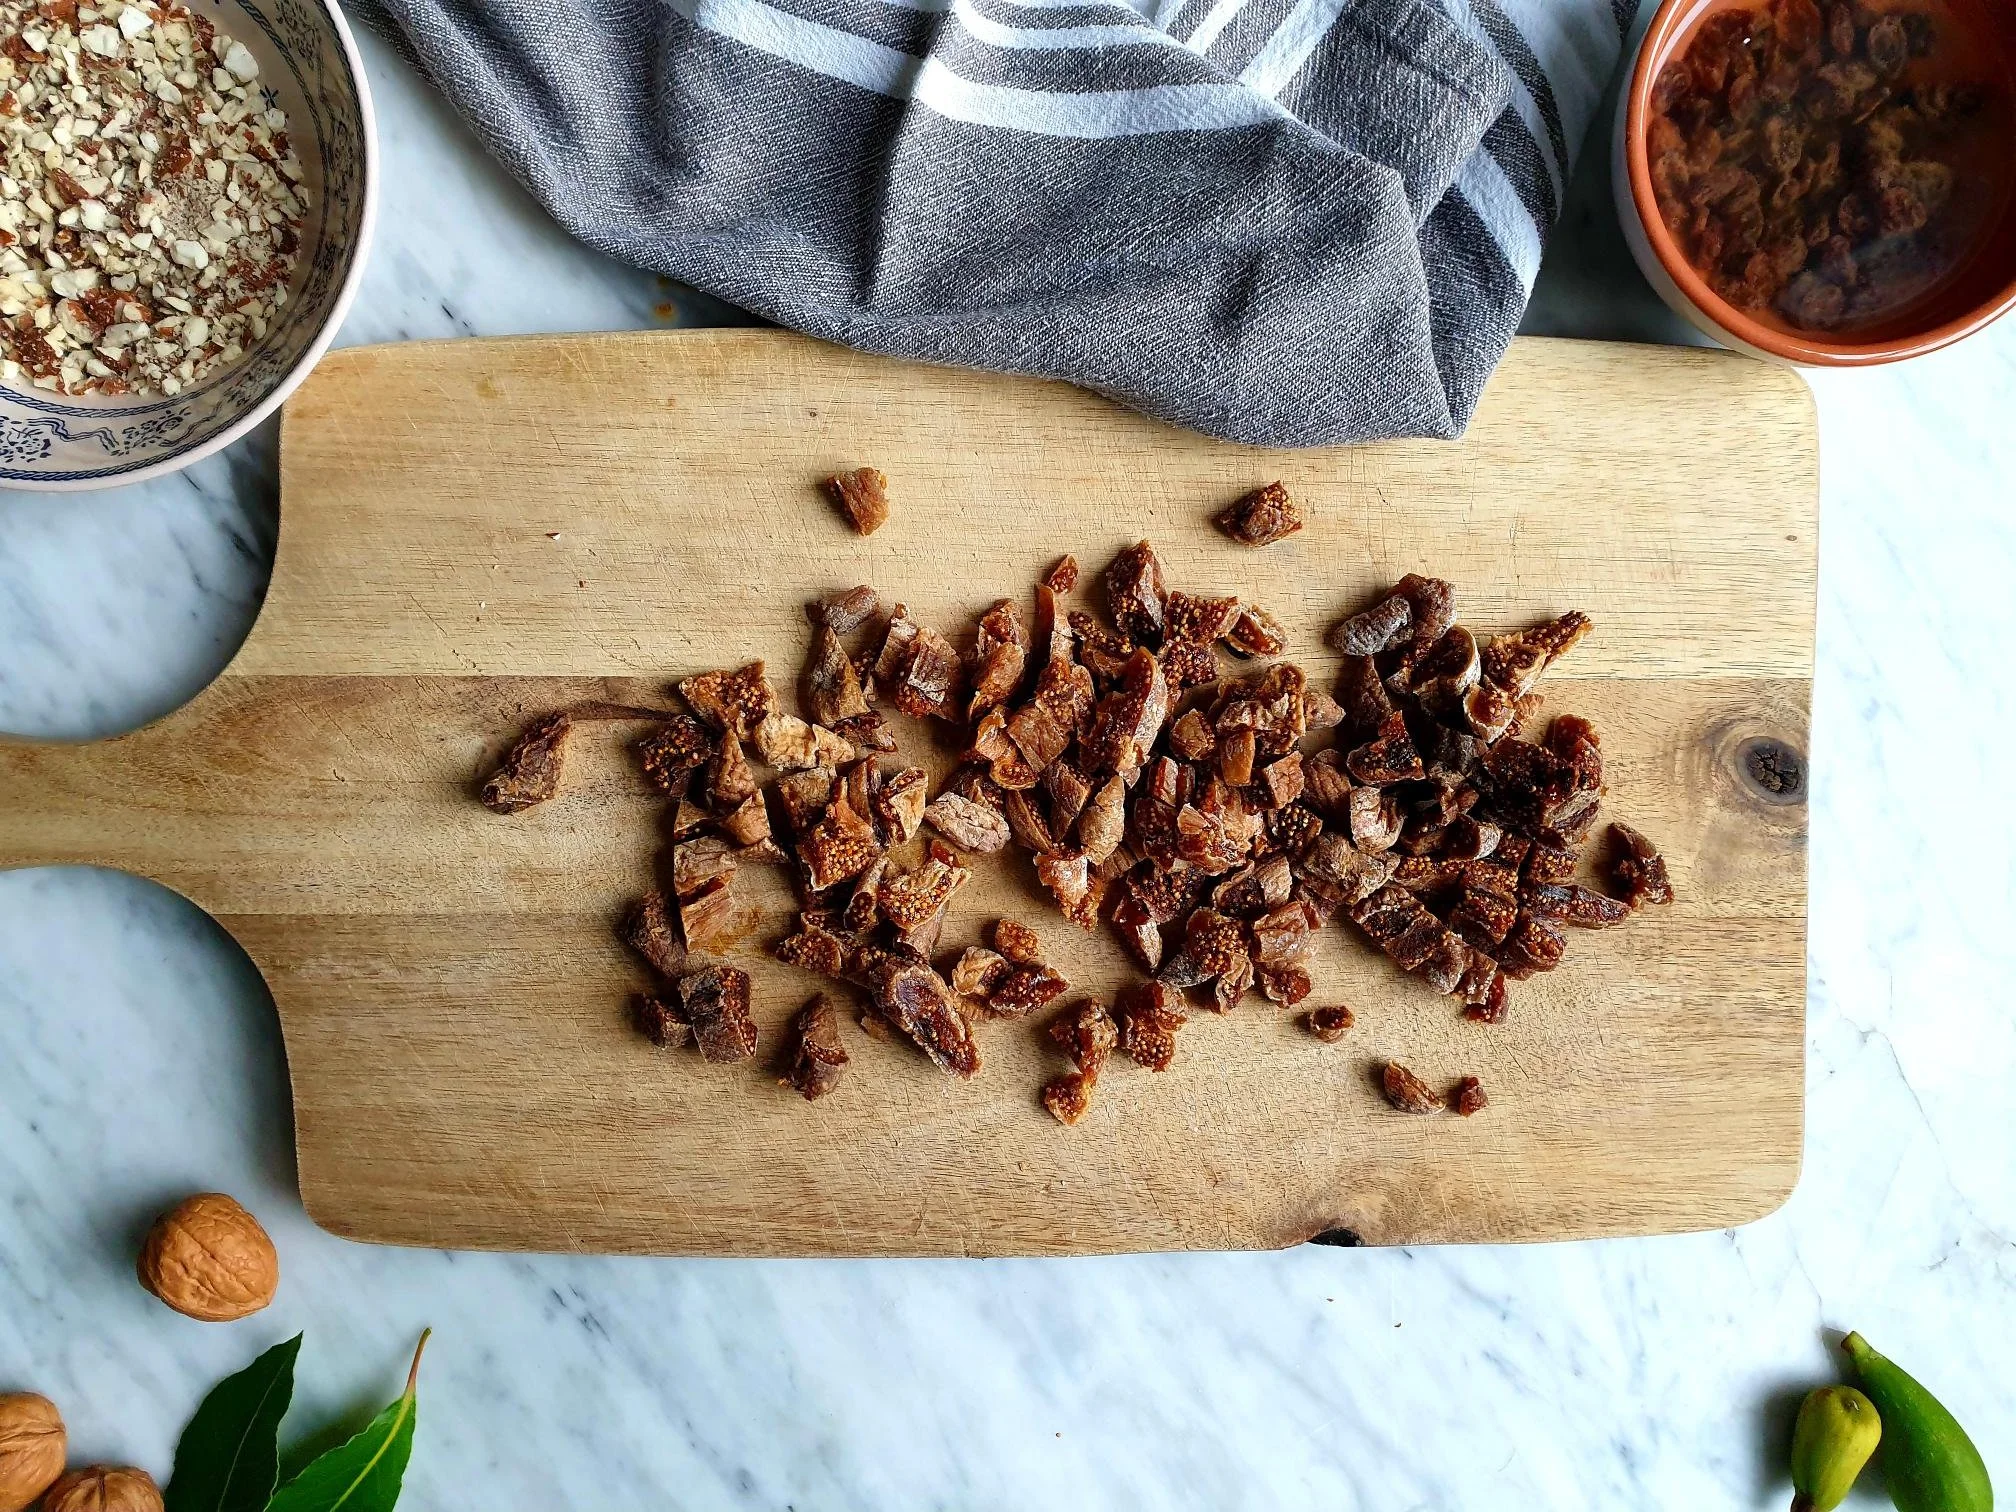
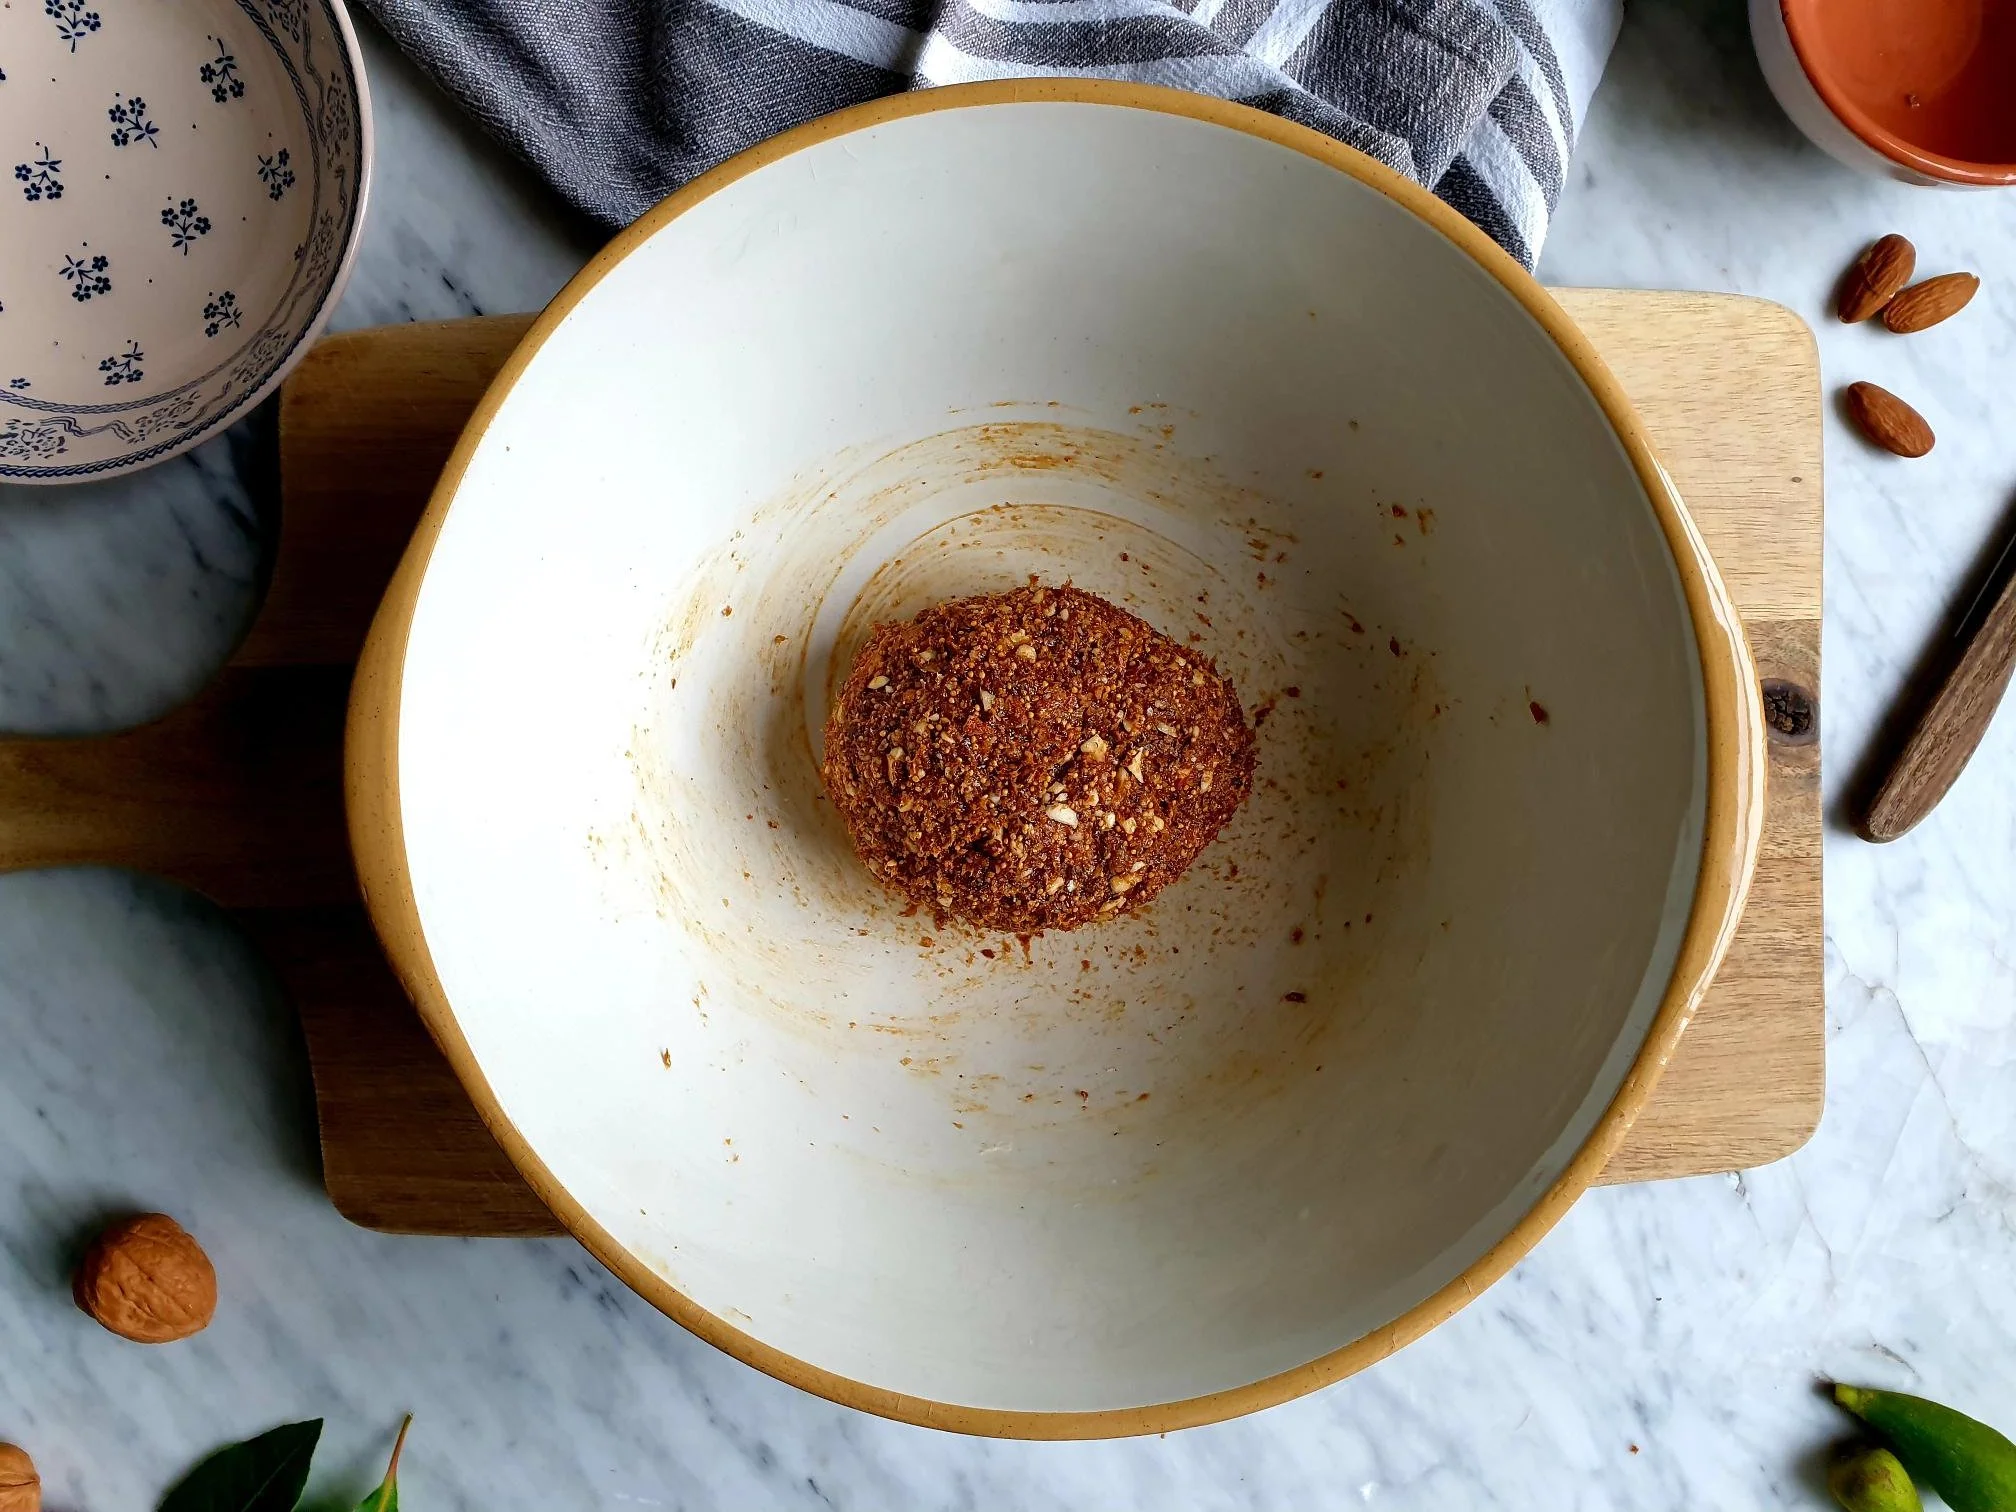
Put roughly chopped dried figs and soaked raisins into a food processor and whizz until they form a sticky paste (if the paste does not quite come together, add a splash of warm water).

View fullsize Dried Fig and Almonds Slice Itrsian Recipe 6.jpg
View fullsize Dried Fig and Almonds Slice Itrsian Recipe 7.jpg

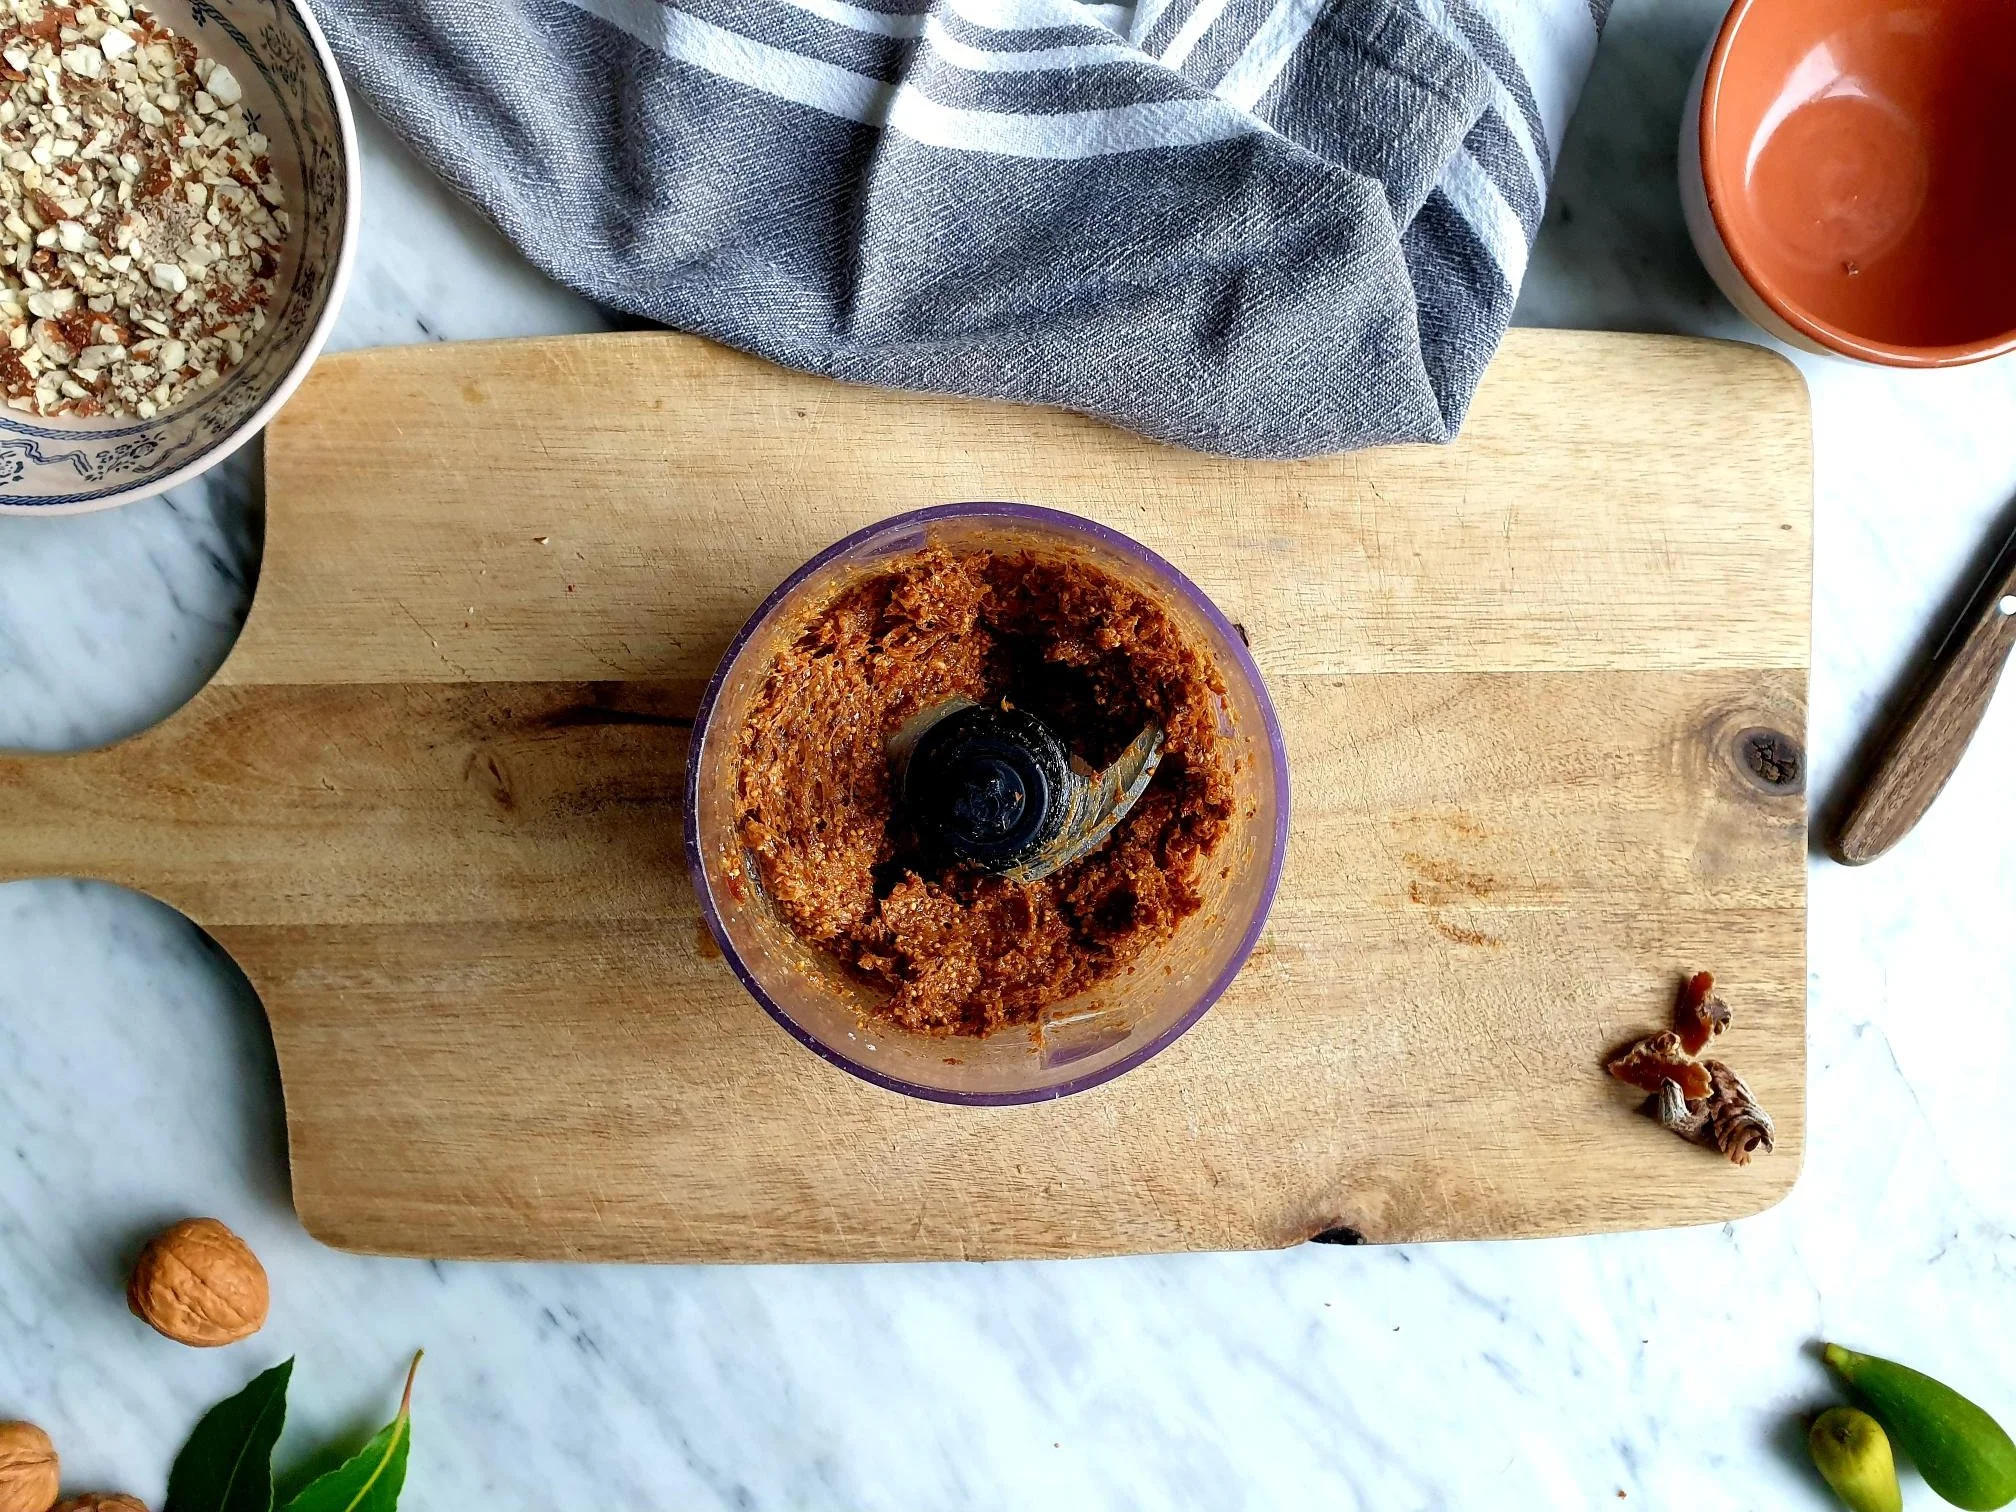
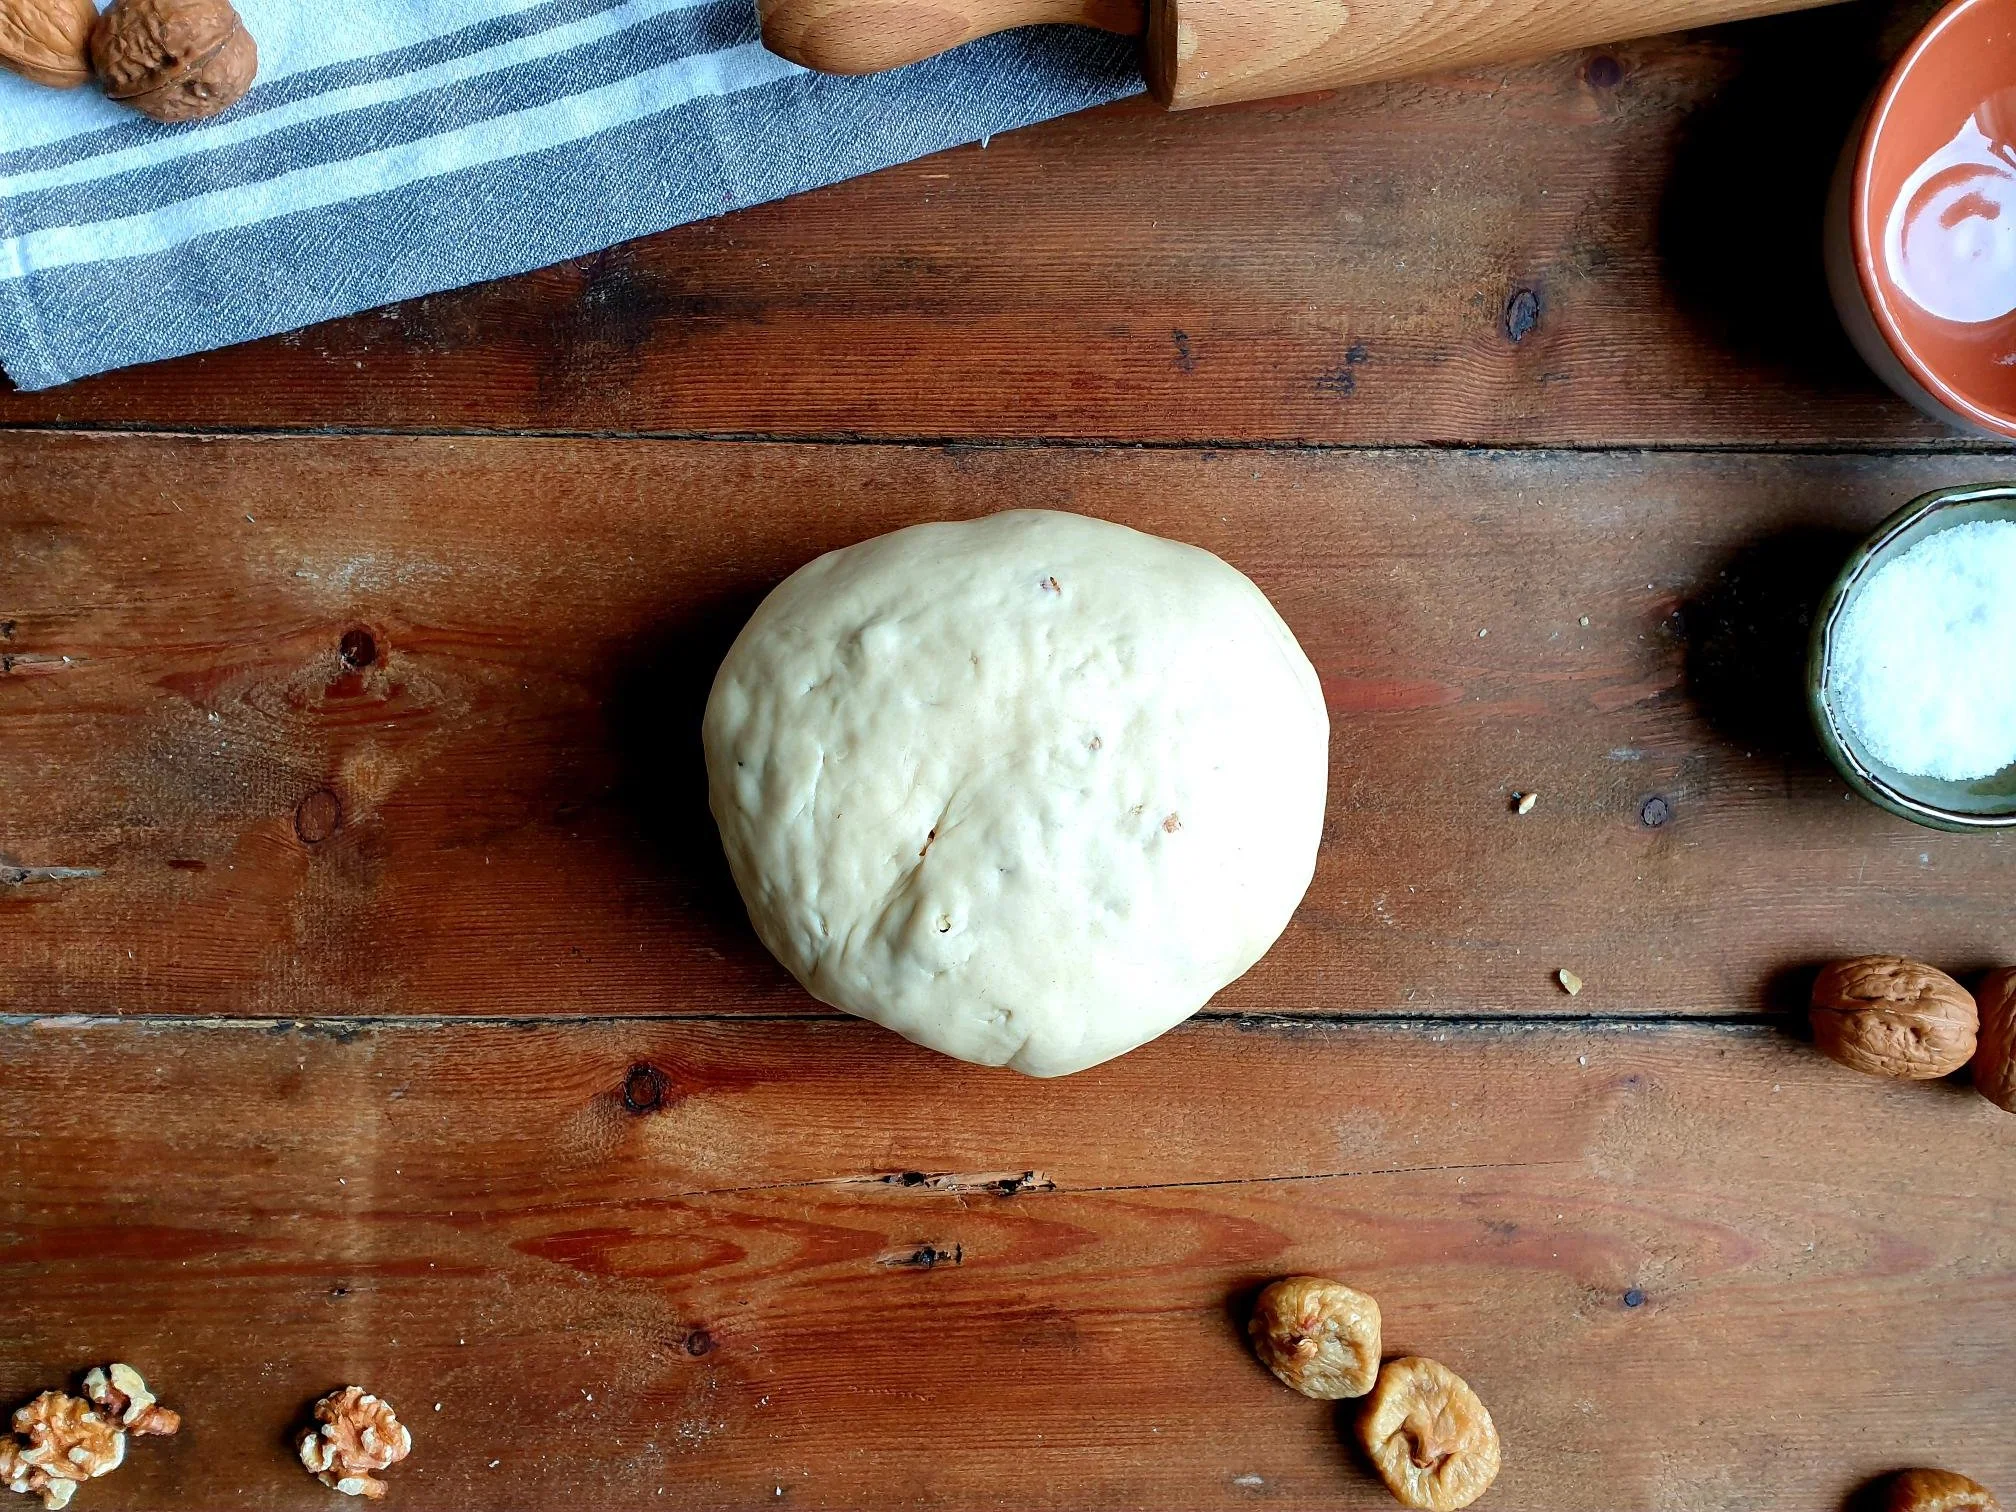
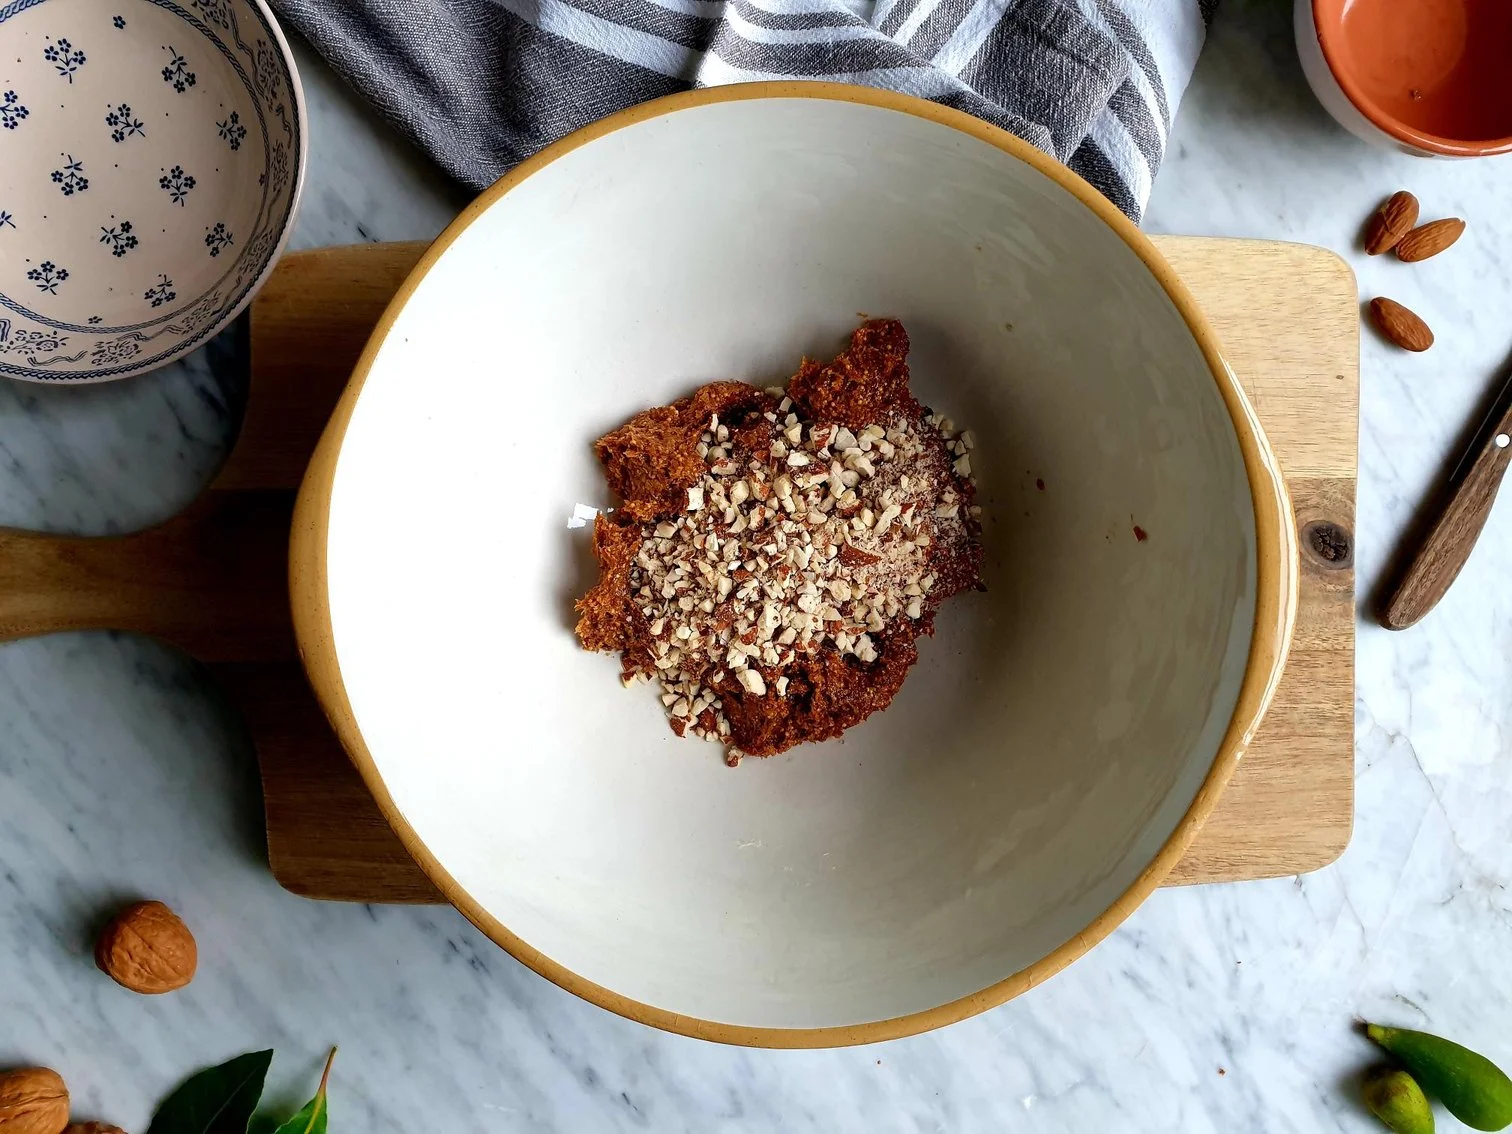
Remove and transfer fig paste into the mixing bowl together with chopped nuts.

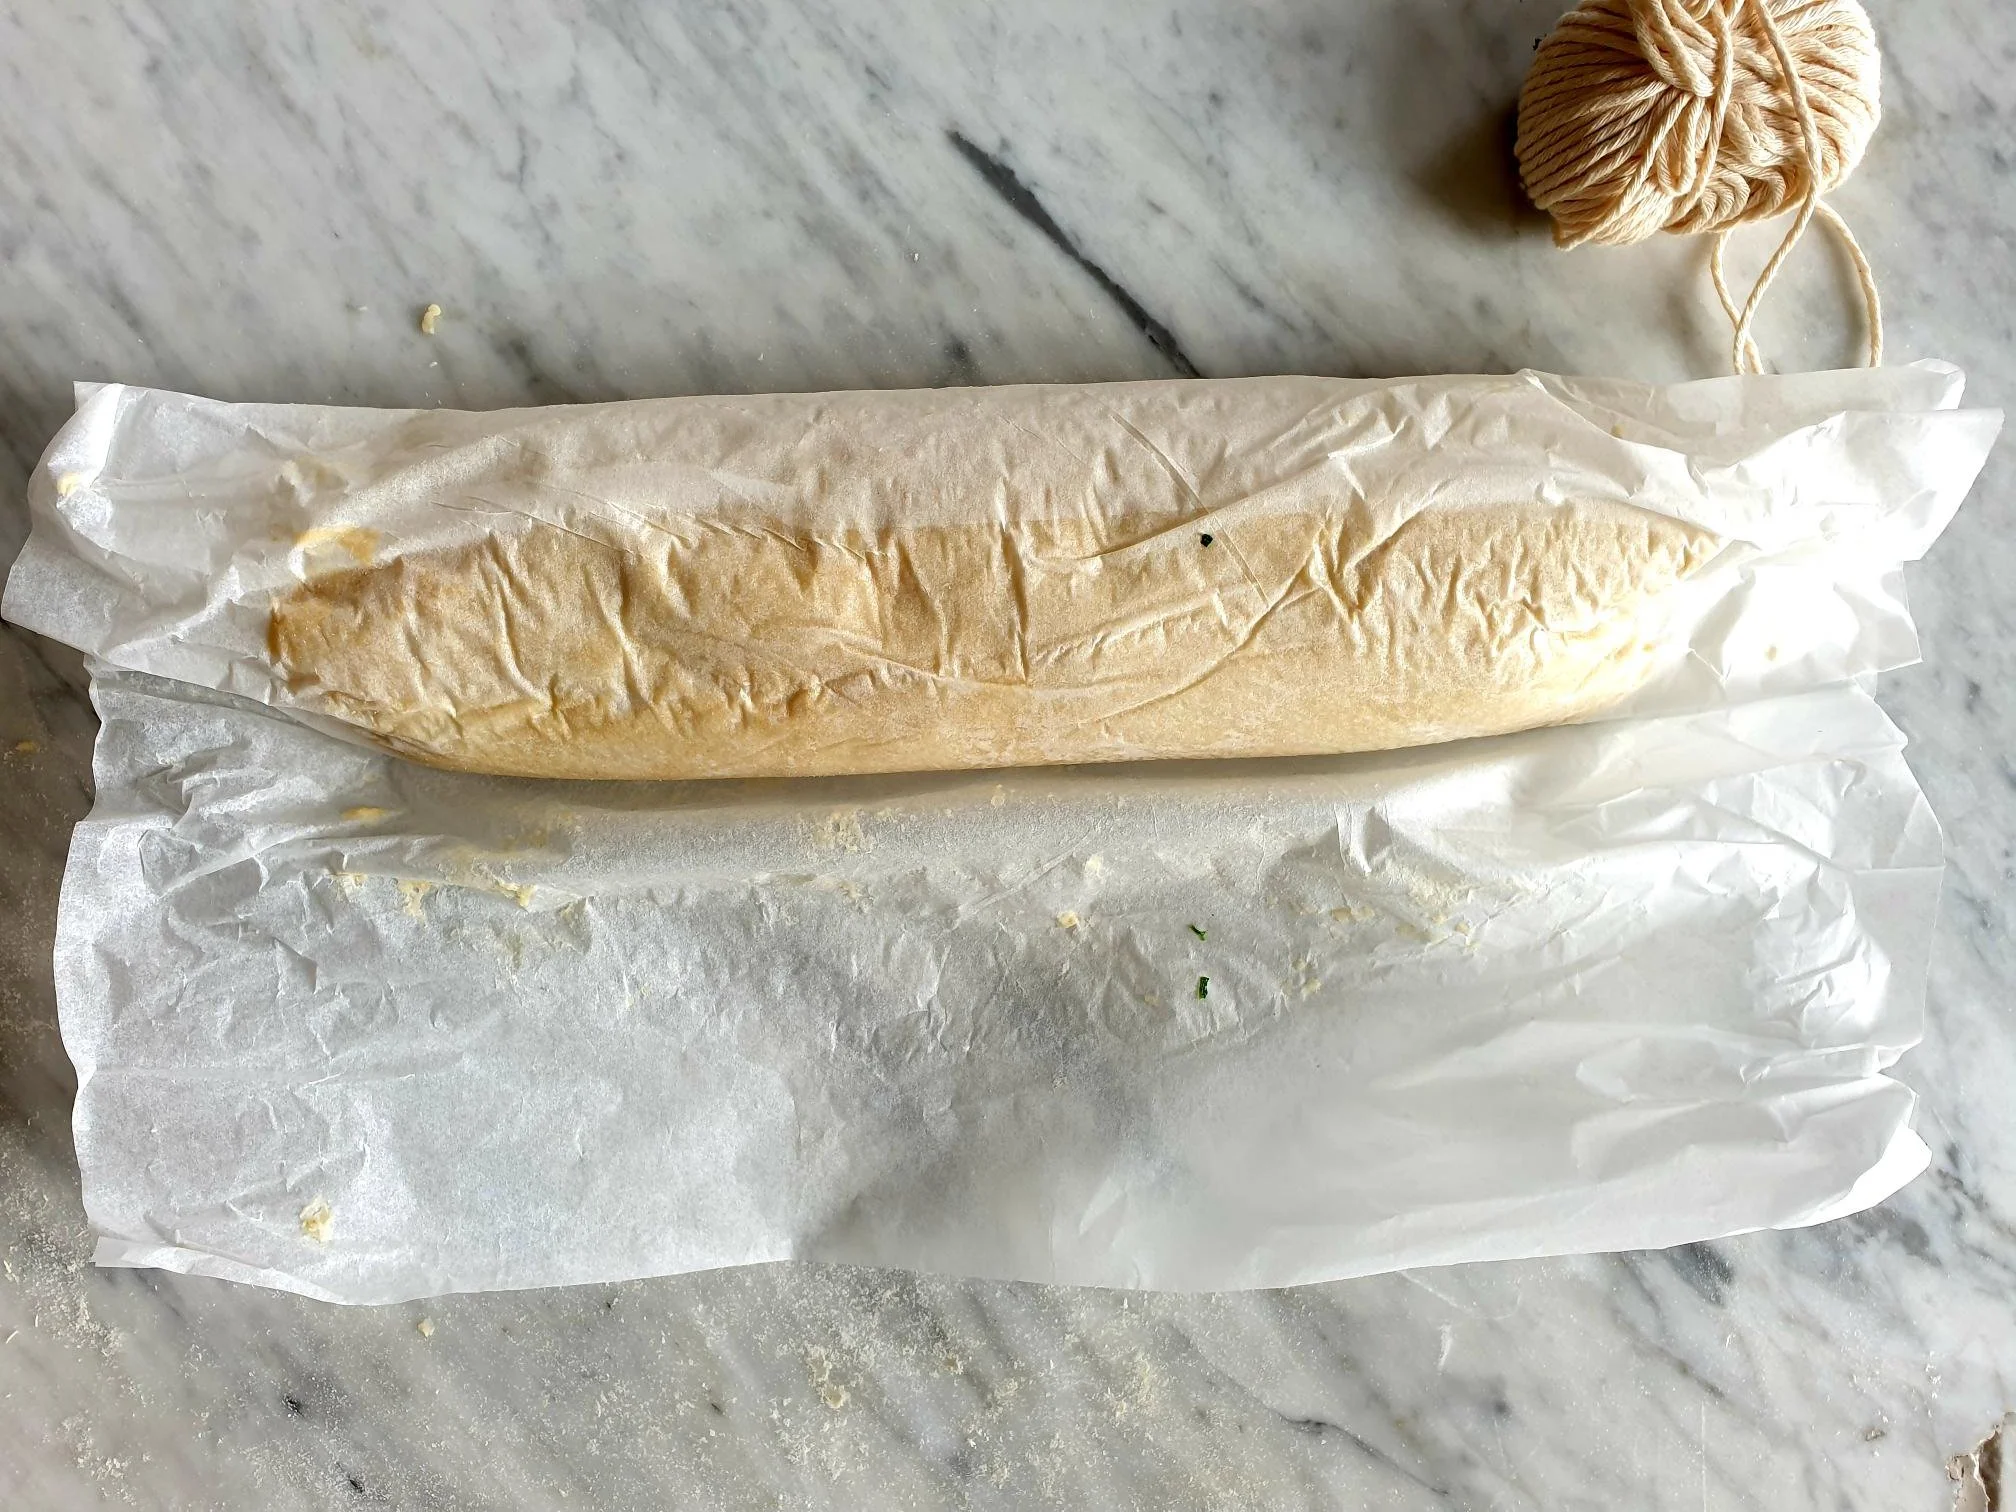
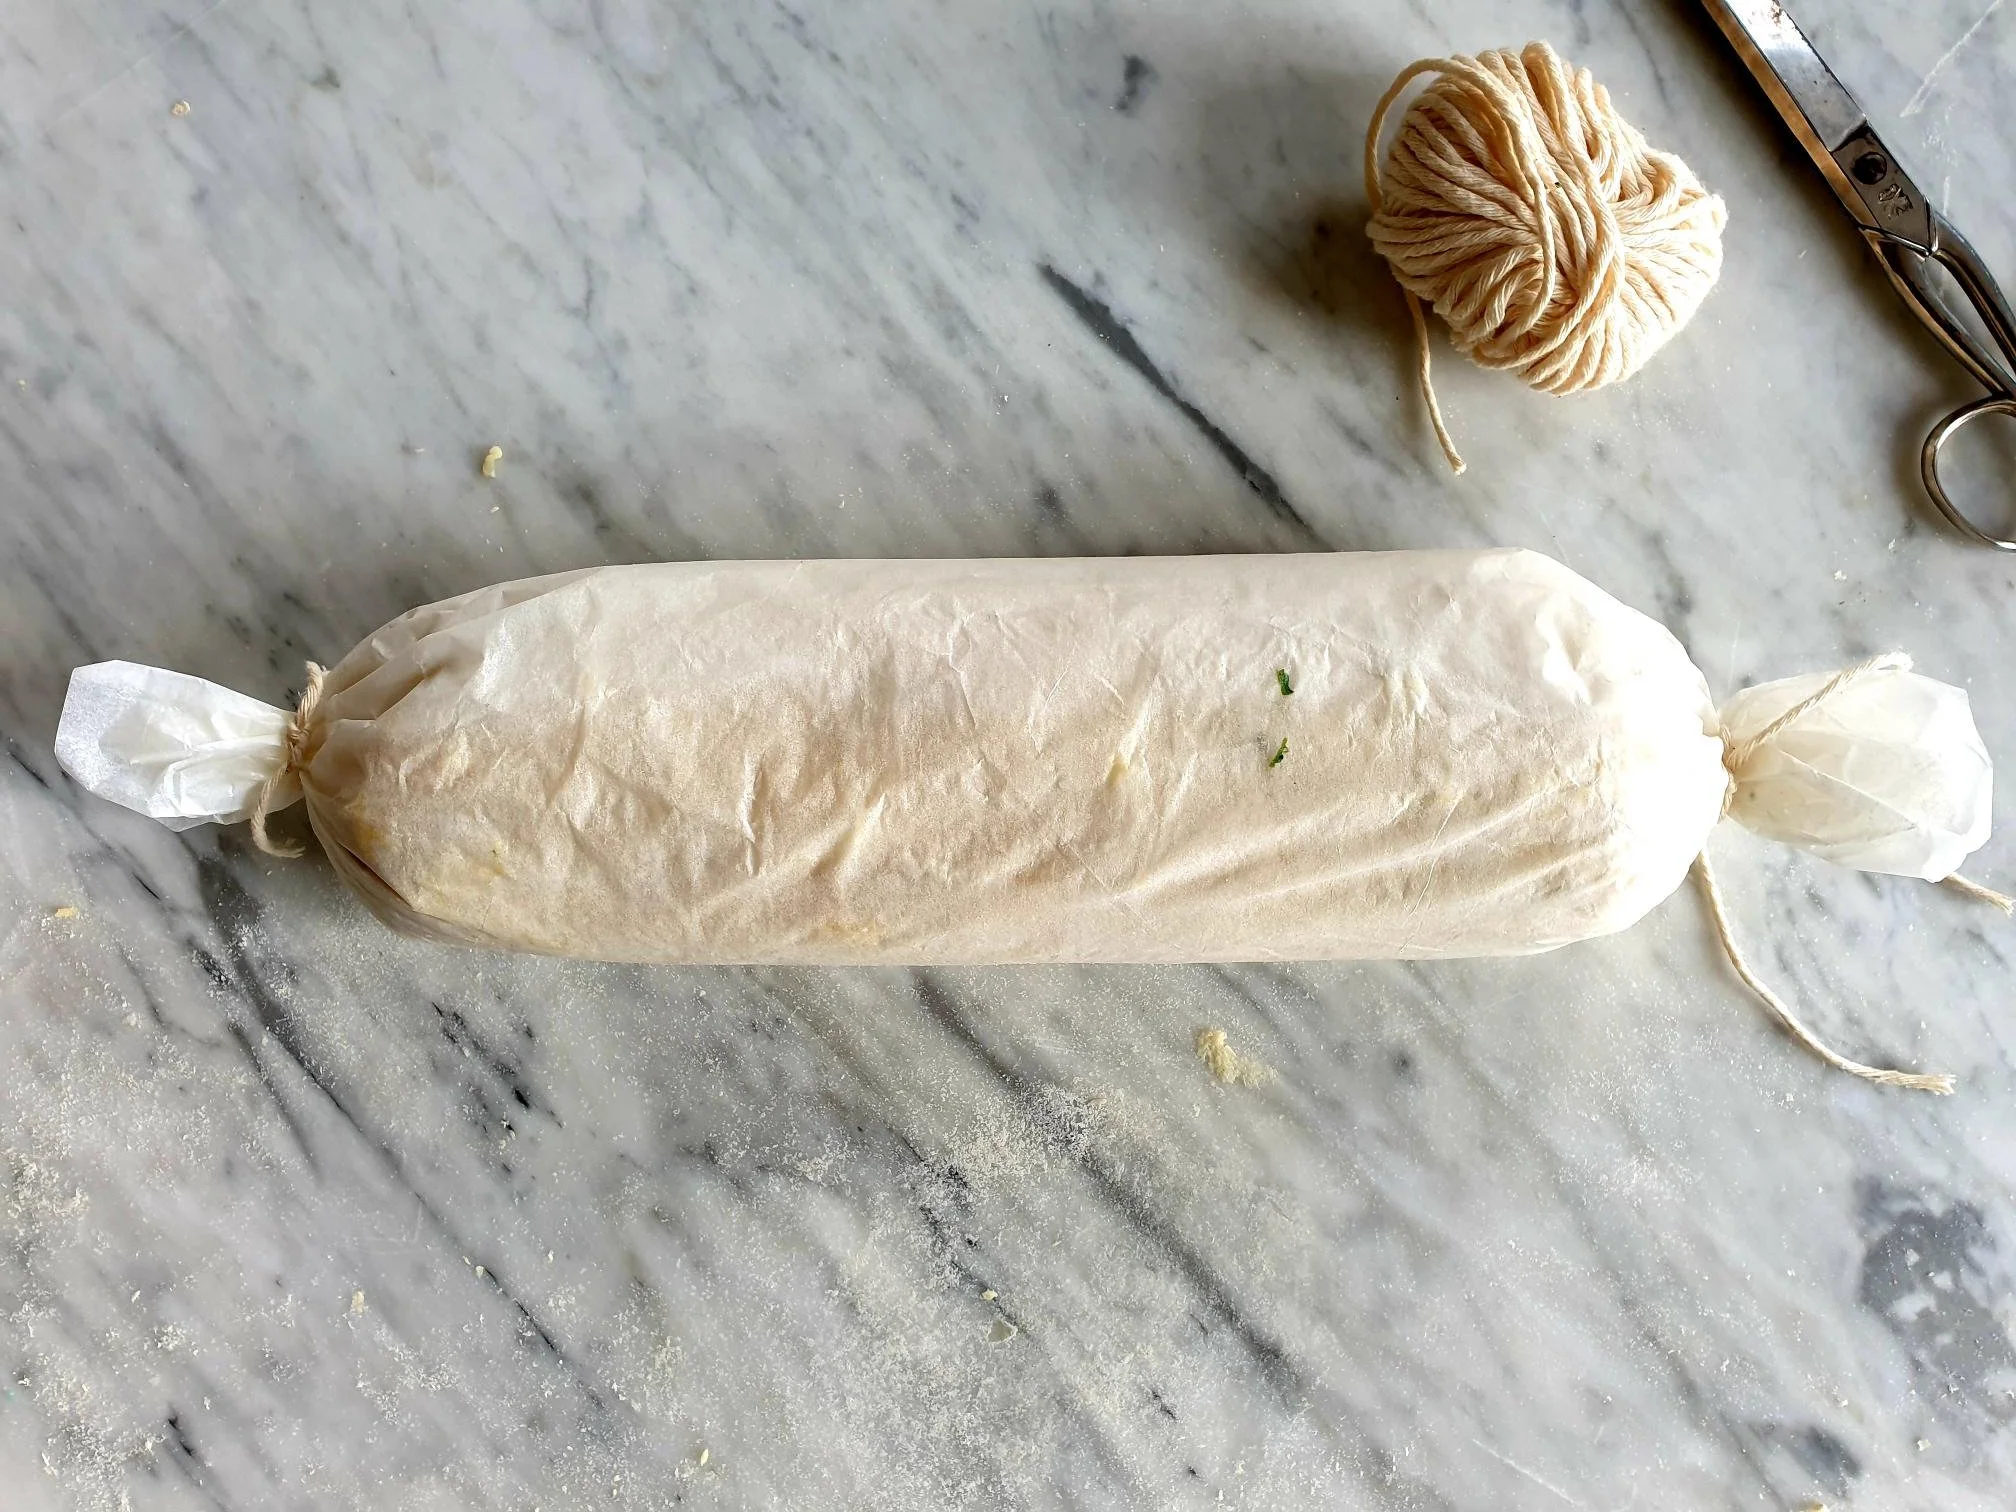
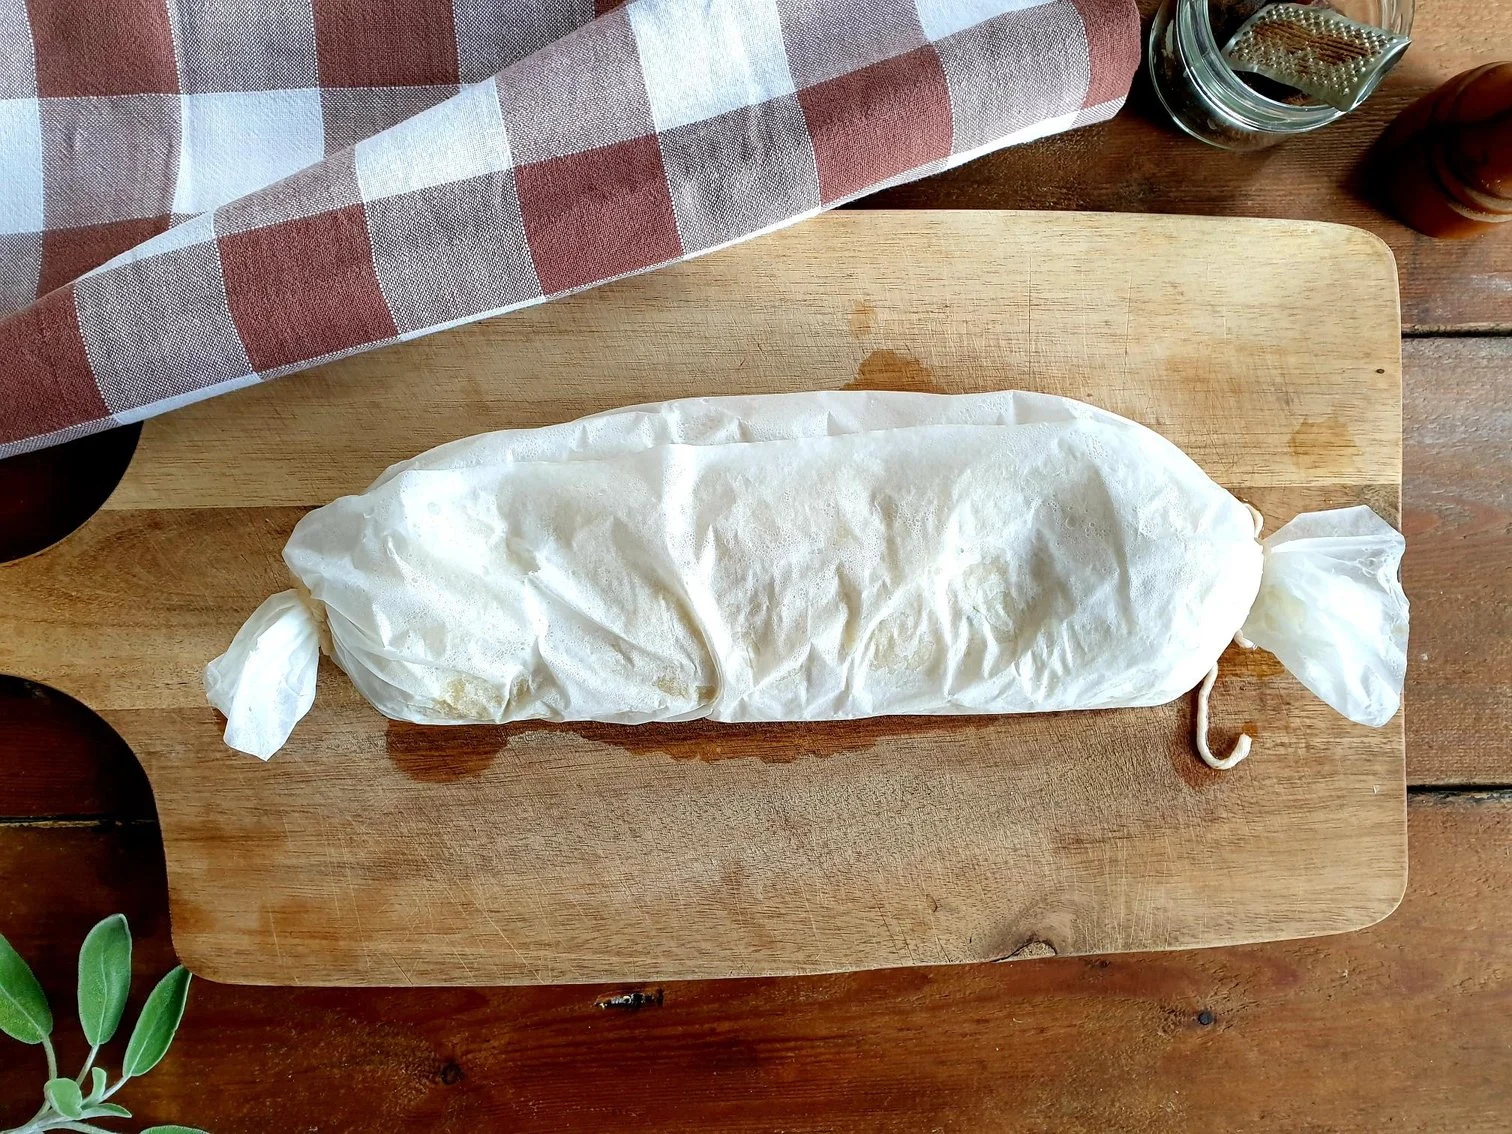
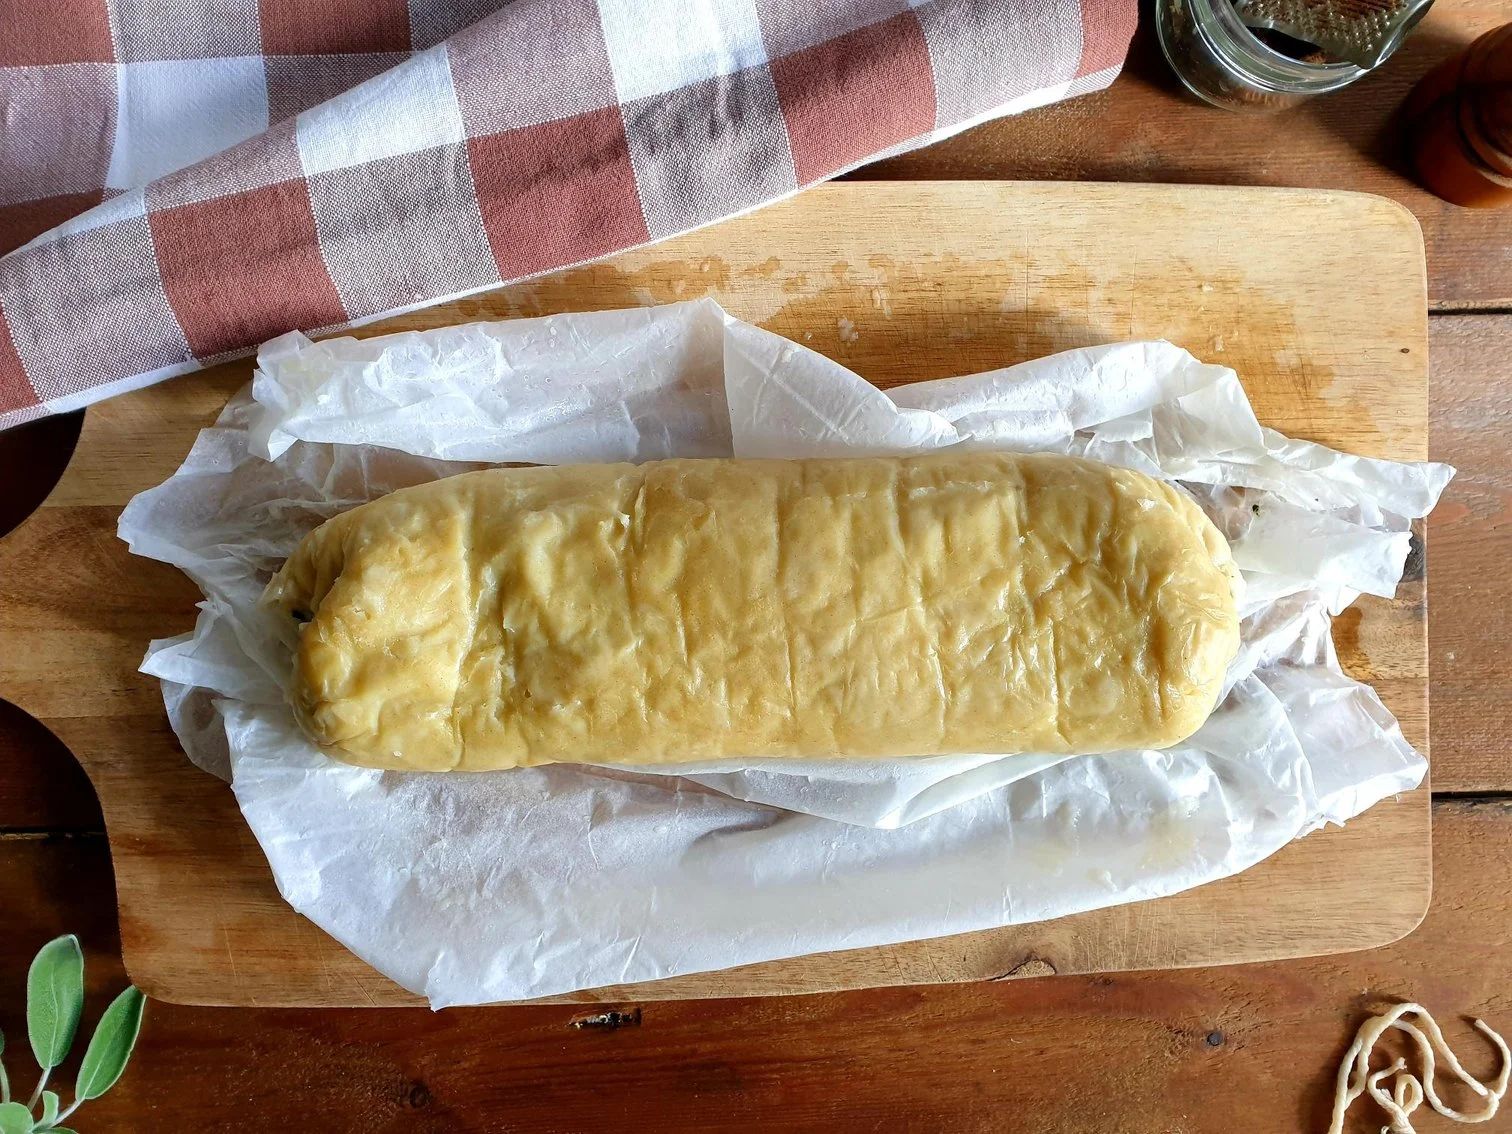
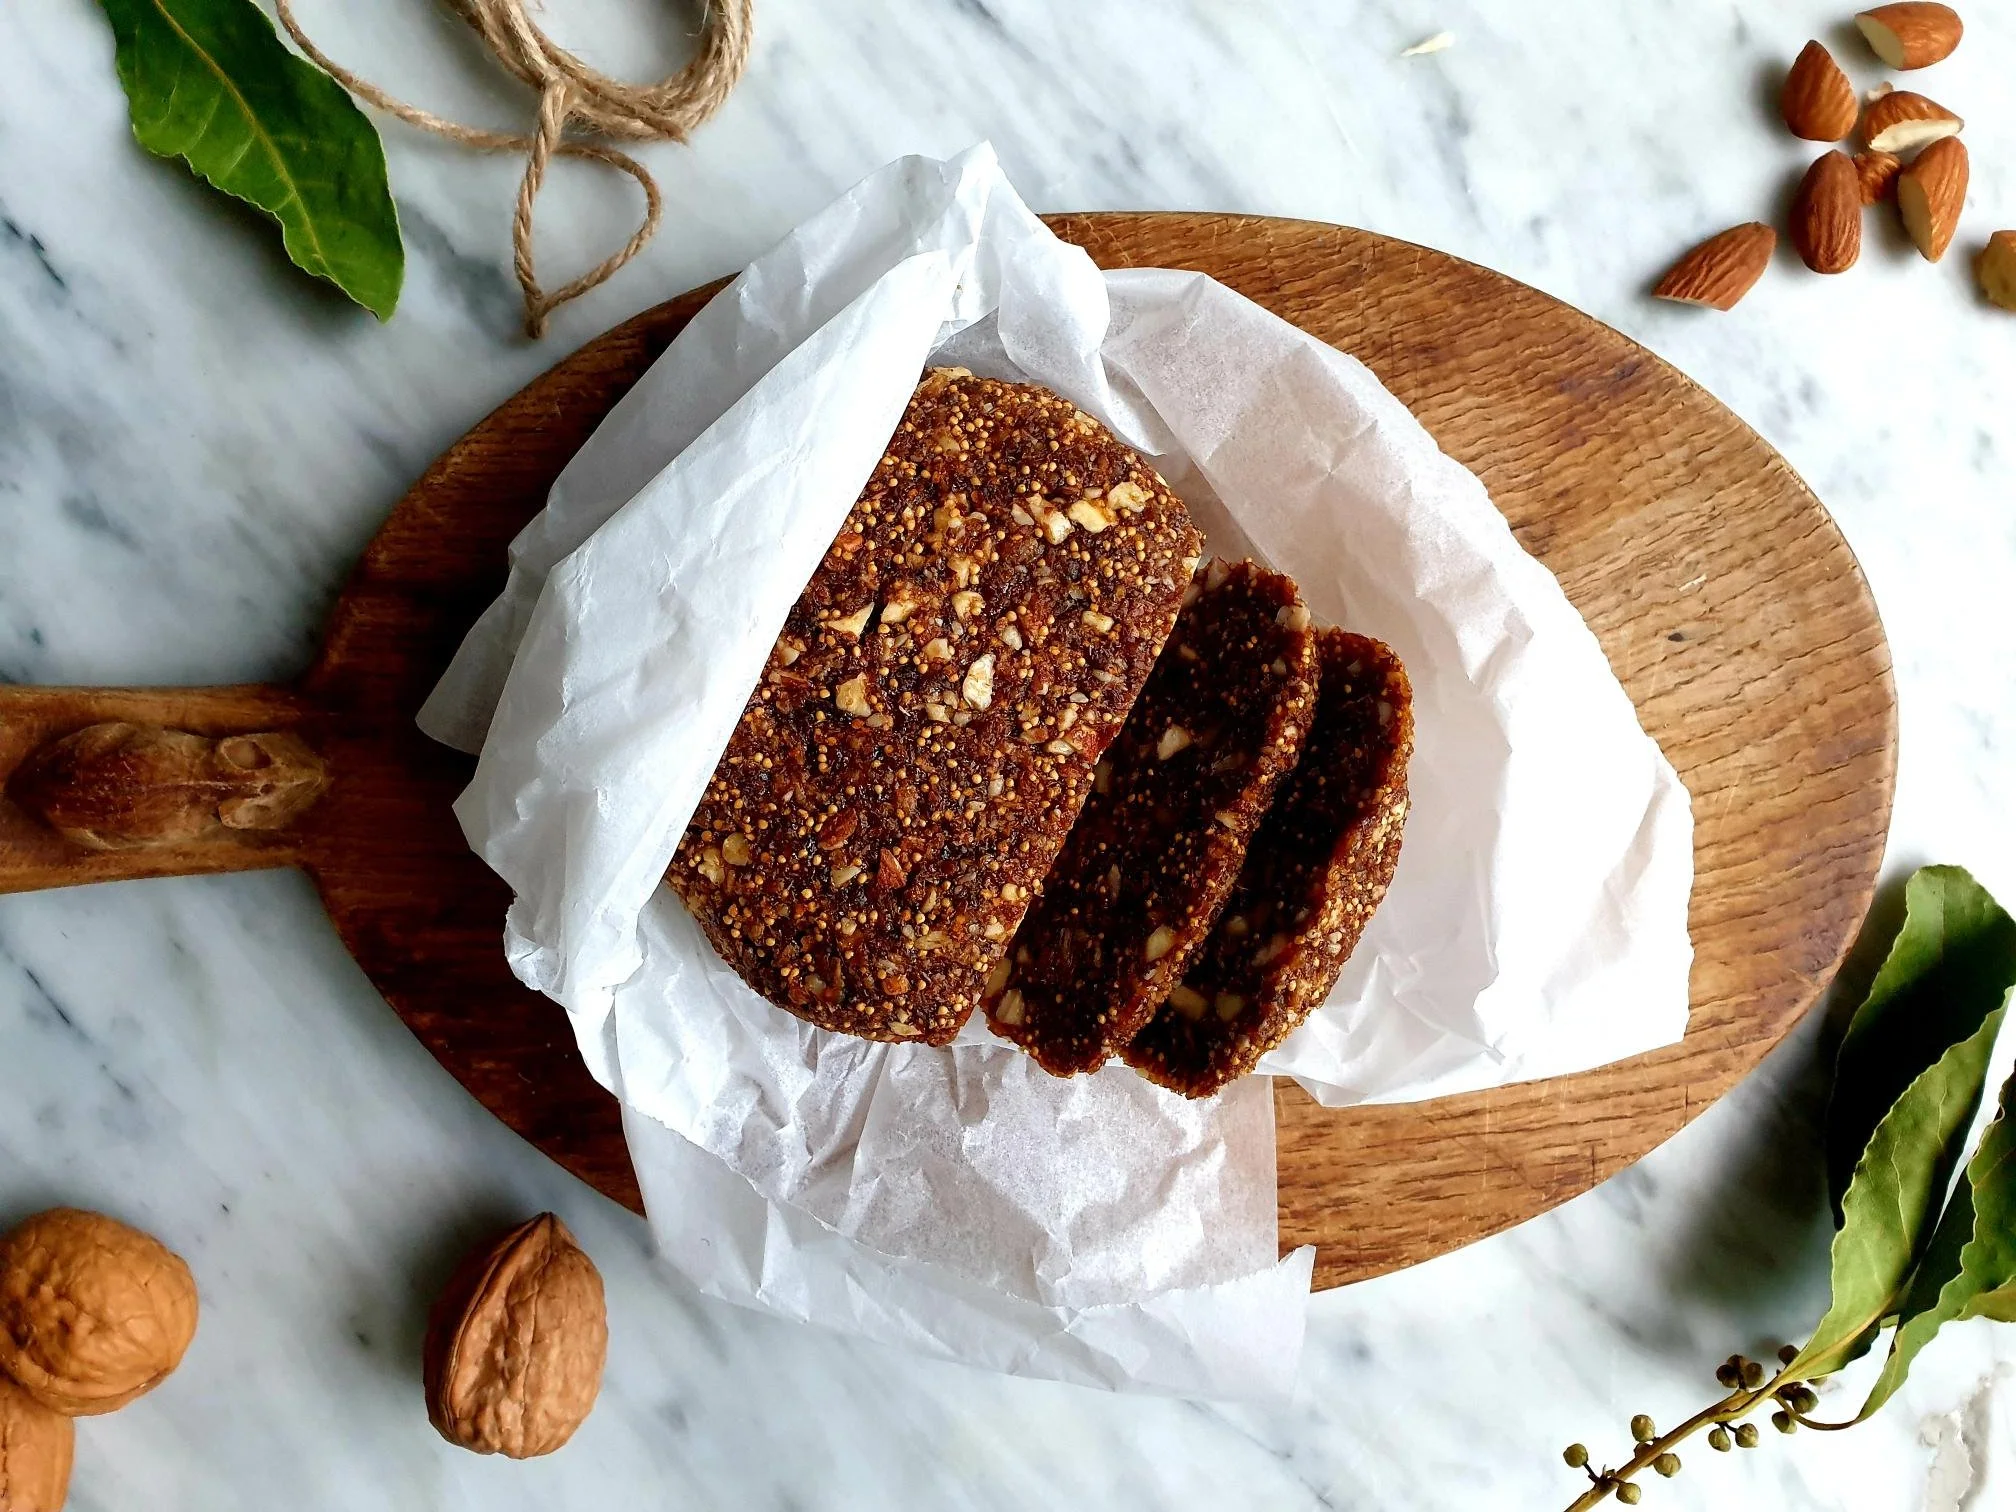
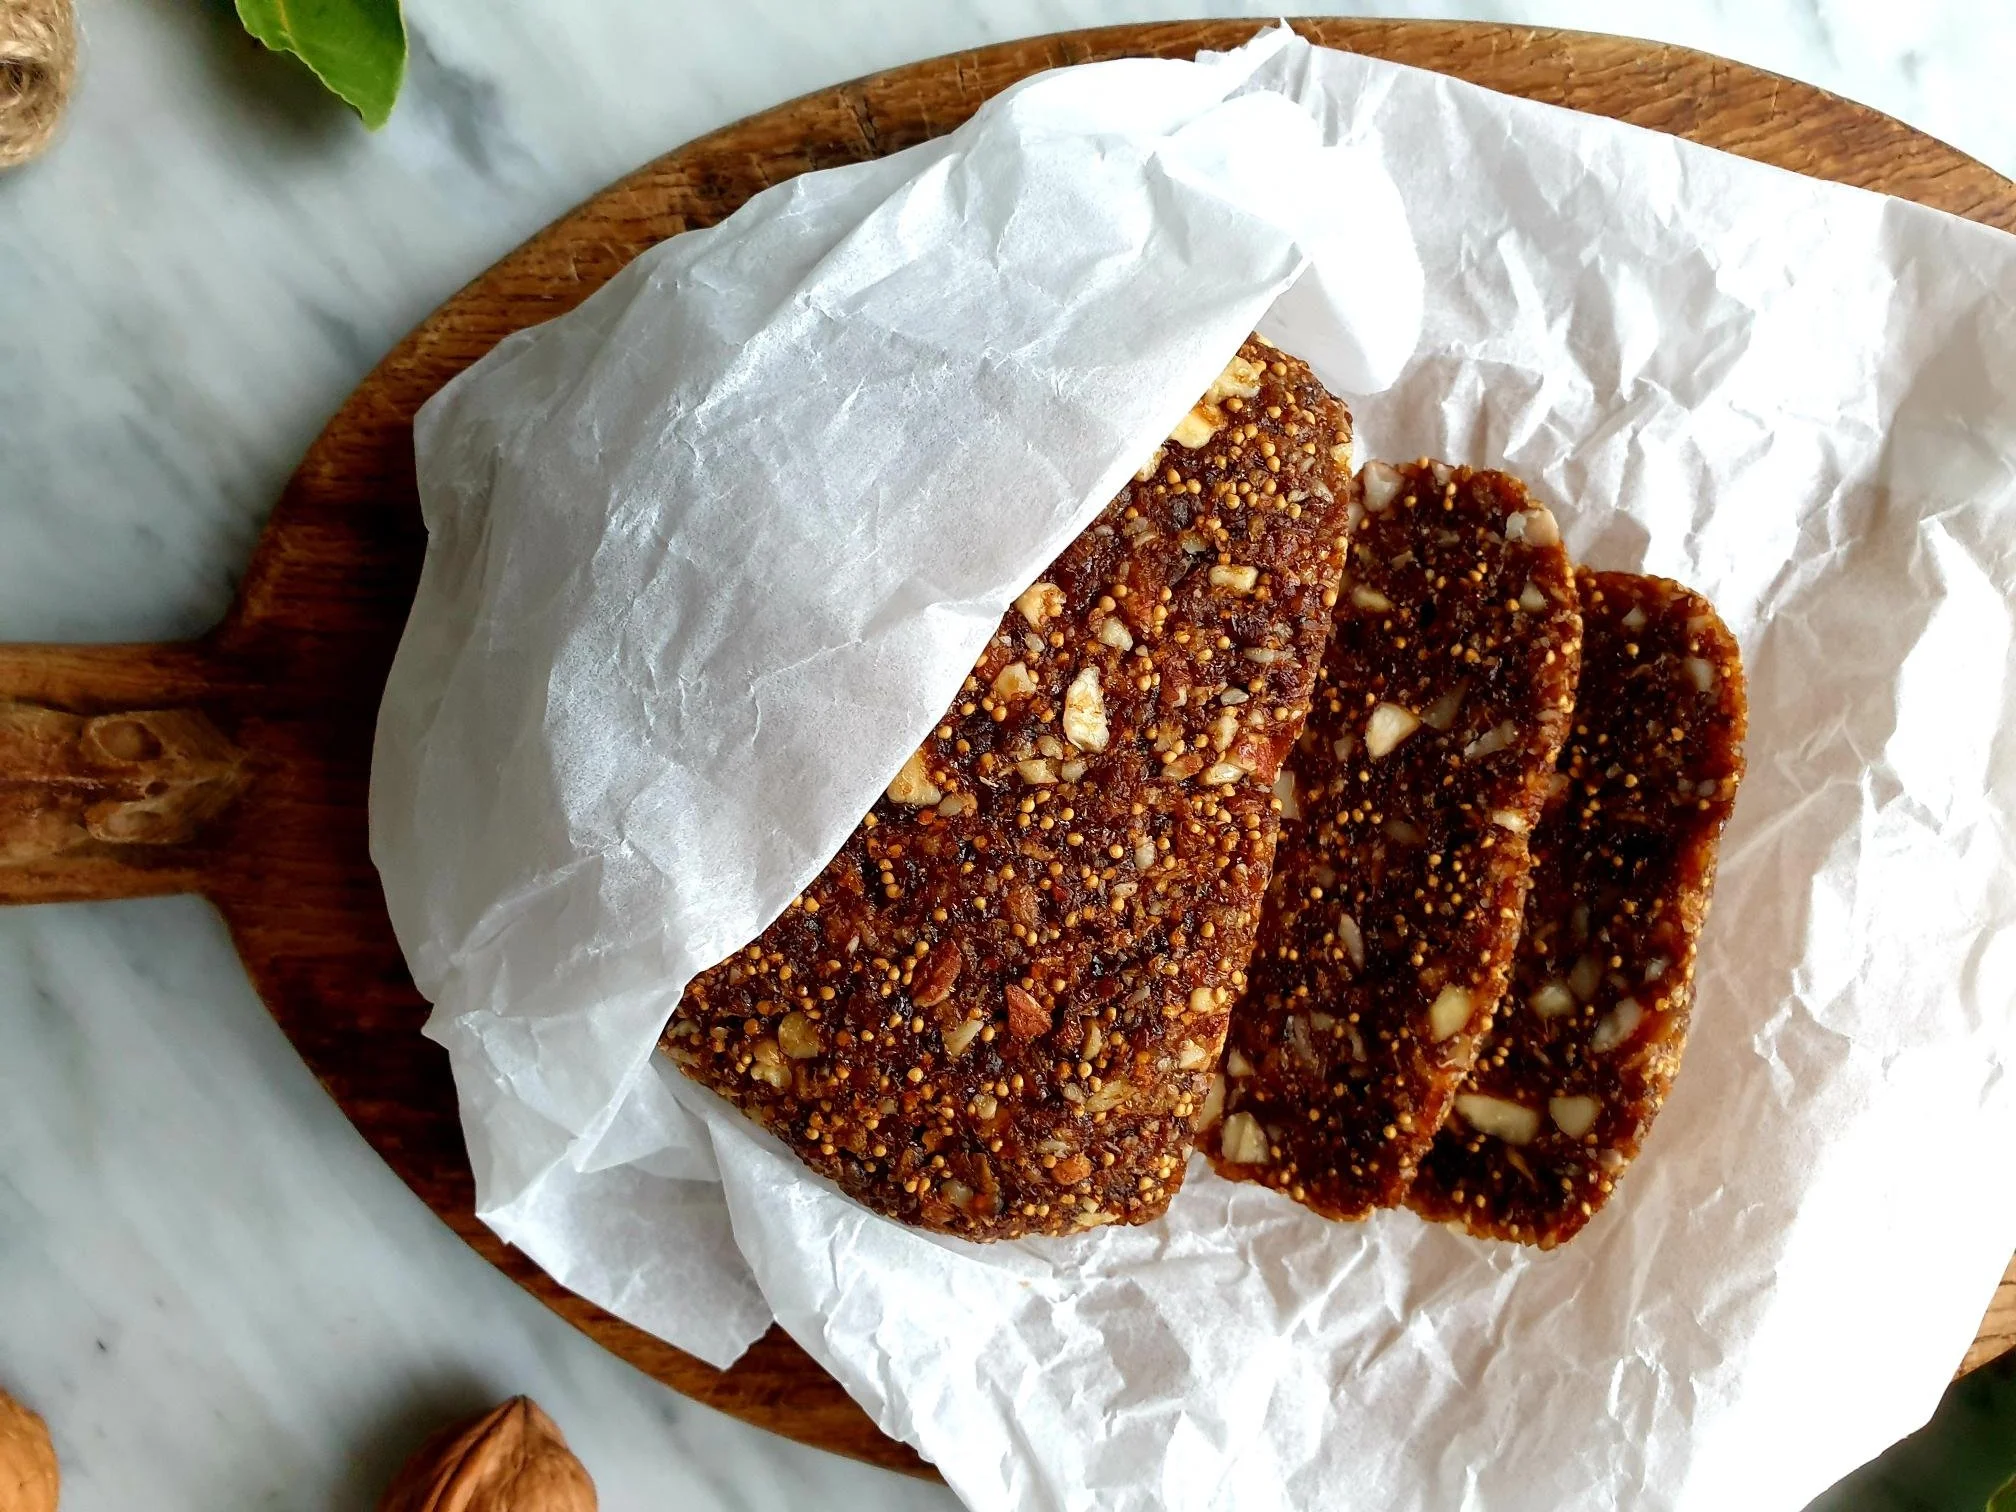
Mix well and shape the fig and nut mixture into a sausage/log or loaf. You can make thicker or thinner log according to the size slices you want.

View fullsize Dried Fig and Almonds Slice Itrsian Recipe 10.jpg
View fullsize Dried Fig and Almonds Slice Itrsian Recipe 11.jpg

Allow to dry, uncovered, in the fridge or a dry place (I put mine in a airing cabinet) for up to a week.

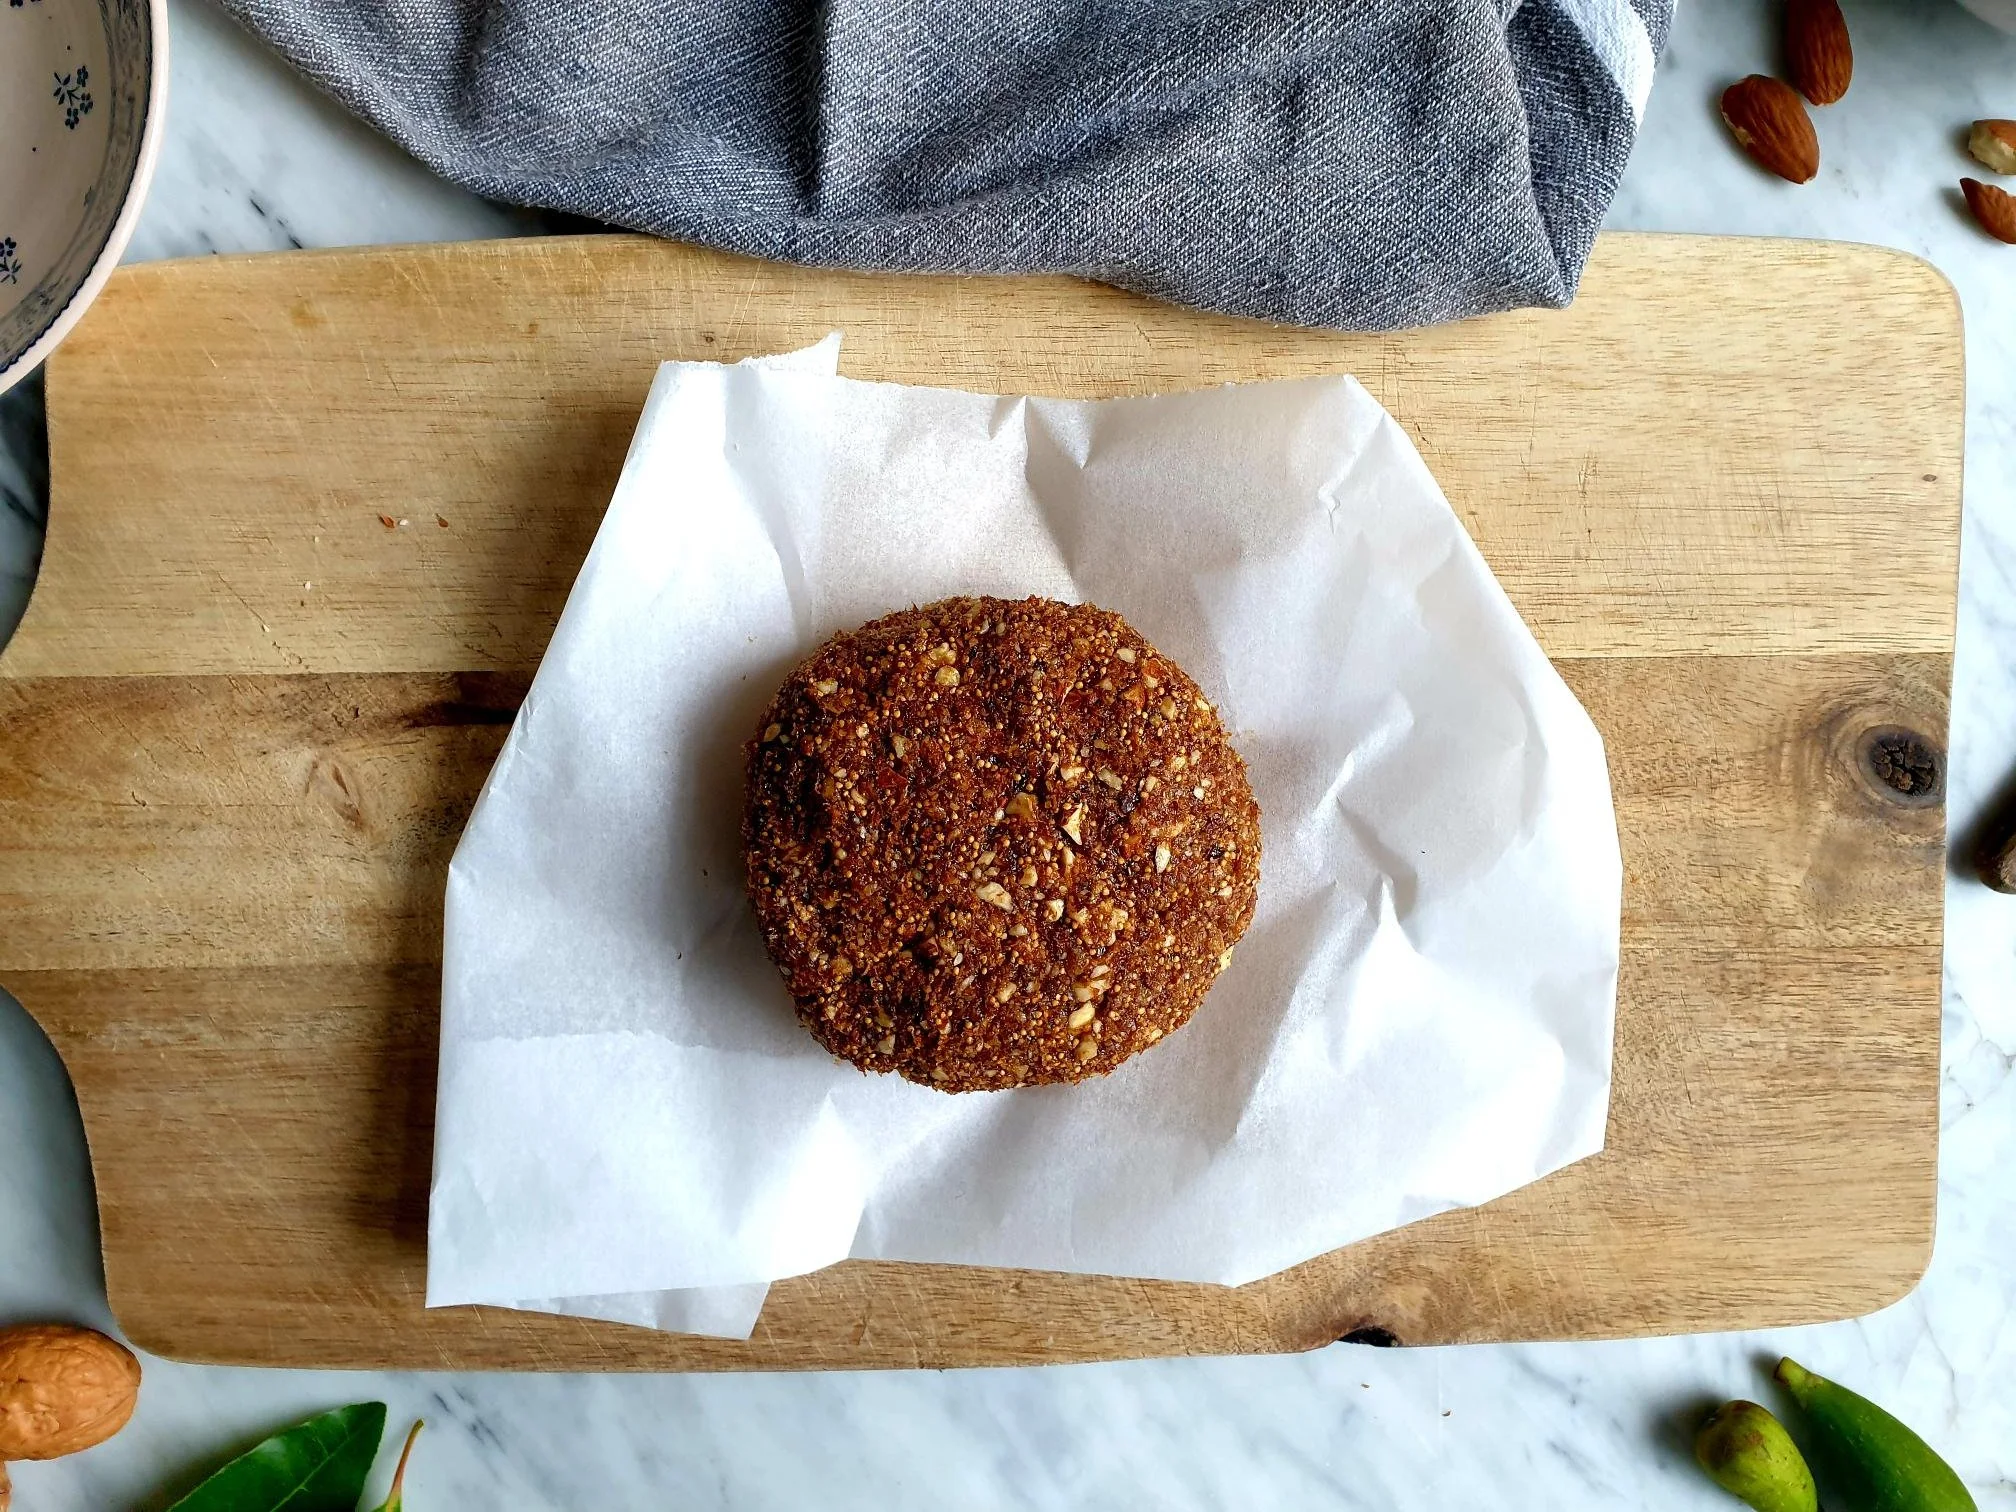
It should become firm and somewhat dried out but not completely hard.

Slice and serve alongside your favourite selection of cheeses or as a sweet treat/dessert at the end of the meal with a coffee or tea or a glass of sweet wine, Rum or Brandy.

Just a thought

Dried fig and almonds slice will keep in a cool place for up to two months.

This dried fig delight also makes a lovely and thoughtful give away present for your foodie friends and family. Wrap and tie in a baking parchment, fig leaves or bay leaves.

You can shape fig and nut mixture into small balls and have them as a healthy snack when the sugar levels gets a bit low.

December 10, 2024 /tina oblak
dry figs, almonds, walnuts, pistachios, dried apricots, Lonzino di fico, Salame di fichi, Figov Hlebček, dates, Turkish dried figs, Calymirna dried figs, raisins, peeled almonds, unpeeled almonds, make ahead, gluten free, Marsala wine, Brandy, Dark Rum, Muscat sweet wine, foodie give away present
Adriatic Recipe, Appetizers, Autumnal dish, Autumnal recipe, bite-sized nibbles, Canapés, Christmas, dessert, Easy recipe, festive dessert, festive dish, festive sweet things, Finger food, Healthy, Istrian cuisine, Istrian food, Istrian gastronomy, Rustic dish, simple recipe, Slovenian cuisine, Slovenian food, Slovenian gastronomy, Small bites, Snacks, Starters, sweet finger food, sweet nibbles, Sweet Things, Vegan, Winter recipe
Comment

Home-made Mulled Wine Recipe

Beans and Sardines
November 29, 2024 by tina oblak in Adriatic Recipe, Appetizers, dinner, Easy recipe, festive sweet things, simple recipe, Slovenian cuisine, Slovenian gastronomy, Winter recipe, Drinks, Festive drinks, Christmas, Christmas drinks

Mulled wine, sometimes refereed as spiced wine, is an alcoholic drink, most frequently made with strong, full bodied red wine that varies according to the area of origin, and sometimes with white wine. It is sweetened with sugar and enriched by aromatic array of mulling spices and citrus fruits. This drink is traditional during cold winter months, especially around Christmas, it is typical of Italian and central Europe mountain areas, and it is served hot or warm.

It is believed that mulled wine comes from English punch which was made using orange or lemon liqueur mixed with rum, but it originated, and was first invented by the Romans. It can be traced back to an early recipe written by a Roman gourmet Marcus Gavius Apicius, great lover of culinary arts, fine food and drink, and it used to be served after a feast or banquet

After many variations since Roam times, mulled wine has been enjoyed for hundreds of years in Italy, where it became gastronomic staple, and it is known as Vin Brulé.

If queuing at the Christmas market is not your thing, and equally you are not keen on sipping this traditional holiday sweet treat outdoors with below zero temperatures, frozen hands, and a red nose, then prepare and recreate this festive beverage in the comfort of your cosy and toasty kitchen and delight your family and friends, giving them an instant burst of energy. This fragrant and intensely flavoured drink will most certainly offer extra festive cheer during special holiday gatherings.

Here I am sharing the family recipe for this much-loved winter warmer that is super easy and quick to make, and feel free and creative to adjust the quantities of the ingredients to your taste.

It is perfect served and enjoyed on its own, and appreciated accompanied by roasted chestnuts or apple strudel.

Recipe

Ingredients

Serves 4-6

  • 1 bottle (750 millilitre) of full-bodied red wine like Cabernet Sauvignon, Merlot, Primitivo, Barolo and similar

  • 150g sugar (granulated or caster)

  • 10 whole cloves, or to taste

  • 2 pieces of cinnamon stick

  • peel of 1 unwaxed orange

  • peel of 1 unwaxed lemon

  • pinch of nutmeg

  • juice of 1 orange, optional

  • extra orange slices to garnish, optional

Method

Put all the ingredients in a saucepan and bring gently to the boil.

View fullsize Mulled Wine Recipe 3.jpg
View fullsize Mulled Wine Recipe 5.jpg

Simmer for about 5-10 minutes, stir occasionally making sure all the sugar has completely dissolved, and some of the alcohol burnt off allowing the liquid to absorb all the flavours from the spices (do not allow vigorous boil).

View fullsize Mulled Wine Recipe 11.jpg
View fullsize Mulled Wine Recipe 12.jpg

Remove from the heat and strain the liquid either through a very fine meshed sieve/colander or using a gauze.

View fullsize Mulled Wine Recipe 18.jpg
View fullsize Mulled Wine Recipe 21.jpg

Pour the drink in glasses, garnish with slices of orange, and serve hot immediately.

Just a thought

The quality of mulled wine depend on the quality of the wine. When choosing the wine for this recipe choose a good quality one with a moderate price tag, avoid cheap or high-end wines.

You can make mulled wine ahead of time, about 2 to 3 days before when you would like to consume it. When your mulled wine is cooked and prepared, let it cool completely, transfer to a glass bottle or sealed container and refrigerate.

Reheat on the stove over gentle heat when you are ready.

November 29, 2024 /tina oblak
red wine, Vin Brulé, full-bodied red wine, whole cloves, cinnamon stick, Cabernet Sauvignon, Merlot, Primitivo, Barolo, peel of orange, peel of lemon, mulling spices, citrus fruit, make ahead, festive beverage, flavoured drinks, cooked wine, spiced wine
Adriatic Recipe, Appetizers, dinner, Easy recipe, festive sweet things, simple recipe, Slovenian cuisine, Slovenian gastronomy, Winter recipe, Drinks, Festive drinks, Christmas, Christmas drinks
Comment

Easter Eggs Dyed with Onion Skins Recipe

Beans and Sardines
March 29, 2023 by tina oblak in Adriatic Recipe, breakfast, brunch, Canapés, Celebratory dish, Easter, Easter recipes, Easter treats, Easy recipe, foraging, Fresh herbs, Istrian cuisine, Istrian gastronomy, Rustic dish, savory nibbles, simple recipe, Slovenian cuisine, Slovenian food, Slovenian gastronomy, Small bites, Snacks, Spring recipe, Starters

The tradition and the roots of dyeing the eggs over the Easter Period of celebrations now might be linked by many to modern and commercial aspect of Easter, but as a matter of fact, it takes us back to the history of the celebration of these events. It is believed that the custom of dying or colouring Easter Eggs started with the early Christians in Mesopotamia.

The eggs were dyed in various colours to represent and symbolise different aspects of the Easter story, yellow represents the resurrection, blue represents love and red represents the blood of Jesus Christ that was shed on the Cross for the sins of the world.

This tradition would spread over time through Catholic and Protestant churches in Europe, even though in pagan cultures eggs were a symbol of rebirth and fertility, and the arrival of Spring. It is another example of the early Church adapting, transforming existing pagan rites, and rituals to the Christian story and its message for the world.

In Slovenian Istra, where I come from, and all the regions of Slovenia, dying eggs during the Easter festivities is a deeply rooted tradition and has passed, luckily, the tests of modern times; Christians and non-Christians can get involved with this fun and family friendly activity. One of the most popular and inexpensive way to colour the eggs is using onion skins.

I am sharing here how the eggs have been decorated with fresh herbs leaves and flowers and dyed with onion skins in my family for generations.

The beautifully decorated and dyed eggs would be put in a wicker basket together with cooked ham, sweet Easter Bread (Pinca) and taken to Mass on Holy Saturday or early on Easter Sunday to be blessed, and only after being blessed, the food was taken from the basket, shared and enjoyed.

Recipe

In this recipe I am using different types of leaves from fresh herbs to decorate the eggs before dying them. If you are short of time however, or not feeling up to the task, you can easily skip the step of decorating the eggs and just colour them, and they will be equally beautiful.

Ingredients

  • 12 eggs at room temperature (white or brown shell eggs or a mixture of both). You can easily change the quantity of the eggs used according to your needs.

  • big mixing bowl full of dry onion skins (from yellow or red onions or a mixture of both), roughly 3-4 handfuls

  • 2 Tbsp white vinegar

  • 1 egg white

  • a selection of fresh herbs and flowers (from the garden or a meadow)

You will also need

  • some old ladies’ nylon tights (quite thin,15 Denier or less)

  • scissors

  • cotton thread or thin string

  • paint brush

  • a big pot

  • vegetable oil

Method

Cut the tights into 10-15cm wide strips (this size of the “pocket” should accommodate nicely the egg)

Lightly brush the inside of the herb leaf or flower with a paint brush dipped in egg white.

Gently place it on the egg, press it lightly to help it stick.

Brush the edges of the herb leaf or flower with the egg white so it adheres better to the egg (preventing the herb or flower moving around). Leave to dry just for a few minutes.

View fullsize Easter Eggs Dyed with Onion Skins Recipe 7.jpg
View fullsize Easter Eggs Dyed with Onion Skins Recipe 8.jpg

Carry on with the process until you decorate all the eggs with herb leaves or flowers.

Place the decorated egg inside the tights strip, wrap it tightly around the egg, this will allow the decoration to stay in place and not move around (you will need to stretch it a bit and adjust the strip of tights).

Tie the end with a thread or a thin string, or stretch the tights pocket a bit and make a knot.

View fullsize Easter Eggs Dyed with Onion Skins Recipe 13.jpg
View fullsize Easter Eggs Dyed with Onion Skins Recipe 14.jpg

Put half of the onion skins in the pot.

Place decorated and prepared eggs into a pot on top of the onion skins.

View fullsize Easter Eggs Dyed with Onion Skins Recipe 16.jpg
View fullsize Easter Eggs Dyed with Onion Skins Recipe 17.jpg

Cover the eggs with the remaining onion skins.

Add cold water so the eggs are completely covered and submerged in water.

Pour two tablespoons of white vinegar.

Bring to boil.

Turn the heat down and gently simmer for about 30 minutes.

View fullsize Easter Eggs Dyed with Onion Skins Recipe 18.jpg
View fullsize Easter Eggs Dyed with Onion Skins Recipe 19.jpg

Turn the heat off and leave the eggs to cool completely.

Allow the eggs to soak (check the eggs for desired colour).

You can leave the eggs to colour for about 4-6 hours, you can leave them to colour for longer or overnight (I leave mine overnight for practical reasons). The longer you leave them to soak, the darker they will get. You can also remove half of the eggs after a few hours and the rest of the eggs the following day (in this case you will end up with some eggs being lighter in colour compared to the ones that were left to soak for longer).

Remove the eggs form the pot.

Cut off the tights with the scissors, remove decorative herbs with the help of some kitchen paper.

View fullsize Easter Eggs Dyed with Onion Skins Recipe 21.jpg
View fullsize Easter Eggs Dyed with Onion Skins Recipe 22.jpg

Dry the eggs with kitchen paper.

If desired, wipe gently the eggs with a bit of vegetable oil. This will give them a beautiful shine.

Display the eggs in the basket.

March 29, 2023 /tina oblak
onion skins, onion peel, natural egg dyes, dyed Easter eggs, fresh eggs, white shell eggs, brown shell eggs, dry onion skins, make ahead, make in advance, family activity, chiled friendly cooking, child friendly cooking, fresh meadow herbs, fresh garden herbs, Easter eggs, Decorating easter eggs, colouring easter eggs, Easter festivity, Easter celebration, Easter traditions
Adriatic Recipe, breakfast, brunch, Canapés, Celebratory dish, Easter, Easter recipes, Easter treats, Easy recipe, foraging, Fresh herbs, Istrian cuisine, Istrian gastronomy, Rustic dish, savory nibbles, simple recipe, Slovenian cuisine, Slovenian food, Slovenian gastronomy, Small bites, Snacks, Spring recipe, Starters
Comment

Sautéed Leeks Istrian Recipe

Beans and Sardines
March 23, 2023 by tina oblak in Adriatic Recipe, Appetizers, Autumnal dish, Autumnal recipe, dinner, Easy recipe, family friendly dish, family friendly meal, Healthy, healthy mael, Istrian cuisine, Istrian dish, Istrian food, Istrian gastronomy, Nutritious, Nutritious dish, Rustic dish, Side Dishes, simple recipe, Slovenian cuisine, Slovenian food, Slovenian gastronomy, Vegetable side dish, Vegetables, Vegetarian, Winter dish, Winter recipe

This dish is simple and rustic, and is made with humble leeks, a vegetable that is very often overlooked, but in this recipe they proudly take central stage, and take no time or trouble to cook.

Raw leeks are almost inedible but when cooked they become sweet, mellow, and taste delicious on i their own as a side dish or used as a base for risotti or soups. Sautéed leeks are also fantastic as a filling, together with some cheese, for a grilled sandwich.

Leeks are omnipresent at vegetable markets but they are at their best during the coldest months of the year, October through May, and better yet, they are packed with nutrients and antioxidants.

I am sharing here my mother's recipe for this incredibly easy way of cooking the leeks. This vegetable side dish would be on our dinner table quite often during colder month when perhaps the range of vegetables on offer to buy was slightly more limited compared to the variety you can find during warmer months of spring and summer.

Try to make it, you might start reaching out for this humble and inexpensive vegetable a bit more often, if you are not doing that already...

Recipe

Ingredients

Serves 4 as a side dish

  • 900g - 1kg leeks, cleaned and chopped or sliced

  • 2 Tbsp extra virgin olive oil

  • 1 Tbsp butter

  • sea salt

  • black pepper

Method

Rinse the leeks under cold running water and pat dry with a paper or clean kitchen towel.

Place the leeks on a chopping board and with a sharp knife cut off the dark green leaf ends of the leek and the muddy tip of the roots (keep the green ends for the stock if you wish or discard).

Cut each leek in half from top to bottom and slice further into thin stripes.

Place sliced leeks into a colander and wash thoroughly under the cold running water. Leeks need a good cleaning before using, as dirt often gets stuck between the layers of leaves as they grow.

View fullsize Sauteed Leeks 3.jpg
View fullsize Sauteed Leeks 4.jpg

Put the butter and the oil in a frying pan, heat it up a bit and allowing the butter to melt.

Transfer the leeks into a pan, add sea salt and black pepper .

Cook on a medium heat, stirring now and again, for about 10-15 minutes, or until the leeks are cooked to a desired consistency (some prefer them very soft and others quite crunchy with a bite).

Taste and adjust the seasoning with sea salt and black pepper.

March 23, 2023 /tina oblak
leeks, make ahead, make in advance, leeks with oilve oil and butter
Adriatic Recipe, Appetizers, Autumnal dish, Autumnal recipe, dinner, Easy recipe, family friendly dish, family friendly meal, Healthy, healthy mael, Istrian cuisine, Istrian dish, Istrian food, Istrian gastronomy, Nutritious, Nutritious dish, Rustic dish, Side Dishes, simple recipe, Slovenian cuisine, Slovenian food, Slovenian gastronomy, Vegetable side dish, Vegetables, Vegetarian, Winter dish, Winter recipe
Comment

Austrian Style Sweet Pull Apart Yeast Buns Recipe

Beans and Sardines
March 09, 2023 by tina oblak in Adriatic Recipe, All year round recipe, Austrian inspired dishes, Autumnal dish, Autumnal recipe, baked dish, baking, breakfast, brunch, Central European recipes, child friendly dish, child friendly meal, dessert, Eastern European recipes, easy baking, Easy recipe, Enriched dough, family friendly dish, home baking, Istrian cuisine, Istrian dish, Istrian food, Istrian gastronomy, Mitteleuropean cuisine, Mitteleuropean dish, Mitteleuropean food, Mitteleuropean recipes, pudding, Rustic dish, simple recipe, Slovenian cuisine, Slovenian food, Slovenian gastronomy, Snacks, Sweet bread, sweet course, sweet finger food, sweet nibbles, Sweet Things

These soft, fluffy and airy sweet yeast buns are filled with apricot jam and are simply irresistible. This baked treat is similar to a crown loaf, it breaks into 12 individual rolls which makes it perfect for sharing, and they transport very well to take on a picnic.

As soon as they are baked the outside is lightly golden and slightly crispy but the crust becomes soft when the buns cool down.

They can be enjoyed as a dessert and are perfect for breakfast, great with tea or coffee, and kids love them as a snack, any time of the day, with a glass of milk or hot chocolate.

They are Austrian in origin (Buchteln plural form and Buchtel singular) where they are very commonly served with the vanilla sauce. These sweet buns are unknown to many people, and because they are slightly off the beaten track, this makes them a bit of an undiscovered treasure. However, they are very popular in Slovenia which borders Austria, and was once part of Austro-Hungarian Empire.

I remember that these buns were baked in school for our mid morning snack, accompanied by a hot drink. The aroma of freshly baked buhteljni (this is what they are called in Slovenian) would travel through the corridors into the classrooms – disrupting at times our concentration! Indeed, just before the break we children would get so excited the teachers found it almost impossible to contain us.

Here I am sharing the recipe of my maternal grandmother, stara mama Iva, she baked them often on a regular basis, they went down as a real treat every single time, and she never seemed to bake enough of them...

Recipe

Ingredients

This recipe makes 12 buns

  • 400g all purpose (plain) flour

  • 40g butter, melted and slightly cooled

  • pinch of sea salt

  • finely grated lemon zest of one unwaxed lemon

  • ½ Tsp vanilla extract

  • 2 medium eggs, at room temperature

  • 140ml semi-skimmed or full fat milk, lukewarm

  • 60g caster sugar

  • 5g (1 ½ Tsp) dry fast-action yeast

  • apricot jam or a jam of your preference for the filling

For the glaze

  • 40g melted unsalted butter for the brushing

For serving

  • icing sugar or vanilla icing sugar for dusting

Method

Put the sifted flour in a large mixing bowl and add the sea salt to one side of the bowl.

Make a well, pour in lukewarm milk and add the yeast.

View fullsize Buhteln 1.jpg
View fullsize Buhteln 2.jpg

In a separate smaller bowl, add the eggs and whisk them lightly. Add the sugar, melted and slightly cooled butter, and vanilla extract.

Pour the egg mixture to a big mixing bowl and add finely grated lemon zest.

View fullsize Buhteln 3.jpg
View fullsize Buhteln 4.jpg

Stir the mixture with the fork first so all the ingredients come together, incorporate, and combine well to make a fairly sticky dough.

Tip the dough into a lightly floured working surface and knead by hand for about 10-15 minutes, adding a little extra flour if needed.

The dough should be very soft, shiny and elastic.

View fullsize Buhteln 5.jpg
View fullsize Buhteln 6.jpg

Transfer the dough to a large lightly oiled container or bowl. Cover tightly with cling film and leave to rise in a warm place for about at least 1 hour, or until the dough has doubled in size.

Form into a sausage and divide into 12 equal pieces.

Flatten them to the thickness of about 1cm to obtain mini pizza shaped discs. You can do this by using floured rolling pin or stretch the dough with your hands.

Put one teaspoon of apricot jam in the centre, on top of each circle, and close the ends well. Do not try to be overgenerous with the jam, if the filling gets on the edges of the disc, it is almost impossible to seal them because the dough will stop sticking. Wrap the dough around the filling, pinching and sealing it tightly You should end up with 12 parcels.

View fullsize Buhteln 8.jpg
View fullsize Buhteln 9.jpg

Lightly grease a 23cm round, deep springform cake tin. You can use other shapes of baking trays, just make sure they are greased to prevent the buns from sticking.

Place the parcels, one next to each other, so they are snug and touching with the seam side down in a non stick baking tray. Melt the butter and brush the top and all the sides.

View fullsize Buhteln 10.jpg
View fullsize Buhteln 11.jpg

Leave to proof for a second time, for about 30min, by covering them with a clean kitchen cloth in a warm room with no draft until they are nicely risen and puffed up.

Bake at 180º static in the preheated oven, on the middle shelf, for about 30minutes or until a skewer inserted into the centre comes out clean.

The buns should be lightly golden on top and well risen.

Leave in the tin for about 5 minutes, then release the sides of the tin.

View fullsize Buhteln 13.jpg
View fullsize Buhteln 14.jpg

Remove and place the sweet buns to a wire rack to cool.

Dust the buns with regular or vanilla icing sugar and enjoy.

March 09, 2023 /tina oblak
sweet buns, pull apart sweet buns, jam filled buns, sweet crown bread, Buchteln, Buchtel, buhteljni, yeast buns, sweet dough, make ahead, pick me up treat, picnic food
Adriatic Recipe, All year round recipe, Austrian inspired dishes, Autumnal dish, Autumnal recipe, baked dish, baking, breakfast, brunch, Central European recipes, child friendly dish, child friendly meal, dessert, Eastern European recipes, easy baking, Easy recipe, Enriched dough, family friendly dish, home baking, Istrian cuisine, Istrian dish, Istrian food, Istrian gastronomy, Mitteleuropean cuisine, Mitteleuropean dish, Mitteleuropean food, Mitteleuropean recipes, pudding, Rustic dish, simple recipe, Slovenian cuisine, Slovenian food, Slovenian gastronomy, Snacks, Sweet bread, sweet course, sweet finger food, sweet nibbles, Sweet Things
Comment

Spinach Roll made with Potato Gnocchi Dough Istrian Recipe

March 01, 2023 by tina oblak in Adriatic Recipe, All year round recipe, Appetizers, baked dish, brunch, Celebratory dish, Central European recipes, child friendly dish, child friendly meal, dinner, Easter dish, Easter recipes, Easy recipe, entrée course, family friendly dish, family friendly meal, festive dish, first course, first course dish, first course meal, Gnocchi, hearty dish, Istrian cuisine, Istrian dish, Istrian food, Istrian gastronomy, main course, main dish, main vegetarian course, main vegetarian dish, main vegetarian meal, Mitteleuropean cuisine, Mitteleuropean dish, Mitteleuropean food, Mitteleuropean recipes, recipe from Northern Ital, Rustic dish, simple recipe, Slovenian cuisine, Slovenian food, Slovenian gastronomy, Spring dish, Spring recipe, Starters

This classic dish is absolutely perfect in its simplicity, it is Austro-Hungarian in origin, and it represents a great comfort food. It is also vegetarian friendly, and looks quite impressive, but in reality is not that difficult to make. What you need is a bit of extra time to spare in the kitchen. It is the dish that will with no doubt impress your family and friends, whether you serve it as a warm starter or as a main dish.

Potato gnocchi dough roll is filled with spinach, boiled, sliced and traditionally served with the gravy or the juices left after roasting a piece of meat, different types of meat ragù, sage butter sauce and freshly grated Parmiggiano Reggiano cheese, and it can be served in a less traditional way with a tomato sauce.

This dish is typically found in the territories that once belonged to Austro-Hungarian Empire, including Slovenian Istria, where I come from, neighbouring city of Trieste in Italy and the surrounding areas and it used to be prepared exclusively during the festivities. My nona told me that the characteristic filling for this dish along the Slovenian coast would be caramelized onions and pancetta a no use of ricotta cheese in the spinach filling.

This special plate of food is a perfect example of ‘recipes without the borders’ in terms of the ingredients and the name of the dish itself, a true testimony of a gastronomic osmosis between different border cultures.

The name of the dish in standard Italian is Strucolo, which is the Italianization of the Slovenian word štrukelj, which itself has originated from a German word strudel. In fact, in German this dish is known as savoury Potato and spinach Strudel, and has very often a ricotta cheese and sliced cooked ham as a filling.

What is particular about this dish is the way it is cooked, the roll gets wrapped in an old piece of kitchen cloth “straza in the local dialect” and then gently boiled in hot water, hence its name Strucolo de spinaze in straza (Rotolo di spinaci cotto nel canavoccio in standard Italian).

Sadly this dish is very rarely found in the restaurants and almost exclusively prepared in households with a wide variety of fillings, (sautéed mushrooms and sliced cooked ham) and very often fresh pasta is used instead of potato gnocchi dough, and there are also a number of sweet variations using different types of fruit and nuts.I am sharing here my nona's recipe for this very special and traditional spinach roll made with potato gnocchi dough and simple spinach filling that still today is prepared during festive periods or to mark a special occasion.

Ingredients

Serves 4-6 people

For gnocchi pasta dough

  • 500g floury, yellow fleshed potatoes e.g. King Edward, Maris Piper, red skin potatoes (avoid new potatoes and choose the potatoes that are more or less the same size)

  • 150g all purpose flour, plus some extra

  • 1 small egg (can use just egg yolk of a medium or big egg)

  • sea salt, a pinch

For spinach filling

  • 450-500g fresh baby spinach, thoroughly washed

  • 15g butter

  • 1 Tbsp extra virgin olive oil

  • sea salt

  • nutmeg, grated

For sage butter sauce

  • a few fresh sage leaves, roughly torn

  • 150g butter

  • Parmiggiano Reggiano or Grana Padano cheese, finely grated, for serving

Recipe

Method

Potato gnocchi dough

Wash the potatoes, with the skin on,  under cold running water.

Place the potatoes, with their skin on, in a pot or in a large saucepan, add plenty of water so the potatoes are completely submerged in the water and bring to boil (you can use boiling hot water directly from the kettle to reduce cooking time).

After the water has come to a boil,  cook for about 20-30 minutes or until tender.  Cooking time will obviously vary depending on the size of the potatoes you are using. You  can check that the potatoes are fully cooked by inserting the toothpick into the potato, it should easily enter the pulp of the potato.  Alternatively, you can steam the potatoes or cook them in the microwave oven.

While the potatoes are cooking prepare the spinach filling (see below).

When the potatoes are cooked, drain them in a colander and let them cool enough to handle, then remove the skin.If the potatoes are still quite warm to handle, the best way to remove the skin is to stick the fork through the potato and peel it using a knife.

On a working surface or on a large wooden board (you can use a pasta board if you have one), pass the potatoes through a potato ricer.

Make a well, add the flour and a pinch of sea salt.

Make another well in the middle of the flour and crack the egg in it.

View fullsize Spinach Roll 5.jpg
View fullsize Spinach Roll 6.jpg

With the fork slightly whisk the egg inside the well, and as you do so pick up the flour as you go around the well.

View fullsize Spinach Roll 7.jpg
View fullsize Spinach Roll 8.jpg

Mix together and form a soft dough which should not stick to your fingers or the surface. If this is the case add a little flour at a time.

View fullsize Spinach Roll 9.jpg
View fullsize Spinach Roll 10.jpg

Spinach filling

Put the washed spinach in pot with hot boiling water and blanch it for a few minutes.

Drain in the colander and let it cool down a bit. When cold enough to handle, squeeze out by hand as much as liquid as you can.

Place the spinach on a chopping board and finely chop.

View fullsize Spinach Roll 2.jpg
View fullsize Spinach Roll 3.jpg

Put the butter and olive oil in a non stick frying pan and let the butter melt. Add the spinach, a pinch of sea salt and a good grating of nutmeg.

Sautéed for a few minutes, stirring frequently then turn the heat off and set aside.

Taste and adjust the seasoning.

Allow to cool completely.

Cut a piece of a non stick baking parchment into a 50 x 40cm rectangle and place it on the working surface and sprinkle it lightly with the flour.

Place the gnocchi dough on the baking parchment and, with the help of slightly floured rolling pin, spread out the gnocchi dough roughly in the shape of a rectangle 38 x 29cm.

View fullsize Spinach Roll 11.jpg
View fullsize Spinach Roll 12.jpg

Spoon the spinach mixture over the dough and spread it evenly.

View fullsize Spinach Roll 13.jpg
View fullsize Spinach Roll 14.jpg

With the help of baking parchment start rolling up the dough into the shape of a log from a long end (as if you were making a Swiss roll).

Press down each end to seal, and wrap the paper around the roll.

View fullsize Spinach Roll 15.jpg
View fullsize Spinach Roll 16.jpg

Tight the ends with the kitchen twine, alternatively you can wrap the roll in an aluminium foil to help the roll keep its shape.

Place the roll in a pot, making sure you choose the pot big enough to accommodate the roll sitting horizontally without bending it (use a fish pot if you have one or an oval shape pan).

Fill it with water, can be boiling hot straight from the kettle, so the roll is almost completely submerged, the water should just cover the roll.

View fullsize Spinach Roll 17.jpg
View fullsize Spinach Roll 18.jpg

Bring to boil, turn the heat down, cover with the lid, and gently simmer for 30 minute.

Remove the roll onto a chopping board and allow to cool for a few minutes.

View fullsize Spinach Roll 19.jpg
View fullsize Spinach Roll 20.jpg

Cut the twine, unwrap the roll and remove the baking parchment.

Slice the roll with a very sharp knife (slicing will be easier if you wet the knife with cold water).

View fullsize Spinach Roll 21.jpg
View fullsize Spinach Roll 22.jpg

Place the slices onto serving plates and spoon over a few tablespoons of sage butter and sprinkle with plenty of Parmiggiano Reggiano cheese, and a little bit of finely freshly grated nutmeg, this is optional but it really does enhance the delicate flour of the dish.

Alternatively you can also gratinate the dish. Arrange the slices in a previously buttered baking dish. Sprinkle with plenty of Parmiggiano Reggiano cheese, spoon over a few tablespoons of melted butter and gratin in a previously hot oven at 200C, for about 20 minutes, or until nice golden in colour. This is a great option if you want to make the dish ahead of a time (simmer the roll, wrap it in aluminium foil and keep it in a fridge for up to a day before slicing and baking).

Sage butter

Put the butter in a small saucepan, heat it gently and add the sage leaves. Cook on a gentle heat until the butter begins to colour and the foam has subsided.

Wine suggestione

Colline Pescaresi Passerina IGT "Chronicon" 2021 - Zaccagnini

March 01, 2023 /tina oblak
gnocchi dough, potato gnocchi dough, fresh spinach, blanched spinach, baby spinach, sauteed baby spinach, sage and butter sauce, fresh sage leaves, nutmeg, grated nutmeg, Parmiggiano Reggiano cheese, Grana Padano cheese, Savoury spinach roll, ahead of time, make ahead, make in advance
Adriatic Recipe, All year round recipe, Appetizers, baked dish, brunch, Celebratory dish, Central European recipes, child friendly dish, child friendly meal, dinner, Easter dish, Easter recipes, Easy recipe, entrée course, family friendly dish, family friendly meal, festive dish, first course, first course dish, first course meal, Gnocchi, hearty dish, Istrian cuisine, Istrian dish, Istrian food, Istrian gastronomy, main course, main dish, main vegetarian course, main vegetarian dish, main vegetarian meal, Mitteleuropean cuisine, Mitteleuropean dish, Mitteleuropean food, Mitteleuropean recipes, recipe from Northern Ital, Rustic dish, simple recipe, Slovenian cuisine, Slovenian food, Slovenian gastronomy, Spring dish, Spring recipe, Starters
Comment

Istrian Pesto Recipe

Beans and Sardines
February 01, 2023 by tina oblak in Adriatic Recipe, All year round recipe, Appetizers, bite-sized nibbles, brunch, Canapés, Fresh herbs, Istrian cuisine, Istrian food, Istrian gastronomy, simple recipe, Slovenian cuisine, Slovenian food, Slovenian gastronomy, Small bites, Snacks, Starters

This quintessentially Istrian Pesto, is a paste like mixture, made with cured pork fat or pancetta, garlic, fresh flat leaf parsley, and sea salt, it is used for adding extra flavour and aroma to the dishes, but equally delicious spread on a slice of fresh or toasted bread.

Istrian food and dishes are quite poor, born out of necessity, and were made from what was available and seasonal.

In the past, people of this land had to be very resourceful and creative with the ingredients they had, and think of ways to enrich poor peasant food, and they came up with ways to flavour what could potentially be bland tasting stews and soups. So, a taca or pest, as locals call it in dialect, was created.

Istrian pesto has very little in common with the Italian styles of pesto sauces used as condiments for pasta, except for the name pesto, which originates from the Italian word pestare (to pound or to crush).

My nona told me that taca (as she refers to it) was used instead of precious cuts of various meats, that would otherwise give the most wonderful taste, but was reserved for special occasions and most certainly not added to everyday meals. 

She went on to tell me that this Istrian paste was exclusively made in the households, done by hand using a very sharp knife with which you could cut this fairly soft cured slab of fat, made from the back fat of the pigs. These delicate slabs of fat were then cured in sea salt for a few months, and the fully cured piece of fat, which is predominantly whitish in colour has a hint of pink, and is rather “sweet” in flavour since fresh pig meat does not absorb salt.

There always has been a strong connection in the region, reminiscent in this country, to the rural life described in many of Thomas Hardy’s novels, to the kind of local culture that comes with a life of hard labour on the farms and fields. Farmers would eat the cured fat either for lunch or as a snack, it would be very thinly sliced on a piece of rustic bread and accompanied by fresh tomatoes, and by a bicerin (a dialect word of Italian origin, indicating a small glass) of red wine. This type of eating kept them strong and fit.My nona also explain to me that there have been times when families kept their own pigs, and nearly everyone in the region was curing the fat in their typical Istrian cellars, which provided the right temperature, and the level of the humidity for the optimum results of the curing process. I very clearly remember my grandfather (nono as I used to call him), curing the fat and hanging it on big metal hooks to dry.

This Istrain taca is not available in the food stores to buy, and these days it is very rarely made with home cured fat. This is why I am sharing here the family recipe for pešt, made with pancetta (as alternative to cured fat) to enrich your stews and soups.

Make sure you always add this flavoursome mixture into cold water at the very beginning of cooking, as the fat will gradually dissolve into the dish (without making it fat or greasy!) and it will eventually completely disappear.

When you add the paste to the cold water it will at first most probably float, do not worry since this is quite normal. You can just take a fork and break the lump of paste pressing it against the wall of the pan until you break it completely and give a good stir.

Recipe

Ingredients

  • 100g pancetta or cured lard in one piece (can use already sliced pancetta)

  • 2-3 cloves of garlic, peeled and pressed 

  • a handful of fresh flat leaf parsley (about 7g), finely chopped 

  • sea salt

  • black pepper

Method

Cut the pancetta into small pieces.

Transfer into a small food processor, add crushed garlic, finely chopped fresh flat leaf parsley, and a pinch of sea salt.

Blitz all the ingredients together until you obtain a paste like consistency. 

View fullsize Istrian Pesto 3.jpg
View fullsize Istrian Pesto 4.jpg

Enjoy spread on a slice of fresh or toasted bread, or add to dishes to enrich the flavour.

February 01, 2023 /tina oblak
fresh flat leaf parsley, sea salt, black pepper, cured lard, pancetta, smoked pancetta, garlic, make ahead
Adriatic Recipe, All year round recipe, Appetizers, bite-sized nibbles, brunch, Canapés, Fresh herbs, Istrian cuisine, Istrian food, Istrian gastronomy, simple recipe, Slovenian cuisine, Slovenian food, Slovenian gastronomy, Small bites, Snacks, Starters
Comment

Dried Fig and Walnut Bread Istrian Recipe

Beans and Srdines
December 21, 2022 by tina oblak in Adriatic Recipe, All year round recipe, Appetizers, baking, breakfast, brunch, Canapés, child friendly dish, child friendly meal, Christmas bakes, dessert, easy baking, Enriched dough, festive bakes, Istrian cuisine, Istrian dish, Istrian food, Istrian gastronomy, Rustic dish, simple recipe, Slovenian cuisine, Slovenian food, Slovenian gastronomy, Small bites, Snacks, Starters, sweet finger food, sweet nibbles, Sweet Things

This rustic, rich and dense loaf filled with dried figs and walnuts, will be a fantastic addition to your cheese platter, it is delicious toasted and buttered for breakfast, makes a nice foodie gift, and it is a great snack. Dried figs give a light sweetness to the bread while the walnuts add a very pleasant crunchy texture. If you are intimidated by bread making, I can assure you, this a foolproof recipe, there is nothing complicated about it!

My 96 year old nona told me that in Slovenian Istra, when she was small, the children were given a slice of this bread as a snack for a special treat. The locals call it in the dialect Pan de Fighi, and it was bought in bakeries, and not usually baked in the household, as one might think. Ripe fresh figs, when in full season at the end of the summer were sold in the Farmer's market which provided an extra income for the family.

Nowadays in Slovenian Istra, this bread is not commonly found in bakeries and supermarkets.

I am sharing here my nona's recipe for this super delicious, enriched, special bread.

Recipe

Ingredients

  • 500g white all purpose (plain) flour, plus extra for dusting and coating

  • 30g caster sugar

  • 10g (2Tsp) instant dried yeast

  • 260ml lukewarm milk or water (or half and half)

  • 60g unsalted butter, melted and slightly cooled

  • 1 Tsp sea salt

  • 150g dried figs, roughly chopped

  • 100g walnut kernels, roughly chopped

Method

With the knife roughly chop the walnuts.

Remove the hard stem from the figs, if there are any, and chop into smaller pieces.

Place the flour, sugar, yeast, milk (water or half and half) and butter in a large bowl. Stir with a fork or a wooden spoon to combine the ingredients then bring together with your hands.

Tip onto a lightly floured work surface, add sea salt and knead for about 10 minutes, pulling and stretching the dough, until it becomes smooth, elastic, and no longer sticks to your fingers or the surface.

View fullsize Dried Fig and Walnut Bread 3.jpg
View fullsize Dried Fig and Walnut Bread 4.jpg

Roll the dough, or press out to flatten slightly into a roughly rectangular or oval shape.

Top with chopped figs and walnuts.

View fullsize Dried Fig and Walnut Bread 6.jpg
View fullsize Dried Fig and Walnut Bread 7.jpg

Knead back into the dough.

Place the dough in a slightly oiled big bowl, cover with cling film (I use plastic shower cap) and leave it to rest in a warm, draught-free room for about 1 hour, or until the dough doubles in size.

View fullsize Dried Fig and Walnut Bread 9.jpg
View fullsize Dried Fig and Walnut Bread 14.jpg

Place the dough onto a lightly floured surface, knock the air out and shape it into a loaf, oval shape.

View fullsize Dried Fig and Walnut Bread 16.jpg
View fullsize Dried Fig and Walnut Bread 17.jpg

Put the loaf onto a baking tray, previously lined with baking parchment, cover with clean tea towel and leave to rest and prove for further 30 minutes, or until risen slightly.

Preheat the oven to 180C static or equivalent.

Sprinkle the top with a little extra flour.

Using a very sharp knife, make a shallow cut along the length of the loaf.

View fullsize Dried Fig and Walnut Bread 18.jpg
View fullsize Dried Fig and Walnut Bread 19.jpg

Bake for about 45 minutes, or until golden brown in colour.

If it browning too much tent the loaf with some aluminium foil.

When baked, the loaf should sound hollow when tapped on the base.

December 21, 2022 /tina oblak
bread, sweet bread, enriched bread, dried figs, walnut kernels, rustic bread, cheese board, make ahead
Adriatic Recipe, All year round recipe, Appetizers, baking, breakfast, brunch, Canapés, child friendly dish, child friendly meal, Christmas bakes, dessert, easy baking, Enriched dough, festive bakes, Istrian cuisine, Istrian dish, Istrian food, Istrian gastronomy, Rustic dish, simple recipe, Slovenian cuisine, Slovenian food, Slovenian gastronomy, Small bites, Snacks, Starters, sweet finger food, sweet nibbles, Sweet Things
Comment