Beans and Sardines

  • Home
  • About
  • Recipe of the week
  • Recipes
  • Wines
  • Contact

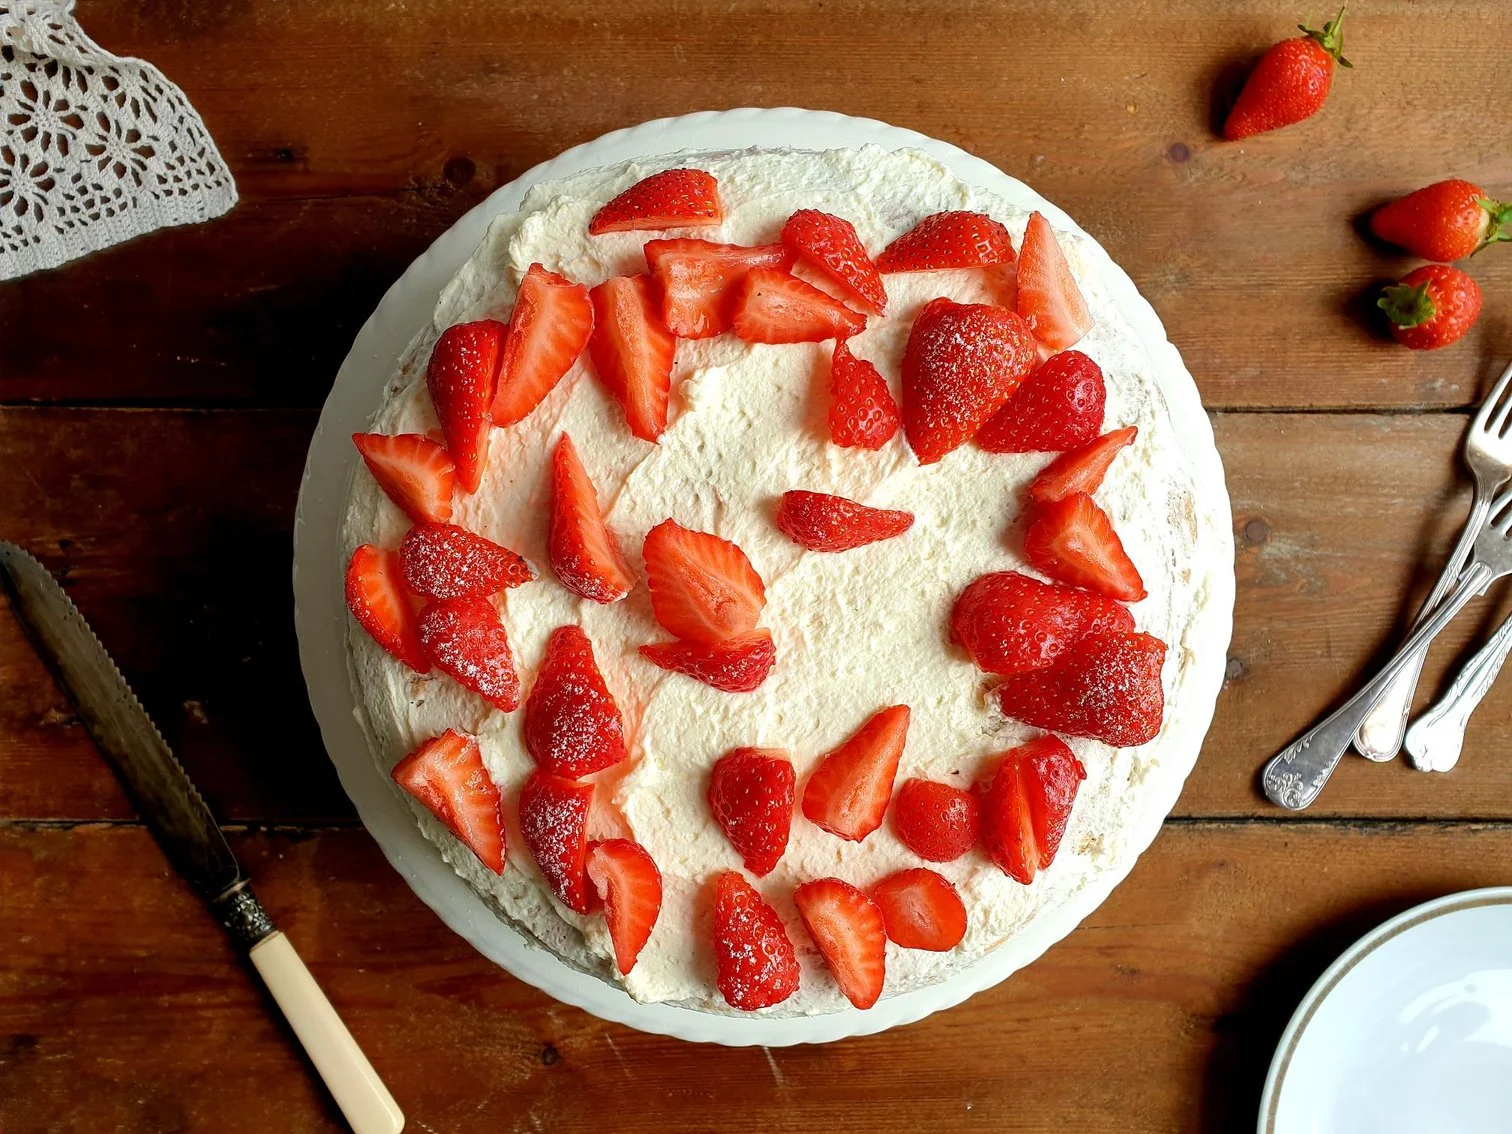
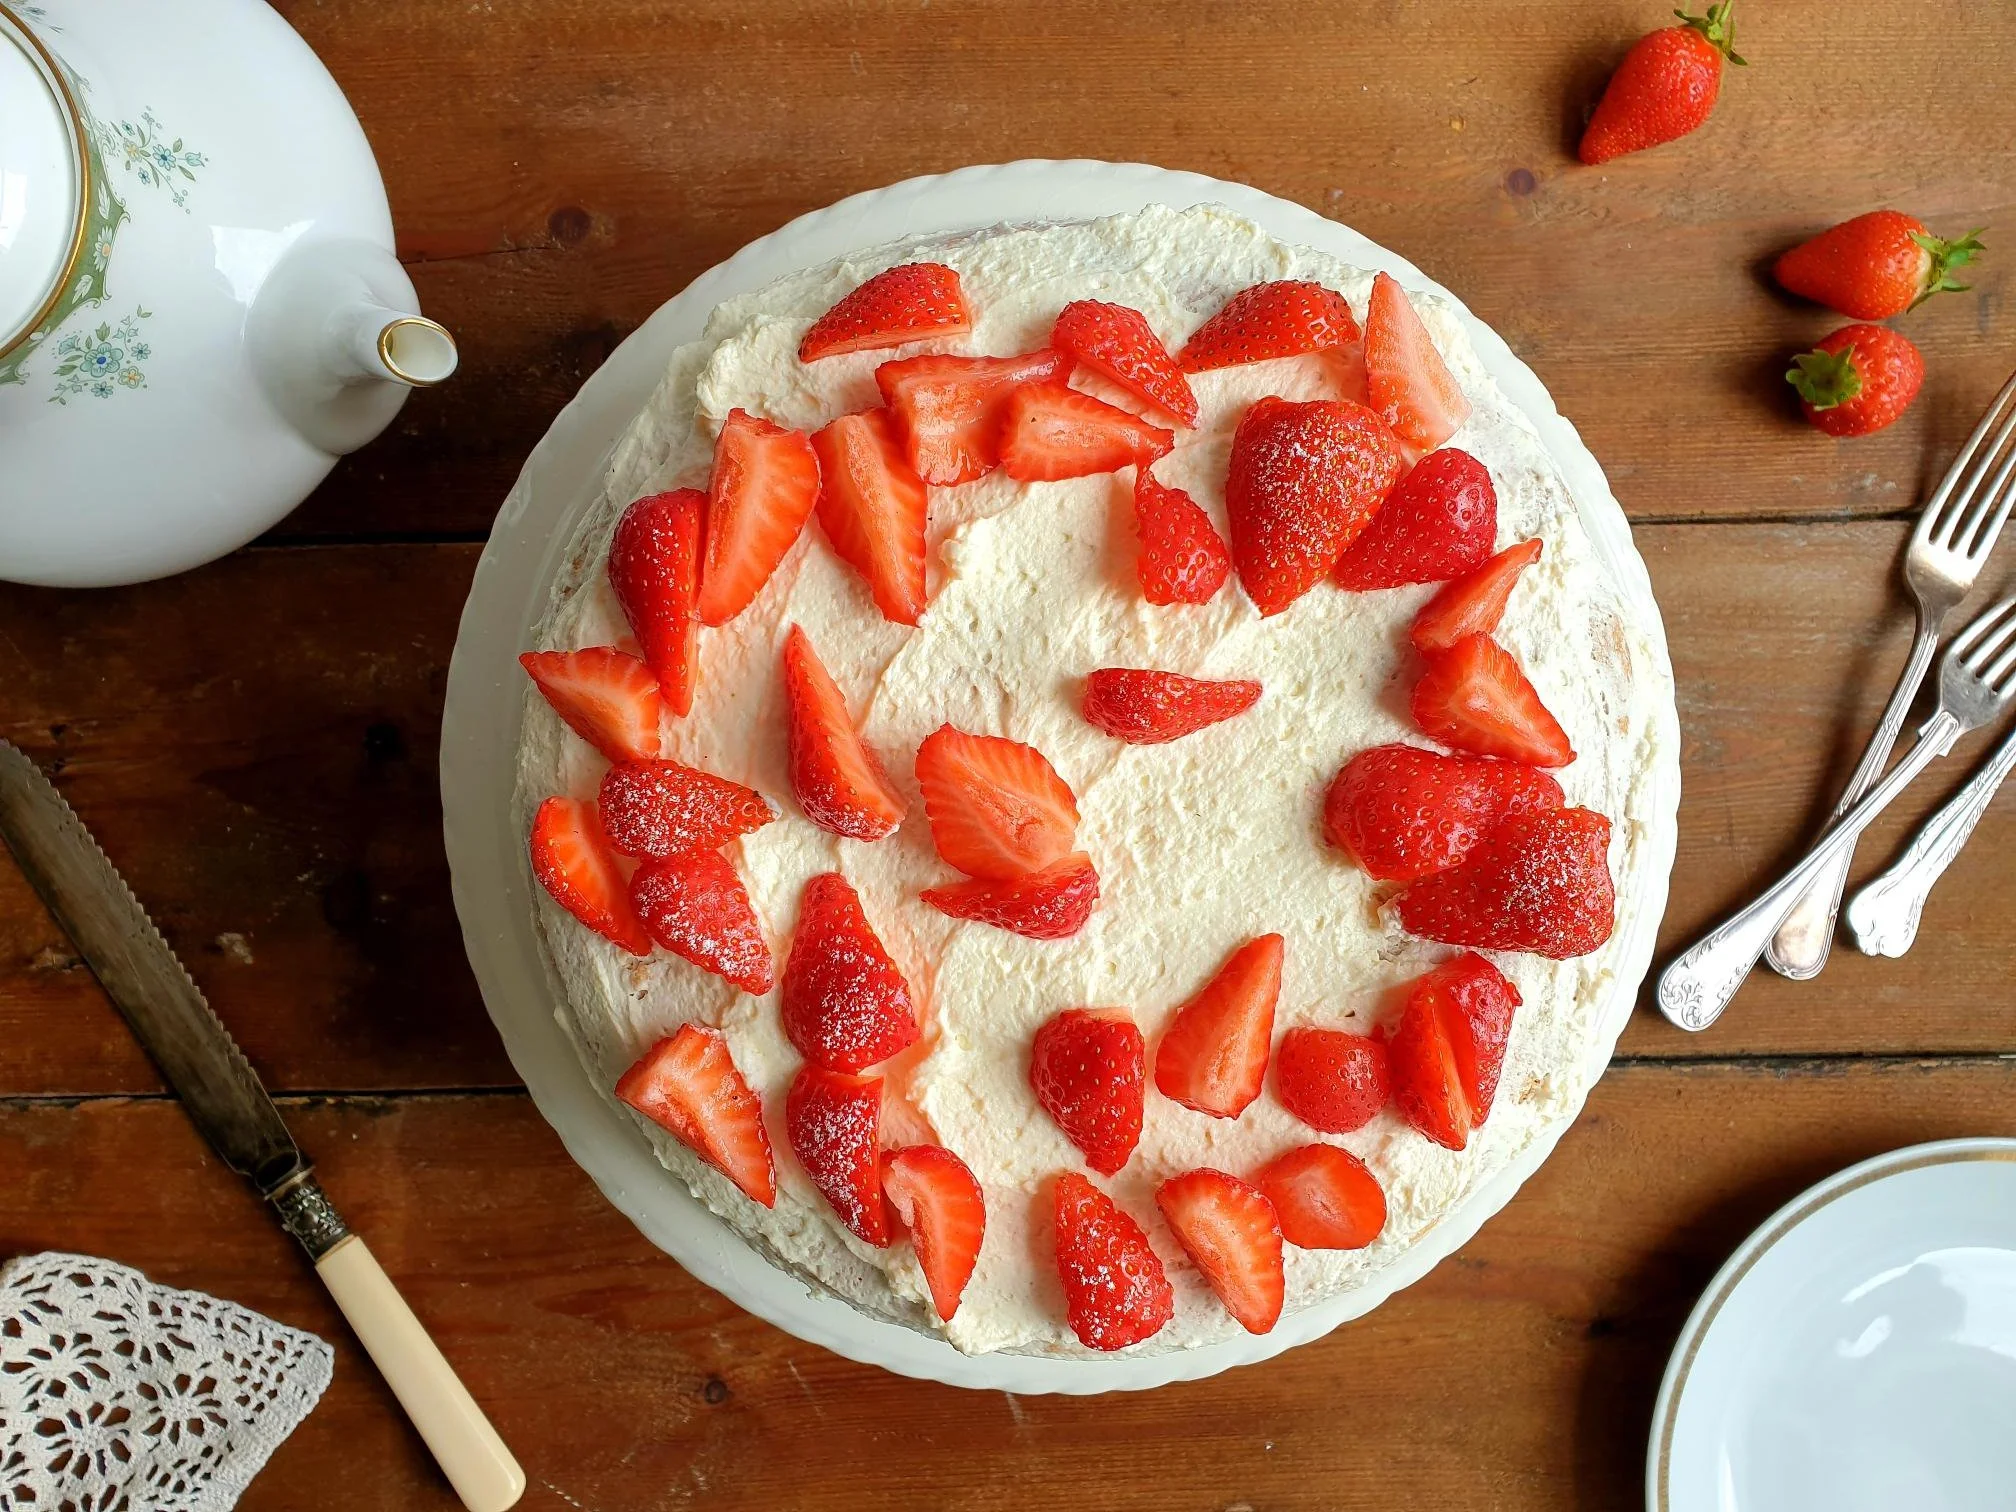
My Mum's Celebratory Sponge Cake with Fresh Strawberries and Cream Recipe

Beans and Sardines
July 30, 2024 by tina oblak in Adriatic Recipe, All year round recipe, baked dish, baking, celebratory desserts, Celebratory dish, easy baking, easy cakes, Easy recipe, festive bakes, festive dessert, festive dish, festive sweet things, pudding, simple recipe, sweet course, patisserie

A classic simple sponge made with eggs, sugar and flour with no use of butter, filled with fresh whipped cream and fresh seasonal strawberries, a true classic celebratory cake that is difficult to beat. It is perfect for spring/summer birthdays and for all other summer special occasions, it is a top favourite with all ages.

This cake is delicious in taste with the lightest and fluffiest sponge; beautiful and elegant in its appearance, it looks like it has just come from the patisserie shop and yet could not be simpler to make.

With a few ingredients and a few simple steps you will impress your family and friends, and they will ask you for the recipe before they leave!

This celebratory cake would accompany all my childhood and my adulthood birthdays, baked exclusively by my mother.

In Slovenian Istra this type of sponge, refereed by the locals in the dialect as”Pandišpanija” (Pan di Spagna, translates literally as Spanish Bread) was the first form of the most simple celebratory cake, it was simply dusted with the sugar on the top and baked for special occasions like weddings. It is believed to originate during Napoleon's reign (19th century), and was first used in Croatian side of Istra, and then to then spread into a Slovenian part. Only later this type of sponge was cut horizontally in half and filled with different types of cream which resembles more to a modern concept of celebratory cake.

She would bake this type of cake for every birthday in the family and for her special friends, changing the fruits a bit to reflect the seasons. Peaches work very well and, in the winter, when the selection of fresh fruit is limited, she would use different types of tinned fruit which works amazingly well, the syrup from the tin was used to spoon the disc of the sponge.

No one will ever get fed up with this celebratory cake, we never had to struggle with any leftovers, bake it and see for yourself!

I am sharing the recipe for this special cake to remember and to honour my mother who recently died, so her legacy for this celebratory cake can live on for years to come.

Recipe

Ingredients

For the Sponge

  • 4 eggs (room temperature)

  • 4 Tbsp cold water

  • 200g icing sugar

  • 1 Tsp vanilla extract or 1 sachet of vanillin powder (very widely used in continental Europe baking)

  • 150g all purpose flour, sifted

  • 8g baking powder, sifted

For the filling and topping

  • 400g fresh strawberries, washed, pat dried and halved or quartered (reserve 100g fresh strawberries to decorate the top of the cake)

  • 2 Tbsp caster sugar (can use less or more depending on the taste and the sweetness of the strawberries)

  • 2 Tbsp water

  • 300ml fresh double cream, cold

  • 2 Tbsp caster sugar or to taste

Method

Preheat the oven to 180º static.

Lightly grease (I used butter) a 22cm (9in) loose-bottomed cake tin or spring form round cake tin and line the base with baking parchment.

Separate the egg whites and the yolks. Put the egg whites in a big clean bowl and the egg yolks in a small cereal type of bowl, whisk the egg yolks lightly with the fork.

View fullsize My Mum's Celebratory Sponge Cake with fresh strawberries and cream 1.jpg
View fullsize My Mum's Celebratory Sponge Cake with fresh strawberries and cream 3.jpg

Add 4 table spoons of cold water into a bowl with egg whites and start whisking with the hand whisker.

During the whisking start gradually adding, one spoon at a time of icing sugar and keep whisking until the egg whites become stiff and firm but not dry.

View fullsize My Mum's Celebratory Sponge Cake with fresh strawberries and cream 4.jpg
View fullsize My Mum's Celebratory Sponge Cake with fresh strawberries and cream 6.jpg

Add vanilla extract and egg yolks and mix well until fully incorporated.

My Mum's Celebratory Sponge Cake with fresh strawberries and cream 8.jpg
My Mum's Celebratory Sponge Cake with fresh strawberries and cream 9.jpg

Slowly and gradually start adding sifted flour together with baking powder.

Gently fold until thoroughly blended, do not mix with the hand mixer as you want to keep all the air inside the mixture which will make the cake incredibly soft and fluffy.

View fullsize My Mum's Celebratory Sponge Cake with fresh strawberries and cream 11.jpg
View fullsize My Mum's Celebratory Sponge Cake with fresh strawberries and cream 12.jpg

Transfer the mixture into the prepared tin and bake in the pre-heated oven for about 25 minutes or until golden in colour, well risen and the top of the cake springs back when lightly pressed with a finger.

View fullsize My Mum's Celebratory Sponge Cake with fresh strawberries and cream 13.jpg
View fullsize My Mum's Celebratory Sponge Cake with fresh strawberries and cream 14.jpg

While the cake is baking prepare the strawberries for the filling. Wash and pat dry 300g of strawberries, cut the smaller strawberries in half and the bigger ones in quarters. Place them in the bowl, add 2 table spoons of caster sugar (or to taste) and two table spoons of water.

View fullsize My Mum's Celebratory Sponge Cake with fresh strawberries and cream 24.jpg
View fullsize My Mum's Celebratory Sponge Cake with fresh strawberries and cream 25.jpg

Mix well and leave the strawberries to macerate, put aside until needed.

View fullsize My Mum's Celebratory Sponge Cake with fresh strawberries and cream 26.jpg
View fullsize My Mum's Celebratory Sponge Cake with fresh strawberries and cream 27.jpg

Filter the strawberries, put them in a sieve and collect the juices.

View fullsize My Mum's Celebratory Sponge Cake with fresh strawberries and cream 29.jpg
View fullsize My Mum's Celebratory Sponge Cake with fresh strawberries and cream 28.jpg

Leave the sponge to cool in the tin for a few minutes, then remove from the tin and peel off the baking parchment.

Finish cooling on a wire rack.

View fullsize My Mum's Celebratory Sponge Cake with fresh strawberries and cream 15.jpg
View fullsize My Mum's Celebratory Sponge Cake with fresh strawberries and cream 16.jpg

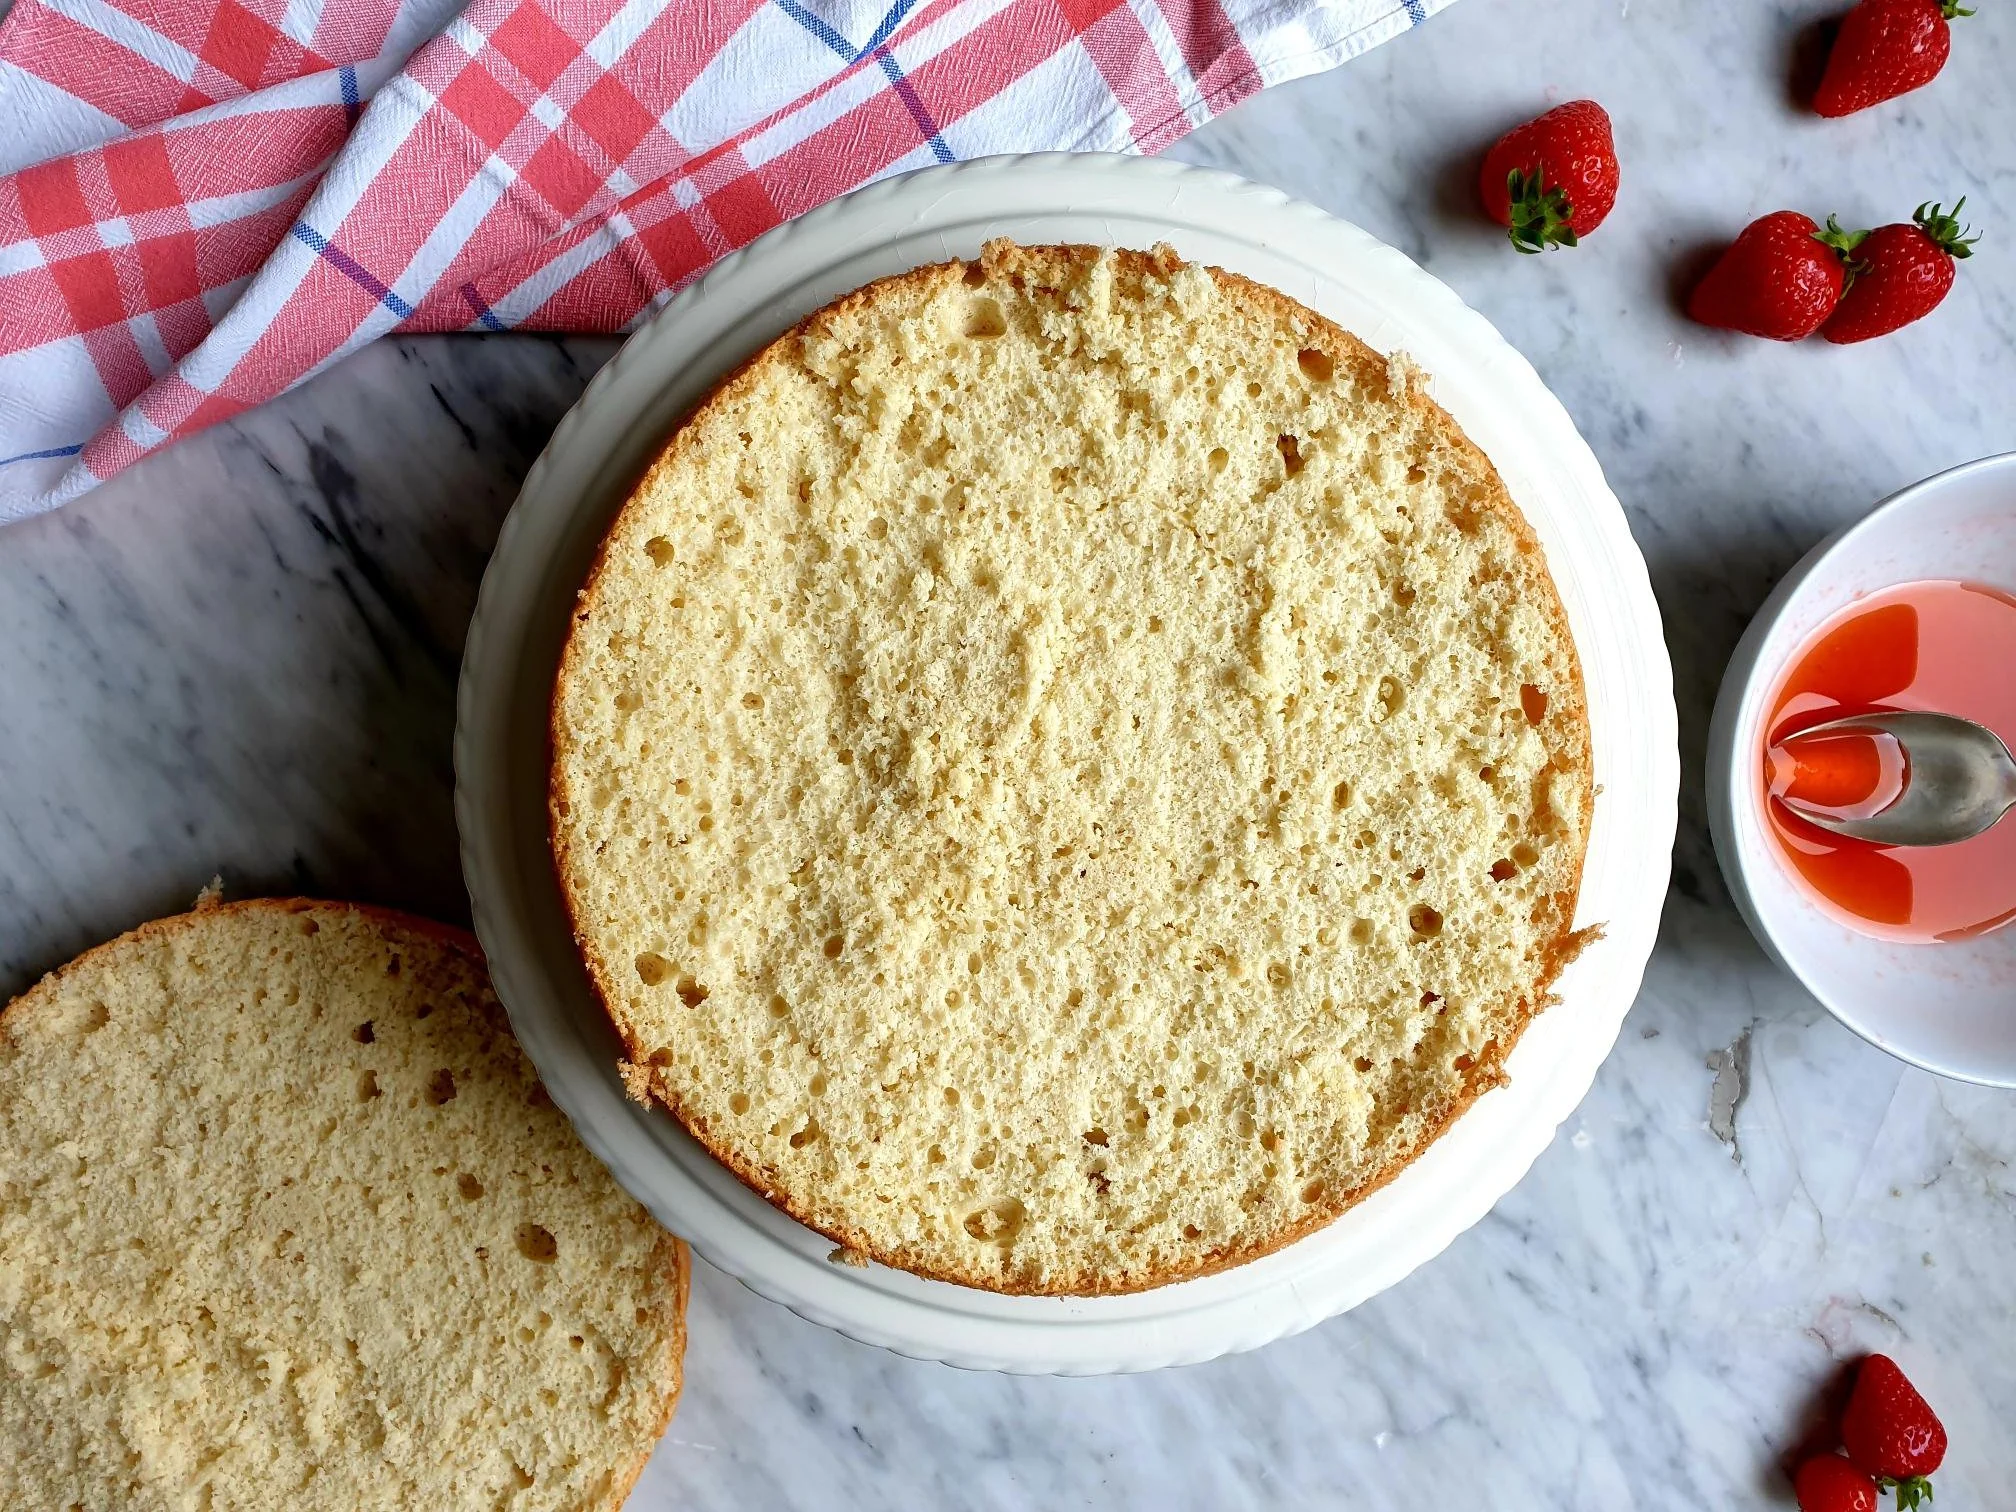
When the sponge is completely cool, take a sharp knife and cut the cake horizontally in half so you obtain two discs.

View fullsize My Mum's Celebratory Sponge Cake with fresh strawberries and cream 20.jpg
View fullsize My Mum's Celebratory Sponge Cake with fresh strawberries and cream 21.jpg

Place the bottom disk of the sponge on a cake stand of your choice.

Take fresh double cream from the fridge and pour it into a mixing bowl. Start whisking with the hand whisker.

During the whisking start adding caster sugar and whisk until the cream becomes stiff enough to be able to spread it on the cake.

View fullsize My Mum's Celebratory Sponge Cake with fresh strawberries and cream 31.jpg
View fullsize My Mum's Celebratory Sponge Cake with fresh strawberries and cream 32.jpg

Spoon strawberry juices over a bottom disk of the sponge.

View fullsize My Mum's Celebratory Sponge Cake with fresh strawberries and cream 34.jpg
View fullsize My Mum's Celebratory Sponge Cake with fresh strawberries and cream 36.jpg

Spread roughly 1/3 of whipped cream.

View fullsize My Mum's Celebratory Sponge Cake with fresh strawberries and cream 37.jpg
View fullsize My Mum's Celebratory Sponge Cake with fresh strawberries and cream 38.jpg

Then arrange the macerated strawberries over the disc to completely cover it.

Place the second disk of the sponge on the top.

View fullsize My Mum's Celebratory Sponge Cake with fresh strawberries and cream 39.jpg
View fullsize My Mum's Celebratory Sponge Cake with fresh strawberries and cream 40.jpg

Spread the rest of the cream on the top and on the sides of the cake.

Decorate to your liking the top of the cake with fresh strawberries, sliced or left whole.

View fullsize My Mum's Celebratory Sponge Cake with fresh strawberries and cream 43.jpg
View fullsize My Mum's Celebratory Sponge Cake with fresh strawberries and cream 44.jpg

Dust with a bit of icing sugar if desired and serve.

Just a thought

This cake must be eaten on the day of filling. You can prepare the sponge a day ahead, cool it completely and store it in an airtight container until the following day when is ready to be filled and decorated.

You can use tinned fruit of your choice instead of fresh strawberries. Make sure you reserve the syrup and use it to spoon over the bottom disc of the sponge as described in the recipe.

July 30, 2024 /tina oblak
sponge cake, double cream, whipped cream, fresh fruit, tinned fruit, celebratory cake, Pandišpanija, Pan di Spagna
Adriatic Recipe, All year round recipe, baked dish, baking, celebratory desserts, Celebratory dish, easy baking, easy cakes, Easy recipe, festive bakes, festive dessert, festive dish, festive sweet things, pudding, simple recipe, sweet course, patisserie
Comment

My Mother's Marble Chocolate and Vanilla Ring Cake Recipe

Beans and Sardines
July 06, 2023 by tina oblak in Adriatic Recipe, All year round recipe, baking, breakfast, brunch, Central Europe cakes, Central European recipes, dessert, Eastern Europe cakes, Eastern European recipes, easy baking, easy cakes, Easy recipe, home baking, Istrian cuisine, Istrian dish, Istrian food, Istrian gastronomy, Mitteleuropean cuisine, Mitteleuropean recipes, Mitteleuropean food, pudding, Rustic dish, simple recipe, Slovenian cuisine, Slovenian food, Slovenian gastronomy, Snacks, Sweet Things

Perhaps, you know the old adage, which actually goes back to Tudor times, ‘You can’t have your cake and eat it (too)?’ Well, with this recipe – you can! All your baking dilemmas, should I go for a chocolate cake this time, or for a vanilla one, are solved with this one recipe – you can have both in one cake!

This chocolate and vanilla sponge cake is a classic childhood sweet treat. It is moist with a soft and fluffy texture, it looks pretty, and is still elegant, since the light and dark batter is blended lightly together giving it a marble appearance, and so, hence its name, marble cake, or it is sometimes called a zebra cake, due to its zebra-striped pattern (skunks are also striped, but I supposed that isn’t a very appealing name for a cake). It is also known as a ring cake or a Bundt cake, especially in the United States.

So, this cake delivers on appearance and flavour every single time, and if you want to impress your family and friends, this is the cake to go for. It is very easy to make and you can whizz it up in no time.

It originated in Germany, where it is still very popular, from a Kugelhopf, a two-coloured sweet yeast bread.

This impressive cake has been frequently baked in Austrian households and other European countries, including in Slovenia (Šarkelj) where it represents one of the most frequently baked weekend sweet treats and it is enjoyed for breakfast as well, there is no wrong time to eat it!

This was a regular bake in my house when I was a small girl, all you need is a few simple ingredients and a few simple steps to follow, I promise you, you will think twice before reaching out for the store-bought version, and here it is, my mother's recipe.

Recipe

Ingredients

  • 4 medium eggs, room temperature

  • 250g caster sugar

  • 1 Tsp vanilla extract

  • 100ml milk, room temperature

  • 100ml sunflower oil, room temperature

  • 250g all purpose white flour (plain flour), sifted

  • 16g baking powder

  • 2 Tbsp cocoa powder, sifted

  • dusting sugar/vanilla powder sugar for dusting, optional

Method

Preheat the oven to 180°C static or equivalent.

Grease well with butter or oil a ring mould or a bundt cake tin. Make sure you cover every nook and cranny (alternatively you can use a 20cm cake tin or a 900g loaf tin, grease and line with baking parchment)

Dust with flour, shake off and tip out the excess.

View fullsize Marble Cake 2.jpg
View fullsize Marble Cake 4.jpg

Put in the mixing bowl the eggs and the sugar, and beat well until the mixture becomes golden pale in colour.

Add the milk, oil and vanilla extract, mix well.

View fullsize Marble Cake 5.jpg
View fullsize Marble Cake 6.jpg

Start adding, one spoonful at the time of sifted flour together with the baking powder.

View fullsize Marble Cake 7.jpg
View fullsize Marble Cake 8.jpg

Divide the batter, spoon half of the batter in a separate bowl.

Add in one half of the batter sifted cocoa and mix well.

View fullsize Marble Cake 10.jpg
View fullsize Marble Cake 11.jpg

Pour the white mixture into the base of the prepared ring mould first. Then pour the chocolate mixture on top.

View fullsize Marble Cake 12.jpg
View fullsize Marble Cake 13.jpg

Gently swirl a little with the knife.

Bake for about 35 minutes or until the cake has shrunk from the sides of the tin and is well risen, the top of the cake should ‘spring back’ when lightly pressed with your fingertips.

Leave to cool in the tin for a few minutes.

Turn out the cake and finish cooling on a wire rack.

Dust with icing sugar or vanilla icing sugar and serve.

July 06, 2023 /tina oblak
chocolate and vanilla ring cake, marble chocolate and vanilla cake, marble cake, zebra cake, Bundt cake, chocolate and vanilla Bundt cake, chocolate and vanilla zebra cake
Adriatic Recipe, All year round recipe, baking, breakfast, brunch, Central Europe cakes, Central European recipes, dessert, Eastern Europe cakes, Eastern European recipes, easy baking, easy cakes, Easy recipe, home baking, Istrian cuisine, Istrian dish, Istrian food, Istrian gastronomy, Mitteleuropean cuisine, Mitteleuropean recipes, Mitteleuropean food, pudding, Rustic dish, simple recipe, Slovenian cuisine, Slovenian food, Slovenian gastronomy, Snacks, Sweet Things
Comment

Austrian Style Sweet Pull Apart Yeast Buns Recipe

Beans and Sardines
March 09, 2023 by tina oblak in Adriatic Recipe, All year round recipe, Austrian inspired dishes, Autumnal dish, Autumnal recipe, baked dish, baking, breakfast, brunch, Central European recipes, child friendly dish, child friendly meal, dessert, Eastern European recipes, easy baking, Easy recipe, Enriched dough, family friendly dish, home baking, Istrian cuisine, Istrian dish, Istrian food, Istrian gastronomy, Mitteleuropean cuisine, Mitteleuropean dish, Mitteleuropean food, Mitteleuropean recipes, pudding, Rustic dish, simple recipe, Slovenian cuisine, Slovenian food, Slovenian gastronomy, Snacks, Sweet bread, sweet course, sweet finger food, sweet nibbles, Sweet Things

These soft, fluffy and airy sweet yeast buns are filled with apricot jam and are simply irresistible. This baked treat is similar to a crown loaf, it breaks into 12 individual rolls which makes it perfect for sharing, and they transport very well to take on a picnic.

As soon as they are baked the outside is lightly golden and slightly crispy but the crust becomes soft when the buns cool down.

They can be enjoyed as a dessert and are perfect for breakfast, great with tea or coffee, and kids love them as a snack, any time of the day, with a glass of milk or hot chocolate.

They are Austrian in origin (Buchteln plural form and Buchtel singular) where they are very commonly served with the vanilla sauce. These sweet buns are unknown to many people, and because they are slightly off the beaten track, this makes them a bit of an undiscovered treasure. However, they are very popular in Slovenia which borders Austria, and was once part of Austro-Hungarian Empire.

I remember that these buns were baked in school for our mid morning snack, accompanied by a hot drink. The aroma of freshly baked buhteljni (this is what they are called in Slovenian) would travel through the corridors into the classrooms – disrupting at times our concentration! Indeed, just before the break we children would get so excited the teachers found it almost impossible to contain us.

Here I am sharing the recipe of my maternal grandmother, stara mama Iva, she baked them often on a regular basis, they went down as a real treat every single time, and she never seemed to bake enough of them...

Recipe

Ingredients

This recipe makes 12 buns

  • 400g all purpose (plain) flour

  • 40g butter, melted and slightly cooled

  • pinch of sea salt

  • finely grated lemon zest of one unwaxed lemon

  • ½ Tsp vanilla extract

  • 2 medium eggs, at room temperature

  • 140ml semi-skimmed or full fat milk, lukewarm

  • 60g caster sugar

  • 5g (1 ½ Tsp) dry fast-action yeast

  • apricot jam or a jam of your preference for the filling

For the glaze

  • 40g melted unsalted butter for the brushing

For serving

  • icing sugar or vanilla icing sugar for dusting

Method

Put the sifted flour in a large mixing bowl and add the sea salt to one side of the bowl.

Make a well, pour in lukewarm milk and add the yeast.

View fullsize Buhteln 1.jpg
View fullsize Buhteln 2.jpg

In a separate smaller bowl, add the eggs and whisk them lightly. Add the sugar, melted and slightly cooled butter, and vanilla extract.

Pour the egg mixture to a big mixing bowl and add finely grated lemon zest.

View fullsize Buhteln 3.jpg
View fullsize Buhteln 4.jpg

Stir the mixture with the fork first so all the ingredients come together, incorporate, and combine well to make a fairly sticky dough.

Tip the dough into a lightly floured working surface and knead by hand for about 10-15 minutes, adding a little extra flour if needed.

The dough should be very soft, shiny and elastic.

View fullsize Buhteln 5.jpg
View fullsize Buhteln 6.jpg

Transfer the dough to a large lightly oiled container or bowl. Cover tightly with cling film and leave to rise in a warm place for about at least 1 hour, or until the dough has doubled in size.

Form into a sausage and divide into 12 equal pieces.

Flatten them to the thickness of about 1cm to obtain mini pizza shaped discs. You can do this by using floured rolling pin or stretch the dough with your hands.

Put one teaspoon of apricot jam in the centre, on top of each circle, and close the ends well. Do not try to be overgenerous with the jam, if the filling gets on the edges of the disc, it is almost impossible to seal them because the dough will stop sticking. Wrap the dough around the filling, pinching and sealing it tightly You should end up with 12 parcels.

View fullsize Buhteln 8.jpg
View fullsize Buhteln 9.jpg

Lightly grease a 23cm round, deep springform cake tin. You can use other shapes of baking trays, just make sure they are greased to prevent the buns from sticking.

Place the parcels, one next to each other, so they are snug and touching with the seam side down in a non stick baking tray. Melt the butter and brush the top and all the sides.

View fullsize Buhteln 10.jpg
View fullsize Buhteln 11.jpg

Leave to proof for a second time, for about 30min, by covering them with a clean kitchen cloth in a warm room with no draft until they are nicely risen and puffed up.

Bake at 180º static in the preheated oven, on the middle shelf, for about 30minutes or until a skewer inserted into the centre comes out clean.

The buns should be lightly golden on top and well risen.

Leave in the tin for about 5 minutes, then release the sides of the tin.

View fullsize Buhteln 13.jpg
View fullsize Buhteln 14.jpg

Remove and place the sweet buns to a wire rack to cool.

Dust the buns with regular or vanilla icing sugar and enjoy.

March 09, 2023 /tina oblak
sweet buns, pull apart sweet buns, jam filled buns, sweet crown bread, Buchteln, Buchtel, buhteljni, yeast buns, sweet dough, make ahead, pick me up treat, picnic food
Adriatic Recipe, All year round recipe, Austrian inspired dishes, Autumnal dish, Autumnal recipe, baked dish, baking, breakfast, brunch, Central European recipes, child friendly dish, child friendly meal, dessert, Eastern European recipes, easy baking, Easy recipe, Enriched dough, family friendly dish, home baking, Istrian cuisine, Istrian dish, Istrian food, Istrian gastronomy, Mitteleuropean cuisine, Mitteleuropean dish, Mitteleuropean food, Mitteleuropean recipes, pudding, Rustic dish, simple recipe, Slovenian cuisine, Slovenian food, Slovenian gastronomy, Snacks, Sweet bread, sweet course, sweet finger food, sweet nibbles, Sweet Things
Comment

Carnival Sweet Crackers Istrian Recipe

Beans and Sardines
February 15, 2023 by tina oblak in Adriatic Recipe, baking, bite-sized nibbles, breakfast, celebratory desserts, Celebratory dish, dessert, Easy recipe, Enriched dough, festive bakes, festive dessert, festive dish, festive sweet things, Finger food, Istrian gastronomy, Pastry, pudding, Rustic dish, simple recipe, Slovenian cuisine, Slovenian gastronomy, Small bites, Snacks, sweet finger food, sweet nibbles, Sweet Things

These delicate, fragile, irresistible and crispy pastries are traditionally associated with Carnival (Pust in Slovenian), and they are super tasty, so light and flaky that they just simply melt in your mouth.

They have a deep connection with Christian, especially Catholic, liturgical festivities like the Carnival season, the time of the year in which eating in excess, and gastronomic indulgence was allowed by the Church before the start of fasting and austerity during Lent, culminating with the Easter celebrations.

To make this crumbly sweet dessert is very easy, sweet dough is rolled out very thinly, it then gets very quickly fried, and it is during the frying process that this wafer thin rectangles of pastry contort into the strangest shapes. When they cool down completely they get covered in a generous dusting of icing sugar to delight children and grown-ups alike.

Together with fritole and jam filled doughnuts they are a very common sight in the pastry shop windows offering to by-passers a very cheerful Carnival atmosphere.

There are many different names for these sweet wafer-like treats throughout Italy, bugie in Piedmont, frappe or sfrappole in Emilia, cenci and donzelle in Tuscany, chiacchiere and lattughe in Lombardy to name just a few.

It is believed that they originated in the region of Veneto, where they are known as Galani or Crostoli, although their origin is being disputed and other Italian regions have claimed the credit for them.

On the coastal part of Slovenian Istra, once being part of what was called, “The most Serene Republic of Venice,” these sinfully delicious and and fragrant little delights are almost a symbol of the Carnival season, and are called, and known by the locals as hroštole, hroštule or krhki flancati in standard Slovenian.

Traditionally, they are made in quite large quantities as they are meant to last for the whole period of Lent, you will find them in rectangular shapes, but the strips of dough can be cut in different shapes like diamonds or squares, you can cut thinner strips and make knots (bows) or create rafioi (or rafioji) folded like ravioli biscuits that use jam or preserve as a filling.

These sweet Carnival temptations have been part of my life. My nona used to make them every year in huge quantities, and I am sharing here her recipe, and her little secret, she adds a bit of single cream to the dough mixture...

Recipe

Ingredients

  • 250g all purpose flour (white plain flour)

  • 3 egg yolks (room temperature), lightly beaten

  • 2 Tbsp milk

  • 3 Tbsp dark rum or grappa (can use Marsala, brandy or similar)

  • finely grated lemon zest of 1 unwaxed lemon

  • 2Tbsp lemon juice

  • 50g sugar (caster or granulated)

  • pinch of sea salt

  • vanilla icing sugar or plain icing sugar, for dusting, to serve

  • oil for frying

Method

Sift the flour in a fairly large mixing bowl and add lightly beaten egg yolks, milk, rum or grappa, finely grated lemon zest, lemon juice, sugar and a pinch of sea salt.

View fullsize Crostoli 1.jpg
View fullsize Crostoli 2.jpg

Mix well with the fork to incorporate all the ingredients, then gather with your hands to form a fairly firm dough.

Adjust the wetness of the dough by either adding a little flour at the time if the dough is too wet, and on the contrary, gradually adding a bit of milk if the dough is too dry.

View fullsize Crostoli 3.jpg
View fullsize Crostoli 4.jpg

Transfer the dough onto a working surface and work the pastry mix quite intensely for about 10-15 minutes. You should end up with a smooth and elastic dough that does not stick to your hands or the surface, it should be firm, bur fairly soft to the touch.

Shape it into a ball and wrap in cling film and leave it to rest at room temperature for at least 30 minutes, ideally about 1 hour.

Divide the dough into smaller portions (about 150g).

If you have a pasta machine, this is the time to use it, alternatively a rolling pin will do the job just fine.

With the palm of your hand flatten slightly the first portion of the dough.

Sprinkle with a little bit of flour and roll it out with the pasta machine to the widest thickness.

View fullsize Crostoli 6.jpg
View fullsize Crostoli 7.jpg

Fold the short sides of the sheet of dough towards the centre.

View fullsize Crostoli 9.jpg
View fullsize Crostoli 10.jpg

Continue to roll the sheet of dough using an increasingly thinner setting on the pasta machine each time.

Stop rolling when you reach the last and the thinnest setting, and the dough sheet reaches the thickness of about 2mm.

Repeat the process with the remaining portions of the dough.

If you are using rolling pin, roll each portion of the dough to the thickness of a coin, roughly 2mm.

Using a knife or a pastry (cutting) wheel, cut the rolled sheets of dough into rectangles (about 5 x 10 or 2-inch x 4-inch).

Make a couple of incisions in the middle of each strip (parallel to the long side on each one).

This will help the sweet crackers to expand during frying.

View fullsize Crostoli 12.jpg
View fullsize Crostoli 13.jpg

Strips of dough can be cut in different shapes, you can cut thinner strips and make knots (bows).

View fullsize Crostoli 18.jpg
View fullsize Crostoli 19.jpg

You can also create rafioi (or rafioji) folded like ravioli biscuits (to make these, you do not want your pastry to be rolled out too thin). Cut out circles (size of your preference). Place a dab of jam or preserve of your choice in the centre of each circle, fold in half. Pinch well to close and fry.

View fullsize Crostoli 14.jpg
View fullsize Crostoli 15.jpg
View fullsize Crostoli 16.jpg
View fullsize Crostoli 17.jpg

Heat the oil in a frying pan, bring it to the temperature of 170° C.

When the oil reaches the right temperature, place 2-3 (this will depend on the size of your frying pan) rectangles of the dough into the oil.

Fry them turning them on both sides until they are golden brown.

View fullsize Crostoli 24.jpg
View fullsize Crostoli 25.jpg

With the help of slotted spoon or a skimmer remove the crackers.

Place them on a tray or a big plate previously lined with kitchen paper allowing to drain.

View fullsize Crostoli 27.jpg
View fullsize Crostoli 28.jpg

Allow to cool completely, sprinkle with plenty of icing sugar.

Pile them in criss-cross layers on a plate and serve.

They are very fragile so be careful not to break them.

And be mindful of the fact that when you eat them you will be, almost inevitably, covered slightly in a bit of crumbs and icing sugar, is all part of the experience, it is Carnival after all!

Just a thought

These sweet Carnival crackers are best enjoyed as soon as they are made.

They can be stored for about 2-3 days in an airtight containers.

February 15, 2023 /tina oblak
Carnival sweet crackers, Pust, Carnevale, Carnival, Carnival sweet treats, fried sweet pastry, bugie, frappe, sfrappole, cenci, donzelle, chiacchiere, lattughe, hroštoli, hroštule, krhki flancati, rafioi, rafioji, Carnival season sweets
Adriatic Recipe, baking, bite-sized nibbles, breakfast, celebratory desserts, Celebratory dish, dessert, Easy recipe, Enriched dough, festive bakes, festive dessert, festive dish, festive sweet things, Finger food, Istrian gastronomy, Pastry, pudding, Rustic dish, simple recipe, Slovenian cuisine, Slovenian gastronomy, Small bites, Snacks, sweet finger food, sweet nibbles, Sweet Things
Comment

Ricotta or Curd Cheese Strudel Recipe

Beans and Sardines
January 25, 2023 by tina oblak in Adriatic Recipe, breakfast, Central European recipes, dessert, Eastern European recipes, easy baking, Easy recipe, Istrian cuisine, Istrian food, Istrian gastronomy, Mitteleuropean cuisine, Mitteleuropean food, Mitteleuropean recipes, pudding, Slovenian cuisine, Slovenian food, Slovenian gastronomy, Snacks, sweet course, sweet finger food, sweet nibbles, Sweet Things

Ricotta cheese strudel is a variation of a traditional, well known and quintessentially Viennese Apple Strudel, it is a very scrumptious dessert, made with very thin, elastic pastry, and the filling contains ricotta or curd cheese, sugar, vanilla bean extract, eggs yolks, grated lemon zest and raisins soaked in dark rum, grappa or just lukewarm water.

Apple strudel was first mentioned in 1696, and later conquered all the countries that were once ruled by the Austro-Hungarian Empire, and curd cheese strudel is as popular and traditional in Austria as the famous Apple strudel.

All three types of strudels (apple, curd cheese and cherry) are very much loved in the North Adriatic, in Slovenian Istra, where I come from, and in the neighbouring city of Trieste, in Italy, and part of its province.

Ricotta strudel is regularly and traditionally baked with curd cheese (called skuta in Slovenian) in local households, and sometimes, if you are lucky enough, you might find it in more informal family run restaurants (skutin štrudelj or skutin zavitek).

This very delicious sweet treat really takes me back to my childhood, not only my mother frequently baked it, we also had it for school dinner as a pudding, and it did go down a treat.

I am sharing here my mother's recipe for ricotta strudel, this slightly off the beaten track recipe, made with home made pastry, but if you are too daunted by the idea of making your own dough, or simply do not have time to make it, you can still indulge yourself, and cut corners a bit by using store bought ready made pastry.

Recipe

Ingredients

Will make two separate strudels.

You can use store bought ready made puff pastry, shortcrust or filo pastry.

Ingredients for home-made strudel dough

  • 250g all purpose flour

  • 1 egg, lightly beaten

  • 3 Tbsp neutral tasting vegetable oil (I used sunflower oil)

  • 2 Tbsp white wine vinegar or lemon juice

  • sea salt, a pinch

  • 60ml lukewarm water, or as needed

Ingredients for ricotta or curd cheese filling

  • 500g ricotta or curd cheese

  • 100g raisins

  • 2 egg yolks

  • 80g caster sugar (I recommend 100g of sugar if using curd cheese as more acidic compared to ricotta)

  • 1 ½ vanilla bean extract

  • 1 unwaxed lemon, finely grated zest

  • 3 Tbsp dark rum, grappa or lukewarm water (for soaking the raisins)

  • generous knob of butter, melted (for brushing the strudels before baking them)

Method

Before starting with the recipe, place the raisins in a small bowl, pour dark rum, grappa or lukewarm water over them, and let them soak and plump up for about 30 minutes (you can leave them to soak for longer or overnight).

To make the dough

Sift the flour in a big mixing bowl and make a well.

In a separate, smaller bowl, mix slightly beaten egg, oil, vinegar or lemon juice, (the acidity will help to relax gluten in the flour making the dough more stretchy) a pinch of sea salt, and lukewarm water. Pour the mixture into a flour well.

With the fork, stir the mixture with the flour until well combined. Only if the mixture is very wet and sticky, add a little bit of flour at a time, until the dough comes nicely together, then work the dough with your hands.

Transfer the dough on a lightly floured working surface and knead the dough for about 10 minutes or until nice and smooth.

After this time, the dough should be moist and elastic and not sticky. Add a little more flour if the dough is too sticky to knead.

In order to further encourage the development of the gluten, resulting in a very elastic dough, slam the dough onto the working surface a few times.

Shape the dough into a smooth ball and place it in a clean bowl, previously brushed with oil.

Cover the bowl with cling film and let the dough rest for about 30-60 minutes at room temperature (strudel dough has no yeast, so do not expect the dough to rise or double in size, it needs to rest for gluten to relax).

View fullsize Apple Strudel 4.jpg
View fullsize Apple Strudel 5.jpg

To make the filling

Place ricotta or curd cheese in a fairly large bowl and stir.

Add caster sugar, vanilla bean extract, egg yolks, grated lemon zest and mix well all the ingredients.

View fullsize Ricotta strudel 1.jpg
View fullsize Ricotta strudel 2.jpg

Drain the raisins, remove excess liquid, add to the mixture.

Set aside for later use.

Preheat the oven to 190C static or equivalent.

View fullsize Ricotta strudel 3.jpg
View fullsize Ricotta strudel 4.jpg

Divide the dough in half to make two separate strudels (easier to work with).

Place half of the dough on a clean and lightly floured table cloth. Flour the rolling pin and start rolling out the dough. While rolling, to prevent sticking, flour the dough and the surface every now and then.

When the dough reaches about 20 cm in diameter pick it up and keep stretching it. The best way to do so is to use the back of your hands, and in particular the knuckles, but make sure you remove any sharp jewellery first.

When the dough becomes difficult to handle as it becomes bigger and thinner, place it on a lightly floured tablecloth.

With your hands (tip of the fingers) keep stretching gently the dough on the tablecloth to paper thin consistency, from the inside to the outside working your way round the sheet of dough.Keep stretching until the sheet of dough starts to look almost translucent and you will be able to see a pattern of your tablecloth through it.You should end up with a thin sheet of dough stretched more or less into a rectangular shape with a diameter of approximately 40 cm which will fit into a standard 40 cm baking tray.

If you notice that the edges are still a bit thick, stretch them further very gently, or cut them off. If you leave the edges thick, when rolling the strudel, they will form quite a thick layer at the very centre of the strudel risking to remain slightly underbaked.

View fullsize Ricotta strudel 5.jpg
View fullsize Ricotta strudel 6.jpg

Place and spoon evenly half of the ricotta mixture (you will use the other half of the mixture to make a second strudel) over ¾ of the dough sheet leaving about 2-3cm to the edge.

View fullsize Ricotta strudel 8.jpg
View fullsize Ricotta strudel 9.jpg

Fold in the side ends of the sheet to prevent filling coming out during rolling.

Fold in the side ends of the sheet to prevent filling coming out during rolling.

Using the tablecloth to help you, roll the dough all the way and roll it directly onto a sheet of baking parchment, seam side down.Transfer very gently the baking parchment with the rolled strudel on a baking tray.

Repeat the process with the other half of the dough to make a second strudel.

View fullsize Ricotta strudel 10.jpg
View fullsize Ricotta strudel 11.jpg

Brush both strudels with a bit of melted butter.

View fullsize Ricotta strudel 12.jpg
View fullsize Ricotta strudel 13.jpg

Bake in the preheated oven on the middle shelf for about 40-45 minutes, or until the strudel crust turns nice golden in colour.

Take it out of the oven and let it cool a bit.

Serve it slightly warm or at room temperature.

Dust with regular icing sugar or vanilla icing sugar, cut into slices and serve it on its own or with custard.

Just a thought

You can make the strudel dough ahead and keep it refrigerated in an airtight container for up to two days. Before using the dough take it out of the fridge allowing it to come to a room temperature.

Ricotta strudel is best eaten the day is made. You can keep it in an airtight container in the fridge for 3-4 days or overnight on the counter.

You can make a less traditional version of this strudel and replace raisins for chocolate chips in the ricotta filling.

Wine suggestion

Colli Orientali del Friuli Verduzzo Sottozona Cialla DOC “Verduzzo di Cialla” 2017 - Ronchi di Cialla

January 25, 2023 /tina oblak
strudel pastry, home made strudel pastry, filo pastry, shortcrust pastry, ready made puff pastry, ricotta, ricotta cheese, curd cheese, raisins
Adriatic Recipe, breakfast, Central European recipes, dessert, Eastern European recipes, easy baking, Easy recipe, Istrian cuisine, Istrian food, Istrian gastronomy, Mitteleuropean cuisine, Mitteleuropean food, Mitteleuropean recipes, pudding, Slovenian cuisine, Slovenian food, Slovenian gastronomy, Snacks, sweet course, sweet finger food, sweet nibbles, Sweet Things
Comment

Apple Fritter Rings Istrian Recipe

Beans and Sardines
November 29, 2022 by tina oblak in Adriatic Recipe, All year round recipe, Appetizers, Austrian inspired dishes, Autumnal dish, Autumnal recipe, bite-sized nibbles, breakfast, brunch, Canapés, Central European recipes, child friendly dish, child friendly meal, dessert, Eastern European dishes, Eastern European recipes, Easy recipe, Finger food, Istrian cuisine, Istrian dish, Istrian food, Istrian gastronomy, Mitteleuropean cuisine, Mitteleuropean dish, Mitteleuropean food, Mitteleuropean recipes, pudding, Rustic dish, simple recipe, Slovenian cuisine, Slovenian food, Slovenian gastronomy, Small bites, Snacks, sweet finger food, sweet nibbles, Sweet Things

This is a simple and rustic sweet treat, yet very much loved apple dessert, and it is as popular with adults as it is with children, who seem never to get enough of it!

Apple fritter rings are incredibly easy and simple to make, apple slices are dipped into a type of pancake batter and then shallow fried to golden brown.

Apple fritters for me are a reminder of my childhood, and I am quite nostalgic about them, they take me right down the proverbial memory lane, and represent a quintessentially autumn dessert. My maternal grandmother would make these fritters on a regular basis, made from the apples grown in the family orchard.

Battered apple ring fritters have been very popular in Slovenian Istra where I come from, which was once part of the Habsburg Monarchy with Maria Theresa being its supreme ruler, and this is her recipe for apple fritters.

Take two eggs and a little wine. Make a batter. Cut the apples in cubes. Put in the batter. Let lard heat in a pan. In it pour your apples. Fry and turn them. Lift out and serve strewn with sugar.

(Maria Theresia Voigtin, 1724)

Rosl Philpot, Viennese Cookery, Hodder and Stoughton Ltd., London, 1965.

Whether you are using my family recipe or Maria Theresa's one, make this delicious apple based sweet treat, it is just a pure perfection in its simplicity.

Recipe

Ingredients

  • 500-600g roughly apples (any apples you like, but they need to be firm and be able to hold the shape when cut into rings)

  • 1 egg

  • 100ml milk

  • 2 Tsp sugar (10g)

  • 100g plain white flour

  • pinch of sea salt

  • ground cinnamon, to taste optional (added to the batter)

  • icing sugar or vanilla icing sugar for dusting

  • vegetable oil for frying

Method

In a medium bowl, whisk the egg, add a pinch of sea salt and sugar.

Pour in the milk and whisk together.

View fullsize Apple fritters 2.jpg
View fullsize Apple fritters 3.jpg

Slowly start adding the flour, bit by bit, and whisk well until you obtain a smooth batter with no lumps. Add ground cinnamon, if using, and whisk well.

Leave the mixture to rest for about 30 minutes, it will thicken a bit.

View fullsize Apple fritters 4.jpg
View fullsize Apple fritters 6.jpg

While the batter is resting, prepare the apples.

Wash, peel, core and slice the apples into rounds. (if you do not have the apple corer, you can remove the centre from the apple ring with a small round cookie cutter or just use the knife to cut out the centre core).

Add roughly 1cm of frying oil in a pan.

Heat the oil to 170C (use food thermometer if you have one).

Dip each slice in the batter and shake off any excess, then carefully lower the slices into the oil and fry on both sides until golden brown in colour.

View fullsize Apple fritters 10.jpg
View fullsize Apple fritters 11.jpg

Transfer onto a large plate or a dish previously lined with the kitchen paper to allow excess oil to absorb.

Dust with icing sugar.

Enjoy hot or at room temperature.

Wine suggestion

Alto Adige Moscato Giallo DOC 2021 - Kaltern

November 29, 2022 /tina oblak
apple fritter rings, apple fritters, battered apple rings, battered apple fritters, pancake battered apple rings
Adriatic Recipe, All year round recipe, Appetizers, Austrian inspired dishes, Autumnal dish, Autumnal recipe, bite-sized nibbles, breakfast, brunch, Canapés, Central European recipes, child friendly dish, child friendly meal, dessert, Eastern European dishes, Eastern European recipes, Easy recipe, Finger food, Istrian cuisine, Istrian dish, Istrian food, Istrian gastronomy, Mitteleuropean cuisine, Mitteleuropean dish, Mitteleuropean food, Mitteleuropean recipes, pudding, Rustic dish, simple recipe, Slovenian cuisine, Slovenian food, Slovenian gastronomy, Small bites, Snacks, sweet finger food, sweet nibbles, Sweet Things
Comment

Rustic Apple Pie Squares Istrian Recipe 

Beans and Sardines
November 02, 2022 by tina oblak in Adriatic Recipe, Autumnal dish, Autumnal recipe, baked dish, baking, bite-sized nibbles, breakfast, Canapés, child friendly dish, dessert, easy baking, Easy recipe, Finger food, Istrian cuisine, Istrian dish, Istrian food, Istrian gastronomy, pudding, Rustic dish, simple recipe, Slovenian cuisine, Slovenian food, Slovenian gastronomy, Small bites, Snacks, sweet course, sweet finger food, sweet nibbles, Sweet Things

This quintessentially autumnal and rustic apple sweet treat is made with mouth-watering crumbly butter dough and apple pure filling,  it is baked in rectangular baking trays, and when completely cooled it is cut into squares. 

It is easy to prepare, inexpensive and becomes a delicious dessert when served warm with some cream or vanilla ice cream, goes very well with tea or coffee and makes an excellent snack. Apple bars, when placed in biscuit tin, can also make a lovely present or a pick-me-up gift for someone special. 

When apples are in season, apple pie squares are baked on a regular basis,  and it is one of the most commonly baked sweet treats in Autumn, not only along the Slovenian coast, where I come from, but in every corner of the country, and also very popular in neighbouring Croatia. 

This good old-fashioned bake from childhood is given to the children as an afternoon snack after school, and in Slovenian it is referred to as  Jabolčna pita. It is commonly baked in households, and is sometimes even offered in more informal family run restaurants, and comes with a few variations. 

For extra texture and taste you can add to the apple filling mixture some pine nuts, roughly chopped walnuts or some raisins and a bit of ground cinnamon and /or ground cloves, and adding an extra layer of curd cheese or ricotta is quite common too. 

My maternal grandmother would bake this pie almost on a weekly basis as my grandfather had an orchard with apple tress, like a lot of households have in the countryside, with abundant varieties of apples, which were often shared in the village or community. 

I am sharing here my mother's recipe for this slightly different, off the beaten track recipe, for Apple Pie Squares. No matter if you picked your own apples, or are given some, or you buy them in the food store, bake this delicious pie and you will come back to it, time and time again. You will see, smell, and taste why there is a reason this pie has been baked and loved for generations! 

Ingredients 

Dough 

  • 400g plain flour 

  • 150g butter 

  • 1 Tsp baking powder 

  • 100g caster sugar 

  • 1 egg, slightly beaten 

  • 1-2 Tbsp milk 

  • lemon zest of 1 unwaxed lemon, finely grated 

  • pinch of sea salt 

Filling 

  • 1.5kg apples 

  • 2 Tbsp caster sugar (quantity of the sugar depends on the sweetness of the apples) 

  • lemon juice of 1 small lemon

  • 1 Tsp of ground cinnamon or cloves (optional) 

  • icing sugar, for dusting 

Method 

Very lightly grease a 30 x 23 cm (12 x 9 in) traybake or roasting tin. 

To make the pastry, measure the flour into a large bowl and add diced butter. 

Using your fingertips, rub the butter until the mixture resembles breadcrumbs.

View fullsize Apple pie bars 3.jpg
View fullsize Apple pie bars 4.jpg

Make a well in the centre of the flour, then add baking powder, sea salt, caster sugar, beaten egg, finely grated lemon zest and the milk. First gently mix with the fork to combine all the ingredients, and for the mixture to come together. 

View fullsize Apple pie bars 5.jpg
View fullsize Apple pie bars 6.jpg

Gently gather the dough with your hands and transfer it onto a lightly floured surface. 

View fullsize Apple pie bars 7.jpg
View fullsize Apple pie bars 8.jpg

Gently press the dough, without kneading it, until it comes together to form a firm ball. 

If too wet add a bit of flour, if too dry wet your hand with cold water and gently knead. 

Press the dough into a roughly rectangular shape (this will help later to roll out the pastry).Wrap in cling film and leave to rest in the fridge for about 30 minutes.

View fullsize Apple pie bars 10.jpg
View fullsize Apple pie bars 11.jpg

Preheat the oven to 180C static or equivalent and prepare the apple filling. 

To make the apple filling peel and coarsely grate the apples, place them in a bowl and add lemon juice.

Add caster sugar and spices, if using, and mix well. 

Transfer the apple mixture into a large frying pan and cook the apples on a gentle heat, stirring occasionally, until they become completely soft, mushy and have a consistency of apple puree.

Turn the heat off and set aside. Taste and adjust sweetness of the filling to your liking by adding more sugar. 

View fullsize Apple pie bars 13.jpg
View fullsize Apple pie bars 14.jpg

 Take the dough out of the fridge and divide it in half. 

On a slightly floured surface, with the rolling pin, roll out each half into roughly the size and shape of four baking tray.

View fullsize Apple pie bars 15.jpg
View fullsize Apple pie bars 16.jpg

Press one rectangle into the bottom of a baking dish. 

If the dough comes up the sides a bit, do not worry, just tuck it in a bit and press down. 

View fullsize Apple pie bars 17.jpg
View fullsize Apple pie bars 19.jpg

Spoon the apple filling.

View fullsize Apple pie bars 20.jpg
View fullsize Apple pie bars 21.jpg

Cover with the other half of the dough, tuck it in a bit, and prick the pie crust with a fork. 

View fullsize Apple pie bars 22.jpg
View fullsize Apple pie bars 23.jpg

Put it in the oven and bake for about 45 minutes or until the top layer is pale golden in colour. 

Cool completely, dust with icing sugar and cut into squares. 

You can enjoy it warm with cream or vanilla ice cream but you will not be able to cut them into bars, as the apple pie, when still warm, is quite soft and crumbly. 

November 02, 2022 /tina oblak
Rustic Apple Pie, Apple pie squares, Apple pie bars, apple pie with apple pure, Jabolčna pita, apples, fresh apples, apple pure, sweet shortcrust pastry
Adriatic Recipe, Autumnal dish, Autumnal recipe, baked dish, baking, bite-sized nibbles, breakfast, Canapés, child friendly dish, dessert, easy baking, Easy recipe, Finger food, Istrian cuisine, Istrian dish, Istrian food, Istrian gastronomy, pudding, Rustic dish, simple recipe, Slovenian cuisine, Slovenian food, Slovenian gastronomy, Small bites, Snacks, sweet course, sweet finger food, sweet nibbles, Sweet Things
Comment

My mum's easy Pear Traybake Recipe

Beans and Sardines
September 14, 2022 by tina oblak in Adriatic Recipe, All year round recipe, Autumnal dish, Autumnal recipe, baked dish, baking, bite-sized nibbles, breakfast, Central Europe cakes, Central European recipes, child friendly dish, dessert, easy baking, easy cakes, Easy recipe, Finger food, home baking, Istrian cuisine, Istrian food, Istrian gastronomy, pudding, Rustic dish, simple recipe, Slovenian cuisine, Slovenian food, Slovenian gastronomy, Small bites, Snacks, sweet course, sweet finger food, sweet nibbles, Sweet Things

This pear tray bake is made with simple, everyday, ingredients found in your pantry, it is moist, light, soft, super delicious, and incredibly easy and quick to prepare. You will want to make it over and over again, and it will become your number one recipe for a traybake.

This recipe covers it all when it comes to sweet treats, it is perfect for any occasion and it can be enjoyed any time of the day. You can serve it at room temperature or cold as a snack, it goes really well with tea and coffee, it can be made in advance and taken to the picnics; but, it also can be equally served warm as an elegant dessert when “dressed up” a bit and accompanied with cream, whipped cream, fromage frais, yoghurt, or a good quality vanilla ice cream or gelato.

This sumptuously moist pear traybake is incredibly popular back home on the Slovenian coast and baked in the households on a regular basis all year round. In fact, the idea behind this traybake is to use the same basic sponge recipe and add different fresh seasonal fruits or their combinations, so you always end up with a slightly different cake. And of course, using jarred or tinned fruit in this recipe is perfectly fine too.

In the autumn you can use for example pears, apples, plums and blackberries and add ground cinnamon and clove and orange zest to enhance that characteristic autumnal flavours, on the contrary, in the spring and summer months the use of peaches, cherries, nectarines and lemon zest will add freshness to the sponge base.

View fullsize Pear Traybake 1.jpg
View fullsize Pear Traybake 2.jpg

I am sharing here my mum's recipe for a tray bake she used to make, and still does, it will become a staple in your sweet things repertoire to bake.

Ingredients

Serves 12

  • 3-4 ripe pears (about 500g), tinned pears also work well in this recipe

  • lemon zest and juice of ½ small unwaxed lemon

  • 3 medium eggs (room temperature)

  • 150g caster sugar

  • 130g plain white all purpose flour

  • 6g baking powder (1 Tsp)

  • 5 Tsp neutral tasting oil (75ml)

  • ½ Tsp vanilla extract

  • ¼ Tsp ground cinnamon, optional

  • ¼ Tsp ground cloves, optional

  • icing sugar, for dusting

Method

Pre-heat the oven to 180C/Fan 160C/Gas 4.

Lightly grease a tray bake or roasting tin, approx 30 x 23cm (12 x 9), then line the base with baking parchment.

Peel, core and thinly slice the pears. Transfer into a bowl, add lemon zest and squeeze the lemon juice over them. This will help the pears from turning brown and discolouring but also adds a bit of of extra flavour.

Crack the eggs into a mixing bowl, add the sugar and beat with a free-standing or hand-held mixer for about 7 minutes or until the mixture has thickened, becomes slightly pale in colour and foamy.

View fullsize Pear Traybake 11.jpg
View fullsize Pear Traybake 12.jpg

Add sifted flour and baking powder along with oil, vanilla extract, and ground cinnamon and clove, if using. Stir with a wooden spoon to incorporate well all the ingredients.

View fullsize Pear Traybake 13.jpg
View fullsize Pear Traybake 14.jpg

Add pears to the mixture and stir with a wooden spoon or spatula.

View fullsize Pear Traybake 15.jpg
View fullsize Pear Traybake 16.jpg

Transfer the mixture into the tray.

Bake in the pre-heated oven for about 40-45 minutes or until the cake is golden, firm to the touch and and when inserting the knife into the centre should come out clean.

Leave to cool then turn out, remove the parchment, dust with a bit of icing sugar and cut into 12 pieces.

You can also serve it warm as a dessert with cream, whipped cream, fromage frais or a good quality vanilla ice cream or gelato.

Just a thought

In this traybake you could use other fruit such as apples, peaches, nectarines, cherries or plums or a combination of the fruits that your prefer, and all of the fresh fruits can be replaced by jarred or tinned alternative.

You can freeze this tray bake for up to three month.

Wine suggestion

Moscato di Trani DOC Dolce Naturale "Dulcis in Fundo" 2019 - Torrevento

September 14, 2022 /tina oblak
Traybakes, fresh fruit, tinned fruit, jarred fruit, fruit sponge cake, fresh pears, ground cinnamon, ground cloves, lemon zest, pear cake, pear traybake
Adriatic Recipe, All year round recipe, Autumnal dish, Autumnal recipe, baked dish, baking, bite-sized nibbles, breakfast, Central Europe cakes, Central European recipes, child friendly dish, dessert, easy baking, easy cakes, Easy recipe, Finger food, home baking, Istrian cuisine, Istrian food, Istrian gastronomy, pudding, Rustic dish, simple recipe, Slovenian cuisine, Slovenian food, Slovenian gastronomy, Small bites, Snacks, sweet course, sweet finger food, sweet nibbles, Sweet Things
1 Comment

Cherry strudel Istrian Recipe

Beans and Sardines
June 29, 2022 by tina oblak in Adriatic Recipe, All year round recipe, Austrian inspired dishes, baked dish, baking, breakfast, child friendly dish, dessert, easy baking, Easy recipe, home baking, Hungarian inspired dishes, Istrian cuisine, Istrian dish, Istrian food, Istrian gastronomy, Mitteleuropean cuisine, Mitteleuropean dish, Mitteleuropean food, Mitteleuropean recipes, pudding, Rustic dish, simple recipe, Slovenian cuisine, Slovenian food, Slovenian gastronomy, Snacks, sweet course, Sweet Things, sweet nibbles

Cherry Strudel is a variation of a traditional and well known Viennese Apple Strudel, it is a very scrumptious dessert made with very thin elastic pastry, and the filling contains fresh cherries, a bit of sugar, lemon zest and breadcrumbs. If you are thinking that you cannot be bothered pitting the cherries and making your own dough, I can guarantee you an equal delicious results using store bought pastry and jarred, tinned or frozen cherries, no hassle involved!

Apple strudel dates back to1696, when it was first mentioned, and “conquered” all the countries that were once part of Austro-Hungarian Empire, but it is believed that strudel originated from baklava (a famous Turkish pastry based dessert) and travelled to Austria with Ottoman's Empire and through Hungarian cuisine.

Apple strudel has been a big hit in all the countries that were once ruled by Austro-Hungarian Empire, but it is in the North Adriatic that this new variation was created giving originality to a very unique and less known type of strudel. A cherry strudel, is a very much loved seasonal dessert in Slovenian Istra, (Češnjev štrudelj or Češnjev zavitek) where I come from, and neighbouring Trieste in Italy.

Cherry strudel has always been very popular, and when fresh cherries are in season, this dessert is regularly baked in the households, and if you are lucky enough, sometimes you can find it on the menus of informal family run restaurants.

This irresistible dessert really takes me back to my childhood. My mother frequently baked it with fresh cherries picked by ourselves in the garden, or were very generously given by our neighbours, it is the garden where I, as a child, spent a lot of time when my parent were working in the restaurant. Along with the girl next door, who was only a year older than me, we used to pick cherries from the tree that had the reddest and ripest cherries, climbed up it, found a comfortable branch to sit on and munch on cherries until we were completely full, chatting and giggling...

When we were called for lunch, there was little appetite left for it, no matter how delicious it was, and my mother would only looked at us and had the answer, our T-shirts were stained, our lips and mouths deep red in colour from the cherry juices...she never got cross with us, just smiled and shook her head...since my mother used to do exactly the same when she was small...

Looking back, it just made me realize how lucky I was, the first time I ever had the chance to buy fresh cherries was when as an adult I moved to England...

Cherry strudel is traditionally served warm and generously dusted (there is no sugar in pastry) with regular icing sugar or vanilla flavoured icing sugar.

You can turn this simple and rustic pudding into an elegant dessert and serve it with whipped cream, vanilla ice cream or vanilla sauce.

I am sharing here my mother's recipe, which is slightly off the beaten track, for cherry strudel made with home-made pastry and fresh cherries, however you can still indulge yourself and cut corners a bit by using a store bought ready made puff pastry and frozen, tinned or jarred cherries.

Ingredients

Serves 10-12

You can use store bought ready made puff pastry, shortcrust or filo pastry.

Ingredients for home-made strudel dough

  • 250g all purpose flour

  • 1 egg, lightly beaten

  • 3 Tbsp neutral tasting vegetable oil (I used sunflower oil)

  • 2 Tbsp white wine vinegar or lemon juice

  • sea salt, a pinch

  • 50ml-60ml lukewarm water, or as needed

Ingredients for cherry filling

  • 700g fresh cherries, washed and pitted (can also use tinned or jarred cherries or store bought frozen cherries, defrost and drain well)

  • 100g caster sugar

  • 1 unwaxed lemon, grated zest

  • 20g butter plus, some extra for brushing

  • 80g dry fine breadcrumbs

  • sea salt, a pinch

  • icing sugar, for dusting

Method

To make the dough

Place the flour in a big mixing bowl and make a well.

In a separate, smaller bowl, mix slightly beaten egg, oil, vinegar or lemon juice, (the acidity will help to relax gluten in the flour making the dough more stretchy) a pinch of sea salt and lukewarm water. Pour the mixture into a flour well.

With the fork, stir the mixture with the flour until well combined. Add a little bit of flour at a time, until the dough comes nicely together, then work the dough with your hands.

Transfer the dough on a lightly floured working surface and knead the dough for about 10 minutes or until nice and smooth.

After this time, the dough should be moist and elastic and not sticky. Add a little more flour if the dough is too sticky to knead.

In order to further encourage the development of the gluten, resulting in a very elastic dough, slam the dough onto the working surface a few times.

Shape the dough into a smooth ball and place it in a clean bowl, previously brushed with oil.

Cover the bowl with cling film and let the dough rest for about 1 hour at room temperature (strudel dough has no yeast, so do not expect the dough to rise or double in size, it needs to rest for gluten to relax).

View fullsize Apple Strudel 4.jpg
View fullsize Apple Strudel 5.jpg

To make the filling

In a small pan melt the butter over medium-low heat. When the butter is melted add breadcrumbs, toast them, stirring constantly until golden-brown in colour. Remove from the heat, cool and set aside.

Wash the cherries, dry them a bit, take the stalks off and pit them. Place them in a colander and leave them to drain until needed.

Preheat the oven to 200C static or equivalent.

Divide the dough in half to make two separate strudels as easier to work with.

Place half of the dough on a clean and lightly floured table cloth. Flour the rolling pin and start rolling out the dough. While rolling, to prevent sticking, flour the dough and the surface every now and then.

When the dough reaches about 20 cm in diameter pick it up and keep stretching it. The best way to do so is to use the back of your hands and in particular the knuckles but make sure you remove any sharp jewellery first.

When the dough becomes difficult to handle as it becomes bigger and thinner, place it on a lightly floured tablecloth.

With your hands (tip of the fingers) keep stretching gently the dough on the tablecloth to paper thin consistency, from the inside to the outside working your way round the sheet of dough.

Keep stretching until the sheet of dough starts to look almost translucent and you will be able to see a pattern of your tablecloth through it.

You should end up with a thin sheet of dough stretched more or less into a rectangular shape with a diameter of approximately 40 cm which will fit into a standard 40 cm baking tray.

If you notice that the edges are still a bit thick, stretch them further very gently or cut them off. If you leave the edges thick, when rolling the strudel, they will form quite a thick layer at the very centre of the strudel risking to remain slightly underbaked.

View fullsize Apple Strudel 9.jpg
View fullsize Cherry Strudel 16.jpg

Transfer the cherries into a bowl, add sugar, breadcrumbs mixture, lemon zest and mix well to incorporate all the ingredients.

View fullsize Cherry Strudel 11.jpg
View fullsize Cherry Strudel 12.jpg
View fullsize Cherry Strudel 13.jpg
View fullsize Cherry Strudel 14.jpg

Place and spoon evenly the cherry mixture over one half of the dough sheet leaving about 2-3cm to the edge. Fold in the side ends of the sheet to prevent filling coming out during rolling.

View fullsize Cherry Strudel 17.jpg
View fullsize Cherry Strudel 18.jpg

Using the tablecloth to help you, roll the dough all the way and roll it directly onto a sheet of baking parchment, seam side down.

View fullsize Cherry Strudel 19.jpg
View fullsize Cherry Strudel 20.jpg

Transfer very gently the baking parchment with the rolled strudel on a baking tray.

Repeat the process with the other half of the dough.

View fullsize Cherry Strudel 21.jpg
View fullsize Cherry Strudel 22.jpg

Brush it with a bit of melted butter.

Bake on the middle shelf for 40-45 minutes.

View fullsize Cherry Strudel 23.jpg
View fullsize Cherry Strudel 24.jpg

Cherry Strudel is ready when the crust turns nice and golden.

Take it out of the oven and let it cool completely. Dust it with icing sugar, cut into slices and serve it on its own or with vanilla ice cream or cream.

Just a thought

You can make the strudel dough ahead and keep it refrigerated for up to two days. Before using the dough take it out of the fridge allowing it to come to a room temperature.

Cherry strudel is best eaten the day is made. You can keep cherry strudel in an airtight container in the fridge for 3-4 days or overnight on the counter.

Wine suggestion

Friuli Colli Orientali Verduzzo Sottozona Cialla DOC "Verduzzo di Cialla" 2016 - Ronchi di Cialla

June 29, 2022 /tina oblak
fresh cherries, Češnjev štrudelj, Češnjev zavitek, jarred cherries, tinned cherries, frozen cherries, store bought pastry, filo pastry, ready made puff pastry, shortcrust pastry, strudel pastry, strudel dough, homemade strudel dough, strudel di ciliege
Adriatic Recipe, All year round recipe, Austrian inspired dishes, baked dish, baking, breakfast, child friendly dish, dessert, easy baking, Easy recipe, home baking, Hungarian inspired dishes, Istrian cuisine, Istrian dish, Istrian food, Istrian gastronomy, Mitteleuropean cuisine, Mitteleuropean dish, Mitteleuropean food, Mitteleuropean recipes, pudding, Rustic dish, simple recipe, Slovenian cuisine, Slovenian food, Slovenian gastronomy, Snacks, sweet course, Sweet Things, sweet nibbles
Comment

Austrian style Curd Cheesecake Recipe

Beans and Sardines
February 16, 2022 by tina oblak in Adriatic Recipe, baked dish, baking, celebratory desserts, dessert, Easy recipe, festive bakes, festive dessert, festive sweet things, pudding, Sweet Things, easy cakes, no flour cakes, home baking, easy baking, Central Europe cakes, Eastern Europe cakes

This Austrian style Curd Cheesecake is a sweet dessert, delicious in its simplicity, consisting of one main layer mixture of curd cheese or ricotta, flavoured with sugar, lemon zest, vanilla extract, eggs and the raisins that have been luxuriously soaked in dark rum.

This cake is quite moist, therefore refreshing and perfect for any occasion, it is very easy to make and a great recipe to keep in the repertoire for cakes that require minimum effort but deliver maximum satisfaction.

In Slovenia, where I come from, curd cheese, in Slovenian called skuta (also referred to as farmer's cheese or baker's cheese) has always been a very popular and commonly used ingredient in baking.

For this recipe, you can easily replace curd cheese for ricotta, which is what I used to do when I first arrived in England, and struggled to find curd cheese, but it is now available these days in most bigger supermarkets or Polish food stores.

Curd cheese

My mother and my maternal grandmother would make this cake very often, this is proper home made rustic baking, and I am sharing here this nostalgic and special family recipe.

Give it a go and try this wonderful cake, but please do remember, despite the temptation, it is really important to completely cool down the cake before cutting it into slices.

Ingredients

Serves 10

  • 120g butter, softened

  • 200g caster sugar

  • 4 eggs, separated

  • 1kg curd cheese or ricotta

  • 100g semolina

  • 3 Tsp vanilla bean extract or seeds of one vanilla pod

  • finely grated lemon zest of 2 unwaxed lemons

  • 120g raisins or sultanas

  • 4 Tbsp dark rum or lukewarm water (for soaking the raisins)

  • icing sugar for dusting

Curd Cheese

Method

Place the raisins in a small bowl, pour dark rum or lukewarm water over them and let them soak and plump up for about 30 min.

Preheat the oven to 200C static or equivalent. Lightly grease a 23cm springform tin or loose-bottomed tin and line the base with baking parchment.

Put the softened butter and sugar in a large bowl and mix well. Beat together until light and creamy.

Start adding to the sugar and butter mixture the egg yolks, one at a time, making sure the egg yolk is fully absorbed before adding the next one.

View fullsize Curd cheescake 7.jpg
View fullsize Curd cheescake 8.jpg

Add grated lemon zest, curd cheese or ricotta, semolina and vanilla extract and mix well all the ingredients.

View fullsize Curd cheescake 9.jpg
View fullsize Curd cheescake 10.jpg

Drain the raisins, remove excess liquid, and add them to the mixture.

View fullsize Curd cheescake 11.jpg
View fullsize Curd cheescake 12.jpg

Put the egg whites in a separate large bowl, add a pinch of salt and whisk the egg whites until stiff but not dry.

View fullsize Curd cheescake 13.jpg
View fullsize Curd cheescake 14.jpg

Fold very gently and lightly into the mixture.

View fullsize Curd cheescake 15.jpg
View fullsize Curd cheescake 16.jpg

Turn the mixture into a prepared tin.

Bake the cake in a preheated oven for 30min on 200C then lower the temperature to 180C and bake further for another 30min. Cake should be golden in colour on the surface and firm to the touch.

If halfway through baking time the cake is browning too fast, cover the top of the cheesecake loosely with the aluminium foil, to prevent the top from becoming too brown.

When the cake is baked, turn off the oven but leave the cheesecake in the oven for about 1 hour allowing it to cool a bit.

Take the cake out of the oven and allow it to cool completely.

View fullsize Curd cheescake 17.jpg
View fullsize Curd cheescake 18.jpg

Loosen the sides of the cake, using a palette knife if needed, and remove the tin.

Invert the cheesecake, then remove the base of the tin and the baking parchment.

Turn the cake back the right way up.

Dust with sifted icing sugar just before serving. This cake is very moist and the icing sugar will dissolve if you dust the cake too soon, no permanent damage though.

Wine suggestion

Montefalco Sagrantino Passito DOCG 2015 - Lungarotti


February 16, 2022 /tina oblak
curd cheese, ricotta, skuta, no flour cakes, moist cakes, baker's cheese, farmer's cheese
Adriatic Recipe, baked dish, baking, celebratory desserts, dessert, Easy recipe, festive bakes, festive dessert, festive sweet things, pudding, Sweet Things, easy cakes, no flour cakes, home baking, easy baking, Central Europe cakes, Eastern Europe cakes
Comment

Fritole - Istrian small doughnuts Recipe

Beans and Sardines
December 23, 2021 by tina oblak in Adriatic Recipe, Autumnal dish, Autumnal recipe, Celebratory dish, Central European recipes, Christmas dish, dessert, Easter dish, Easter treats, Eastern European recipes, Easy recipe, Enriched dough, Festive dish, Finger food, Istrian cuisine, Istrian dish, Istrian food, pudding, Rustic dish, Slovenian cuisine, Slovenian food, Slovenian gastronomy, Small bites, Snacks, sweet course, Sweet Things, Winter dish, Winter recipe, festive sweet things, festive dessert, celebratory desserts

Fritole are a type of small fried doughnuts made of thick batter-like dough enriched with raisins and served warm covered in icing sugar, they are light and crunchy on the outside and soft and aromatic on the inside, they just melt in your mouth.

This sinfully delicious and fragrant little delights have a very deep connection with Christian, especially Catholic liturgical festivities like the Carnival season, the time of the year in which eating in excess, and gastronomic indulgence was allowed by the Church before the start of fasting and austerity during Lent, and ending with Easter.

In Venice, where this sweet treats are a synonym of Carnival, fritole used to be prepared and served strictly during the days of Carnival. Nowadays, they appear not only in Venice but also in the region of Veneto and north-east region of Friuli-Venezia Giulia, Italy, and Istria where fritole are also very popular and start appearing as soon as Christmas festivities are over and remain around on offer as a irresistible sweet temptation until Ash Wednesday begins the Lent season.

However, on the coastal part of Slovenian Istra, once being part of what was called, ‘The most Serene Republic of Venice,’ fritole hold a very special place on Christmas Eve and this is when my nona would make fritole as the tradition called upon her to do.

In dialect they could also be called Fritle, Fritule or miške, meaning little mice in standard Slovenian, as when you drop the batter in hot oil, there is a little trail on the end, resembling little mice.

My father adored them and everyone in the family simply loves fritole, and whoever also grew up with fritole knows this very well. I am sure they can share with me the fact that they get eaten far faster than they can ever be made! When my nona started to get ready for the frying process, the kitchen would suddenly get crowded, we would get louder, and more excited, and our eyes would sparkle with joy just waiting in anticipation for them to be finished, and ready to eat!

My nona would be carefully scooping fritole out of hot oil and they would be disappearing in front of her yes and my nona, being incredibly experienced and fast could hardly keep up with us.

My nona made fritole with raisins but like most recipes fritole have few variation where pine nuts, cinnamon and candied fruit is added to a basic batter.

We would eventually get full, our greediness would decrease, the kitchen would be less noisy and less crowded but she kept frying, ending up layering the fritole on a big plate and dusting them with sugar looking like a snowy mountain, and this vision will stay with me forever...

She would then lovingly packed them for us to take home...

I am miles away from her kitchen, and years have passed by, but when I close my eyes I get transported immediately right back there ... I can smell and feel all of it, and in the stillness of these thoughts I can fully recollect all the nostalgic flavours, and the emotions so closely tied to my family.

My nona is now 93 years old, and her hands sadly are no longer able to make fritole, and so I feel privileged to be have learned how to make them from her, and since she gave me the family recipe, I am to able to keep making them and keep this family tradition alive.

This is why for me these sweet treats hold a very special place in my heart, they are more than just another recipe, they are part of who I am, and who I have become as a person ...

I am sharing here my nona's recipe that was passed down to her by her nona, and so try to make them, and delight your family and friends.

Ingredients

Makes about 40 small doughnuts

  • 400g plain flour

  • 3 eggs, (room temperature) beaten

  • 50g granulated sugar

  • 60-70g raisins or sultanas

  • 3 Tsp fast action dried yeast (also called instant yeast) or 40 g of fresh yeast

  • 250ml milk, lukewarm (full fat or semi skimmed)

  • 4 Tbsp of dark rum or grappa

  • finely grated lemon zest of one unwaxed lemon

  • sea salt, a pinch

  • sunflower or corn oil for frying

  • icing sugar for dusting

Method

Put the raisins in a small bowl, add warm water to completely cover and soak them for at least 20 minutes or until they plump up.

In a large bowl place the flour, beaten eggs, sugar, pinch of salt, yeast, grated lemon zest.

Gradually start adding the milk, mixing constantly until all the ingredients are well incorporated and you end up with a sticky dough that will be soft but thick resembling batter-like dough or a thick cake mix.

Adjust the dough by adding more milk if the dough is too thick, on the contrary, if you find the dough too runny add a bit more flour.

Add to the dough drained soaked raisins (squeeze out the all the excess liquid).

Cover the bowl with cling film or clean tea towel and place it in a warm place free of drafts from any open window.

Let the dough rest for at least 1 hour.

After this time the dough should rise a bit and have a bubbly surface.

Take a medium- sized deep skillet. Add the oil and heat it up over a medium heat to about 180C.

(If you do not have a thermometer, drop a cube of bread into the oil, it is ready when bread turns golden brown in 15 seconds).

Fritole are fried by dropping a small spoonfuls of dough/batter into the hot oil.

Take two tablespoons, with the first spoon scoop up the sticky dough from the bowl, with the second spoon slip off the dough from the first spoon into the hot oil.

Do not overcrowd the skillet with fritole and fry them in small batches, a few at the time, (4-6) this will obviously depend on the size of your pan. Fry them on both sides, fitole are fried in no time, about a minute on each size, so help them to flip over by using a fork or some tongs, however fritole will sometimes flip over themselves.

Whne you drop the batter/dough into a hot oil they will most probably not form perfect shaped balls but instead will leave a little trail on the end.

Fry until dark-ish brown in colour, puffed and well cooked through. I suggest you do a little test to make sure they are not raw inside. Simply open up a cooked fritola, if still gooey inside the oil is probably too hot and the heat too high.

Line a large plate with absorbent kitchen paper towels. Drain fried fritole with a slotted spoon and transfer them on a plate.

Allow the fritole to cool a bit.

Dust them with icing sugar or roll them in caster sugar.

Serve warm or at room temperature.

Just a thought

Fritole are to best enjoyed served still warm, however they are still delicious at room temperature.

Fritole can be warmed up in a microwave or in the oven. My nona put a plate of fritole on the radiator.

Wine suggestion

Moscato del Veneto IGT "Dindarello"2020 - Maculan'

December 23, 2021 /tina oblak
fritole, fritule, deep fried desserts, miske, miške, Fritle, Traditional Istrian doughnuts, small doughnuts, doughnuts, Venetian desserts, Venetian frittole
Adriatic Recipe, Autumnal dish, Autumnal recipe, Celebratory dish, Central European recipes, Christmas dish, dessert, Easter dish, Easter treats, Eastern European recipes, Easy recipe, Enriched dough, Festive dish, Finger food, Istrian cuisine, Istrian dish, Istrian food, pudding, Rustic dish, Slovenian cuisine, Slovenian food, Slovenian gastronomy, Small bites, Snacks, sweet course, Sweet Things, Winter dish, Winter recipe, festive sweet things, festive dessert, celebratory desserts
Comment

Apple Strudel with home made pastry Recipe

Beans and Sardines
November 05, 2021 by tina oblak in Adriatic Recipe, baked dish, baking, breakfast, Central European recipes, dessert, Eastern European recipes, Istrian cuisine, Istrian dish, Istrian food, Istrian gastronomy, Mitteleuropean recipes, pudding, recipe from Northern Ital, Rustic dish, Slovenian cuisine, Slovenian food, Slovenian gastronomy, sweet course, Sweet Things

Apple strudel is a traditional Viennese dessert, made of very thin elastic pastry, and the filling contains sliced apples, sugar, cinnamon, raisins (soaked in dark rum), lemon zest, lemon juice and bread crumbs. This popular pastry can also be found in the rest of Austria, Bavaria, Czech Republic, Northern Italy, and in many other countries in Europe that were once part of the Austro-Hungarian Empire.

It is believed that strudel originated from baklava, a very famous Turkish pastry based dessert, that came to Austria with the Ottoman's Empire and through Hungarian cuisine.

Records show that Strudel was first named in 1696 and gained popularity after it was served to Empress Maria Theresia who was the ruler of the Habsburg dominions and the only women to hold the position.

In Slovenia and in coastal Istria, areas that also once belonged to Austro-Hungarian Empire, apple strudel became, and today still is, a very well known sweet treat. It has gained such a high level of popularity that it is almost considered a national dessert. During autumn and winter months, this typical and very much loved dessert would be baked on a regular basis up and down the country, with little variations, and no Sunday roast lunch could be completed without a slice of strudel, dusted, of course, with a generous amount of icing sugar. When this task was left for us children, there would be so much icing sugar on the top that you could hardly see what type of dessert was hiding underneath it. Some things just never change...this is what happens when I leave my 11 year old son with the icing sugar task!

Apple strudel in Slovenia is called Jabolčni štrudelj or Jabolčni zavitek while along the coast of Northwest Istria, where the informal Istrian dialect is also spoken, it can be referred to as Strucolo de pomi.

Strudel made with apples is by far the most popular but in the North Adriatic two variations of strudel have been created and are also very well liked, strudel filled with ricotta cheese filling and strudel with cherries.

In my family we all knew when it was weekend, as apple strudel, this warming autumnal pudding, would be in the oven, and the aromas of apples and cinnamon would travel around the house. This dessert is not just part of my childhood but part of my adulthood as well. It has been the most frequently baked dessert by my mum and even today my friends and family cannot get enough of it. Now that I live abroad it is even more special, and it really does take me right back home to my childhood, and my mum's kitchen.

Apple strudel is traditionally served warm, dusted with regular icing sugar or vanilla floured icing sugar, and when accompanied with whipped cream, vanilla ice cream or vanilla sauce, this rustic pudding soon turns into a complete and very elegant dessert.

This recipe for apple strudel is made with home made pastry, however you can still indulge yourself and cut corners a bit by using a store bought ready made puff pastry, in which case only half the amount of apple filling is enough

Apples can be sliced or coarsely grated and lightly toasted walnuts can replace pine kernels.

View fullsize Apple Strudel 1.jpg
View fullsize Apple Strudel 2.jpg

In this recipe I will indicate which apples are appropriate to use for apple strudel, however, I have never used specific type of apples and that is simply because I always bake apple strudel when apples are in season and abundant in nature. Apples would be generously given from neighbours and friends with fruit orchards or apple trees in their gardens, I just make sure I taste them and pick a mixture of sweet and tart apples.

Ingredients

Serves 10-12

Dough

  • 250g all purpose flour or bread flour

  • 1 egg, lightly beaten

  • 3 Tbsp neutral tasting vegetable oil (I used sunflower oil)

  • 2 Tbsp white wine vinegar or lemon juice

  • sea salt, a pinch

  • 50ml-60ml lukewarm water, or as needed

Apple Filling

  • 1kg apples, peeled, cored, quartered and sliced (sweet-tart apples like MacIntosh and Gala in combination) Bramley

  • 1 unwaxed lemon, grated zest and juice (grate lemon zest first and then squeeze the lemon juice, trying to do it the other way round might prove a tricky task)

  • 1 Tsp ground cinnamon

  • 30g pine nut kernels, slightly toasted (can use walnuts)

  • 50g raisins or sultanas

  • 3 Tbsp dark rum or lukewarm water (for soaking the raisins)

  • 60g dry fine breadcrumbs

  • 20g unsalted butter plus extra for brushing

  • 80g caster sugar

  • icing sugar for dusting

Method

To make the dough

Place the flour in a big mixing bowl and make a well.

In a separate, smaller bowl, mix slightly beaten egg, oil, vinegar or lemon juice, (the acidity will help to relax gluten in the flour making the dough more stretchy) a pinch of sea salt and lukewarm water. Pour the mixture into a flour well.

With the fork, stir the mixture with the flour until well combined. Add a little bit of flour at a time, until the dough comes nicely together, then work the dough with your hands.

Transfer the dough on a lightly floured working surface and knead the dough for about 10 minutes or until nice and smooth.

After this time, the dough should be moist and elastic and not sticky. Add a little more flour if the dough is too sticky to knead.

In order to further encourage the development of the gluten, resulting in a very elastic dough, slam the dough onto the working surface a few times.

Shape the dough into a smooth ball and place it in a clean bowl, previously brushed with oil.

Cover the bowl with cling film and let the dough rest for about 1 hour at room temperature.

View fullsize Apple Strudel 4.jpg
View fullsize Apple Strudel 5.jpg

To make the filling

In a small pan, place pine nuts and toast them on a medium-low heat for a few minutes until golden-light brown in colour. Remove from the heat, cool and set aside.

In another pan melt the butter over medium-low heat. When the butter is melted add breadcrumbs, toast them, stirring constantly until golden-brown in colour. Remove from the heat, cool and set aside.

In a small bowl, place raisins or sultanas, add dark rum (traditionally used) or lukewarm water. Leave them to soak and plump up for at least 15 minutes, or until you need them.

Peel, core, quarter and slice the apples. Place sliced apples in a bowl, pour lemon juice over them, toss and mix well. The lemon juice will prevent apples from oxygenating and turning brown.

View fullsize Apple Strudel 6.jpg
View fullsize Apple Strudel 7.jpg

Add lemon zest, roasted pine nuts, breadcrumbs mixture, soaked raisins or sultanas (squeeze out excess rum or water), sugar and cinnamon. Mix well to incorporate all the ingredients.

Preheat the oven to 200C static or equivalent.

Place the dough on a clean and lightly floured table cloth. Flour the rolling pin and start rolling out the dough. While rolling, to prevent sticking, flour the dough and the surface every now and then.

When the dough reaches about 20 cm in diameter pick it up and keep stretching it. The best way to do so is to use the back of your hands and in particular the knuckles but make sure you remove any sharp jewellery first.

View fullsize Apple Strudel 9.jpg
View fullsize Apple Strudel 10.jpg

When the dough becomes difficult to handle as it becomes bigger and thinner, place it on a lightly floured tablecloth.

With your hands (tip of the fingers) keep stretching gently the dough on the tablecloth to paper thin consistency, from the inside to the outside working your way round the sheet of dough.

Keep stretching until the sheet of dough starts to look almost translucent and you will be able to see a pattern of your tablecloth through it.

You should end up with a thin sheet of dough stretched more or less into a rectangular shape with a diameter of approximately 40 cm which will fit into a standard 40 cm baking tray.

If you notice that the edges are still a bit thick, stretch them further very gently or cut them off. If you leave the edged thick, when rolling the strudel, they will form quite a thick layer at the very centre of the strudel risking to remain slightly underbaked.

Place and spoon evenly the apple mixture over one half of the dough sheet leaving about 2-3cm to the edge.

Fold in the side ends of the sheet to prevent filling coming out during rolling. Using the tablecloth to help you, roll the dough all the way and place the rolled strudel very gently on a baking tray previously lined with baking parchment, seam side down.

View fullsize Apple Strudel 11.jpg
View fullsize Apple Strudel 12.jpg
View fullsize Apple Strudel 13.jpg
View fullsize Apple Strudel 14.jpg

Brush it with a bit of melted butter.

View fullsize Apple Strudel 16.jpg
View fullsize Apple Strudel 17.jpg

Bake on the middle shelf for 40 45 min.

Apple Strudel is ready when the crust turns nice and golden.

Take it out of the oven, let it cool. Dust it with icing sugar, cut into slices and serve it on its own or with vanilla ice cream or cream.

Just a thought

You can make the strudel dough ahead and keep it refrigerated for up to two days. Before using the dough take it out of the fridge allowing it to come to a room temperature.

Wine suggestion

Alto Adige Gewürztraminer DOC Vendemmia Tardiva "Roen" 2019 - Cantina Tramin (0.375l)

November 05, 2021 /tina oblak
apples, strudel dough, Autumnal dessert, cinnamon, pine nuts kernels, raisins, Apple strudel home made, Strudel di mele, Jabolčni štrudelj, Jabolčni zavitek, Strucolo de pomi
Adriatic Recipe, baked dish, baking, breakfast, Central European recipes, dessert, Eastern European recipes, Istrian cuisine, Istrian dish, Istrian food, Istrian gastronomy, Mitteleuropean recipes, pudding, recipe from Northern Ital, Rustic dish, Slovenian cuisine, Slovenian food, Slovenian gastronomy, sweet course, Sweet Things
Comment
Plum Dumplings 18.jpg

Plum Dumplings Recipe

Beans and Sardines
September 16, 2021 by tina oblak in Adriatic Recipe, Appetizers, breakfast, brunch, Central European recipes, dessert, dinner, Easter treats, Eastern European recipes, Easy recipe, entrée course, Istrian cuisine, Istrian dish, Istrian food, Istrian gastronomy, main course, main dish, Mitteleuropean recipes, pudding, Rustic dish, Slovenian cuisine, Slovenian food, Slovenian gastronomy, Starters, supper, sweet course, Sweet Things, Vegetarian, Dumplings

This is a great dish for Autumn that originated in the Austro-Hungarian Empire. It is made with potato gnocchi dough in which you stuff the plums, simmer them in water, and then coat them with breadcrumbs, sugar and cinnamon mixture.

These rustic plum dumplings will become a real treat in the family since they are super delicious and easy to make! This dish is traditionally offered as a dessert, however, it is very common as a main course for lunch or dinner.

Plum dumplings are very well known and common throughout the countries that were once part of the Austro-Hungarian Empire. This dish is therefore very popular in Eastern and Central Europe as well as in Trieste and the province of Trieste in Italy.

This historical influence made plum dumplings a very appreciated meal in Slovenia, and is referred to in Slovenian as češpljevi cmoki or slivovi cmoki (češplje and slive meaning plums and cmoki meaning dumplings). They are widely available to buy frozen in bags in the supermarkets, but nothing is comparable to making them at home with this simple recipe.

This dish is very familiar to me, I grew up with it, and it was prepared frequently in the late summer and early autumn when plums are in peak season, in abundance, and with the right level of sugar and sweetness in them.

In Slovenia, where I come from, plum trees are very common to have in the back garden or in a near by orchard and the sight of these beautiful, humble, bluish purple colour fruits, almost like jewels hanging from the branches, is simply heart warming. Plums are popular to use not only for plum dumplings but also for other desserts like bake trays, tarts, jams, and compotes.

Damsons plums, being oval and small, therefore easy to handle, are the preferred and most frequently used type of plums for this recipe. Other types of plums work very well too and fresh apricots are also used frequently to make the dumplings.

If you decide to offer plum dumplings as a dessert, I would suggest to serve 2, if you decide to prepare them as a main meal then 3 or 4 depending on the size.

Plum Dumplings 1.jpg

Ingredients

Serves 6- 8 (you will get about 16 dumplings)

Ingredients for the plum dumplings

  • 16 fresh plums, Damsons plums and prune plums most commonly used, you can use other variety (plums should be sweet, ripe and fairly firm to the touch, avoid overripe with soft pulp as it gets quite difficult and messy to pit them). You can use fresh apricots instead.

  • 1kg floury, yellow-fleshed potatoes, e.g. King Edward, Maris Piper, (avoid new potatoes). I use red skin potatoes.

  • 300g all purpose flour (plus extra for flouring the board and working surface)

  • 1 egg, slightly beaten

  • sea salt, a pinch

Ingredients for the breadcrumb coating

The ingredients stated here are to coat all the dumplings, if you wish to half the quantity of dumplings half the ingredients for the breadcrumb coating

  • 100g unsalted butter

  • 5 Tbsp natural dry breadcrumbs

  • 5 Tbsp caster sugar

  • 1 Tsp cinnamon

Method

Start this recipe by making a basic potato gnocchi dough. (For more details refer to my full step by step recipe for Potato gnocchi dough)

Wash the potatoes, with the skin on, under cold running water.

Place the potatoes in a saucepan or a pot, cover with cold water and bring to boil. After the water has come to a boil, cook for about 20 minutes or until tender. Cooking time will obviously vary depending on the size of the potatoes you are using.

Don't pierce them during cooking and don't overcook them allowing the skin to burst as they will absorb too much water, alternatively you can steam them.

Remove from the pot, drain them in a colander and let them cool enough to handle, then remove the skin. If the potatoes are still quite warm to handle, the best way to remove the skin is to stick the fork though the potato and peel it using a knife.

Put the flour on a working surface, add salt and mix with the fork.

Make a well in the middle and pass the potatoes through a potato ricer while still warm as they become stickier when cooler. Allow riced potatoes to cool for few minutes and then add the egg.

With your fingers work the flour into the potato and egg, bringing the dough together, until it becomes a soft, pliable dough and do not overwork it. If the dough is too sticky, wet and soft add a bit more flour. Make sure your working surface is always well floured.

When the dough is the right consistency it should not stick to your fingers.

Shape the potato dough into a log.

Plum Dumplings 4.jpg

Prepare your plums by washing them and pat dry them. Then cut each plum lengthwise all the way round in order to get two halves and remove the pits.

View fullsize Plum Dumplings 2.jpg
View fullsize Plum Dumplings 3.jpg

Flour well your working surface and divide and cut the potato dough log roughly into 16 portions.

With your hands slightly floured, flatten and shape each portion into a round circle.

View fullsize Plum Dumplings 4a.jpg
View fullsize Plum Dumplings 5.jpg

Place one half of the plum in the centre and fill it with half Tsp of sugar, then place the other half of the plum on top of it.

If your plums are quite big in size, you might want to use only one half, as you will end up with very big dumplings which are more difficult to handle and not looking particularly elegant on a serving plate.

View fullsize Plum Dumplings 6.jpg
View fullsize Plum Dumpling 7.jpg

Wrap the dough tightly around the plums.

Seal the edges properly and tightly and shape it into a ball, roughly the size of a peach.

If the edges do not stick properly, dampen the edges with your fingers previously dipped in a bit of water, this will act a bit like a glue.

This step is quite important to prevent the dumplings from bursting and losing the juices during cooking.

Make sure you place each dumpling on a well floured surface to avoid sticking.

View fullsize Plum dumplings 8.jpg
View fullsize Plum Dumplings 9.jpg

It is quite crucial, when making dumplings, that you start and finish the process without interrupting for too long, as the sauce from inside the dumplings (the sugar inside the plum starts dissolving) will start leaking from the dumplings making it quite a mission to rescue them, and this is from the first hand experience!

Repeat the process until you use all the dough.

View fullsize Plum Dumplings 10.jpg
View fullsize Plum Dumplings 11.jpg
Plum Dumplings 12.jpg

Fill a large pot with water, add a generous pinch of salt and bring to boil.

Place gently each plum dumpling in a pot making sure they do not stick to the bottom.

Cook the plum dumplings in simmering water for about 12 minutes (not strong boiling as that can damage the dumplings).

They are fully cooked when they float on the surface.

While the plum dumplings are simmering, make the breadcrumbs sauce.

In a large pan, ideally non stick, melt gently the butter, add the breadcrumbs and toast for few minutes on a medium-low heat until slightly darker in colour.

Add sugar and cinnamon and mix until all the ingredients are well combined. Remove the pan from the heat to avoid burning the breadcrumbs mixture.

View fullsize Plum Dumplings 13.jpg
View fullsize Plum Dumplings 14.jpg

With a slotted spoon, remove plum dumplings from the simmering water.

Transfer them and place them in a pan with breadcrumbs mixture.

View fullsize Plum Dumplings 15.jpg
View fullsize Plum Dumplings 16.jpg

Shake the pan gently so the dumplings can roll around and get fully coated in the breadcrumbs mixture.

Plum Dumplings 17.jpg

Place on the serving plate, dust them with a bit of extra icing sugar and serve immediately. They are best eaten hot but equally delicious at room temperature.

Plum Dumplings 19.jpg

Just a thought

If you decide to only make half a batch of plum dumplings, you can use half of the potato dough for the plum dumplings and the other half for potato gnocchi. (see my full recipe step by step for potato gnocchi).

You can store cooked plum dumplings for up to three days in a airtight container.

If you need and desire to warm them up, putting them in a microwave is a good option as they retain the moisture.

The great thing about plum dumplings is also that they freeze very well. It is very important that you spread the uncooked dumplings in a single layer, leaving a bit of space between each dumpling, so they don't stick together, on a well floured wooden board, baking sheet, serving tray laid with baking parchment or with well floured kitchen cloth or similar.

Put the tray with the freshly made dumplings into a freezer, for at least 20- 30 minutes, and once frozen, put them into a freezing bag.

When you want to cook them just drop them frozen directly into a boiling salted water without defrosting them first, bearing in mind that the cooking time will be slightly longer, around 15 minutes. They are ready when they are floating on the surface.

Wine suggestion

Moscato Rosa delle Venezie IGT 2014 - Foffani

September 16, 2021 /tina oblak
Autumn Recipe, autumnal recipe, plums, plum puddings, plum desserts, potato gnocchi dough, češpljevi cmoki, slivovi cmoki, sweet dumplings
Adriatic Recipe, Appetizers, breakfast, brunch, Central European recipes, dessert, dinner, Easter treats, Eastern European recipes, Easy recipe, entrée course, Istrian cuisine, Istrian dish, Istrian food, Istrian gastronomy, main course, main dish, Mitteleuropean recipes, pudding, Rustic dish, Slovenian cuisine, Slovenian food, Slovenian gastronomy, Starters, supper, sweet course, Sweet Things, Vegetarian, Dumplings
Comment
Kaiserschmarrn 1.jpg

Kaiserschmarrn (Austrian style giant shredded pancake) recipe

Beans and Sardines
April 13, 2021 by tina oblak in Sweet Things, pudding, dessert, sweet course, breakfast, brunch

My maternal grandma Iva would make this dish quite often for us children. And she would make it as a main meal for dinner with a big glass of fresh milk. Yes, having a sweet based dinner is perfectly acceptable now and again and we children just loved it.

It takes me back into my childhood as this dish would also often be freshly prepared and served in schools as a dessert. It was reassuring to learn from my two lovely nephews living in Slovenia, that this is still the case and they still “fight” in the queue for second helpings.

The name of this dish comes from the Austrian Emperor Kaiser Franz Joseph I (1830- 1916) who apparently had a bit of a sweet tooth and the dish was first prepared for him.

Kaiserscmarn is also known as emperor's mess, (Kaiser = German, meaning Emperor; Schmarrn = Austrian German, meaning mess or nonsense.

Austrian in origin, Kaiserscmarrn, is a fluffy and light giant pancake that is cooked and then shredded into bite size pieces. Raisins soaked in lukewarm water or dark rum can be added in which case you can make this dish into a dessert and serve it with seasonal fruit compote, fresh fruit or ice cream served on the side.

Quick and easy to make, and commonly dusted with icing sugar. Great option for breakfast, especially during dark and cold winter months. I regularly make it at this time. Needles to say, we all love it in the family.

Very popular in Austria, where it can be served as a main meal, especially in mountainside restaurants and taverns in the Austrian Alps, Bavaria and many parts of the former Austro- Hungarian Empire, e.g. Hungary, Slovenia and northern Croatia. In Slovenia it is simply called “šmorn” or “cesarski praženec”.

Ingredients

Serves 4

  • 4 eggs (separated)

  • 2 Tbsp caster sugar

  • pinch of sea salt

  • 250ml milk

  • 130g all purpose flour

  • 30g raisins (optional) soaked in few Tbsp of dark rum or lukewarm water and drained

  • ½ Tsp vanilla extract

  • knob (1-2 Tbsp roughly) of unsalted butter or any neutral tasting oil for cooking

  • icing sugar for dusting (vanilla icing sugar even better if you can get hold of it)

Kaiserschmarrn 2.jpg

Method

If using raisins, start by soaking them in a lukewarm water or dark rum for at least 15min, then drain.

Put in one large bowl egg whites, a pinch of salt and half the sugar. With a hand blender whisk to soft-firm white peaks.

In another bowl, put egg yolks, add milk, other half of sugar, vanilla extract, and whisk a bit with a hand blender to combine the ingredients then start adding the flour gradually and whisk further until you obtain a nice smooth batter with no lumps.

With a spatula, very gently add half of egg whites to the egg yolk mixture and fold delicately. Then add the other half of egg whites again by folding gently. Keep the batter nice and airy.

View fullsize Kaiserschmarrn 3.jpg
View fullsize Kaiserschmarrn 4.jpg
View fullsize Kaiserschmarrn 5.jpg

Take a fairly large (I used 29cm) non stick and quite deep skillet and melt a knob of butter or oil. Heat it up and pour the batter, spread it evenly with the spatula and sprinkle, if using, the raisins on top. Cover with the lid and cook for few minutes on a fairly low heat.

Uncover the lid occasionally and check that the sides are nice and golden in colour. With a spatula cut the pancake in quarters, even if the top is still a bit runny, and flip over each quarter. Most probably they will collapse a bit but this is quite normal and do not worry.

View fullsize Kaiserschmarrn 6.jpg
View fullsize Kaiserschmarrn 7.jpg
View fullsize Kaiserschmarrn 8.jpg

At this stage you will take the spatula and start shredding the pancake into smaller bite size pieces and stirring them around cooking further until they are cooked.

View fullsize Kaiserschmarrn 9.jpg
View fullsize Kaiserschmarrn 10.jpg
View fullsize Kaiserschmarrn 11.jpg

Transfer to the plate and dust with icing sugar.

Kaiserschmarrn 12.jpg
Kaiserschmarrn 13.jpg

Wine suggestion

Moscato Giallo Dolce DOC 2020 by Cantina Tramin, Alto Adige.

April 13, 2021 /tina oblak
Austrian dessert recipe, Kaiserschmarrn recipe, Austrian style giant shredded pancake recipe, šmorn, cesarski praženec
Sweet Things, pudding, dessert, sweet course, breakfast, brunch
3 Comments
LRM_20191017_111905 (1).jpg

Rustic Fig Jam Crostata (rustic Italian style jam tart) recipe

Beans and Sardines
March 16, 2021 by tina oblak in Sweet Things, Adriatic Recipe, baking, dessert, Easy recipe, pudding, recipe from Northern Ital, Rustic dish

When I was a child, desserts after the main meal were more of a weekend treat, and it is when my mum would bake.

And there is one simple dish she always baked in our household, and that is a jam tart or simply crostata as we call it in Italian. It is made using Italian style sweet shortcrust pastry that is enriched with eggs, which help make the dough even flakier, lemon zest, sugar, and baking powder. It is still very popular to bake at home and easily available in bakery shop and supermarkets.

My mum would use different fruit jams that she made using a variety of fruits in the season from our orchard or fruit given by friends or neighbours. Most commonly used type of jam to fill the crostata with would be the apricot jam. Crostata can be also filled with ricotta, Nutella, pastry cream and fresh fruit.

This year we had a brilliant year for figs and they were in abundance in my grandma's back garden. Most were eaten just picked directly from the tree, how luxurious. But there were just so many figs and since nothing gets ever wasted, we made a lot of jam!

View fullsize P8239632.JPG
View fullsize P8239635.JPG

There is something so comforting and homely about jam crostata, with a delicate flake crust, filled with your favourite choice of jam. Simply delicious, just melts into your mouth, and most importantly, it is easy to make, and the aroma during the baking is unmistakable.

Crostata is also great for colder days, as a dessert or snack, and is commonly served for breakfast too.

Nice accompanied with cream, vanilla ice-cream or natural Greek yogurt, just to tone down a bit the sweetness of the the fig jam.

LRM_20191017_114606.jpg

Ingredients

  • 250g all purpose flour

  • 105g diced butter, room temperature

  • 1 egg and 1 egg yolk (slightly beaten), keep the egg white for brushing the crostata just before putting it in the oven for baking

  • 50g caster sugar (optional if you use fig jam as it is quite sweet already)

  • lemon zest of one small unwaxed lemon, finely grated

  • 1 Tsp of liquor like grappa or rum ( I used rum)

  • ¼ Tsp baking powder

  • jar of fig jam or any other jam of your choice, home made or a good quality one from the food store

Method

To make the pastry, measure the flour into a large bowl and add the butter.

Using just your fingertips, rub the butter into the flour until the mixture resembles fine breadcrumbs.

Make a well in the centre of the flour, then add the sugar, the eggs, lemon zest, liquor, and baking powder. First stir gently with the fork to combine all the ingredients and for the mixture to come together.

LRM_20191016_103910.jpg
View fullsize LRM_20191016_105737.jpg
View fullsize LRM_20191016_110609.jpg

Gently gather the dough together with your hands and transfer it onto a floured work surface.

Gently press the dough, without kneading it, until it comes together to form a firm ball.

Press the dough into a flat disc, wrap it in cling film and refrigerate for about 30min.

View fullsize LRM_20191016_111346 (1).jpg
View fullsize LRM_20191016_111840.jpg
View fullsize LRM_20191016_112034.jpg

Preheat the oven to 180C static or equivalent.

Lightly flour the surface and the rolling pin. Take about 2/3 of the pastry and with the rolling pin roll it out on a surface, then roll the pastry back over the rolling pin, so it is hanging, and ease it into the 23cm loose bottom non stick flan tin.

Press the pastry shell into the side of the tin.

Allow the excess to hang over the side and roll the rolling pin over the top of the flan tin, to cut off the excess pastry.

View fullsize LRM_20191016_120752 (2).jpg
View fullsize LRM_20191016_121132 (2).jpg
View fullsize LRM_20191016_121512.jpg
View fullsize LRM_20191016_121652.jpg
View fullsize LRM_20191016_121805.jpg
View fullsize LRM_20191016_123009.jpg

Spoon the jam of your choice into the pastry case.

On a lightly floured surface roll out the remaining pastry, cut it in strips with pastry wheel cutter or with the knife and decorate your tart.

If you happen to have a bit of left pastry, just take your favourite cookie cutter and make few biscuits.

Brush the pastry with a slightly beaten egg white, put it in the oven and bake for 30-40min until nice and golden in colour.

View fullsize LRM_20191016_125219.jpg
View fullsize LRM_20191016_130654.jpg
View fullsize LRM_20191016_131203.jpg
View fullsize LRM_20191016_131635.jpg

When baked, let it cool in a tin, dust with little icing sugar and serve warm or cold.

LRM_20191016_152518 (1).jpg
View fullsize LRM_20191017_104058 (3).jpg
View fullsize LRM_20191017_114606 (1).jpg

Wine suggestion

Verduzzo Friulano Passito DOC 2019 by La Tunella, Colli Orientali del Friuli.

March 16, 2021 /tina oblak
Rustic Fig Jam Crostata (rustic Italian style jam tart) recipe, classic jam crostata recipe, Italian style jam filled tart recipe, Rustic Italin style jam tart recipe, crostata recipe, Italian sweet pastry
Sweet Things, Adriatic Recipe, baking, dessert, Easy recipe, pudding, recipe from Northern Ital, Rustic dish
1 Comment