Beans and Sardines

  • Home
  • About
  • Recipe of the week
  • Recipes
  • Wines
  • Contact

Sgroppino – Venetian Style Lemon Sorbet Cocktail Recipe

Beans and Sardines
April 30, 2025 by tina oblak in Adriatic Recipe, All year round recipe, Christmas drinks, dessert, Drinks, Easy recipe, Festive drinks, festive sweet things, recipe from Northern Ital, simple recipe, Slovenian gastronomy, Sweet Things

Sgroppino is a type of alcoholic beverage traditionally made with lemon sorbet (or other types of fruit sorbet), Prosecco and chilled Vodka. It is incredibly simple and fast to prepare, and ready in a few minutes!

This Italian style cocktail is a real treat for lemon lovers, it can be served during rustic and more informal settings or during fancier and more formal dining parties.

Nowadays, this lemony and foamy delight is offered as a light and refreshing dessert, or as a cocktail after a heavier meal as a palate cleanser.

This sorbet-based cocktail is perfect for parties and different types of celebrations like weddings, birthdays, anniversaries, Christmas, New Year and Easter, and particularly appreciated during summer months because it is so refreshing.

Despite its modern appearance and taste, this drink originated hundreds of years ago in the northern region of Veneto in Italy. And it is in this part of Italy that the term for this sorbet style drink was“sgroppino” or “desgropante” which means to “untie or loosen knots”.

In fact, this cocktail was served to the elite and aristocrats as a digestif to help to “loosen” the stomach, and help with the digestion, during intervals of a rich and heavy meal.

However, the concept of sorbet takes us further back to Romans and Greeks, who used fruit juice, syrup and honey to flavour crashed ice.

This drink has been very popular throughout Italy, and the love for this cocktail, due to geographical proximity, stretched “across the border” along the Slovenian coast where it became part of local gastronomic tradition.

I fact, it is offered in just about any restaurant and you can find it on the menu as “Limonin Sorbet”. A lot of times restaurants nowadays would also offer a non-alcoholic version of it.

If you want to seriously impress your guests and entertain Italian style, this is the recipe to go for!

Recipe

Ingredients

Serves 2 (2 flute glasses)

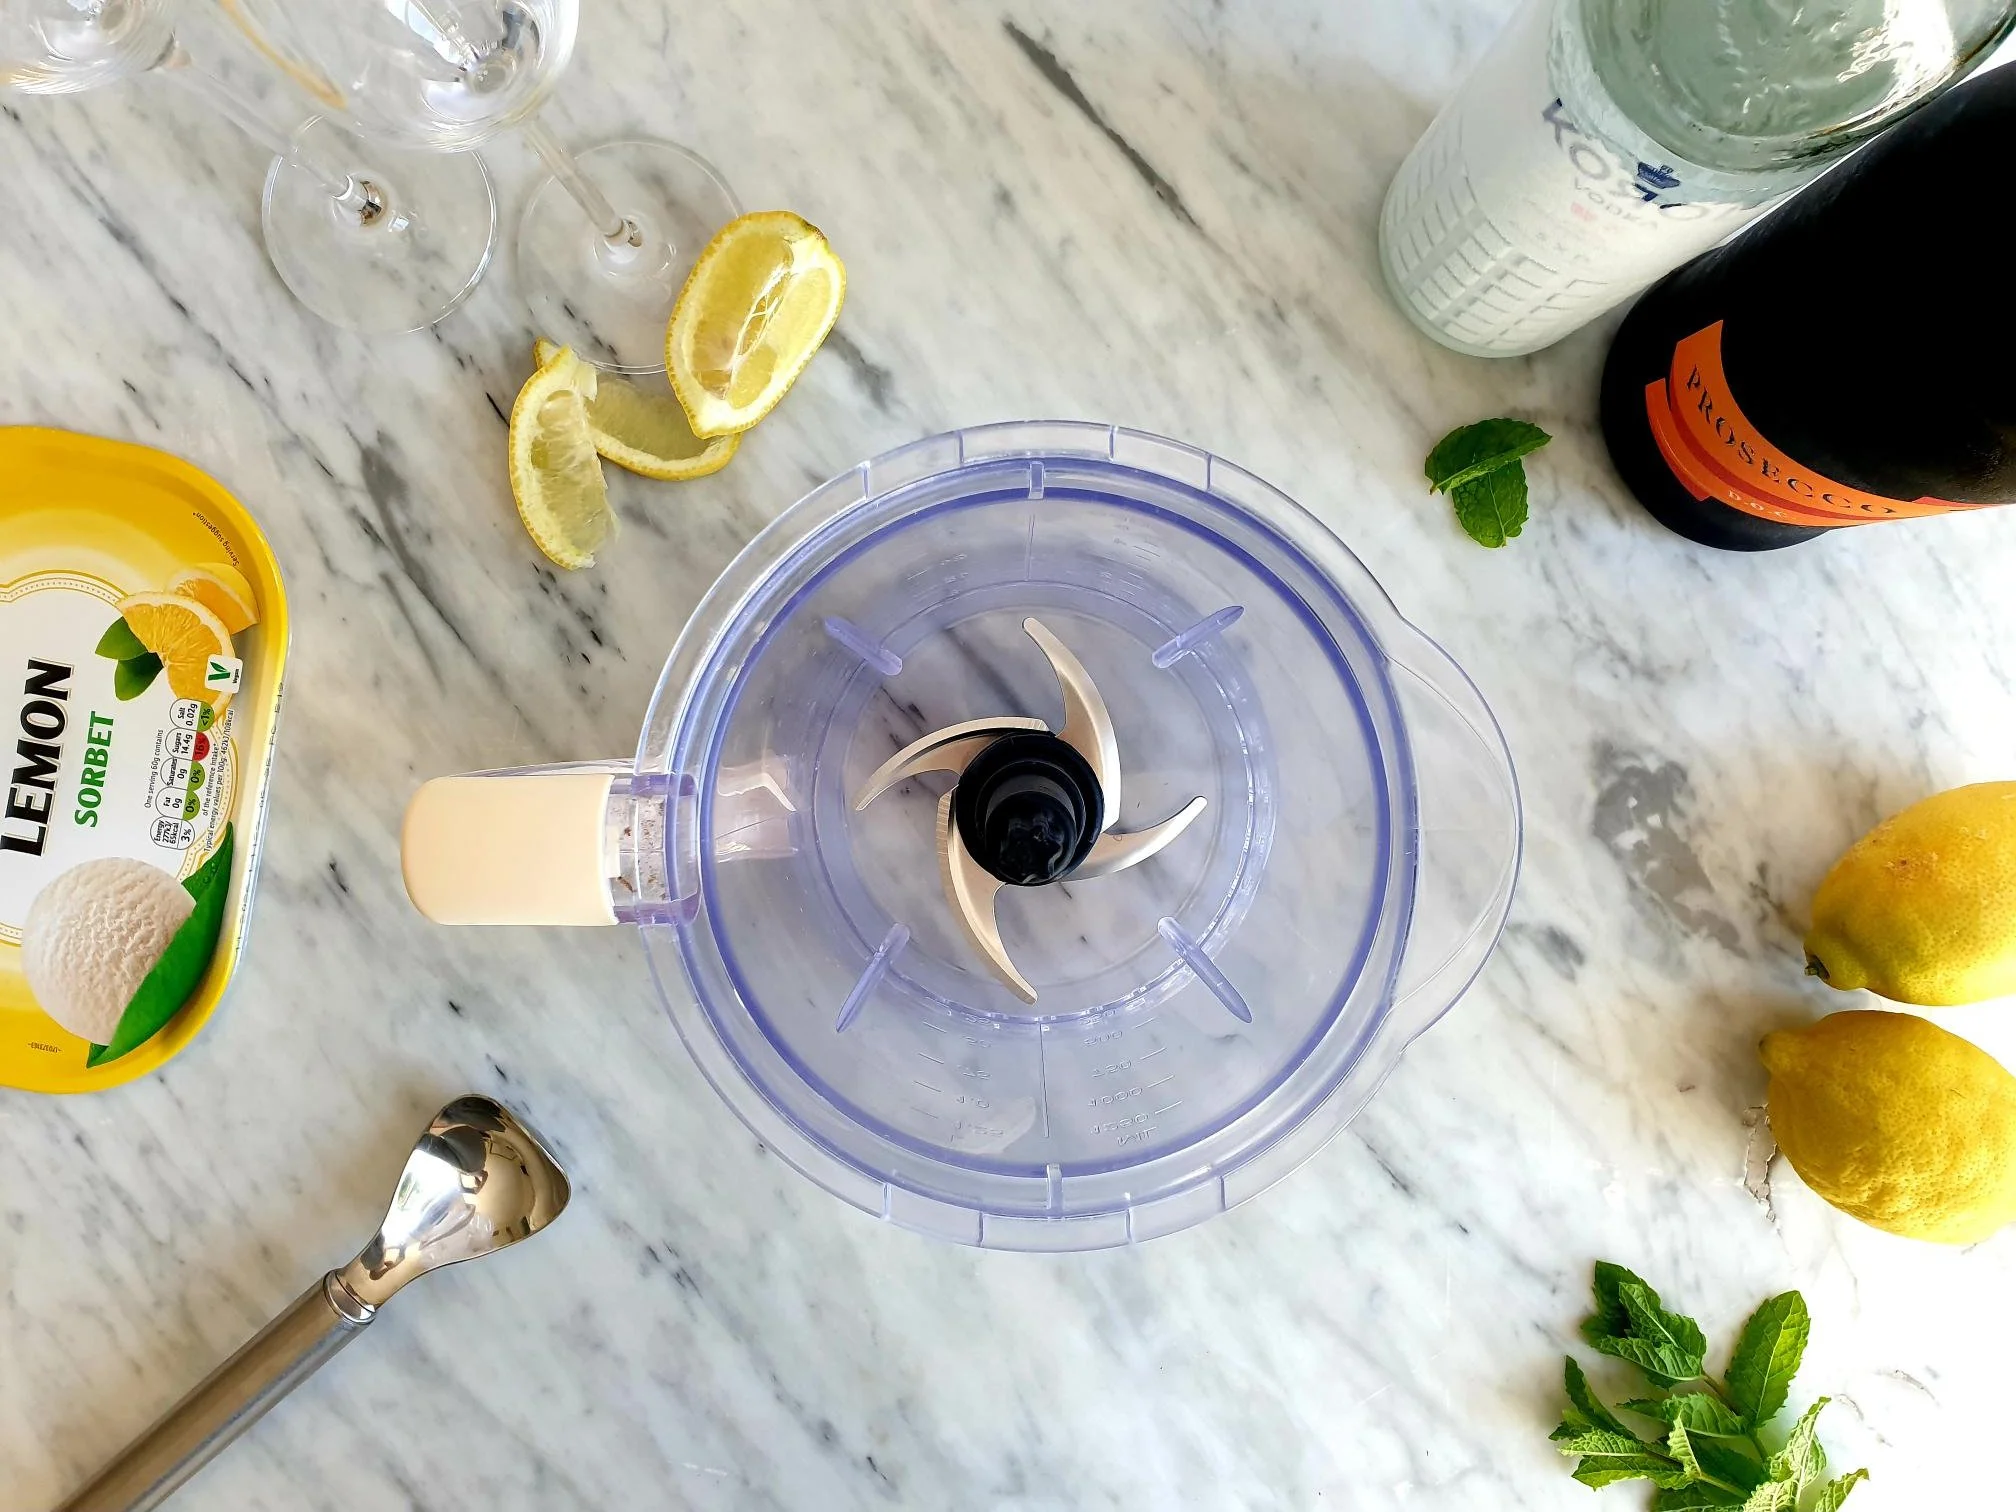
  • 180g (about 6 scoops) lemon sorbet or other fruit sorbet like strawberry, raspberry, mango

  • 80ml Chilled Prosecco (Italian sparkling white wine)

  • 25ml Chilled Vodka (about 2Tbsp) (the best and easiest way to keep Vodka chilled is by keeping it and storing it in the freezer, it will not freeze solid due to its high content of alcohol).

Method

Put all the ingredients in an electric blender and blend for about one minute until the mixture becomes smooth cream.

Alternatively, you can make this lemony foamy treat by hand.

In a big bowl put lemon sorbet, or other fruit sorbet of your choice, and Prosecco, a little at a time and whisk together.

Gradually add more of each and keep whisking in the same direction, trying to avoid the mixture to collapse.

Continue to whisk until you obtain a slightly slushy and frothy consistency, and in the end, add a bit of chilled vodka to the mixture.

View fullsize Sorbetto 4.jpg
View fullsize Sorbetto 6.jpg

Pour into flute glasses or other type of long-stemmed glasses and serve.

You can garnish this drink using fresh basil or mint leaves, lemon slices, wedges or twist, and/ or lemon zest.

Just a thought

In the recipe above I am giving an approximate amount of the ingredients to make this super delicious cocktail.

You can play with the quantities of the ingredients and tailor make this beverage to suit your palate and desires.

Champagne or other white dry sparkling wine can be used instead of Prosecco, and Gin can be used instead of Vodka, and of course, you can be creative and use other types of drinks and use the basic concept of the recipe to make other types of fruit sorbet-based cocktails.

April 30, 2025 /tina oblak
Sgroppino, Lemon Sorbet Cocktail, Prosecco, Vodka, Lemon Sorbet, Refreshing Drink, Champagne, white dry sparkling wine, Gin, fruit sorbet-based cocktails, strawberry sorbet, raspberry sorbet, mango sorbet
Adriatic Recipe, All year round recipe, Christmas drinks, dessert, Drinks, Easy recipe, Festive drinks, festive sweet things, recipe from Northern Ital, simple recipe, Slovenian gastronomy, Sweet Things
Comment

Prežganka – Traditional Flour Based Soup Recipe

Beans and Sardines
February 26, 2025 by tina oblak in Adriatic Recipe, All year round recipe, Appetizers, breakfast, Central European recipes, child friendly dish, child friendly meal, comfort, dinner, Easy recipe, entrée course, family friendly dish, family friendly meal, first course, first course dish, first course meal, Hearty soups, Istrian cuisine, Istrian dish, Istrian food, Istrian gastronomy, Mitteleuropean cuisine, Mitteleuropean dish, Mitteleuropean food, Mitteleuropean recipes, Rustic dish, simple recipe, Slovenian cuisine, Slovenian food, Slovenian gastronomy, Soups, Starters, Vegetarian

This humble and modest flour-based soup, that used to feed the poorest of the poor, offers a lot more than eyes can meet. It is quite incredible how much taste this dish can deliver considering it only uses a handful of very basic cupboard ingredients.

It is an easy and super quick soup to cook when feeling a bit under the weather, it helps with indigestion problems and alleviates colds and flu.

In the olden days this soup used be served for breakfast along with some slices of bread, and offered to unexpected guest, if there was nothing else in the household, in fact, this dish was created when times were tough with not much available.

This type of soup is sometimes compared to the Roman Egg drop soup, or also known as, Stracciatella in brodo or Stracciatella alla Romana, and to the German variation Einbrennsuppe.

In Slovenia it is called Prežganka, from a word prežgati, meaning browning the flour in butter or oil.

It is very popular up and down the country, not found in the restaurants and exclusively made in the households, particularly liked by small children and elderly.

It offers variations from region to region, for example the use of olive oil, garlic and fresh parsley is more typical of the coastline region, while the use of butter and lard with addition of 1 teaspoon of whole caraway seeds or ground cumin is more typically found in inland, bay leaf and ground paprika are also used.

I am sharing here the recipe for Preažganka from Slovenian Istra how has been made in my family for generations.

Recipe

Ingredients

Serves 4

  • 2 Tbsp olive oil or butter

  • 1 clove of garlic, peeled

  • 3 Tbsp white all-purpose flour

  • 1litre water

  • 1 Tsp, or to taste, fresh flat leaf parsley, finely chopped (plus some extra to garnish, optional)

  • 2 eggs

  • sea salt, to taste

  • black pepper, to taste

  • bread croutons, to serve, optional

Method

Place olive oil or butter in a saucepan and heat up a bit. Add the garlic and fry it on a gentle heat until it becomes golden in colour. The oil or the butter, depending on what are you using, will be nicely infused with garlic.

Start adding the flour and stir constantly with a small whisk.

View fullsize Prezganka-Traditional Slovenian Flour Based Soup 1.jpg
View fullsize Prezganka-Traditional Slovenian Flour Based Soup 2.jpg

Cook for about 6 minutes, or until the flour roux becomes light to dark brown in colour. Be a bit mindful not to burn the flour!

View fullsize Prezganka-Traditional Slovenian Flour Based Soup 3.jpg
View fullsize Prezganka-Traditional Slovenian Flour Based Soup 4.jpg

While stirring the roux, gradually add and pour the water. Cook and keep stirring constantly until the mixture becomes thick and smooth.

View fullsize Prezganka-Traditional Slovenian Flour Based Soup 5.jpg
View fullsize Prezganka-Traditional Slovenian Flour Based Soup 6.jpg

Stir well and add fresh finely chopped parsley. Bring to a boil, lower the heat, season with sea salt, and gently simmer for about 10 to 15 minutes.

In meanwhile, crack the eggs in a small bowl, and gently beat with the fork.

View fullsize Prezganka-Traditional Slovenian Flour Based Soup 9.jpg
View fullsize Prezganka-Traditional Slovenian Flour Based Soup 10.jpg

When the soup is cooked, slowly pour the beaten eggs in the soup in a thin stream, making sure you stir gently the soup constantly with the fork. Cook further for another 1to 2 minutes.

Ladle the soup into the plates or bowls, sprinkle with freshly chopped parsley and ground black pepper, optional, and serve hot immediately. You can top it with croutons and turn this soup into even more substantial meal.

February 26, 2025 /tina oblak
white flour, all purpose flour, eggs, Prežganka, Roman Egg drop soup, Stracciatella in brodo, Stracciatella alla Romana, Einbrennsuppe, humble soup, modest soup, roux based soup
Adriatic Recipe, All year round recipe, Appetizers, breakfast, Central European recipes, child friendly dish, child friendly meal, comfort, dinner, Easy recipe, entrée course, family friendly dish, family friendly meal, first course, first course dish, first course meal, Hearty soups, Istrian cuisine, Istrian dish, Istrian food, Istrian gastronomy, Mitteleuropean cuisine, Mitteleuropean dish, Mitteleuropean food, Mitteleuropean recipes, Rustic dish, simple recipe, Slovenian cuisine, Slovenian food, Slovenian gastronomy, Soups, Starters, Vegetarian
Comment

Dry-Cured Ham in Red Wine Sauce Istrian Recipe

Beans and Sardines
December 17, 2024 by tina oblak in Adriatic Recipe, All year round recipe, Appetizers, breakfast, brunch, Canapés, Easy recipe, entrée course, Istrian cuisine, Istrian dish, Istrian food, main course, main dish, main meat course, Meat, Rustic dish, savory nibbles, simple recipe, Slovenian cuisine, Slovenian food, Slovenian gastronomy, Small bites, Snacks, Starters

This simple, uncomplicated and humble peasant dish must be one of the quickest and easiest recipes ever. You will only need three ingredients to make it, olive oil, red wine and some kind of dry-cured meat, and a couple of minutes to spare to cook it.The recipe originated in the Slovenian region of Karst, and it was prepared in the olden days by the housewives for their husbands upon their return home hungry after working all day in the fields and with the animals, and needed a quick and filling meal.

This dish was cooked using the ingredients that were exclusively homemade, types of dry cured meats changed according to what was available in the households.

It is a very much-loved simple dish that can be found in this region on the menus in local run family rustic restaurants referred to as Pršut z Refoškom, Pršut z vinom or Teranov toč (word vino meaning wine, and Refošk and Teran are the two typical full bodied red wines produced in the Karst region).

It is usually made with Kraški Pršut, a dry-cured non-smoked ham from the Kras (Karst) region in Slovenia, with a Protected Geographical Indication (PGI). This region is blessed with a continuous breeze and relatively low humidity, creating perfect conditions for drying meat, a strong tradition that has been kept alive among local people since the earliest settlements.

This is how a well renowned and famous Slovenian polymath John Weikhard Freiherr von Valvasor described in 1689 the Karst region and the traditions of its humble culinary customs.

This good people help

themselves as they can live

poorly: they are very happy if they

have a piece of pork fat (which they can digest due to their

ardours work), onion, and a

piece of plain, coarse, brown,

rolled bran bread.

I am sharing here a family recipe for this unique recipe that travel only a few kilometres from inland Karst region to the Slovenian Istrian coast, where it became part of local repertoire of recipes.

Recipe

Ingredients

Serves 4 as a starter

  • 1 Tbsp extra virgin olive oil or olive oil

  • 10 thinly sliced dry-cured ham (you can use dry-cured sausage like Italian salami or French Saucisson for example)

  • 100ml full-bodied red wine

  • knob of unsalted butter, optional

  • black pepper, optional

  • fresh flat leaf parsley, chopped, optional

Method

Put the olive oil in a fairly large frying pan and heat it up a bit.

Place the slices of dry-cured ham in a frying pan and cook them on a medium heat very briefly, just until they change the colour, it will literally take seconds.

View fullsize Dry-cured ham in red wine sauce Istrian Recipe 3.jpg
View fullsize Dry-cured ham in red wine sauce Istrian Recipe 4.jpg

Then pour the wine and cook for further a minute or two, or until the alcohol evaporates and the sauce thickens slightly. When it is cooked you can add a knob of butter if you wish to make the sauce creamier and richer.

View fullsize Dry-cured ham in red wine sauce Istrian Recipe 5.jpg
View fullsize Dry-cured ham in red wine sauce Istrian Recipe 6.jpg

Season with some black pepper if you wish, however, there is no need to season this dish with additional sea salt as dry-cured ham is already naturally quite salty.

Serve immediately hot or warm with slices of rustic bread or on a bed of soft, cooked polenta.

Just a thought

This dish is best eaten immediately after it has been prepared, and it is not suitable for freezing.

December 17, 2024 /tina oblak
dry cured ham, prosciutto crudo, Parma Ham, Pršut z Refoškom, Pršut z vinom, Teranov toč, Kraški Pršut, Kras, Karst region, full-bodied red wine, dry-cured non-smoked ham, Italian salami, French Saucisson
Adriatic Recipe, All year round recipe, Appetizers, breakfast, brunch, Canapés, Easy recipe, entrée course, Istrian cuisine, Istrian dish, Istrian food, main course, main dish, main meat course, Meat, Rustic dish, savory nibbles, simple recipe, Slovenian cuisine, Slovenian food, Slovenian gastronomy, Small bites, Snacks, Starters

Grilled Squid (Calamari) Istrian Recipe

Beans and Sardines
August 14, 2024 by tina oblak in Adriatic Recipe, All year round recipe, Appetizers, child friendly dish, child friendly meal, Easy recipe, family friendly dish, family friendly meal, Fish & Seefood, fish starter, Healthy, healthy mael, Istrian cuisine, Istrian dish, Istrian food, Istrian gastronomy, light fish course, light meal, main course, main dish, main fish course, main fish meal, Rustic dish, simple recipe, Slovenian cuisine, Slovenian food, Slovenian gastronomy, Small bites, Starters, supper

Tender and succulent, grilled or pan-fried squid can be enjoyed all year round, but it is particularly popular during the hot weather, it is light and fresh and makes a perfect summer meal.

This classic Mediterranean dish can be served as an appetizer or part of a main dish, and it is incredibly easy and fast to make.

Some people are put off and maybe a bit reluctant cooking with squid maybe as a result of experiencing chewy and rubbery tasting squid.

For the squid to be tender it needs to be cooked very fast for only a few minutes or slow cooked, at least 30 minutes, and seasoned with sea salt at the very end.

Observe these two tricks and successful end result is guaranteed. For a very tender squid I have been suggested to soak the squid in milk prior cooking (I have not tried this yet).

This dish is very popular along the Slovenian coast and can be found on menus in just about any type of restaurant. Locals refer to this dish as Kalamari na žaru or called Lignji na žaru in standard Slovenian.

It is traditionally served with a simple garlic, parsley and olive oil sauce referred to by the locals as Tržaska omaka (Trieste sauce, Triestine sauce or salsa Triestina).

I am sharing here the family recipe for this seriously delicious grilled squid, after you try it, you will be checking out the fish counter for fresh squid a bit more often!

Recipe

Ingredients

Serves 4 as a starter or 2 as a main with a side dish

  • 1kg fresh squid, tubes and tentacles, cleaned (if daunted by the task of cleaning the squid yourself ask your fishmonger to do it for you). Alternatively you can use store bought already cleaned frozen squid, make sure it is defrosted safely before using.

  • extra virgin olive oil, a generous drizzle

  • sea salt

  • black pepper, optional

  • 1 lemon, cut in wedges to serve, optional

  • For the sauce, optional

  • 1 handful of fresh flat leaf parsley (about 10g) washed, dried and very finely chopped

  • 2 cloves of garlic or to taste, very finely chopped, as finely as you can

  • 3-5 Tbsp extra virgin olive oil

Method

Rinse well already cleaned squid under cold running water (make sure you rinse the inside of the tubes as well).

Dry well with kitchen paper and place in a dish, plate or bowl. Add a generous drizzle of extra virgin olive oil, toss the squid and leave to rest for about 15 minutes. Set aside.

View fullsize Grilled Squid 4.jpg
View fullsize Grilled Squid 5.jpg

While the squid is marinating in olive oil make the sauce if using. Place very finely chopped garlic and parsley in a small bowl and add extra virgin olive oil, mix well and set aside until needed. The quantities for this simple sauce in this recipe are approximate and you can adjust it and tweak it to your liking. Add more garlic if you wish, omit garlic altogether if not keen having raw garlic in the sauce, add more oil etc.

Take a griddle or regular non stick pan and heat very well.

When is very hot place the squid tubes and tentacles in a pan and cook for about 5 minutes, two and a half minutes on each side.

If you see the squid is drying out a bit just drizzle or brush a bit more olive oil.Season with sea salt at the very end.

Place the little bowl with garlic, parsley and olive oil sauce on the table, so everyone can spoon a bit of sauce on top of grilled squid if desired, and lemon wedges.

Serve grilled squid with boiled potatoes, chard with potatoes, chips or simply with some rustic bread. You can also serve it on a bed of rocket and make it into a main seafood salad dish.

Just a thought

The sauce should always be offered separately for everyone to be given a choice to spoon it over grilled squid if desired.

If you are left over with the sauce, you can spoon it on other types of grilled or pan-fried fish, great on grilled scallops and other sea food like prawns or langoustines.

Although not part of local costume this sauce can be spooned over grilled meat or pizza.

August 14, 2024 /tina oblak
fresh squid, fresh calamari, frozen squid, frozen calamari, quick squid dish, Kalamari na žaru, Lignji na žaru, Tržaska omaka, Trieste sauce, Triestine sauce, salsa Triestina
Adriatic Recipe, All year round recipe, Appetizers, child friendly dish, child friendly meal, Easy recipe, family friendly dish, family friendly meal, Fish & Seefood, fish starter, Healthy, healthy mael, Istrian cuisine, Istrian dish, Istrian food, Istrian gastronomy, light fish course, light meal, main course, main dish, main fish course, main fish meal, Rustic dish, simple recipe, Slovenian cuisine, Slovenian food, Slovenian gastronomy, Small bites, Starters, supper
Comment

My Mum's Celebratory Sponge Cake with Fresh Strawberries and Cream Recipe

Beans and Sardines
July 30, 2024 by tina oblak in Adriatic Recipe, All year round recipe, baked dish, baking, celebratory desserts, Celebratory dish, easy baking, easy cakes, Easy recipe, festive bakes, festive dessert, festive dish, festive sweet things, pudding, simple recipe, sweet course, patisserie

A classic simple sponge made with eggs, sugar and flour with no use of butter, filled with fresh whipped cream and fresh seasonal strawberries, a true classic celebratory cake that is difficult to beat. It is perfect for spring/summer birthdays and for all other summer special occasions, it is a top favourite with all ages.

This cake is delicious in taste with the lightest and fluffiest sponge; beautiful and elegant in its appearance, it looks like it has just come from the patisserie shop and yet could not be simpler to make.

With a few ingredients and a few simple steps you will impress your family and friends, and they will ask you for the recipe before they leave!

This celebratory cake would accompany all my childhood and my adulthood birthdays, baked exclusively by my mother.

In Slovenian Istra this type of sponge, refereed by the locals in the dialect as”Pandišpanija” (Pan di Spagna, translates literally as Spanish Bread) was the first form of the most simple celebratory cake, it was simply dusted with the sugar on the top and baked for special occasions like weddings. It is believed to originate during Napoleon's reign (19th century), and was first used in Croatian side of Istra, and then to then spread into a Slovenian part. Only later this type of sponge was cut horizontally in half and filled with different types of cream which resembles more to a modern concept of celebratory cake.

She would bake this type of cake for every birthday in the family and for her special friends, changing the fruits a bit to reflect the seasons. Peaches work very well and, in the winter, when the selection of fresh fruit is limited, she would use different types of tinned fruit which works amazingly well, the syrup from the tin was used to spoon the disc of the sponge.

No one will ever get fed up with this celebratory cake, we never had to struggle with any leftovers, bake it and see for yourself!

I am sharing the recipe for this special cake to remember and to honour my mother who recently died, so her legacy for this celebratory cake can live on for years to come.

Recipe

Ingredients

For the Sponge

  • 4 eggs (room temperature)

  • 4 Tbsp cold water

  • 200g icing sugar

  • 1 Tsp vanilla extract or 1 sachet of vanillin powder (very widely used in continental Europe baking)

  • 150g all purpose flour, sifted

  • 8g baking powder, sifted

For the filling and topping

  • 400g fresh strawberries, washed, pat dried and halved or quartered (reserve 100g fresh strawberries to decorate the top of the cake)

  • 2 Tbsp caster sugar (can use less or more depending on the taste and the sweetness of the strawberries)

  • 2 Tbsp water

  • 300ml fresh double cream, cold

  • 2 Tbsp caster sugar or to taste

Method

Preheat the oven to 180º static.

Lightly grease (I used butter) a 22cm (9in) loose-bottomed cake tin or spring form round cake tin and line the base with baking parchment.

Separate the egg whites and the yolks. Put the egg whites in a big clean bowl and the egg yolks in a small cereal type of bowl, whisk the egg yolks lightly with the fork.

View fullsize My Mum's Celebratory Sponge Cake with fresh strawberries and cream 1.jpg
View fullsize My Mum's Celebratory Sponge Cake with fresh strawberries and cream 3.jpg

Add 4 table spoons of cold water into a bowl with egg whites and start whisking with the hand whisker.

During the whisking start gradually adding, one spoon at a time of icing sugar and keep whisking until the egg whites become stiff and firm but not dry.

View fullsize My Mum's Celebratory Sponge Cake with fresh strawberries and cream 4.jpg
View fullsize My Mum's Celebratory Sponge Cake with fresh strawberries and cream 6.jpg

Add vanilla extract and egg yolks and mix well until fully incorporated.

My Mum's Celebratory Sponge Cake with fresh strawberries and cream 8.jpg
My Mum's Celebratory Sponge Cake with fresh strawberries and cream 9.jpg

Slowly and gradually start adding sifted flour together with baking powder.

Gently fold until thoroughly blended, do not mix with the hand mixer as you want to keep all the air inside the mixture which will make the cake incredibly soft and fluffy.

View fullsize My Mum's Celebratory Sponge Cake with fresh strawberries and cream 11.jpg
View fullsize My Mum's Celebratory Sponge Cake with fresh strawberries and cream 12.jpg

Transfer the mixture into the prepared tin and bake in the pre-heated oven for about 25 minutes or until golden in colour, well risen and the top of the cake springs back when lightly pressed with a finger.

View fullsize My Mum's Celebratory Sponge Cake with fresh strawberries and cream 13.jpg
View fullsize My Mum's Celebratory Sponge Cake with fresh strawberries and cream 14.jpg

While the cake is baking prepare the strawberries for the filling. Wash and pat dry 300g of strawberries, cut the smaller strawberries in half and the bigger ones in quarters. Place them in the bowl, add 2 table spoons of caster sugar (or to taste) and two table spoons of water.

View fullsize My Mum's Celebratory Sponge Cake with fresh strawberries and cream 24.jpg
View fullsize My Mum's Celebratory Sponge Cake with fresh strawberries and cream 25.jpg

Mix well and leave the strawberries to macerate, put aside until needed.

View fullsize My Mum's Celebratory Sponge Cake with fresh strawberries and cream 26.jpg
View fullsize My Mum's Celebratory Sponge Cake with fresh strawberries and cream 27.jpg

Filter the strawberries, put them in a sieve and collect the juices.

View fullsize My Mum's Celebratory Sponge Cake with fresh strawberries and cream 29.jpg
View fullsize My Mum's Celebratory Sponge Cake with fresh strawberries and cream 28.jpg

Leave the sponge to cool in the tin for a few minutes, then remove from the tin and peel off the baking parchment.

Finish cooling on a wire rack.

View fullsize My Mum's Celebratory Sponge Cake with fresh strawberries and cream 15.jpg
View fullsize My Mum's Celebratory Sponge Cake with fresh strawberries and cream 16.jpg

When the sponge is completely cool, take a sharp knife and cut the cake horizontally in half so you obtain two discs.

View fullsize My Mum's Celebratory Sponge Cake with fresh strawberries and cream 20.jpg
View fullsize My Mum's Celebratory Sponge Cake with fresh strawberries and cream 21.jpg

Place the bottom disk of the sponge on a cake stand of your choice.

Take fresh double cream from the fridge and pour it into a mixing bowl. Start whisking with the hand whisker.

During the whisking start adding caster sugar and whisk until the cream becomes stiff enough to be able to spread it on the cake.

View fullsize My Mum's Celebratory Sponge Cake with fresh strawberries and cream 31.jpg
View fullsize My Mum's Celebratory Sponge Cake with fresh strawberries and cream 32.jpg

Spoon strawberry juices over a bottom disk of the sponge.

View fullsize My Mum's Celebratory Sponge Cake with fresh strawberries and cream 34.jpg
View fullsize My Mum's Celebratory Sponge Cake with fresh strawberries and cream 36.jpg

Spread roughly 1/3 of whipped cream.

View fullsize My Mum's Celebratory Sponge Cake with fresh strawberries and cream 37.jpg
View fullsize My Mum's Celebratory Sponge Cake with fresh strawberries and cream 38.jpg

Then arrange the macerated strawberries over the disc to completely cover it.

Place the second disk of the sponge on the top.

View fullsize My Mum's Celebratory Sponge Cake with fresh strawberries and cream 39.jpg
View fullsize My Mum's Celebratory Sponge Cake with fresh strawberries and cream 40.jpg

Spread the rest of the cream on the top and on the sides of the cake.

Decorate to your liking the top of the cake with fresh strawberries, sliced or left whole.

View fullsize My Mum's Celebratory Sponge Cake with fresh strawberries and cream 43.jpg
View fullsize My Mum's Celebratory Sponge Cake with fresh strawberries and cream 44.jpg

Dust with a bit of icing sugar if desired and serve.

Just a thought

This cake must be eaten on the day of filling. You can prepare the sponge a day ahead, cool it completely and store it in an airtight container until the following day when is ready to be filled and decorated.

You can use tinned fruit of your choice instead of fresh strawberries. Make sure you reserve the syrup and use it to spoon over the bottom disc of the sponge as described in the recipe.

July 30, 2024 /tina oblak
sponge cake, double cream, whipped cream, fresh fruit, tinned fruit, celebratory cake, Pandišpanija, Pan di Spagna
Adriatic Recipe, All year round recipe, baked dish, baking, celebratory desserts, Celebratory dish, easy baking, easy cakes, Easy recipe, festive bakes, festive dessert, festive dish, festive sweet things, pudding, simple recipe, sweet course, patisserie
Comment

Easy Lamb Casserole Istrian Recipe

Beans and Sardines
June 07, 2024 by tina oblak in Adriatic Recipe, All year round recipe, baked dish, casserole, Celebratory dish, child friendly dish, child friendly meal, dinner, Easter, Easter dish, Easter recipes, Easy recipe, family friendly dish, family friendly meal, festive dish, hearty dish, Istrian cuisine, Istrian dish, Istrian food, Istrian gastronomy, main course, main dish, main meat course, Meat, one pot meal, one pot meat recipe, roasted dish, Rustic dish, simple recipe, Slovenian cuisine, Slovenian food, Slovenian gastronomy, supper, make ahead, weekend, slow cook, comfort, batch cooking

This slow-cooked lamb casserole recipe is absolutely amazing, it is incredibly easy to make using cheaper and tougher cuts of lamb that by the end of cooking become so tender they truly melt into your mouth.

It is a simple dish to put together, perfect for a cosy and satisfying meal, and great to make ahead of time as the flavours will have the chance to mingle, develop fully and intensify.

Along the Slovenian coast you might find this dish in more informal and rustic style restaurants called in local dialect Janje or Jančić na rošto or referred to as Pečeno Jagnje in standard Slovenian.

This very popular and much-loved dish is frequently prepared in the households during the weekends, and when the family and friends get together for special celebrations. It is also a recipe that is understandably appropriate for an Easter menu.

I am sharing here my family recipe with you. It only needs a few basic ingredients and you are ready to go.

You will come back to this recipe time and time again, as the best things about this incredibly flavourful lamb casserole is that the oven will take over and do the work for you.

Recipe

Ingredients

Serves 4

  • 1kg diced lamb meat of your choice (I used neck fillet). You can use boneless shoulder or leg of lamb, trimmed of excess fat and diced.

  • 1 medium onion (about 150g), peeled and finely chopped

  • 2 cloves of garlic, peeled and crushed

  • 3 Tbsp olive oil

  • 100 ml white wine, optional

  • 100g ripe and sweet tomatoes of your choice, roughly chopped (I used mini-San Marzano tomatoes)

  • If you cannot get hold of ripe and sweet tomatoes, you can use high quality tinned chopped tomatoes instead.

  • a sprig of fresh parsley, finely chopped

  • leaves from a small sprig of fresh rosemary (about 1 Tsp), very finely chopped or ¼ Tsp of dry rosemary

  • sea salt

  • black pepper

Method

Heat the oven to 250°C static or equivalent.

Trim off the excess fat from the diced meat if necessary to avoid the final dish being too greasy and potentially unpleasant to eat.

Put the olive oil in a fairly large flameproof casserole dish or Dutch Oven.

Add finely chopped onions, crushed garlic, a pinch of sea salt, and gently fry until soft and transparent.

View fullsize Lamb Roast 3.jpg
View fullsize Lamb Roast 4.jpg

Place diced lamb meat in a casserole dish and mix with the onions.

Transfer in the oven and bake for 15 minutes.

View fullsize Lamb Roast 5.jpg
View fullsize Lamb Roast 6.jpg

Remove from the oven and add chopped tomatoes, the herbs, and season with sea salt and black pepper.

Add white wine, if you are including it, and pour enough water to almost completely cover the meat.

Stir gently so all the ingredients are mixed together.

Turn the heat down to 220ºC.

Transfer the casserole dish back into the oven and cook for about 1 hour or until the meat is very tender.

Check the casserole now and again, giving it a good stir making sure there is always enough liquid.

If the casserole gets too dry, top up with a bit more water.

View fullsize Lamb Roast 7.jpg
View fullsize Lamb Roast 8.jpg

When the dish is ready you can spoon out any excess oil at the surface of the casserole.

Great served with oven baked potatoes, mashed potatoes, soft cooked polenta, some crusty rustic bread, sautéed peas, and other green vegetables like beans, broccoli, curly kale, and cavolo nero just to mention a few possible vegetables.

Just a thought

This lamb casserole is great for freezing. Once fully cooked, allow it to cool completely, and then freeze for up to three months.

June 07, 2024 /tina oblak
lamb, lamb meat, tougher cuts of lamb, cheap cuts of lamb, diced lamb neck fillet, lamb neck fillet, lamb shoulder, leg of lamb, Janje or Jančić na rošto, Pečeno Jagnje
Adriatic Recipe, All year round recipe, baked dish, casserole, Celebratory dish, child friendly dish, child friendly meal, dinner, Easter, Easter dish, Easter recipes, Easy recipe, family friendly dish, family friendly meal, festive dish, hearty dish, Istrian cuisine, Istrian dish, Istrian food, Istrian gastronomy, main course, main dish, main meat course, Meat, one pot meal, one pot meat recipe, roasted dish, Rustic dish, simple recipe, Slovenian cuisine, Slovenian food, Slovenian gastronomy, supper, make ahead, weekend, slow cook, comfort, batch cooking
Comment

Sea Bass Baked in Sea Salt Crust Recipe

Beans and Sardines
May 22, 2024 by tina oblak in Adriatic Recipe, All year round recipe, baked dish, baked fish, Celebratory dish, child friendly dish, child friendly meal, dinner, Easy recipe, family friendly dish, family friendly meal, Fish & Seefood, Healthy, healthy mael, Istrian cuisine, Istrian dish, Istrian food, Istrian gastronomy, light fish course, light meal, main course, main dish, main fish course, Nutritious, Nutritious dish, recipe from Northern Ital, Rustic dish, simple recipe, Slovenian cuisine, Slovenian food, Slovenian gastronomy, Venetian dish

Cooking sea bass, or any medium to large fish, covered in sea salt is one of the best ways of preparing it. The crust that forms during the baking helps to seal in the fish juices resulting in the fish meat having a very delicate taste and staying very moist and succulent which makes it incredibly flavoursome and deliciously tender to eat.

Sea salt crust prevents and shelters the fish in the oven from direct heat and allows it to bake evenly without the risk of overbaking it and therefore drying the fish. This recipe is also incredibly healthy as there is no need for additional fats or condiments.

This recipe for sure is a real showstopper and meant for special occasions. When you break the sea salt crust in front of your guests you create a bit of drama and bring a bit of theatre to your meal, it will leave them very impressed indeed!

The recipe has a very cheffy feel to it, but on the contrary to what you might think, the recipe is surprisingly simple.

This simple method of cooking the fish has been widely known and practised in various countries in the Mediterranean. It would have been expensive to prepare this dish, as quite a large amount of salt is needed. The dish would have been reserved as a feast dish for prosperous and wealthy, but it is believed that the recipe originated from the people on a more modest budget living in the areas where sea salt was produced.

This way of cooking is very popular in the Venetian area where preparing the fish this way is traced back before the end of the Roman Empire, during which time the salt pans were fully operating in the lagoon of Venice.

This practice of cooking the fish covered in sea salt crust has been also very popular along the Slovenian coastline since the time when La Serenissima (the Most Serene Republic of Venice) occupied this territory which is also blessed with the presence of the salt pans and the abundance of sea salt.

This recipe is not really suggested as your mid-week dinner. The locals would sometimes prepare the fish baked in sea salt crust in the households to mark and celebrate special occasions, but most of the time it would be enjoyed and ordered as a treat in the restaurants specialised in serving fish and sea food where you can find this dish on the menu in Slovenian as Brancin v soli or in Italian (due to present bilingualism) as Branzino al sale.

I am sharing here my family recipe to enjoy.

Recipe

Ingredients

Serves 2-4 people

  • 2 whole sea bass (each weighing about 400g), clean, gutted and ideally not scaled, however, you can use the fish that has been scaled already. Ask the fishmonger to help you with this task if uncomfortable tackling it yourself.

  • 2kg sea salt

  • fresh rosemary or parsley sprigs, optional

  • pepper, optional

Method

Preheat the oven to 180 °C.

Gut and clean the fish.

Rinse well the fish inside and out under cold running water and pat dry with kitchen paper.

If you wish you can stuff the inside of the fish belly (cavity) with fresh spring of parsley or rosemary and season with pepper.

Prepare the salt mixture to make the salt crust by putting the sea salt in a bowl and add enough water (about 100ml but you might need a bit more) so the mixture is wet and moist enough to be moulded. A bit like the sand on the beach when you are trying to build a sandcastle, if the sand is too dry or too wet you cannot shape it.

The principal for making sea salt mixture is similar, use a little bit of your judgment how much water you should use.

View fullsize Sea Bass Baked in sea salt crust Recipe 2.jpg
View fullsize Sea Bass Baked in sea salt crust Recipe 3.jpg

Line a baking tray (large enough to fit the fish comfortably) with baking parchment.

Put half of the salt mixture into a lined baking tray and flatten to make a bed for the fish.

Place the fish on top.

Cover completely with the remaining salt mixture.

Press with your hands to mould and seal.

View fullsize Sea Bass Baked in sea salt crust Recipe 5.jpg
View fullsize Sea Bass Baked in sea salt crust Recipe 6.jpg

Bake in the oven for about 50 minutes, or until the crust is crisp and lightly golden.

Remove the fish from the oven and bring it to the table in its crust.

Carefully crack the salt crust, remove it from the fish and discard.

Peel and remove the skin from the fish and discard that too.

Brush off any excess salt to avoid getting on to the fish.

View fullsize Sea Bass Baked in sea salt crust Recipe 7.jpg
View fullsize Sea Bass Baked in sea salt crust Recipe 10.jpg

Flake the fish from the bone in large pieces and place them onto a serving plate.

Spoon over a simple green sauce made with olive oil and finely chopped fresh parsley, and serve with some boiled new potatoes, spinach or chard with garlic and olive oil, salad, creamed spinach, bean salad, green beans salad, peperonata Istrian style.

Just a thought

You can stuff the cavity of the fish with herbs of your preference like fresh parsley, rosemary or thyme, or garlic and a slice of lemon, or a combination.

Wine suggestion

Vermentino di Sardegna DOC 2023 - Selezione Argiolas

May 22, 2024 /tina oblak
Sea Bass, Fresh whole Sea Bass, Fresh whole Sea Bream, sea salt, fresh herbs, Sea Salt Crust, Fresh whole fish in Sea Salt Crust
Adriatic Recipe, All year round recipe, baked dish, baked fish, Celebratory dish, child friendly dish, child friendly meal, dinner, Easy recipe, family friendly dish, family friendly meal, Fish & Seefood, Healthy, healthy mael, Istrian cuisine, Istrian dish, Istrian food, Istrian gastronomy, light fish course, light meal, main course, main dish, main fish course, Nutritious, Nutritious dish, recipe from Northern Ital, Rustic dish, simple recipe, Slovenian cuisine, Slovenian food, Slovenian gastronomy, Venetian dish
Comment

Oven Baked Ricotta (or curd cheese) Filled Crêpes Recipe

Beans and Sardines
March 01, 2024 by tina oblak in Adriatic Recipe, All year round recipe, Austrian inspired dishes, baked dish, baking, breakfast, brunch, Central European recipes, child friendly dish, child friendly meal, dessert, dinner, Eastern European dishes, Eastern European recipes, easy baking, Easy recipe, family friendly dish, festive dessert, festive sweet things, home baking, Hungarian inspired dishes, Istrian cuisine, Istrian dish, Istrian food, Istrian gastronomy, Mitteleuropean cuisine, Mitteleuropean dish, Mitteleuropean food, Mitteleuropean recipes, oven baked fish, Rustic dish, simple recipe, Slovenian cuisine, Slovenian food, Slovenian gastronomy

If you love your traditional pancakes but looking for a recipe that will elevate it a notch, look no further.

This recipe consists of frying thin pancakes (French style crêpe) and then filling them with sweetened ricotta, or curd cheese, flavoured with lemon and vanilla. The pancakes are then rolled up, placed in a greased baking tray, a custard-like mixture is then poured over them, and the whole dish gets baked in the oven for a bit.

The end result is truly divine, the steps to make this recipe are fairly simple and not at all complicated or lengthy, even though it may appear at first glance.

Usually these filled pancakes are served for breakfast or early dinner, or they make a great rustic style pudding, and can even be offered as a more formal type of dessert. Whichever way you decide to serve this sweet delight, they will most surely bring the smile to anyone having them.

This recipe, with slight variations, has been enjoyed around the world, and there is a very good reason – eating these pancakes hot or cold they are undeniably delicious.

This dish is sometimes refereed as Blintzes (or ricotta or curd cheese Blintzes). The recipe originated in Eastern Europe, and is part of Jewish cuisine, customarily eaten for the Jewish holiday of Shavuot.

The most common filling is curd or farmer's cheese but ricotta, mascarpone, cream cheese, cottage cheese or crème fraiche are also used. What you chose as a filling depends on your preference, but it will also depend on where you are in the world and types of ingredients available to you.

They are very popular and a much-loved dish in all the regions of Slovenia, as this land was ruled by the Austro-Hungarian Empire.

This sweet treat is prepared on a regular basis and is commonly offered in restaurants, and is called palačinke s skuto (word palačinka from German palatschinken).

This recipe is very special to me since it brings a lot of childhood memories that take me right back into my maternal grandmother's kitchen where she would make them quite often.

I am sharing here this much treasured family recipe where curd cheese is replaced by the use of ricotta cheese.

Recipe

Ingredients

Serves 6-8 people

For the crêpes (will make 10-12 crêpes if using 24cm, 9inch pan)

  • 250g white all purpose (plain) flour

  • 350 ml semi skimmed milk

  • 150 ml cold sparkling mineral water (can use regular cold water instead, sparkling water makes very light crêpes)

  • 2 medium eggs

  • sea salt, a pinch

For the filling

  • 500g ricotta cheese (or curd, farmer's cheese) If using curd cheese increase the amount of sugar to 100g or to your liking as more acidic in taste compared to ricotta.

  • 100g raisins or sultanas soaked in lukewarm water or dark rum

  • 1 medium egg

  • grated lemon zest of one unwaxed lemon

  • 1 Tsp vanilla bean extract

  • 80g sugar

For the custard sauce to pour over the pancakes

  • 250ml full fat milk or single cream (can use half milk and half cream)

  • 1 medium egg

  • 1 Tsp vanilla bean extract

  • 2 Tbsp sugar

Method

Before you start with the recipe, place the raisins or sultanas in a small bowl and cover completely with lukewarm water or dark rum and let them soak, absorb the water, and become plump for at least 20 minutes, or until needed (you can leave them to soak longer).

To make the crêpes

First make the crêpes by putting all the wet ingredients, eggs, milk and mineral sparkling water into a mixing bowl and whisk well until combined.

Start adding the flour, a bit at a time, a pinch of sea salt and whisk thoroughly until the batter is smooth and free of lumps. You can use an electric hand whisker, a food processor or a blender.

Set aside and leave it to rest for at least 15 minutes, ideally 30 minutes.

In a large non-stick frying pan or crêpe pan melt the butter over a medium heat (you can use a drizzle of oil instead).

Tilt the pan so the melted butter (or oil) covers and coats the whole surface of the pan.

Pour or ladle enough batter into the pan, swirling quickly, to thinly cover the base.

Cook for 1-2 minutes, or until golden brown, completely set on the upper part, or until it starts to come away from the sides of the pan.

Check that the pancakes are golden in colour underneath, then flip the pancake over and cook for 1 more minute or until cooked through.

Remove and place on a large plate and cook the rest.

Set aside to cool.

While the crêpes are cooling start making the filling.

To make the filling

Place ricotta or curd cheese in a bowl and stir.

Add the egg, grated lemon zest, sugar and vanilla bean extract and mix well all the ingredients.

Drain the raisins or sultanas, remove excess liquid and add to the mixture.

Set aside.

Preheat the oven to 180°C static or equivalent. Place about two tablespoons of ricotta filling in the centre of each crêpe and spoon evenly.

View fullsize 11.jpg
View fullsize 5.jpg

Fold in the side ends of the crêpe to prevent filling coming out during the rolling (if it does, it is not the end of the world).

View fullsize 6.jpg
View fullsize 12.jpg

Roll filled crêpe and place it in a greased oven proof dish seam side down in a single layer.

Repeat the process until you use all crêpes and all the filling.

View fullsize 13.jpg
View fullsize 15.jpg

To make custard sauce

Put the milk (or single cream if using), egg, sugar and vanilla bean extract in a jar and whisk well.

Pour the custard mixture over the filled crêpes until they are covered.Bake in the preheated oven for about 20 minutes.

View fullsize 17.jpg
View fullsize 18.jpg

Serve hot, warm or cold with a light dusting of sifted vanilla flavoured or regular icing sugar.

Just a thought

Ricotta filled crêpes can be assembled several hours in advance and baked just before serving.

March 01, 2024 /tina oblak
ricotta cheese, curd cheese, pancakes, French crêpe, Blintzes, ricotta cheese Blintzes, Curd cheese blintzes, mascarpone cheese, cream cheese, cottage cheese, crème fraiche, palačinke s skuto, palatschinken
Adriatic Recipe, All year round recipe, Austrian inspired dishes, baked dish, baking, breakfast, brunch, Central European recipes, child friendly dish, child friendly meal, dessert, dinner, Eastern European dishes, Eastern European recipes, easy baking, Easy recipe, family friendly dish, festive dessert, festive sweet things, home baking, Hungarian inspired dishes, Istrian cuisine, Istrian dish, Istrian food, Istrian gastronomy, Mitteleuropean cuisine, Mitteleuropean dish, Mitteleuropean food, Mitteleuropean recipes, oven baked fish, Rustic dish, simple recipe, Slovenian cuisine, Slovenian food, Slovenian gastronomy
1 Comment

Panada - Venetian Style Bread Soup Recipe

Beans and Sardines
January 31, 2024 by tina oblak in Adriatic Recipe, All year round recipe, child friendly dish, child friendly meal, dinner, Easy recipe, family friendly dish, family friendly meal, hearty dish, Hearty soups, Istrian cuisine, Istrian dish, Istrian food, Istrian gastronomy, main course, main dish, main vegetarian course, main vegetarian dish, one pot meal, recipe from Northern Ital, Rustic dish, simple recipe, Slovenian cuisine, Slovenian food, Slovenian gastronomy, Soups, supper, Vegan, Venetian dish

Panada is a bread soup that has porridge like consistency, it is smooth and delicate in flavour, it is perfect for colder months as it is filling, and great when you want to use up and recycle all that stale bread you are not quite sure what to do with it.

It is similar to other types of soups, where stale bread is used as a main ingredient, like Soupe valpellinentze (Valle d'Aosta), Suppa cauta from the Italian island of Sardegna and Tuscan Pancotto (pancotto literally meaning cooked bread) just to mention a few.

In all honesty, this dish would not quite qualify to fall into a category of the most appealing of dishes at a first glance. The recipe for this soup only calls for three main ingredients, stale bread, broth or stock and extra virgin olive oil, and the success of this dish, as it is so simple, really lies in using exceptionally good quality ingredients.

It is hard to imagine that this incredibly humble soup that fed the poorest of the poor was created in today's one of the wealthiest regions of Italy, Veneto. This was not always the case as Veneto used to be one of the least prosperous regions of Italy where people had to be incredibly resourceful and creative with the ingredients they had. This is the dish that older generations, including my nona, remembers with both great fondness and melancholy, as it was prepared very often in their youth, during the World War II, but also during the years that followed.It was ideal for small children and the elderly, and it was traditionally also prepared during the Lent.

My nona shared with me that in Slovenian Istra, Panada (without the use of cheese) used to be a common site on the dinner tables. This would come as no surprise as this part of land used to be ruled by the Serenissima, ‘The most Serene Republic of Venice,’ which significantly shaped the gastronomic habits in this region.

Nowadays, Panada is one of those dishes that most of the younger generation have never heard of or even never tasted. This is an almost forgotten dish, in this day and age, it is a rarely cooked soup in homes, and most certainly not offered, or found on the menus in restaurants.

I am sharing here this much treasured family recipe.

Recipe

Ingredients

Serves 4

  • 400g stale bread (rustic type of loaf is particularly indicated)

  • extra virgin olive oil, a generous drizzle or to taste, and some extra to serve

  • 1.5 litre beef, chicken or vegetable broth (preferably homemade but you can use a really good quality store bought stock)

  • sea salt

  • black pepper

  • grated Parmiggiano Reggiano cheese, to serve, optional (you can use any hard cheese you like)

Method

Thinly slice stale loaf of bread.

Place the slices in a pan in layers.

View fullsize 20240123_112603.jpg
View fullsize 20240123_112627.jpg

Cover with beef, chicken or vegetable warm broth or stock, and drizzle generously with extra virgin olive oil.

Leave to stand for about 40 minutes and allow the bread to thoroughly absorb the liquid.

View fullsize 20240123_112650.jpg
View fullsize 20240123_112714.jpg

Place the pan on a stove and cook on a very gentle heat for about 45 minutes stirring quite frequently but gently.

When is fully cooked you should end up with a smooth, creamy and velvety bread soup.

Taste and season with sea salt and black pepper.

Serve hot with grated Parmiggiano Reggiano cheese or other type of hard cheese of your preference, optional, and a drizzle with extra virgin olive oil.

Just a thought

If you want to make this recipe intentionally, and not because of the left over bread, you can also buy a fresh rustic loaf from the shop and keep it out until it dries a bit, and then use it.

January 31, 2024 /tina oblak
stale bread, dry bread, old bread, leftover bread, rustic loaf of bread, bread soup, cooked bread, Lent, Soupe valpellinentze, Suppa cauta, Pancotto
Adriatic Recipe, All year round recipe, child friendly dish, child friendly meal, dinner, Easy recipe, family friendly dish, family friendly meal, hearty dish, Hearty soups, Istrian cuisine, Istrian dish, Istrian food, Istrian gastronomy, main course, main dish, main vegetarian course, main vegetarian dish, one pot meal, recipe from Northern Ital, Rustic dish, simple recipe, Slovenian cuisine, Slovenian food, Slovenian gastronomy, Soups, supper, Vegan, Venetian dish
Comment

Steamed and Marinated Prawns Istrian style Recipe

Beans and Sardines
December 27, 2023 by tina oblak in Adriatic Recipe, All year round recipe, Appetizers, bite-sized nibbles, Canapés, Celebratory dish, child friendly dish, child friendly meal, dinner, Easy recipe, entrée course, family friendly dish, family friendly meal, festive dish, first course, Fish & Seefood, fish starter, Healthy, healthy mael, Istrian cuisine, Istrian dish, Istrian food, Istrian gastronomy, light fish course, light meal, main course, main dish, main fish course, recipe from Northern Ital, Rustic dish, simple recipe, Starters, supper, Venetian dish

This uncomplicated dish with its delicate flavour consists of quickly boiling, chilling and dressing the prawn tails with a simple dressing. This dressing is made with olive oil, finely chopped parsley, finely chopped garlic (optional), freshly squeezed lemon juice and seasoned with sea salt. Black pepper can also be added if desired.

It is perfect to make ahead of time and enjoyed as a starter or as a second course.

Traditionally, this recipe would call for Mantis shrimps (from Latin Squilla Mantis) which is a type of mantis shrimp, fished in the shallow sandy lagoons of the northern Adriatic and Mediterranean during colder months of the year. They represent a real seasonal treat and a type of seafood not typically seen anywhere else. This particular variety of shrimp is also widely used to make risotti, it is delicious in fish stew, and used to prepare pasta sauce.

This seafood delicacy is very much valued and appreciated along the north Adriatic coast from Venice to Trieste in Italy, in nearby inland towns, and along the Slovenian coast, where Mantis Shrimp is known as morska bogomolka or morska bogomoljka or in local dialect as kanoče (strong influence from nearby Venice, where these types of shrimp are referred to as canoce, also spelt canocce).

In Italy, this particular type of shrimp has many names, in standard Italian it is called Cannocchia, pannochia or cicala di mare, which literally translates into cicada of the sea.

I am sharing here the family recipe for this simple dish that can be prepared ahead of time and be ready when you are. Enjoy it with some rustic bread to soak up the juices.

Ingredients

Serves 4

  • 500g prawns

For the dressing

  • 5 Tbsp extra virgin olive oil (or to taste)

  • a small handful of fresh flat leaf parsley (about 3g), finely chopped

  • small clove of garlic, peeled and very finely chopped, optional

  • lemon juice, to taste, optional

  • sea salt

  • finely ground black pepper, optional

Method

Wash the prawns (or mantis shrimp, if you can get hold of them) under the cold running water.

Place them in a fairly large, shallow pot lying side by side, preferably in a single layer.

Add just enough water to cover the bottom of the pan.

Add a pinch of sea salt and bring to boil, then turn the heat down.

Cover with the lid and cook for about 3 minutes, or until the prawns turn pink in colour.

View fullsize Boiled shripms ( canocchie) with dressing 2.jpg
View fullsize Boiled shripms ( canocchie) with dressing 3.jpg

Remove from the pot and let them cool a bit, i.e. enough to handle them.

Remove the tails from the shell.

Place cleaned prawn tails in a serving dish in a single layer.

View fullsize Boiled shripms ( canocchie) with dressing 4.jpg
View fullsize Boiled shripms ( canocchie) with dressing 5.jpg

Prepare the dressing by putting in a small bowl finely chopped garlic (if using), fresh flat leaf parsley, extra virgin olive oil, a squeeze of half of lemon juice or to taste, sea salt to taste and finely ground black pepper to taste (optional).

Mix well so all the ingredients incorporate well.

Spoon over the cooked prawn tails and serve immediately with some fresh crunchy bread and some lemon wedges (optional).

View fullsize Boiled shripms ( canocchie) with dressing 6.jpg
View fullsize Boiled shripms ( canocchie) with dressing 7.jpg

If made in advance, cover with the cling film and put in the fridge.

Take out of the fridge half an hour before serving and add a little more extra virgin olive oil if needed, sprinkle with some freshly chopped parsley.

Serve with some bread to soak up the juices.

December 27, 2023 /tina oblak
Prawns, Mantis shrimps, Squilla Mantis, morska bogomolka, morska bogomoljka, kanoče, Cannocchia, pannochia, cicala di mare, extra virgin olive oil, fresh flat leaf parsley, lemon juice, dressing
Adriatic Recipe, All year round recipe, Appetizers, bite-sized nibbles, Canapés, Celebratory dish, child friendly dish, child friendly meal, dinner, Easy recipe, entrée course, family friendly dish, family friendly meal, festive dish, first course, Fish & Seefood, fish starter, Healthy, healthy mael, Istrian cuisine, Istrian dish, Istrian food, Istrian gastronomy, light fish course, light meal, main course, main dish, main fish course, recipe from Northern Ital, Rustic dish, simple recipe, Starters, supper, Venetian dish
Comment

Austrian inspired Linzer Cookie Recipe

Beans and Sardines
December 21, 2023 by tina oblak in All year round recipe, Austrian inspired dishes, baking, biscuits, Central European recipes, Christmas bakes, cookies, dessert, Eastern European recipes, easy baking, Easy recipe, festive bakes, festive sweet things, simple recipe, sweet nibbles, Sweet Things

This incredibly delicious and very pretty in appearance biscuits are made with flour, butter, sugar, eggs and vanilla. Almond flour is very often used to give these irresistible cookies a delicate and light texture. They are jammed together with different types of preserves.

Quick and easy to make, this little works of art can be a perfect holiday gift for your foodie friends and family.

Linzer style cookies are very popular type of biscuits and are traditionally prepared around Christmas holidays in all regions of Slovenia but can be eaten any time of the year.

You can buy them in food stores or bakeries, and they are enjoyed all year round. They are often seen sandwiched together by chocolate spread.

These biscuits are Austrian in origin, and are linked to Linzer Cake, a recipe takes us back to 1653, and so it is often called the oldest recipe in the world. There are speculations, guesses and different legends and stories as to where the Linzer cookies come from. It is believed that Linzer biscuits originated in the Austrian city of Linzer by a pastry chef, who mixed the ingredients for the cake but rather than making a cake cut out the cookies instead.

This recipe, like many others, has variations and adaptations, one of which does not include almond flour as an ingredient.

I am sharing here the family top favourite recipe for the festive baking.

Recipe

Ingredients

  • 125g soft butter (at room temperature)

  • 1 egg, small or medium (at room temperature)

  • 75g caster sugar

  • 1 ½ Tbsp vanilla sugar or ¼ Tsp vanilla extract

  • finely grated lemon zest of ½ lemon

  • 250g plain white (all purpose) flour, plus more for rolling out

  • 2 Tsp baking powder

  • a pinch of fine sea salt

  • icing sugar or vanilla icing sugar, to dust the biscuits

  • a pinch of ground cinnamon, optional

  • a pinch of ground nutmeg, optional

  • smooth apricot jam (can use strawberry, raspberry or red currant jam, or any jam of your preference)

Method

Place softened butter and sugar in a mixing bowl and beat until pale and fluffy.

Add the egg, finely grated lemon zest, vanilla sugar (or vanilla extract), and mix until all the egg is fully incorporated (if you happen to get a bit of “curdled appearance” at this stage do not worry).

View fullsize Linzer cookies 1.jpg
View fullsize Linzer cookies 2.jpg

Add sifted flour together with the baking powder and mix with the wooden spoon first until all the ingredients are incorporated and the dough comes together in large clumps.

Transfer to a lightly floured surface (or keep the mixture in the bowl) and with your hands gently knead the dough until it becomes soft and smooth (if the dough is too wet to handle add a bit of flour at the time until you get the dough that does not stick to your hands or to the working surface; the wetness of the dough will depend on the size of the egg you are using).

Shape the dough into a disc and wrap it tightly in cling film.

Put the dough in the fridge and let it rest and chill for at least 30 minutes.

Lay a baking tray with baking parchment.

View fullsize Linzer cookies 3.jpg
View fullsize Linzer cookies 4.jpg

Take the disc of the dough out of the fridge and place it onto a lightly floured working surface.

Lightly flour the rolling pin and gently roll out the dough to the thickness of about 4mm.

Stamp out rounds (circles) using a smooth or crinkle-edged cookie cutter and place on a baking tray.

(I decided to make quite big biscuits and used 9cm, 3 ½ - inch, fluted round cookie cutter).

If the dough sticks to the cookie cutters, deep them into the flour first.

Lift away the excess dough, form a ball and roll it out again.

Cut out as many more biscuits as you can.

Use a small round or select your favourite mini festive cookie cutters (heart, star, Christmas tree, flower for example) to stamp a circle, or other shapes, from the centre of the biscuits.

Remember you need to end up with an even number.

View fullsize Linzer cookies 5.jpg
View fullsize Linzer cookies 6.jpg

Place on a baking tray and bake in a preheated oven at 180°C static or equivalent for about 10 minutes or until light golden in colour (the baking time will depend on the size of the cookies).

View fullsize Linzer cookies 7.jpg
View fullsize Linzer cookies 8.jpg

When baked, leave to cool just for a few minutes on the tray, then transfer to a wire rack to cool completely.

View fullsize Linzer cookies 9.jpg
View fullsize Linzer cookies 10.jpg

When the biscuits are completely cold, they are ready to be sandwiched together.

Turn the whole biscuits upside down.

Spoon on top a bit of jam and spread it over the biscuits.

View fullsize Linzer cookies 12.jpg
View fullsize Linzer cookies 13.jpg

Dust with icing sugar or vanilla icing sugar the top part of the cookies you cut the shape out of.

View fullsize Linzer cookies 14.jpg
View fullsize Linzer cookies 15.jpg

Sandwich the biscuits together, use the other half of the biscuits with icing sugar and gently place them on top of the other bottom half of the biscuits.

When freshly baked this Linzer style biscuits are nice and crunchy but will become softer the following day and just melt in your mouth.

Just a thought

You can keep the biscuits in the airtight container for about six days.

December 21, 2023 /tina oblak
linzer cookies, Linzer biscuits, almond flour
All year round recipe, Austrian inspired dishes, baking, biscuits, Central European recipes, Christmas bakes, cookies, dessert, Eastern European recipes, easy baking, Easy recipe, festive bakes, festive sweet things, simple recipe, sweet nibbles, Sweet Things
Comment

Crispy Fried Squid (Calamari) Recipe

Beans and Sardines
December 13, 2023 by tina oblak in Adriatic Recipe, All year round recipe, Appetizers, bite-sized nibbles, Canapés, child friendly dish, child friendly meal, dinner, Easy recipe, entrée course, family friendly dish, family friendly meal, festive dish, Finger food, Fish & Seefood, fish starter, Istrian cuisine, Istrian dish, Istrian food, Istrian gastronomy, main course, main dish, main fish course, main fish meal, Rustic dish, simple recipe, Slovenian cuisine, Slovenian food, Slovenian gastronomy, Small bites, Starters, Venetian dish

This incredibly popular dish is a real crowd pleaser and will be the talk of the table. It can be served as a starter or as a main course and makes a great party food as its taste is pretty extraordinary.

With a few simple steps and a tiny bit of effort you can tackle this simple and quick recipe at home and end up with crispy calamari to delight your friends and family. There is nothing daunting and tricky about it.

Squid flourish in the Mediterranean and Adriatic sea where for the locals fried calamari are equivalent to British concept of “Fish and Chips”.

Along the Slovenian coast, this dish can be found on the menu in just about every restaurant (Ocvrti lignji or Ocvrti kalamari). It is served with chips and mayonnaise or tartar sauce or a traditional Istrian vegetable side dish made with spinach or chard and potatoes. During hotter months a mixed summer salad could be a great alternative to accompany this exquisite dish.

It is enjoyed as part of everyday meal or as a seafood feast during festivities, very popular on Christmas Eve when traditionally fish and seafood-based menu is served according to the tradition that originates from the Roman Catholic practice of not eating meat on Fridays.

Fried squid can be served on their own or with whitebait or other small fish, prawn tails or shrimp.

I am sharing here my mother's recipe how to make the best crispy calamari!

Ingredients

Serves 4

  • about 800g squid, tubes and tentacles, cleaned

  • 250-500g plain white flour

  • vegetable oil, for frying

  • sea salt

  • 2 lemons, quartered, to serve

Method

Prepare and clean the squid.

Remove from the squid tube the head, backbone and innards, and separate the tentacles.

(If you are uncomfortable with this task, ask the fishmonger to clean the squid for you).

Wash thoroughly under the cold running water.

Pat squid dry with the kitchen paper.

Cut the squid pouches into rings, roughly about 5mm.

View fullsize 20231128_120729 (1).jpg
View fullsize 20231128_120813.jpg

Put enough oil in a saucepan to come halfway up the pan.

Place on a medium heat and heat the oil for deep-frying to 190°C, if using a thermometer.

(if not using a thermometer, one way to check that the oil is at the right temperature is to drop a small cube of bread into the hot oil, it should become crispy and golden in 1minute)

While the oil is heating, put the flour into a shallow dish, bowl or a plate.

Coat lightly the squid in flour (work in small batches).

View fullsize 20231128_120853.jpg
View fullsize 20231128_120918.jpg

Transfer them into a sieve and gently shake off the excess.

Carefully drop into the hot oil.

Fry in batches (and do not overload the pan) for about 2 minutes or until the squid becomes golden in colour

(dropping bigger batches of floured squid in hot oil can bring the temperature of oil down, the squid will be “cooking and steaming” in oil rather than frying and potentially compromising its crunchiness).

Remove the squid from the pan with a slotted spoon.

Place on the kitchen paper to absorb excess oil and drain.

Sprinkle with sea salt to taste.

Serve with lemon quarters.

Serve as a starter or as a main dish with mayonnaise, garlic mayonnaise, tartar sauce, salad or chips and chard or spinach with potatoes Istrian style.

December 13, 2023 /tina oblak
crowd pleaser, fried squid, fried calamari, crispy calamari, Christmas Eve, Ocvrti lignji, ocvrti kalamari, fresh squid, frozen squid, deep fried calamari, deep fried squid
Adriatic Recipe, All year round recipe, Appetizers, bite-sized nibbles, Canapés, child friendly dish, child friendly meal, dinner, Easy recipe, entrée course, family friendly dish, family friendly meal, festive dish, Finger food, Fish & Seefood, fish starter, Istrian cuisine, Istrian dish, Istrian food, Istrian gastronomy, main course, main dish, main fish course, main fish meal, Rustic dish, simple recipe, Slovenian cuisine, Slovenian food, Slovenian gastronomy, Small bites, Starters, Venetian dish
2 Comments

Clear Beef Broth Soup Recipe

Beans and Srdines
November 22, 2023 by tina oblak in Adriatic Recipe, All year round recipe, Appetizers, Austrian inspired dishes, Celebratory dish, Central European recipes, child friendly dish, child friendly meal, Christmas dish, dinner, Eastern European dishes, Eastern European recipes, Easy recipe, entrée course, family friendly dish, family friendly meal, festive dish, first course, first course dish, first course meal, Healthy, healthy mael, hearty dish, Hearty soups, Istrian cuisine, Istrian dish, Istrian food, Istrian gastronomy, Italian soups, light meal, Rustic dish, simple recipe, Slovenian cuisine, Slovenian food, Slovenian gastronomy, Soups, Starters, supper

Beef broth is a strained, thin, clear type of a soup, cooked with meat, vegetables and fresh herbs. It is incredibly easy to make, and therefore, a perfect recipe for the beginners.

This soup is very comforting, hearty and delicate but incredibly flavoursome. It can be eaten as a hot starter or as a first course meal, instead of other types of soups, pasta, risotto or gnocchi dishes.

It is also recurrently used as a stock, to make risotto dishes for example, and in countless other recipes.

This is a staple dish in Slovenia where it is almost impossible to imagine a traditional family Sunday lunch without it. It will be prepared and served also during holidays including Christmas, New Year, Easter, and to mark special family celebrations. It is one of the basic dishes in Slovenia together with clear chicken or vegetable broth, and every household will have a little secret how to make the best one.

Slovenian households will almost always have some stored in the fridge or in the freezer, and you will have no trouble finding it on almost every menu as Goveje juha.

If you happen to fall ill with the cold or a flue in Slovenia, you will most surely be offered a hot clear broth to make you feel better as it is used like a “magic cure”.

Along the Slovenian coast the use of fresh marjoram will distinguish this broth from other regional varieties of the recipe found in neighbouring Italy and Austria for example, where this soup is also very popular and very much-loved dish.

I am sharing here my family recipe for this delicious soup.

Ingredients

It will make about 2 litres of broth.

  • about 800g beef meat (cheaper cuts like shin of beef/shank or shoulder/beef clod are normally used, these types of meats are quite tough but when slowed cooked over a low heat will result in tender, moist and rich in flavour). You can use chicken meat, with most of the skin removed, or a combination of chicken and beef.

  • about 450g oxtail or beef bones (beef marrow bone rings), optional

  • 1 parsnip, washed and peeled

  • 1 carrot, washed and peeled

  • 1 medium onion, peeled

  • a piece of celeriac (about 80g), peeled, optional

  • 1 celery stick, washed

  • a few celery leaves, optional

  • a handful of fresh flat leaf parsley sprigs (stalks included), washed

  • a few sprigs of fresh marjoram, optional

  • a few whole black peppercorns

  • sea salt

  • 4 l cold water

Method

Cut the onion in half and place the two halves of the onion in a small pan (flat sides facing down) without adding any oil or other types of fat.

Fry for a few minutes until blackened slightly, then set aside.

View fullsize Clear Beef Broth 3.jpg
View fullsize Clear Beef Broth 4.jpg

Wash the meat and the bones, and place them in a fairly large pot (big stock pot is ideal if you have one).

Add all the washed and prepared vegetables, and the herbs.

Add the black peppercorns, water and bring to the boil.

View fullsize Clear Beef Broth 5.jpg
View fullsize Clear Beef Broth 6.jpg

With the slotted spoon skim the foam from the surface.

Lower the heat to a minimum and partially cover with the lid.

Check the broth now and again and make sure it is not boiling aggressively, it should simmer very gently for about 3 hours.

Skim regularly the foam from the surface.

When the broth is cooked add sea salt to your taste.

Remove all the vegetables, the meat and the bones from the pot and set aside.

View fullsize Clear Beef Broth 7.jpg
View fullsize Clear Beef Broth 8.jpg

Filter the broth, if you want to end up with a very clear soup (this phase is optional if you do not want a “muddy” looking broth).

Place the colander, lined with clean kitchen towel, muslin cloth, or cheese cloth, over another large pot (big enough to contain all the broth) and gently pour,or ladle, the broth into the lined colander.

View fullsize Clear Beef Broth 9.jpg
View fullsize Clear Beef Broth 11.jpg

Beef broth can be enjoyed clear, on its own, or with a small, shaped pasta (like little stars or orzo pasta), egg type noodles (like vermicelli or tagliolini pasta), croutons, shredded pancakes, grated egg based pasta dough, semolina dumplings, little tortellini, capelletti or passatelli, and Austrian style bread dumplings, just to mention a few.

Vegetables and herbs removed from the broth get normally discarded (except the carrot, parsnip and other root vegetable, which sometimes are cut into smaller pieces and put back into the broth when served).

Meat can be shredded back into the broth, or sliced and eaten as a main dish separately, traditionally it is accompanied by horseradish cream sauce, freshly grated horseradish, mustard, mayonnaise and pan-fried potatoes with onions and pancetta.

Just a thought

You can store the broth in the fridge for 2/3 days. Make sure you cool it first completely and then store it in the fridge, leaving the broth in a pot or transferring it into an airtight container.

You can also freeze the broth for up to 3 months.

November 22, 2023 /tina oblak
clear beef broth soup, clear meat broth soup, clear chicken broth soup, clear vegetable broth soup, parsnip, carrots, meat based stock, made ahead, goveja juha, domaca goveja juha, brodo di carne, beef meat, shin of beef, beef shank, beef shoulder, beef clod, oxtail, beef bones, beef marrow bone rings, celeriac
Adriatic Recipe, All year round recipe, Appetizers, Austrian inspired dishes, Celebratory dish, Central European recipes, child friendly dish, child friendly meal, Christmas dish, dinner, Eastern European dishes, Eastern European recipes, Easy recipe, entrée course, family friendly dish, family friendly meal, festive dish, first course, first course dish, first course meal, Healthy, healthy mael, hearty dish, Hearty soups, Istrian cuisine, Istrian dish, Istrian food, Istrian gastronomy, Italian soups, light meal, Rustic dish, simple recipe, Slovenian cuisine, Slovenian food, Slovenian gastronomy, Soups, Starters, supper
Comment

Fuži – traditional handmade Istrian fresh pasta Recipe

Beans and Sardines
November 10, 2023 by tina oblak in Adriatic Recipe, All year round recipe, Celebratory dish, child friendly dish, child friendly meal, dinner, Easy recipe, Egg based pasta, entrée course, family friendly dish, family friendly meal, first course, first course dish, first course meal, Healthy, hearty dish, Istrian cuisine, Istrian dish, Istrian food, Istrian gastronomy, main course, main dish, Pantry, Pasta, Rustic dish, Slovenian cuisine, Slovenian food, Slovenian gastronomy, Starters, fresh pasta

Fuži (together with bleki and pljukanci) is a traditional and very well renowned type of Istrian fresh pasta from Slovenia and Croatia. It uses only two ingredients, it is easy and fun to make, and its shape is really beautiful.

Traditionally it is homemade, and hand rolled with a wooden rolling pin, but these days pasta machine is frequently used for practical reasons.

The origin of the name fuži comes from Latin word fusus, meaning a spindle.

This recipe for fresh pasta is great for the beginners, as there really is nothing daunting about making it, and children love getting involved too.

Generally, when we think of pasta, we have in mind a quick mid-week meal. This type of pasta, however, has been usually made in the households during festivities, holidays or as a Sunday lunch, and it has been traditionally served with chicken or rabbit goulash and sautéed sauerkraut.

It is also very commonly enjoyed with venison stew, braised pheasant, classic beef goulash, asparagus (in Istria wild asparagus when in season), cured ham or pancetta cream-based sauce, mushroom creamy sauce, and of course, the Istrian luxurious white truffle creamy sauce, popular in the autumn.

This pasta is also very delicious paired with any vegetarian and fish-based sauces or any other sauce you might like (different types of pesto).

I am sharing here the recipe for fuži, a fresh homemade pasta that holds a very special place in Istrian gastronomy, and it is frequently found in local restaurants.

Ingredients

Serves 2-4

  • 300g plain (all purpose) white flour

  • 3 medium eggs

You will also need a wooden kebab stick, or a wooden spoon, to shape the fuži.

Method

Place the flour directly on a working surface, wooden board or a mixing bowl, and make a well in the centre.

Crack the eggs directly into a well.

Using a fork, mix the eggs with the flour, incorporating a little at a time, until everything is combined, and the dough comes together.

View fullsize Fuzi 2.jpg
View fullsize Fuzi 3.jpg

Transfer the dough onto a working surface and start kneading. It could take around 10 minutes of kneading for the gluten to develop in the flour and to get a smooth and elastic lump of dough.

Wrap the dough tightly with the cling film or a clean cotton kitchen cloth and let it rest for about 30 minutes at the room temperature.

View fullsize Fuzi 4.jpg
View fullsize Fuzi 5.jpg

Unwrap the dough and divide it into 4 pieces. Take one piece of the dough and cover the rest of the dough that you are not working with, with the cling film to prevent it from drying and cracking.

With your hands flatten the piece of the dough you are working with to a thickness of about 0.5cm and lightly dust with flour to prevent it from sticking.

Put the flattened piece of the dough through pasta machine on the widest setting. If you don't have pasta machine, use a rolling pin.

Fold the dough in half, keep rollers on the widest setting, and roll the dough again through the pasta machine.

Flour as needed to prevent sticking, and keep rolling pasta dough through pasta machine reducing the width of the rollers one setting at a time.

Continue rolling until pasta dough has been rolled through the thinnest setting.

At this stage you should end up with a very thin pasta (lasagna) sheet.

Place pasta sheet on a working surface.

View fullsize Fuzi 6.jpg
View fullsize Fuzi 7.jpg

With a sharp knife (I used pizza cutter wheel) cut the pasta sheet into 4cm (1½ inch) squares.

Take a wooden kebab stick (some prefer to use the handle of a wooden spoon) and place it on the edge of the pasta square.

View fullsize Fuzi 8.jpg
View fullsize Fuzi 9.jpg

Gently roll the stick to get a shape of a fuži, then remove the stick.

View fullsize Fuzi 10.jpg
View fullsize Fuzi 11.jpg

Repeat the process with other pasta squares (during this process try to avoid a lot of flour as this will prevent the opposite sides of the pasta square to stick together).

The idea behind shaping this pasta is that the opposite ends of the squares/diamonds are folded over each other, overlapping slightly, and sticking together forming a hollow shaped fuži.

Repeat the process with other pieces of dough.

Just a thought

Fuži can be made ahead of time and frozen. Make sure you place and spread the uncooked fuži in a single layer (so they do not stick together) on a floured baking tray (sheet), wooden board or similar. Place them in the freezer for at least 20-30 minutes, and once frozen separately, put them into freezing bags. When you want to cook them just drop them frozen directly into boiling salted water without defrosting them first.

You can also store already cooked fuži. Cook fresh pasta as soon you make it, drain it and place it in an airtight container, drizzle with a bit of oil and gave a container a little shake. Let it cool completely, cover with the lid, and store in the fridge for a couple of days (the pasta will turn slightly greyish in colour, do not get alarmed, this is perfectly normal).

You can also dry the pasta. Place freshly made fuži onto a floured baking sheet or wooden board and cover the shaped pasta with a clean kitchen towel and let them dry for a few days. Give fuži a gentle toss now and again. Store in a paper bag or in a jar.

November 10, 2023 /tina oblak
fresh pasta, egg based fresh pasta, handmade pasta, Handmade rolled pasta, pasta machine
Adriatic Recipe, All year round recipe, Celebratory dish, child friendly dish, child friendly meal, dinner, Easy recipe, Egg based pasta, entrée course, family friendly dish, family friendly meal, first course, first course dish, first course meal, Healthy, hearty dish, Istrian cuisine, Istrian dish, Istrian food, Istrian gastronomy, main course, main dish, Pantry, Pasta, Rustic dish, Slovenian cuisine, Slovenian food, Slovenian gastronomy, Starters, fresh pasta
Comment

Venetian style Rice and Peas Recipe (Risi e Bisi)

Beans and Sradines
September 20, 2023 by tina oblak in Adriatic Recipe, All year round recipe, Central European recipes, child friendly dish, child friendly meal, dinner, Easter, Easter dish, Easter recipes, Easy recipe, entrée course, family friendly dish, family friendly meal, festive dish, first course, first course dish, first course meal, healthy mael, hearty dish, Istrian cuisine, Istrian dish, Istrian food, Istrian gastronomy, main course, main dish, one pot meal, one pot meat recipe, recipe from Northern Ital, Risotti, Risotto, Rustic dish, simple recipe, Slovenian cuisine, Slovenian food, Slovenian gastronomy, Starters, supper, Vegetables, Venetian dish

This springtime speciality dish Risi e Bisi, meaning rice and peas in Venetian dialect, originated in the north-eastern region of Veneto in Italy. It is a dish that has been long disputed in the culinary world whether it is a very ‘runny’ risotto or a very ‘thick’ soup, and hence whether you should eat it with the fork or with a spoonBeing a risotto or a soup, this dish is absolutely delicious, incredibly satisfying and deeply rooted in the history of the region. It has such a profound cultural significance to the point of being celebrated by the Venetian poet Domenico Varagnolo:

To bless the holy spring,

which makes a garden a paradise,

all I need is a soup bowl,

a soup bowl of our own risi e bisi...

There, in hundreds of tiny little globes,

I savour a tender green jewel of the earth

scattered in a white sea of tender smiles.

Risi e Bisi was one of the key dishes, among a menu of more sophisticated foods and fine wines, that used to be served at the Doge's banquet (Doge is the highest official of the republic of Venice for more than 1,000 years, from the 8th to the 18th century, and symbol of the sovereignty of the Venetian state) on April 25th to mark and celebrate Venice's patron Saint, St. Mark, the Evangelist, since he is the saint who evangelised the people of the Veneto.

This traditional dish served on a feast day also marked the period approaching Easter, the end of winter, and the arrival of Spring, which provided the very first peas in the new season, renowned for being small, sweet and tender.

This dish has been very popular and very much loved along the Slovenian coastline where it is known as Rizi e Bizi. This should come as no surprise since this area is bordering with Italy and was once dominated and ruled by the majestic La Serenissima (‘The most Serene Republic of Venice’) which left behind a significant “foodprint” in the region.

A pea and rice dish is a very family friendly meal and was cooked by my mother on a regular basis when the peas where in season and at their best. Shelling the peas was worth the effort since the final dish is divine in its simplicity and humbleness.

This recipe has remained one of the top favourites among family and friends. Try to make it and you will understand what the fuss is all about and why the Doge requested it every year at his palace...

This is not the dish I would normally cook in springtime as peas are a long way off in the UK where I currently live, but are widely available a bit later in the season. It is well worth waiting for them, and you will end up with unbeatable (late) summer or early autumn supper!

Recipe

Ingredients

Serves 4

  • 1 kg fresh young peas in their pods, shelled (can use 400g of frozen petits pois)

  • 1.2 litres good vegetable, chicken or beef stock

  • 4 Tbsp olive oil

  • 1 small onion (about 100g), peeled and finely chopped

  • 50-100g pancetta (salt-cured pork belly) or ham, cubed

  • 250g risotto rice like Vialone Nano, Arborio or Carnaroli

  • 40-50g Parmiggiano Reggiano or Grana Padano cheese, freshly finely grated

  • small handful of fresh flat leaf parsley leaves (about 15g), finely chopped and some extra for garnish

  • a knob of butter, optional

  • sea salt

  • black pepper

Method

Before starting to make the risotto have your boiling hot stock ready to hand for later.

Pour the oil in a low-sided pan, add finely chopped onions and cubed pancetta.

Cook for a few minutes until the onions become soft and translucent and the pancetta begins to release its fat.

View fullsize Risi e Bisi 5.jpg
View fullsize Risi e Bisi 6.jpg

Add the peas and the chopped parsley, sauté for a few minutes, stirring constantly and making sure that the mixture does not start to stick to the bottom of the pan.

Season with black pepper and add roughly a glass of stock.

Cook the mixture over a fairly high heat so that the liquid evaporates quickly.

View fullsize Risi e Bisi 8.jpg
View fullsize Risi e Bisi 9.jpg

Add more stock and the rice. Cook, stirring constantly to prevent sticking to the pan, until the first amount of liquid is absorbed.

Start gradually adding ladles of hot stock, one at a time, allowing the liquid to be absorbed before adding more.

View fullsize Risi e Bisi 10.jpg
View fullsize Risi e Bisi 11.jpg

Cook on a medium heat, stirring almost constantly, until the rice is cooked and ready, and the mixture has a distinctly runny consistency.

Finish the dish with a typical Italian “mantecare phase” (when the rice is cooked, remove the saucepan from the heat, add a knob of butter (if using), and finely grated Parmiggiano Reggiano or Grana Padano cheese. Stir quite vigorously with a wooden spoon to obtain a creamy consistency).

Taste and adjust the seasoning with black pepper (if using) and the sea salt, but the latter might not be necessary since the stocks from the stores, generally speaking, pancetta and the cheese contain salt already.

View fullsize Risi e Bisi 13.jpg
View fullsize Risi e Bisi 14.jpg

Serve immediately while still hot and distinctly runny in consistency.

Ladle onto the plates and sprinkle with some roughly chopped fresh parsley to garnish (optional).

Just a thought

A variation of this recipe, which further refines the dish, involves the use of the empty pea pods which get washed, placed in pan with a plenty of cold water and boiled for roughly an hour.

Then they get drained in a colander and the inside of the shells get scraped with the spoon obtaining the green paste which is added to the onion, pancetta, pea and parsley mixture.

I have not been familiar with this process and made aware that this is only done if the peas are organically produced.

Apparently, all the pesticides residues concentrate on the inside of the pea shell and the farmers are very keen on the use of the chemicals as peas are particularly susceptible to pests.

Wine suggestion

Soave Classico DOC "Vin Soave" 2022 - Inama

September 20, 2023 /tina oblak
Risi e bisi, Rizi in bizi, Rice and Peas, fresh young peas, peas in pods, frozen petits pois, pancetta, salt-cured pork belly, ham, risotto, risotto rice, pea risotto, Vialone Nano rice, Arborio rice, Carnaroli rice, Parmiggiano Reggiano cheese, Grana Padano cheese
Adriatic Recipe, All year round recipe, Central European recipes, child friendly dish, child friendly meal, dinner, Easter, Easter dish, Easter recipes, Easy recipe, entrée course, family friendly dish, family friendly meal, festive dish, first course, first course dish, first course meal, healthy mael, hearty dish, Istrian cuisine, Istrian dish, Istrian food, Istrian gastronomy, main course, main dish, one pot meal, one pot meat recipe, recipe from Northern Ital, Risotti, Risotto, Rustic dish, simple recipe, Slovenian cuisine, Slovenian food, Slovenian gastronomy, Starters, supper, Vegetables, Venetian dish
Comment

My Mother's Marble Chocolate and Vanilla Ring Cake Recipe

Beans and Sardines
July 06, 2023 by tina oblak in Adriatic Recipe, All year round recipe, baking, breakfast, brunch, Central Europe cakes, Central European recipes, dessert, Eastern Europe cakes, Eastern European recipes, easy baking, easy cakes, Easy recipe, home baking, Istrian cuisine, Istrian dish, Istrian food, Istrian gastronomy, Mitteleuropean cuisine, Mitteleuropean recipes, Mitteleuropean food, pudding, Rustic dish, simple recipe, Slovenian cuisine, Slovenian food, Slovenian gastronomy, Snacks, Sweet Things

Perhaps, you know the old adage, which actually goes back to Tudor times, ‘You can’t have your cake and eat it (too)?’ Well, with this recipe – you can! All your baking dilemmas, should I go for a chocolate cake this time, or for a vanilla one, are solved with this one recipe – you can have both in one cake!

This chocolate and vanilla sponge cake is a classic childhood sweet treat. It is moist with a soft and fluffy texture, it looks pretty, and is still elegant, since the light and dark batter is blended lightly together giving it a marble appearance, and so, hence its name, marble cake, or it is sometimes called a zebra cake, due to its zebra-striped pattern (skunks are also striped, but I supposed that isn’t a very appealing name for a cake). It is also known as a ring cake or a Bundt cake, especially in the United States.

So, this cake delivers on appearance and flavour every single time, and if you want to impress your family and friends, this is the cake to go for. It is very easy to make and you can whizz it up in no time.

It originated in Germany, where it is still very popular, from a Kugelhopf, a two-coloured sweet yeast bread.

This impressive cake has been frequently baked in Austrian households and other European countries, including in Slovenia (Šarkelj) where it represents one of the most frequently baked weekend sweet treats and it is enjoyed for breakfast as well, there is no wrong time to eat it!

This was a regular bake in my house when I was a small girl, all you need is a few simple ingredients and a few simple steps to follow, I promise you, you will think twice before reaching out for the store-bought version, and here it is, my mother's recipe.

Recipe

Ingredients

  • 4 medium eggs, room temperature

  • 250g caster sugar

  • 1 Tsp vanilla extract

  • 100ml milk, room temperature

  • 100ml sunflower oil, room temperature

  • 250g all purpose white flour (plain flour), sifted

  • 16g baking powder

  • 2 Tbsp cocoa powder, sifted

  • dusting sugar/vanilla powder sugar for dusting, optional

Method

Preheat the oven to 180°C static or equivalent.

Grease well with butter or oil a ring mould or a bundt cake tin. Make sure you cover every nook and cranny (alternatively you can use a 20cm cake tin or a 900g loaf tin, grease and line with baking parchment)

Dust with flour, shake off and tip out the excess.

View fullsize Marble Cake 2.jpg
View fullsize Marble Cake 4.jpg

Put in the mixing bowl the eggs and the sugar, and beat well until the mixture becomes golden pale in colour.

Add the milk, oil and vanilla extract, mix well.

View fullsize Marble Cake 5.jpg
View fullsize Marble Cake 6.jpg

Start adding, one spoonful at the time of sifted flour together with the baking powder.

View fullsize Marble Cake 7.jpg
View fullsize Marble Cake 8.jpg

Divide the batter, spoon half of the batter in a separate bowl.

Add in one half of the batter sifted cocoa and mix well.

View fullsize Marble Cake 10.jpg
View fullsize Marble Cake 11.jpg

Pour the white mixture into the base of the prepared ring mould first. Then pour the chocolate mixture on top.

View fullsize Marble Cake 12.jpg
View fullsize Marble Cake 13.jpg

Gently swirl a little with the knife.

Bake for about 35 minutes or until the cake has shrunk from the sides of the tin and is well risen, the top of the cake should ‘spring back’ when lightly pressed with your fingertips.

Leave to cool in the tin for a few minutes.

Turn out the cake and finish cooling on a wire rack.

Dust with icing sugar or vanilla icing sugar and serve.

July 06, 2023 /tina oblak
chocolate and vanilla ring cake, marble chocolate and vanilla cake, marble cake, zebra cake, Bundt cake, chocolate and vanilla Bundt cake, chocolate and vanilla zebra cake
Adriatic Recipe, All year round recipe, baking, breakfast, brunch, Central Europe cakes, Central European recipes, dessert, Eastern Europe cakes, Eastern European recipes, easy baking, easy cakes, Easy recipe, home baking, Istrian cuisine, Istrian dish, Istrian food, Istrian gastronomy, Mitteleuropean cuisine, Mitteleuropean recipes, Mitteleuropean food, pudding, Rustic dish, simple recipe, Slovenian cuisine, Slovenian food, Slovenian gastronomy, Snacks, Sweet Things
Comment

Sweet Dough Yeasted Rings (Busolai) Recipe

Beans and Sardines
May 31, 2023 by tina oblak in All year round recipe, baked dish, baking, biscuits, breakfast, brunch, celebratory desserts, Celebratory dish, cookies, dessert, Easter, Easter recipes, easy baking, Easy recipe, Enriched dough, festive bakes, festive dessert, festive sweet things, home baking, Istrian cuisine, Istrian food, Istrian gastronomy, recipe from Northern Ital, simple recipe, Slovenian cuisine, Slovenian Easter Sweet Br, Slovenian food, Slovenian gastronomy, Snacks, Sweet bread, sweet course, sweet nibbles, Sweet Things

Busolai (also spelled Bussolai or Buzolai) are sweet treats that originate in the region of Veneto in north-east Italy. They are characteristic of Venice, and in particular on the fishermen island of Burano, hence these baked delights are also called Buranei (Burano buiscuits).

They are known as biscuits as they have the consistency of a biscuit, the dough does not contain the yeast, and it can be shaped into a ring or like the letter “S” (not a coincidence, since the S-shaped form of the biscuits makes it easier to dunk into milk or sweet wines).

They used to be only prepared and enjoyed during Easter festivities but nowadays almost every bakery on the island of Burano and in Venice sells them all year round.

Apparently, the letter from the Government of Venice, which still exists, has been found in the national archives of Italy, warning the nuns of the convent of St. Matthew on an island in the Venetian Lagoon that they should cut the number of Bussolai enjoyed during Easter festivities or otherwise they would encounter financial troubles.

The recipe for these biscuits, however, travelled further east, through the region of Friuli, and reached the city of Trieste (in Italy), and the land of Slovenian Istria across the “border”, where the recipe took a slightly different turn

The yeast was added to the dough making these baked goodies resemble more like soft doughnuts than the cookies, in fact, in the area they are described by the locals as sweet bread rings (obročki iz sladkega kruha).

As soon as they were freshly baked, it was a custom of some locals to spoon a bit of rum or grappa over them and sprinkle them with extra sugar.

Being like biscuits or doughnuts, they have one unmistakable characteristic in common, they have a hole in the centre, called “busa” in Venetian dialect”, hence their name, Busolai.

To make things more confusing in terms of naming this sweet treat, busolai are sometimes known as “kolach”, name originated from Old Slavonic word kolo meaning “wheel” or “circle”.

Once again, they were baked during festivities, especially during Easter since a great percentage of eggs are used in the recipe (egg representing the symbol of rebirth and resurrection).

These sweet baked rings were traditionally very popular during Confirmation (a rite in the Christian Church, at which baptized persons affirm their Christian belief, and are admitted as a full member of the Church).

Busolai were made into a garland with the use of a simple string and the godfather would gift these to his god child. This is described by a very well know and famous proverb in local dialect “Chi ga santoli ga buzzolai” (only the one who has a godfather will get busolai).

This tradition would be furthermore highlighted by another proverb in the local dialect “Bezi, basi e bussolai no i xe boni se no I xe assai,” which translates in standard Italian as (Soldi, baci e bussolai non sono buoni se non sono assai), and in English means that money, kisses and bussolai are no good if not given in abundance.

My husband’s uncle (known as zio Livio) with a garland of bussolai received on his Confirmation day by his godfather

This custom used to be very popular in Slovenian Istra, and almost each village would have a slightly different recipe for it. I am sharing with you my nona's recipe from the village of Marezige, a few kilometres from a coastal town of Koper where there used to be only one baker in town, at the time when my nona was a little girl, selling busolai, run by a family of Venetian origin.

Very sadly, there are no bakers selling busolai anymore, moreover, the custom of godfathers gifting the children with busolai has completely died out, and younger generations have never seen or heard of busolai.

Only a bunch of elderly people still alive today will tell you, with nostalgic voices and tearful eyes, with touching and emotional stories about their Confirmation Day, and they very much anticipated sugar coated busola, the only gift they received, if they were lucky enough.

Recipe

Ingredients

  • 500g regular plain flour

  • 1 cube of fresh (brewer's) yeast 42g or 14g of dry yeast

  • 100g unsalted butter, melted

  • 150g sugar

  • 2 medium eggs, lightly beaten

  • 2 egg yolks, lightly beaten

  • 100ml tepid lukewarm milk (semi skimmed or full fat)

  • 2 Tbsp dark rum or grappa (alcoholic, fragrant grape-based pomace brandy of Italian origin)

  • finely grated lemon zest of 1 unwaxed lemon

  • pinch of sea salt

  • 1 small egg, lightly beaten, for glazing (can use lightly beaten egg whites, the busolai will result lighter in colour after baking)

Method

In a small bowl place dry or fresh yeast (if using fresh yeast slightly brake it down into smaller pieces with your fingers).

Add 100ml of lukewarm milk and ¼ tsp of caster sugar.

Gently stir and leave for about 20 minutes or until gentle bubbles form on the surface.

In a separate mixing bowl put the eggs, egg yolks and beat them gently.

Add melted butter, sugar, rum or grappa, grated lemon zest and a pinch of sea salt, and with the fork mix well all the ingredients.

In a large mixing bowl put the flour, add egg mixture and the yeast mixture.

Combine well all the ingredients with the wooden spoon or spatula to start with. When all the ingredients are well combined transfer the mixture onto a clean, floured surface.

Work with your hands and knead the dough for about 10-15 minutes, stretching it and folding it, adding a little flour at the time if the dough is too sticky.

Knead the dough until it becomes smooth, soft, shiny and elastic (the dough should not stick to the surface or your hands).

Shape the dough in a ball, place it back into a previously oiled mixing bowl.

Cover tightly with cling film, leave to rest and prove in a draft free space at a room temperature for 3 hours.

After this time your dough should be at least double in size.

Line 2 large flat baking trays with baking parchment.

Take the dough out of the mixing bowl, place it on a working surface, knock the air out of the dough and shape it into a log.

View fullsize Busolai 3.jpg
View fullsize Busolai 4.jpg

Divide the dough into more or less equal parts (10-12 parts each weighting roughly 100g).

Shape each piece of the dough into a sausage and form a ring, pinching the ends together (make sure you are generous with the size of the ring, during the baking the busalai rise and stretch quite a bit, if the whole is too small, after the baking you will end up with busolai that have almost a non-existing hole, not that this is really a problem).

View fullsize Busolai 5.jpg
View fullsize Busolai 6.jpg

Place your ring-shaped sweet dough onto a tray.

Cover with clean tea towel and leave to prove for the second time for about 30 minutes.

Gently brush the sweet dough rings with lightly beaten egg or egg whites and sprinkle the top of the rings with sugar.

View fullsize Busolai 9.jpg
View fullsize Busolai 12.jpg

Preheat the oven to 180°C and bake for 20 to25 minutes or until well risen and deep golden brown (they will be slightly lighter in colour if you brush them with egg whites).

Remove from the oven and transfer the busolai to a wire rack to cool completely.

Busolai are best eaten within a few hours.

You can easily freeze them, just make sure you freeze them as soon as they are completely cool.

Wine suggestion

Vin Santo di Torgiano DOC 2010 - Lungarotti

May 31, 2023 /tina oblak
sweet dough yeasted rings, Busolai, Bussolai, Buzolai, Istrian Busolai, obročki iz sladkega kruha, Buranei, Buranei buiscuits, Venitian Buiscuits, sweet dough, sweet bread, Cinfirmation sweet treats
All year round recipe, baked dish, baking, biscuits, breakfast, brunch, celebratory desserts, Celebratory dish, cookies, dessert, Easter, Easter recipes, easy baking, Easy recipe, Enriched dough, festive bakes, festive dessert, festive sweet things, home baking, Istrian cuisine, Istrian food, Istrian gastronomy, recipe from Northern Ital, simple recipe, Slovenian cuisine, Slovenian Easter Sweet Br, Slovenian food, Slovenian gastronomy, Snacks, Sweet bread, sweet course, sweet nibbles, Sweet Things
Comment

Austrian Style (no mayo) Potato Salad Recipe

Beans and Sardines
May 24, 2023 by tina oblak in Adriatic Recipe, All year round recipe, Appetizers, Austrian inspired dishes, Central European recipes, child friendly dish, child friendly meal, dinner, Eastern European dishes, Eastern European recipes, Easy recipe, family friendly dish, family friendly meal, Healthy, healthy mael, Istrian cuisine, Istrian dish, Istrian food, Istrian gastronomy, main vegetarian course, main vegetarian dish, main vegetarian meal, Mitteleuropean cuisine, Mitteleuropean dish, Mitteleuropean food, Mitteleuropean recipes, Root vegetables, Rustic dish, Salads, Side Dishes, simple recipe, Slovenian cuisine, Slovenian food, Slovenian gastronomy, supper, Vegan, Vegetable side dish, Vegetables, Vegetarian

This recipe for Austrian style potato salad uses sliced boiled potatoes and a simple dressing made with olive oil and vinegar and no use of mayonnaise, which makes it very light and fresh.

It can be enjoyed as a main dish and it is most commonly pared with a famous Wiener schnitzel and breaded fillets of fish.

Great dish to add into your picnic baskets and great side dish to barbecued meat, fish and vegetables, and a great addition to any selection on a buffet table.

This potato salad is best made ahead allowing the potatoes to soak and absorb the light vinaigrette, this makes it very juicy and succulent.

The beauty of this salad is that it can be enjoyed and eaten warm, at a room temperature or chilled in the fridge (perfect for hot summer days).

In Slovenia, up and down the country this is a dish (Krompirjeva Solata) that is prepared in the households and canteen on a regular basis and sometimes found in local family run restaurants.

I am sharing here the recipe for this humble and very tasty potato salad that has been prepared and enjoyed for generations in my family.

To this basic potato salad you can add hard boiled eggs and other types of raw vegetables, this is not however the way it is traditionally eaten.

Recipe

Ingredients

  • 500g waxy potatoes (like new or baby potatoes, Jersey Royal, Charlotte and similar, they have smooth and dense flesh that holds its shape when cooked; for this recipe I used miniature potatoes)

  • 2 Tbsp extra virgin olive oil

  • 50ml white wine vinegar (can use cider vinegar)

  • onion (about 30g or to taste), peeled and finely chopped, optional

  • fresh flat leaf parsley, chopped roughly or finely to your preference

  • 100ml cold water

  • sea salt

  • black pepper

Method

Wash the potatoes, place them into a saucepan and cover with cold water. Bring to boil, cover with a lid and simmer until the potatoes are fully cooked and tender (for small, baby potatoes it should take between 8-12 minutes).

Alternatively, you can cook the potatoes with your preferred method like steaming or microwaving.

Drain well and peel the potatoes when still warm (as soon as you can handle them).

Slice them and transfer into a serving salad dish.

Pour over cold water and let the potatoes cool completely (pouring cold water over warm potatoes stops the potatoes absorb too much dressing, therefore the potato salad stays nice and moist).

View fullsize Austrian Style potato salad 2.jpg
View fullsize Austrian Style potato salad 3.jpg

While the potatoes are cooling, prepare the dressing.

In a small bowl pour olive oil, vinegar, sea salt, black pepper and whisk well. Add finely chopped onions.

Pour the dressing over sliced potatoes and mix very gently so the potatoes do not break completely (some will break, and this is normal).

View fullsize Austrian Style potato salad 4.jpg
View fullsize Austrian Style potato salad 5.jpg

Taste and adjust the seasoning, sprinkle with fresh parsley and serve.

May 24, 2023 /tina oblak
Potato Salad, potatoes, potato salad with simple dressing, potato salad with simple vinaigrette, Krompirjeva solata, Insalata di patate, boiled potatoes, baby potatoes, Jersey Royal potatoes, Charlotte potatoes
Adriatic Recipe, All year round recipe, Appetizers, Austrian inspired dishes, Central European recipes, child friendly dish, child friendly meal, dinner, Eastern European dishes, Eastern European recipes, Easy recipe, family friendly dish, family friendly meal, Healthy, healthy mael, Istrian cuisine, Istrian dish, Istrian food, Istrian gastronomy, main vegetarian course, main vegetarian dish, main vegetarian meal, Mitteleuropean cuisine, Mitteleuropean dish, Mitteleuropean food, Mitteleuropean recipes, Root vegetables, Rustic dish, Salads, Side Dishes, simple recipe, Slovenian cuisine, Slovenian food, Slovenian gastronomy, supper, Vegan, Vegetable side dish, Vegetables, Vegetarian
Comment

Mackerel in a Pan with Olive oil, Lemon juice and Fresh parsley Recipe

Beans and Sardines
May 11, 2023 by tina oblak in Adriatic Recipe, All year round recipe, Appetizers, brunch, child friendly dish, child friendly meal, dinner, family friendly dish, family friendly meal, Fish & Seefood, fish starter, Healthy, healthy mael, Istrian cuisine, Istrian dish, Istrian food, Istrian gastronomy, light fish course, light meal, main course, main dish, main fish course, main fish meal, Nutritious, Nutritious dish, one pot meal, simple recipe, Slovenian cuisine, Slovenian food, Slovenian gastronomy, supper

Mackerel, or any other type of fish, cooked in a pan with olive oil, fresh parsley, lemon juice and a splash of water is probably the simplest fish-based recipe, and it is absolutely perfect for all of those who are slightly intimidated and generally not too confident cooking with fish.

It is a no-fuss dish and a great choice for a quick and uncomplicated rustic lunch or dinner, it is very nutritious and healthy as it contains beneficial fats (omega-3 fatty acids).

This dish is of Venetian influence and the success of it lies in seasoning well the fish and using the freshest and best quality ingredients you can find and afford to buy.

Mackerel is an inexpensive, affordable, massively underrated fish, and far too often overlooked by the shoppers, maybe perhaps it is an oily fish that carries a slightly stronger and distinctive flavours compared to some other fish.

In this one pan recipe the fresh and citrusy ingredients like parsley and lemon juice, cut through the richness, “oiliness” and “fishiness” of the mackerel, and when combined with the juices released from the fish during the cooking process. This combination of the flavours produces the most stunning plate of food.

I am sharing here this very simple family recipe, which is an absolute winner. Fish cooked this way has been prepared and loved in my family for generations using different types of fish depending on what was found fresh in the fish market on the day.

Recipe

Ingredients

Serves 4

  • 1kg fresh mackerel, gutted, cleaned, washed, and dried (the fishmonger will be happy to do this for you, alternatively you can use the fillets).

    For this recipe you can easily replace mackerel for other types of fish or fillets of your choice like sea bream, sea bass, sardines, trout, and monkfish to name just a few.

  • 4 Tbsp extra virgin olive oil

  • a handful of fresh flat leaf parsley (about10g, plus some extra for serving), finely chopped

  • lemon juice of ½ lemon or to taste

  • sea salt

  • black pepper

Method

Season the outside and the inside (the cavity) of the mackerel with sea salt.

Put the olive oil in a pan (big enough to accommodate the mackerel).

Place the whole fish or the fillets in a pan in a single layer.

Sprinkle with fresh parsley, add the lemon juice, a splash of water and black pepper to taste (optional).

Cover with the lid and cook the fish on a gentle heat for about 25 minutes (if using the fillets cooking time will reduce to about 15 minutes).

View fullsize Mackerel with lemon juice, olive oil and parsley 2.jpg
View fullsize Mackerel with lemon juice, olive oil and parsley 3.jpg

To serve, lay the whole mackerel, or the fillets, on a plate and pour the juices they have released during the cooking process, over them.

Best enjoyed warm with some crunchy rustic bread, boiled potatoes, cooked rice, grilled polenta, and a side salad of your choice.

Wine suggestion

Venezia Giulia Bianco Sivi IGT 2018 - Dario Princic

May 11, 2023 /tina oblak
whole mackerel, whole fresh mackerel, fresk mackerel fillets, trout, sea bass, sea bream, monkfish, lemon juice, fresh parsley, skuša
Adriatic Recipe, All year round recipe, Appetizers, brunch, child friendly dish, child friendly meal, dinner, family friendly dish, family friendly meal, Fish & Seefood, fish starter, Healthy, healthy mael, Istrian cuisine, Istrian dish, Istrian food, Istrian gastronomy, light fish course, light meal, main course, main dish, main fish course, main fish meal, Nutritious, Nutritious dish, one pot meal, simple recipe, Slovenian cuisine, Slovenian food, Slovenian gastronomy, supper
Comment

Grilled Polenta Recipe

Beans and Sardines
May 04, 2023 by tina oblak in Adriatic Recipe, All year round recipe, Appetizers, bite-sized nibbles, breakfast, brunch, Canapés, child friendly dish, child friendly meal, dinner, Easy recipe, family friendly dish, family friendly meal, Finger food, Healthy, healthy mael, hearty dish, Istrian cuisine, Istrian dish, Istrian food, Istrian gastronomy, light meal, Nutritious, Nutritious dish, recipe from Northern Ital, Rustic dish, savory nibbles, Side Dishes, simple recipe, Slovenian cuisine, Slovenian food, Slovenian gastronomy, Small bites, Snacks, supper, Vegan, Vegetarian, Venetian dish

Polenta, despite being offered and marketed as one of the fairly recent gastronomic fashions in high end restaurants around the world, has incredibly humble origins, it represents a staple peasant food that fed the poorest of the poor.

Grilled polenta slices taste great, they are crispy on the outside, soft on the inside, and will have a very light smoky flavour when barbecued, they are very easy to make and incredibly practical and convenient, as polenta mixture can be prepared ahead of time.

Polenta is incredibly versatile, in fact, there is nothing really that does not go with grilled polenta, it is one of the best side dishes you can pick to go with your grilled or barbecued meat, fish or vegetables.

Grilled polenta slices topped with vegetables (sautéed mushrooms, peppers, courgettes), different types of cheeses, cured meats and spreads make the most sophisticated appetizers and finger food to be served with drinks.

Polenta in Slovenin Istra is traditionally enjoyed with different meat, fish or bean stews, and Venetian style liver. What is wonderful is polenta with creamed salted cod, and even a simple fried egg can accompany humble polenta.

Polenta used to be also eaten for breakfast, however, this gastronomic ritual from the past has nowadays almost disappeared. Only a handful of elderly people would still have it as the first meal of the day, perhaps as a nostalgic reminder of their youth.

My nona told me that cooled and set polenta would be cut into smaller pieces, put into a bowl, then some milk would be added, and a pinch of sea salt to counterpart the natural sweetness of the milk. This provided a very nourishing morning meal. I guess it was like an old-fashioned concept of bowl of cereal with milk.

Polenta is also incredibly popular in the neighbouring region of Friuli, in Italy, where maize flour cooked in milk, speciality from the region called Suf, used to be eaten either for breakfast or as an evening meal, this dish provided a nutritious and easily digested plate of food.

Nowadays, polenta, being soft cooked, hard cooked or grilled, it is still very much loved and is a recurrently cooked dish in almost every household for unpretentious mid-week meals, or during festivities. Its popularity has never decreased and reflects a true identity of the local people and is deeply rooted in the gastronomic traditions of the area.

I am sharing here the recipe for this polenta dish where hot cooked runny polenta would be traditionally poured on round wooden boards, and not into loaf tins like I do for practical reasons. When polenta was completely cooled and set so it becomes firm it would then be cut into strips or random shaped chunks, and then quickly pan fried (only left over polenta used to be grilled).

Recipe

Ingredients

  • 250g yellow or white polenta (instant polenta) maize flour

  • 1 litre of water

  • sea salt

Method

Before you start cooking the polenta prepare the loaf tin. With a brush (or just with your hands and fingers) slightly oil the loaf tin, this will prevent polenta from sticking.

Pour the water into a pan and bring to boil (to speed up the process you can use hot boiling water directly from the kettle).

View fullsize Grilled polenta 2.jpg
View fullsize Grilled polenta 4.jpg

Lower the heat and gradually start slowly pouring the polenta into a hot water, whisk constantly.

Cook and whisk until the mixture begins to thicken and becomes smooth in consistency with no lumps. Follow the instruction how long to cook the polenta (timing may vary a bit, mine took about 10 minutes).

During the cooking process polenta mixture will create air bubbles that will pop (a bit like tiny volcanos erupting, be careful not to burn yourself).

Taste and adjust the seasoning with sea salt.

View fullsize Grilled polenta 6.jpg
View fullsize Grilled polenta 9.jpg

Pour cooked polenta into a loaf tin, smooth the top with the back of the spatula or a wooden spoon. (you can pour the cooked polenta into a baking tray, previously lined with backing parchment, spread it and flatten it, when the polenta is completely cooled, cut it in whatever shape you like, strips, triangles, rounds or use cookie cutters of your choice).

Allow the polenta to set and cool completely at a room temperature or put it in the fridge to speed up the process.

View fullsize Grilled polenta 10.jpg
View fullsize Grilled polenta 11.jpg

Tip the polenta onto a chopping board (it should be completely moulded into the shape of your loaf tin).

Cut the polenta loaf into 1-1.5cm (about ½ inch) slices.

View fullsize Grilled polenta 12.jpg
View fullsize Grilled polenta 13.jpg

Preheat a non-stick griddled pan (indoor grill pan) or a regular non-stick frying pan over a medium high heat for a few minutes.Place polenta slices in the griddled pan and charcoal grill on a fairly high heat for a few minutes. Do not move the polenta around., let the polenta slices sizzle in the pan undisturbed (do not overcrowd the pan and work in batches).

Turn the slices the other side and grill for another few minutes. Be patient with this process, only turn and flip the slices after you have tested the edges, flip the slices when the polenta easily lifts off the grill pan.

Polenta slices should have grill marks when fully grilled and have crispy outside layer.

Serve hot immediately.

View fullsize Grilled polenta 14.jpg
View fullsize Grilled polenta 18.jpg

Just a thought

This is a very convenient dish, you can make polenta mixture about up to two days before you actually need to grill it.

Although not done traditionally, you can cook the polenta with a stock of your choice for extra flavour and you can also add some grated cheese of your choice to a hot polenta mixture.

May 04, 2023 /tina oblak
polenta grigliata, polenta, pan fried polenta, barbecued polenta, maize flour, white polenta, instant polenta, cucina povera
Adriatic Recipe, All year round recipe, Appetizers, bite-sized nibbles, breakfast, brunch, Canapés, child friendly dish, child friendly meal, dinner, Easy recipe, family friendly dish, family friendly meal, Finger food, Healthy, healthy mael, hearty dish, Istrian cuisine, Istrian dish, Istrian food, Istrian gastronomy, light meal, Nutritious, Nutritious dish, recipe from Northern Ital, Rustic dish, savory nibbles, Side Dishes, simple recipe, Slovenian cuisine, Slovenian food, Slovenian gastronomy, Small bites, Snacks, supper, Vegan, Vegetarian, Venetian dish
Comment
  • Newer
  • Older