Beans and Sardines

  • Home
  • About
  • Recipe of the week
  • Recipes
  • Wines
  • Contact

Fuži – traditional handmade Istrian fresh pasta Recipe

Beans and Sardines
November 10, 2023 by tina oblak in Adriatic Recipe, All year round recipe, Celebratory dish, child friendly dish, child friendly meal, dinner, Easy recipe, Egg based pasta, entrée course, family friendly dish, family friendly meal, first course, first course dish, first course meal, Healthy, hearty dish, Istrian cuisine, Istrian dish, Istrian food, Istrian gastronomy, main course, main dish, Pantry, Pasta, Rustic dish, Slovenian cuisine, Slovenian food, Slovenian gastronomy, Starters, fresh pasta

Fuži (together with bleki and pljukanci) is a traditional and very well renowned type of Istrian fresh pasta from Slovenia and Croatia. It uses only two ingredients, it is easy and fun to make, and its shape is really beautiful.

Traditionally it is homemade, and hand rolled with a wooden rolling pin, but these days pasta machine is frequently used for practical reasons.

The origin of the name fuži comes from Latin word fusus, meaning a spindle.

This recipe for fresh pasta is great for the beginners, as there really is nothing daunting about making it, and children love getting involved too.

Generally, when we think of pasta, we have in mind a quick mid-week meal. This type of pasta, however, has been usually made in the households during festivities, holidays or as a Sunday lunch, and it has been traditionally served with chicken or rabbit goulash and sautéed sauerkraut.

It is also very commonly enjoyed with venison stew, braised pheasant, classic beef goulash, asparagus (in Istria wild asparagus when in season), cured ham or pancetta cream-based sauce, mushroom creamy sauce, and of course, the Istrian luxurious white truffle creamy sauce, popular in the autumn.

This pasta is also very delicious paired with any vegetarian and fish-based sauces or any other sauce you might like (different types of pesto).

I am sharing here the recipe for fuži, a fresh homemade pasta that holds a very special place in Istrian gastronomy, and it is frequently found in local restaurants.

Ingredients

Serves 2-4

  • 300g plain (all purpose) white flour

  • 3 medium eggs

You will also need a wooden kebab stick, or a wooden spoon, to shape the fuži.

Method

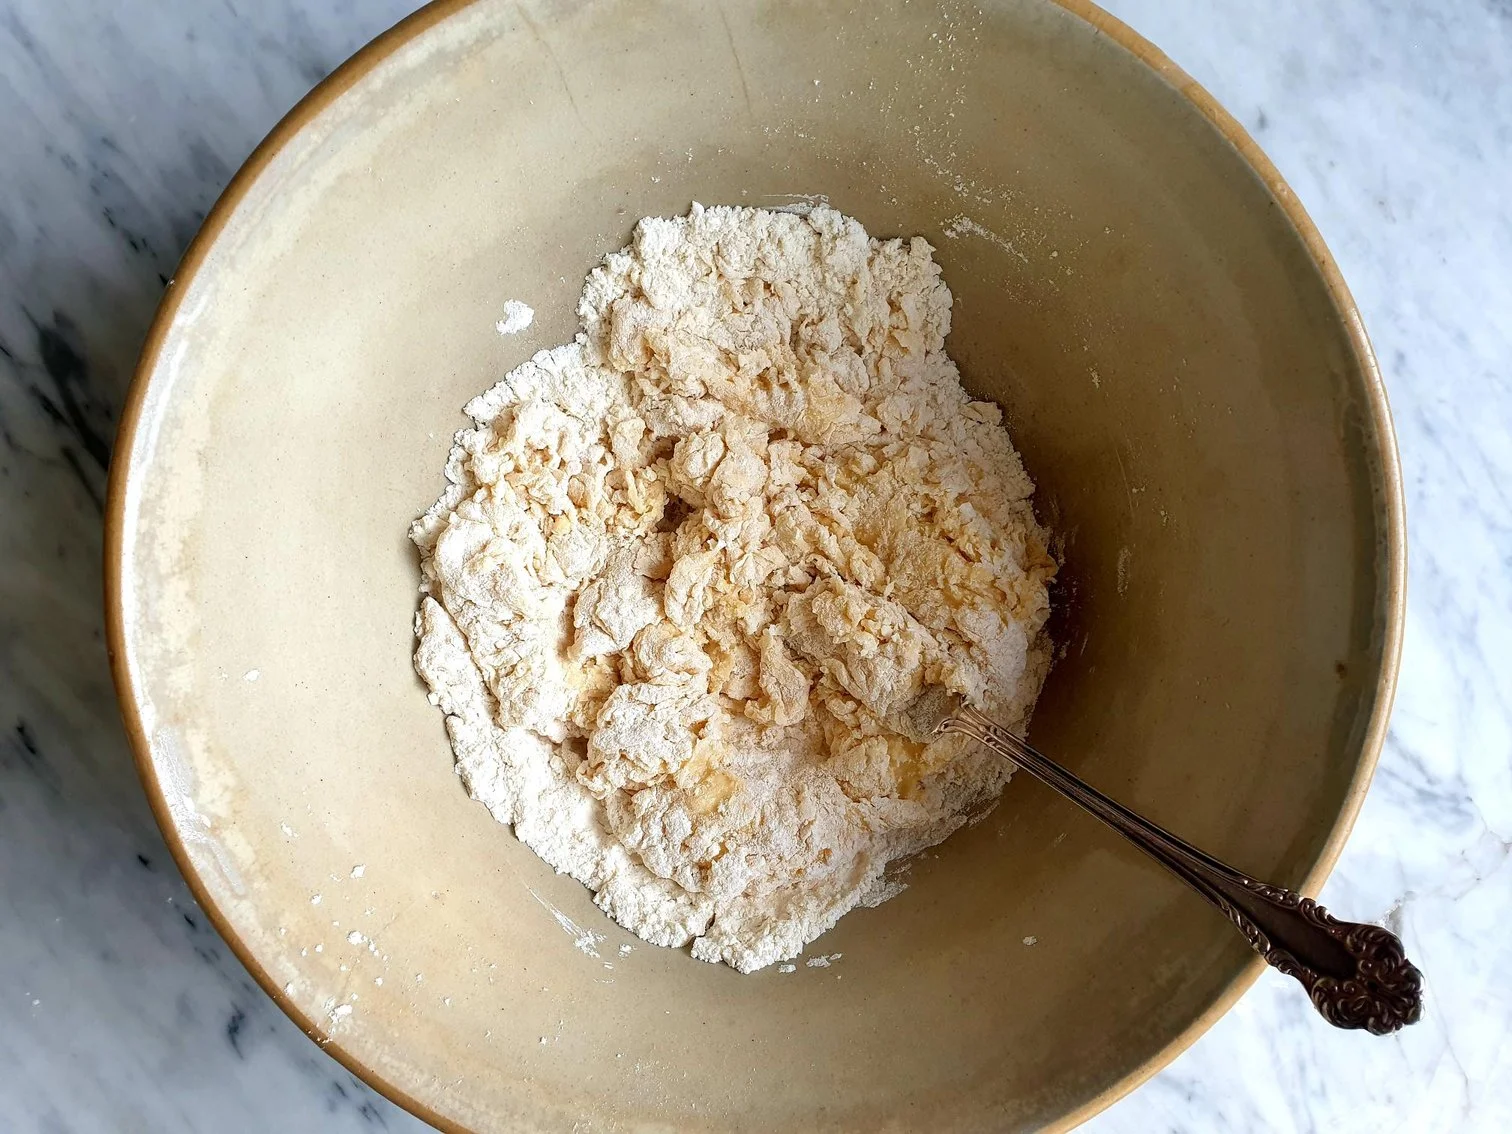
Place the flour directly on a working surface, wooden board or a mixing bowl, and make a well in the centre.

Crack the eggs directly into a well.

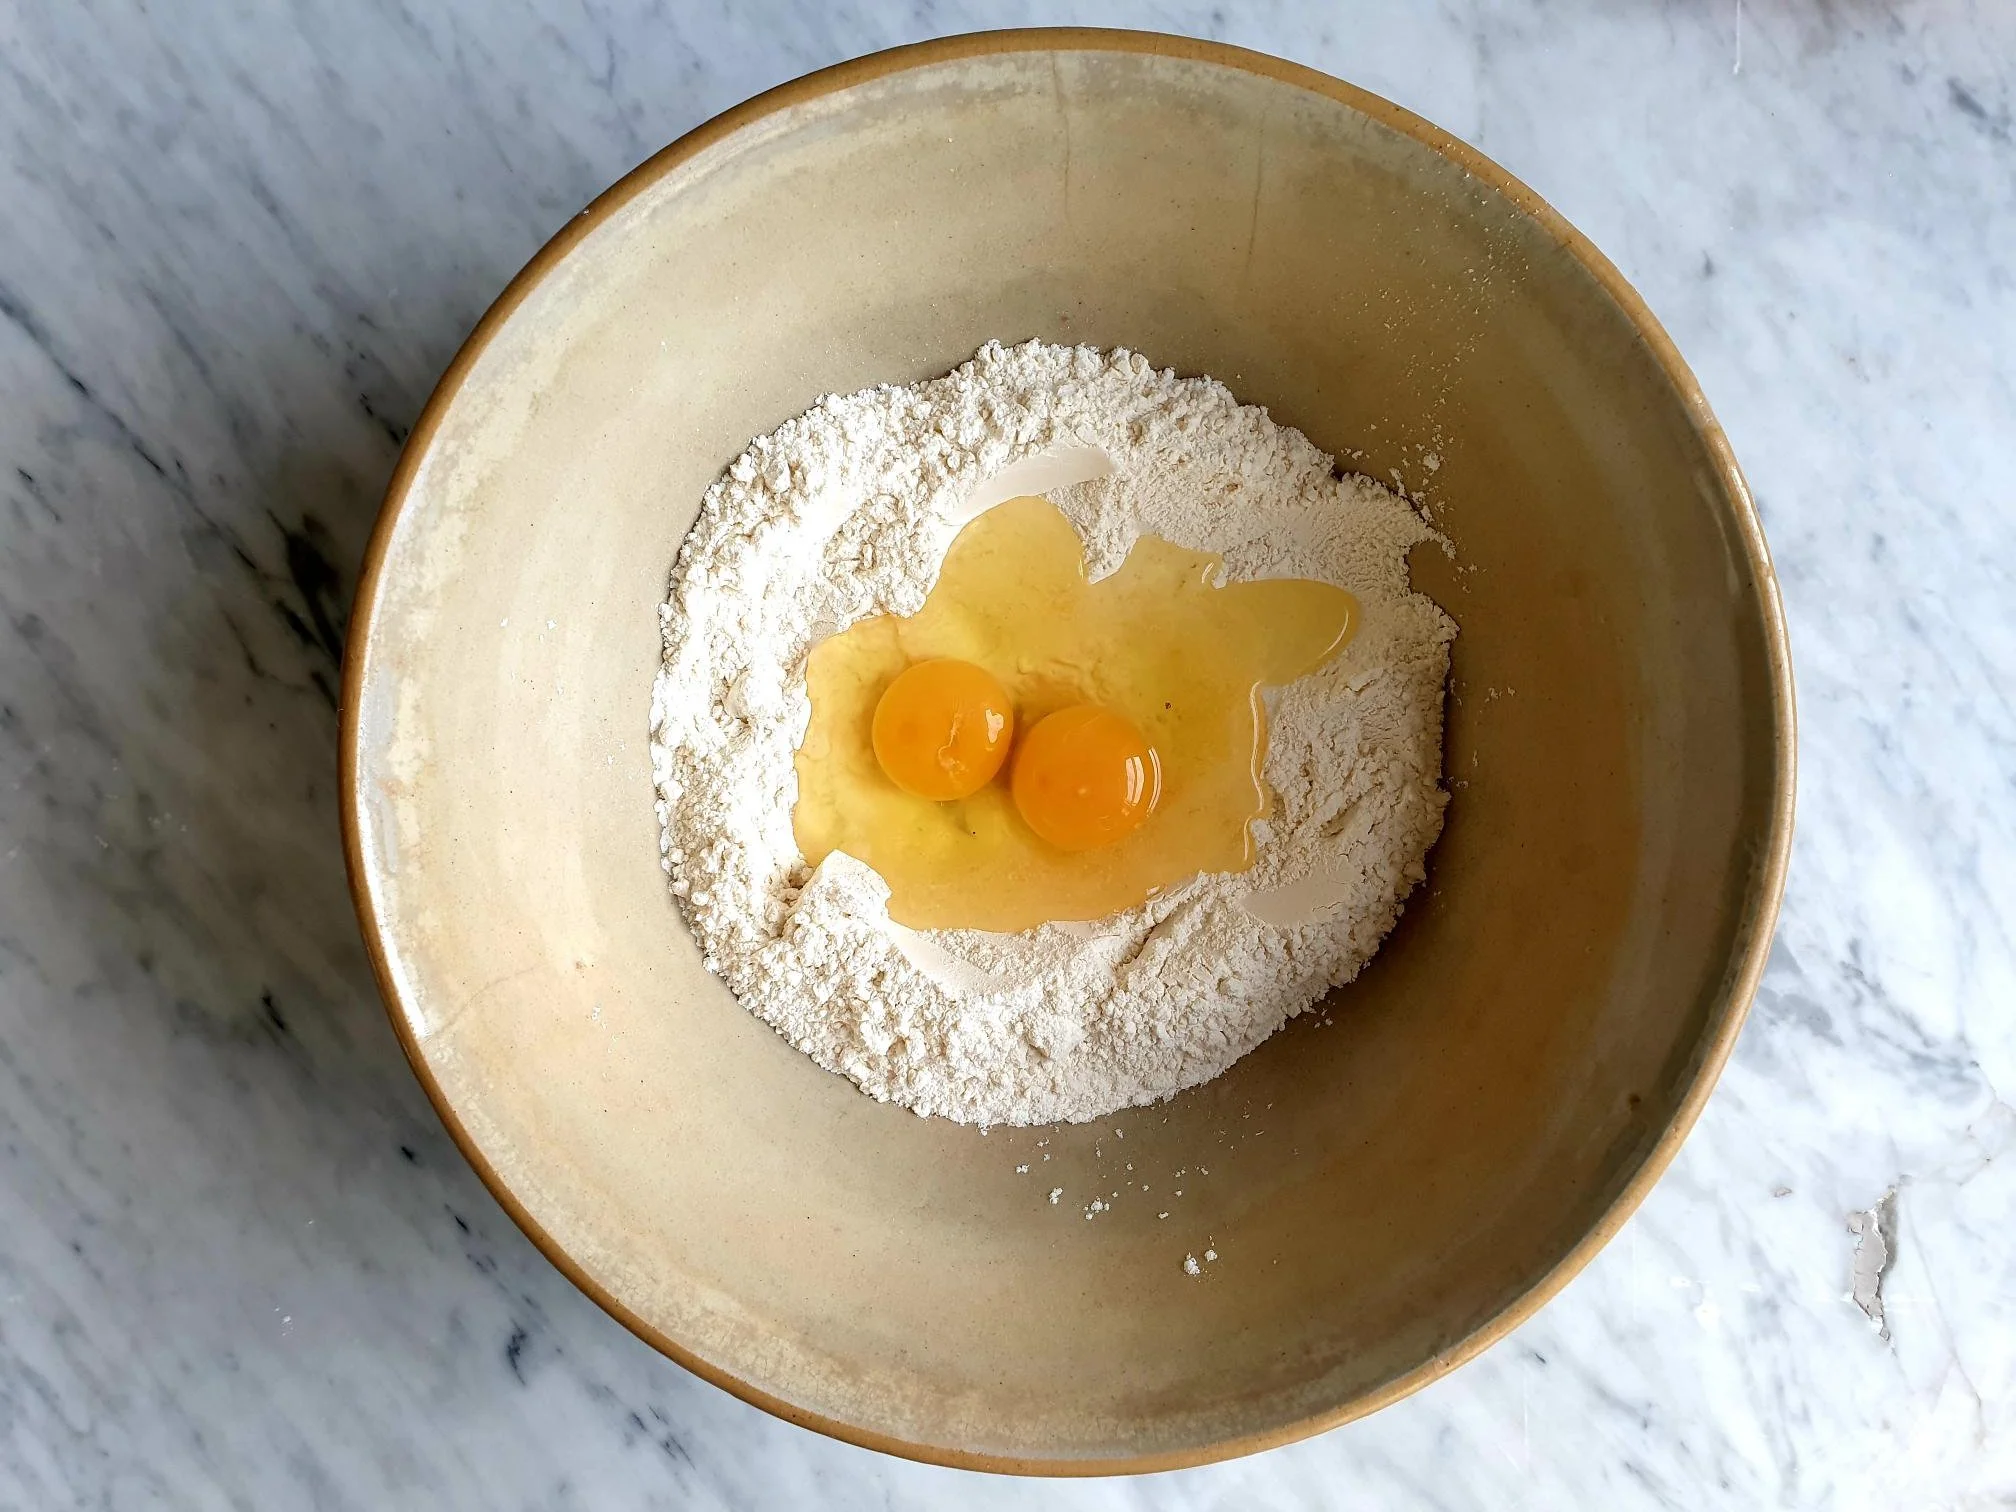
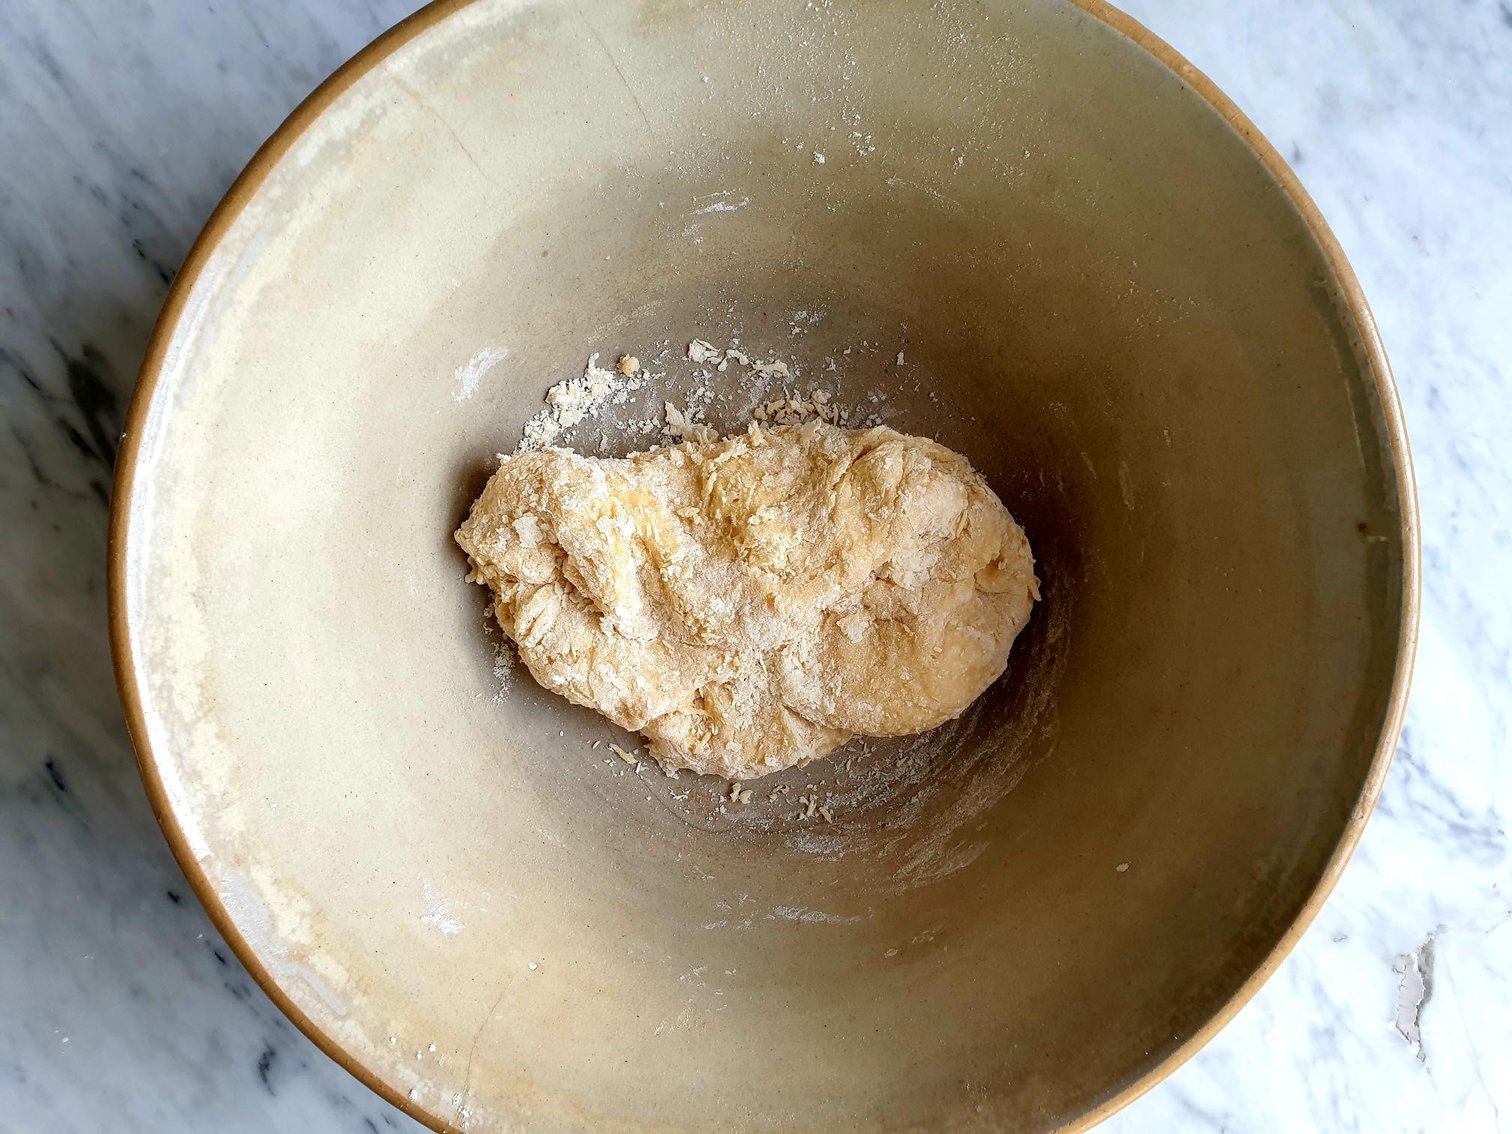
Using a fork, mix the eggs with the flour, incorporating a little at a time, until everything is combined, and the dough comes together.

View fullsize Fuzi 2.jpg
View fullsize Fuzi 3.jpg

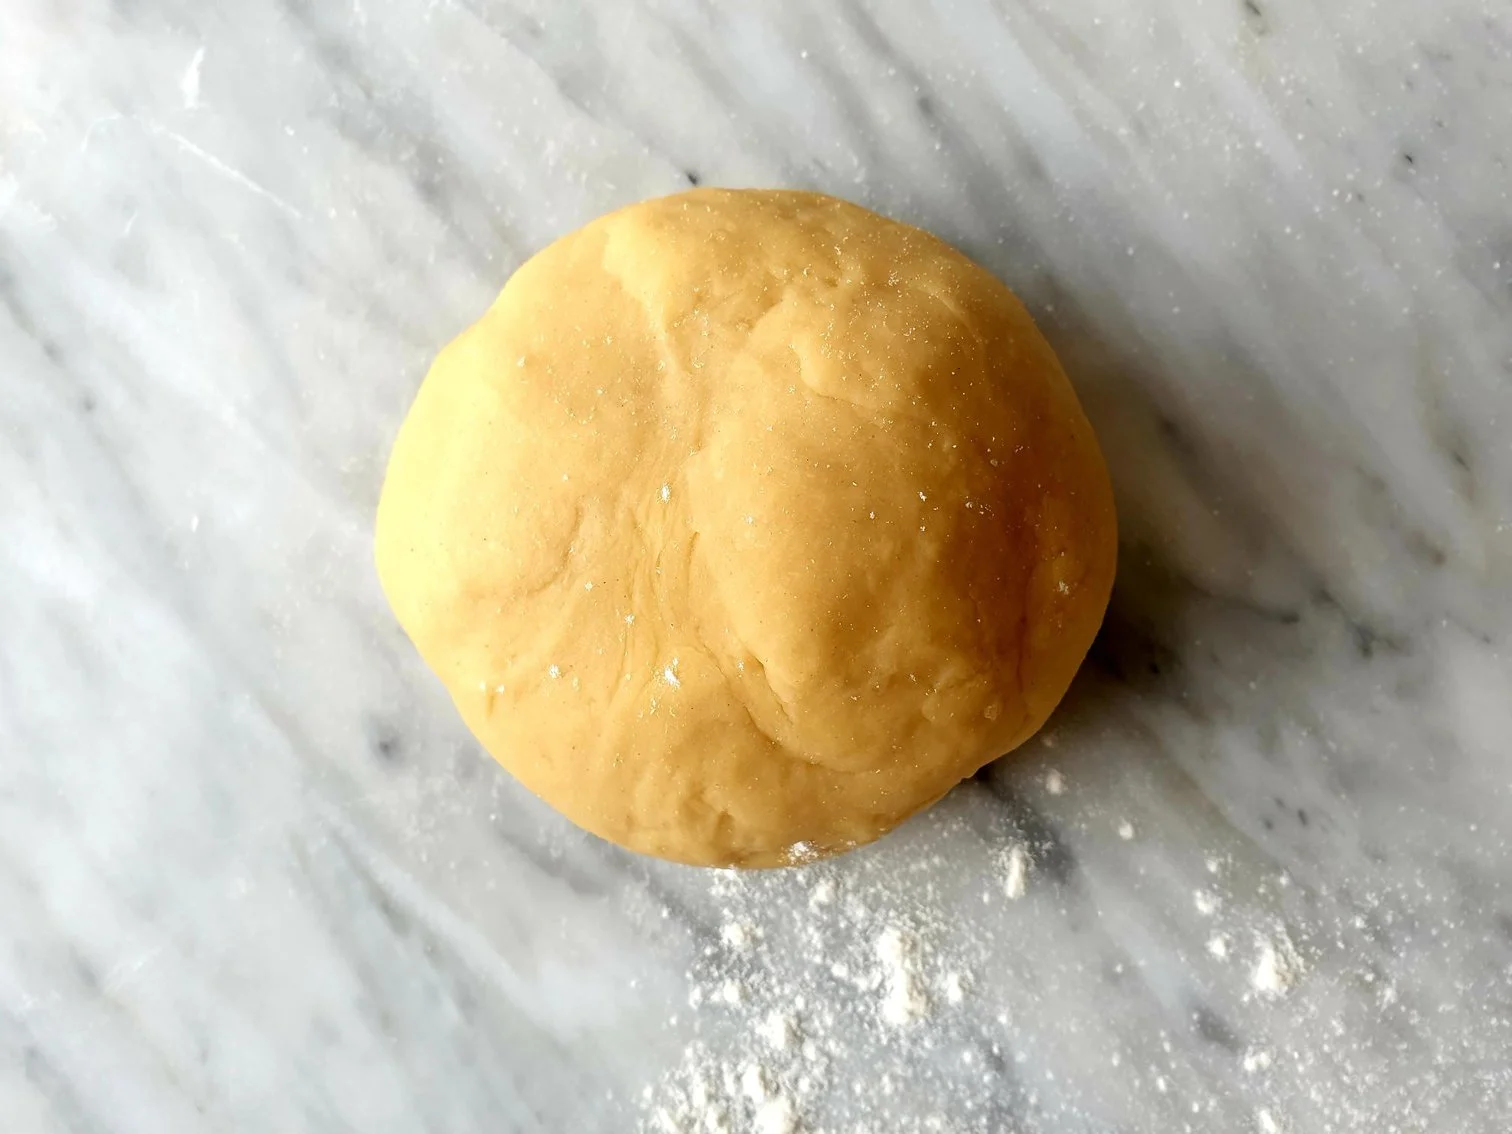
Transfer the dough onto a working surface and start kneading. It could take around 10 minutes of kneading for the gluten to develop in the flour and to get a smooth and elastic lump of dough.

Wrap the dough tightly with the cling film or a clean cotton kitchen cloth and let it rest for about 30 minutes at the room temperature.

View fullsize Fuzi 4.jpg
View fullsize Fuzi 5.jpg

Unwrap the dough and divide it into 4 pieces. Take one piece of the dough and cover the rest of the dough that you are not working with, with the cling film to prevent it from drying and cracking.

With your hands flatten the piece of the dough you are working with to a thickness of about 0.5cm and lightly dust with flour to prevent it from sticking.

Put the flattened piece of the dough through pasta machine on the widest setting. If you don't have pasta machine, use a rolling pin.

Fold the dough in half, keep rollers on the widest setting, and roll the dough again through the pasta machine.

Flour as needed to prevent sticking, and keep rolling pasta dough through pasta machine reducing the width of the rollers one setting at a time.

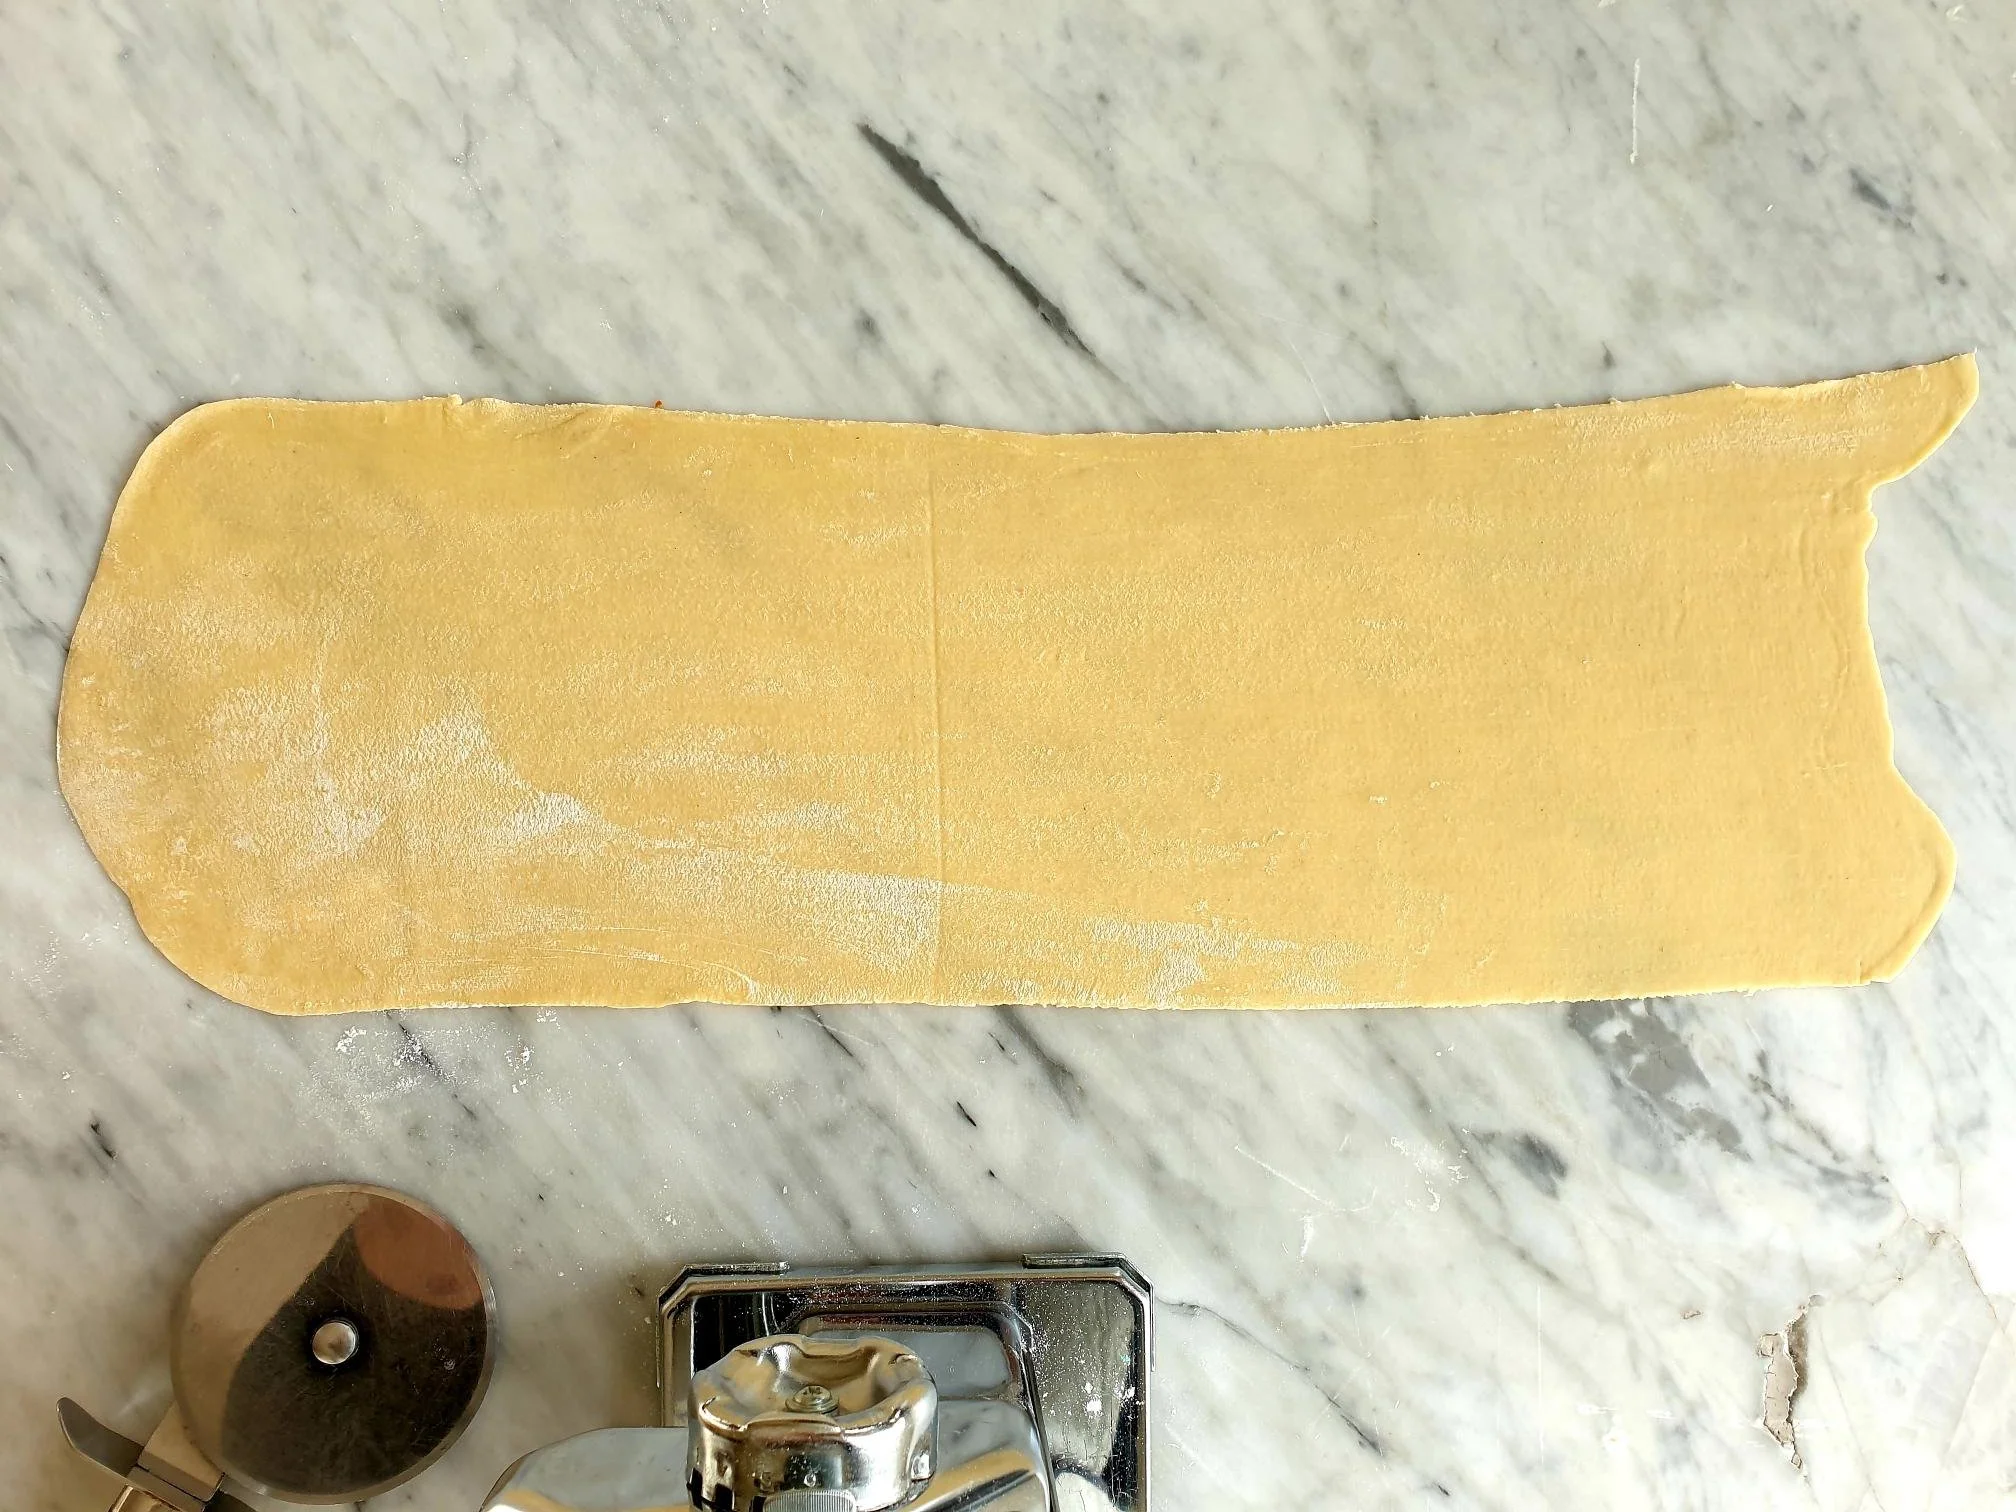
Continue rolling until pasta dough has been rolled through the thinnest setting.

At this stage you should end up with a very thin pasta (lasagna) sheet.

Place pasta sheet on a working surface.

View fullsize Fuzi 6.jpg
View fullsize Fuzi 7.jpg

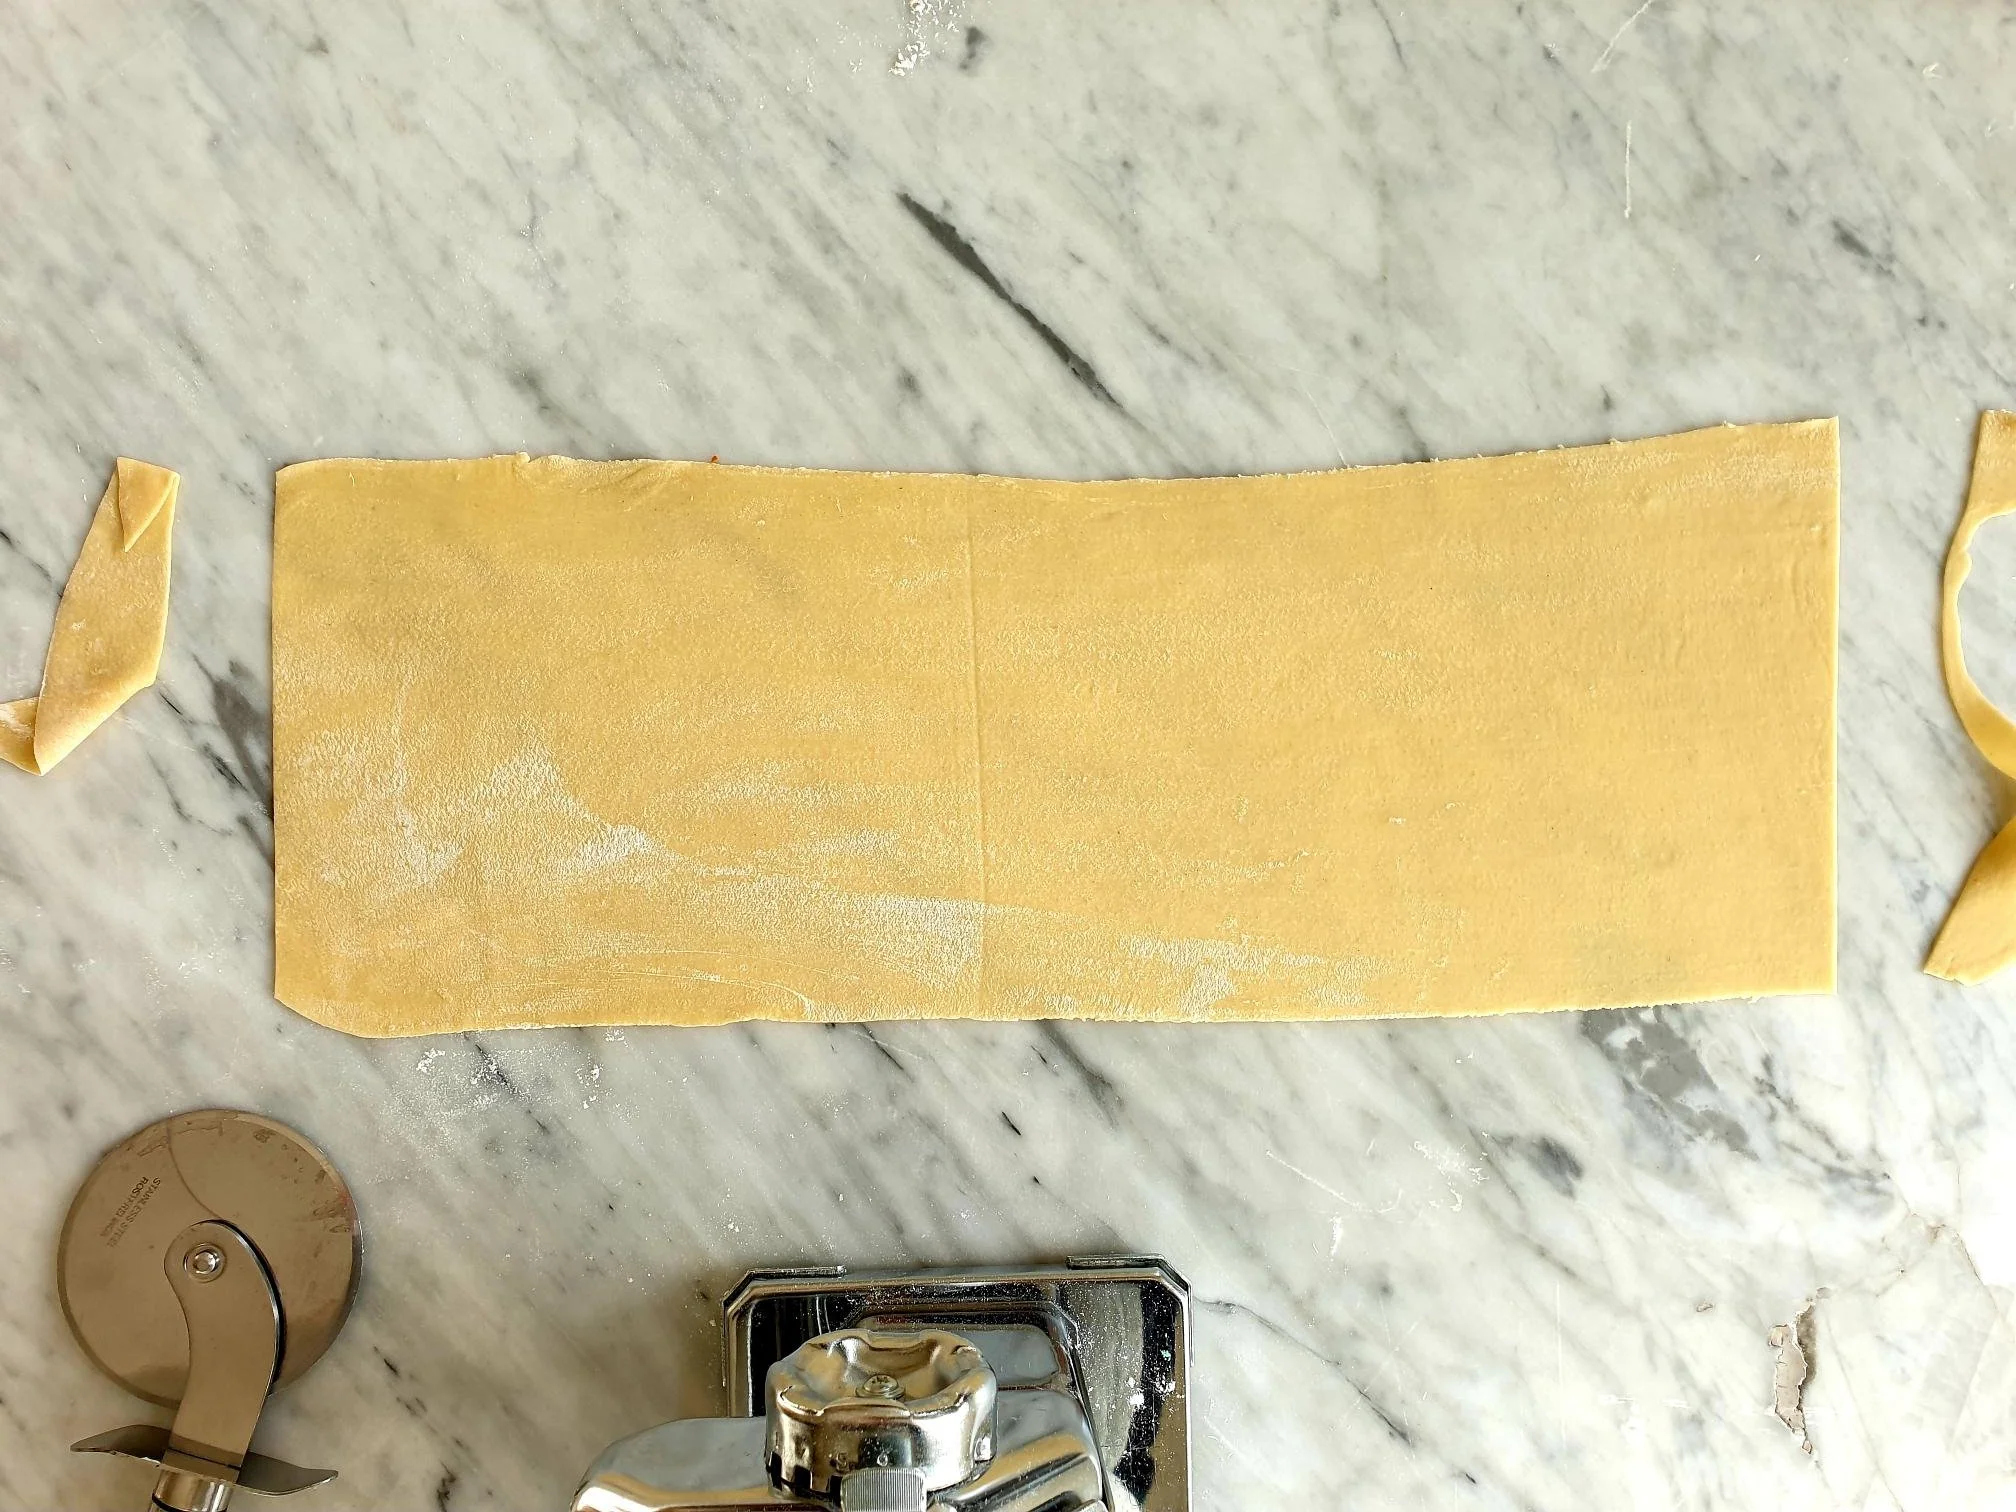
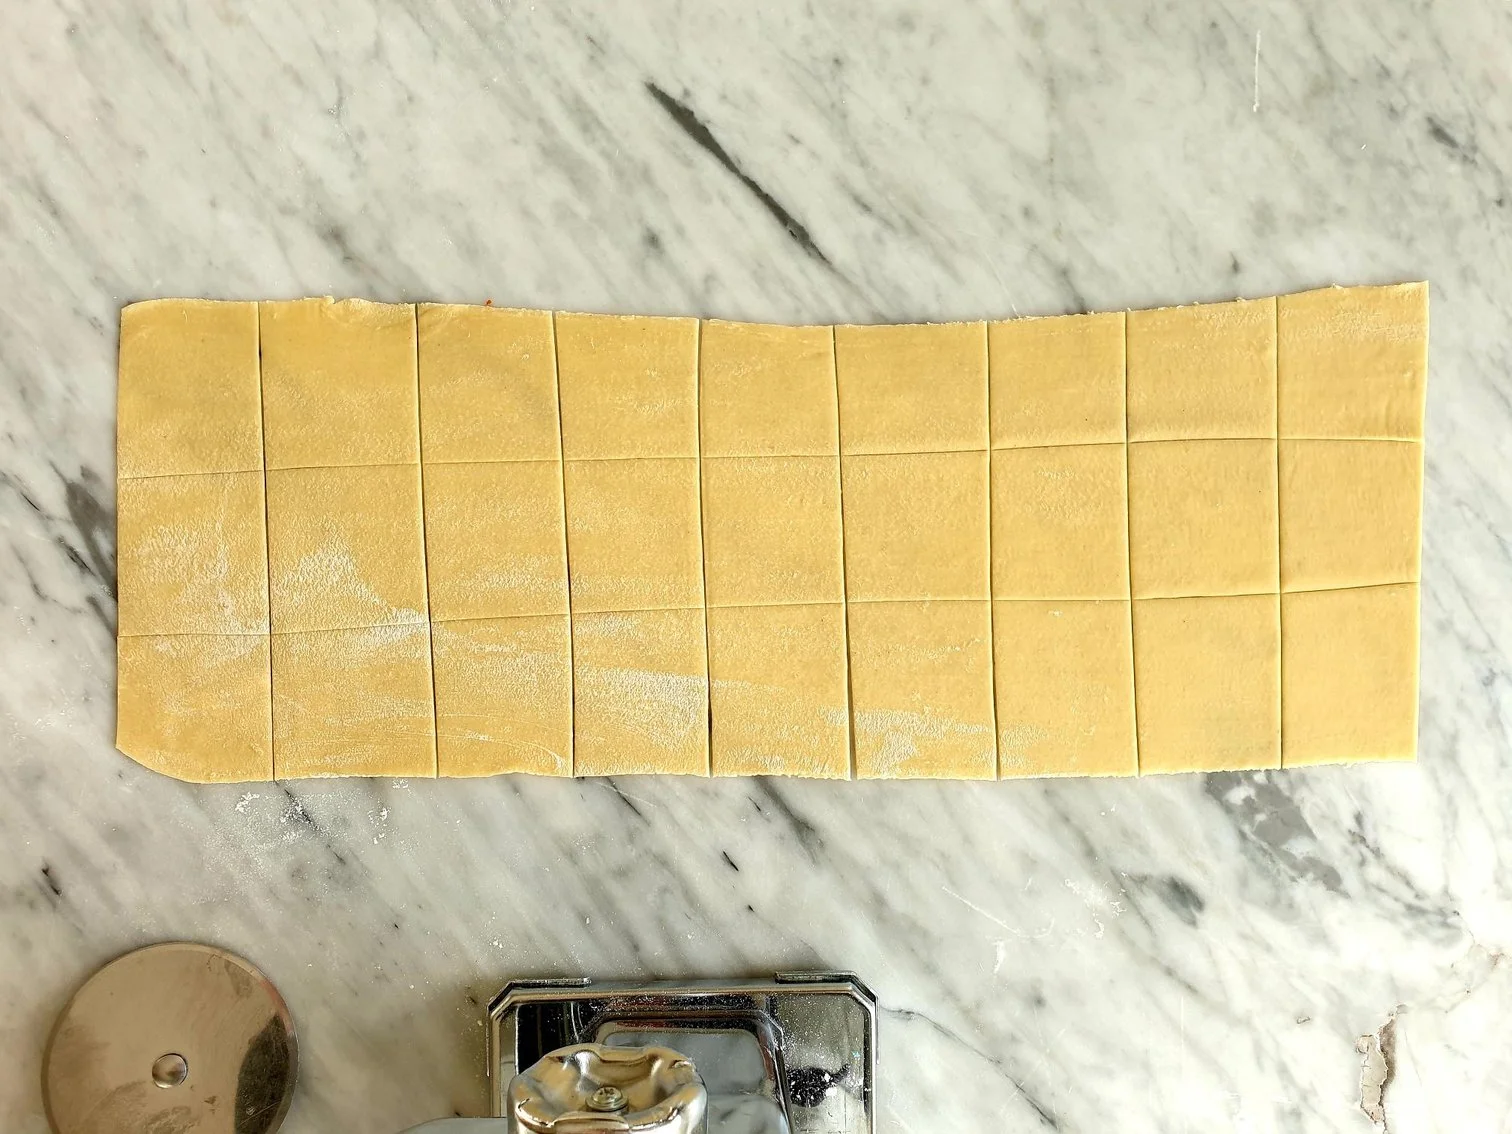
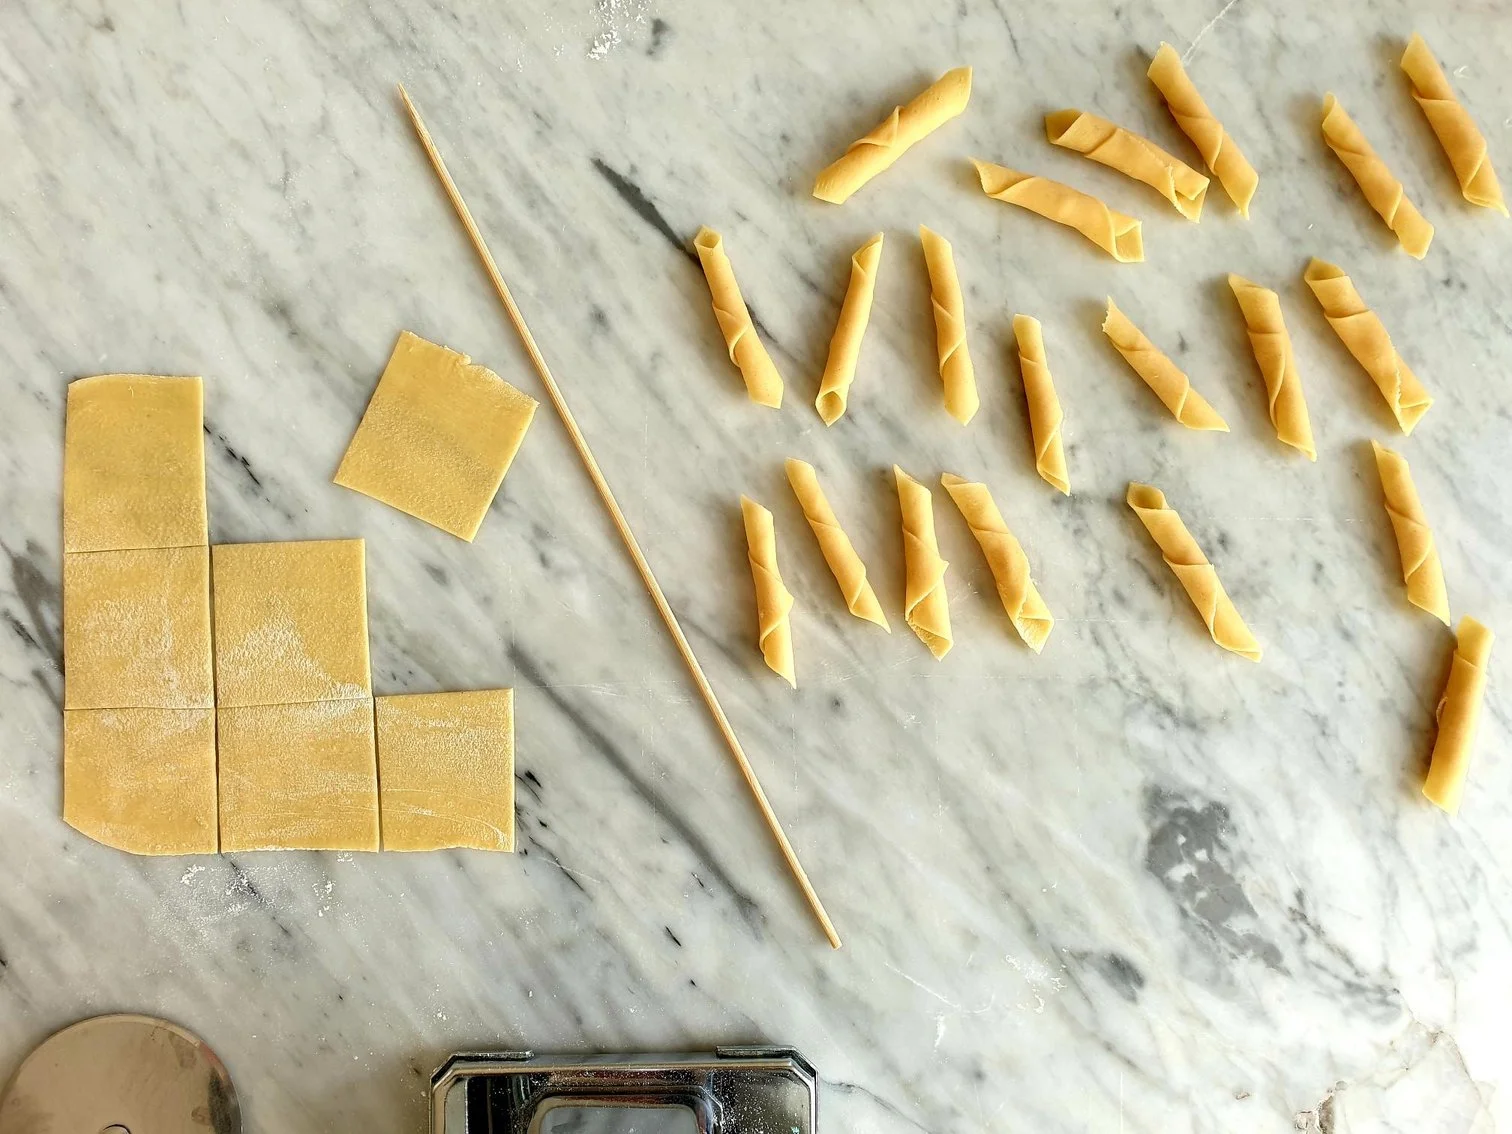
With a sharp knife (I used pizza cutter wheel) cut the pasta sheet into 4cm (1½ inch) squares.

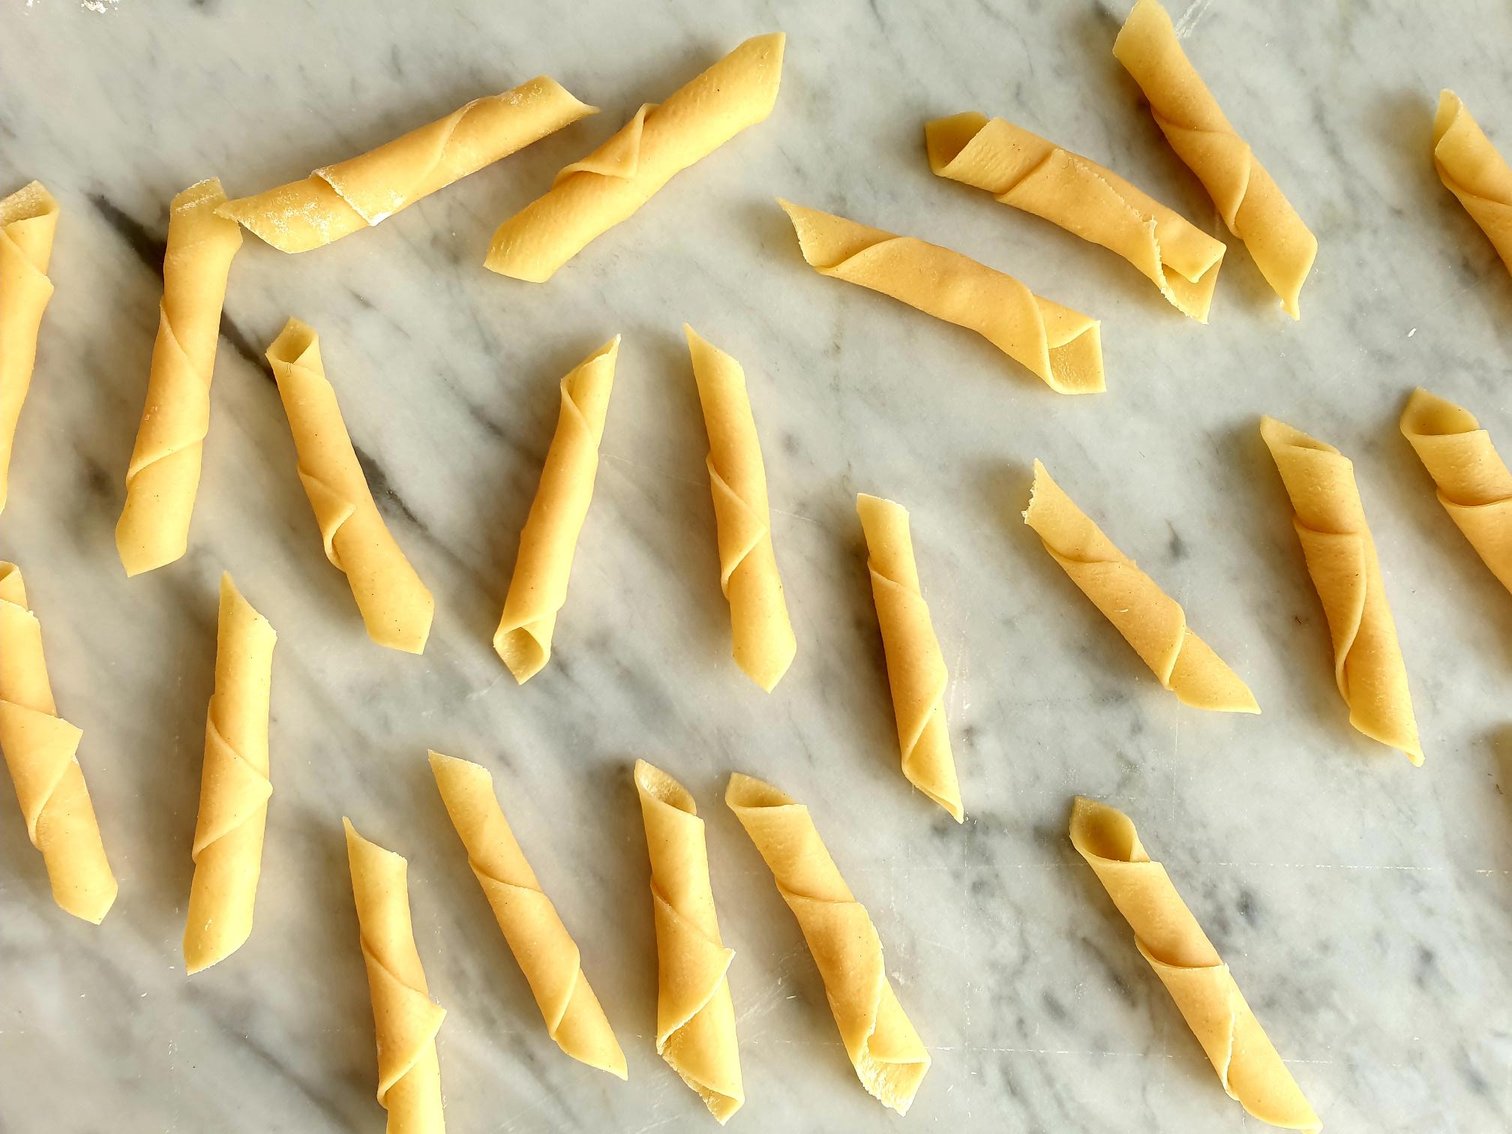
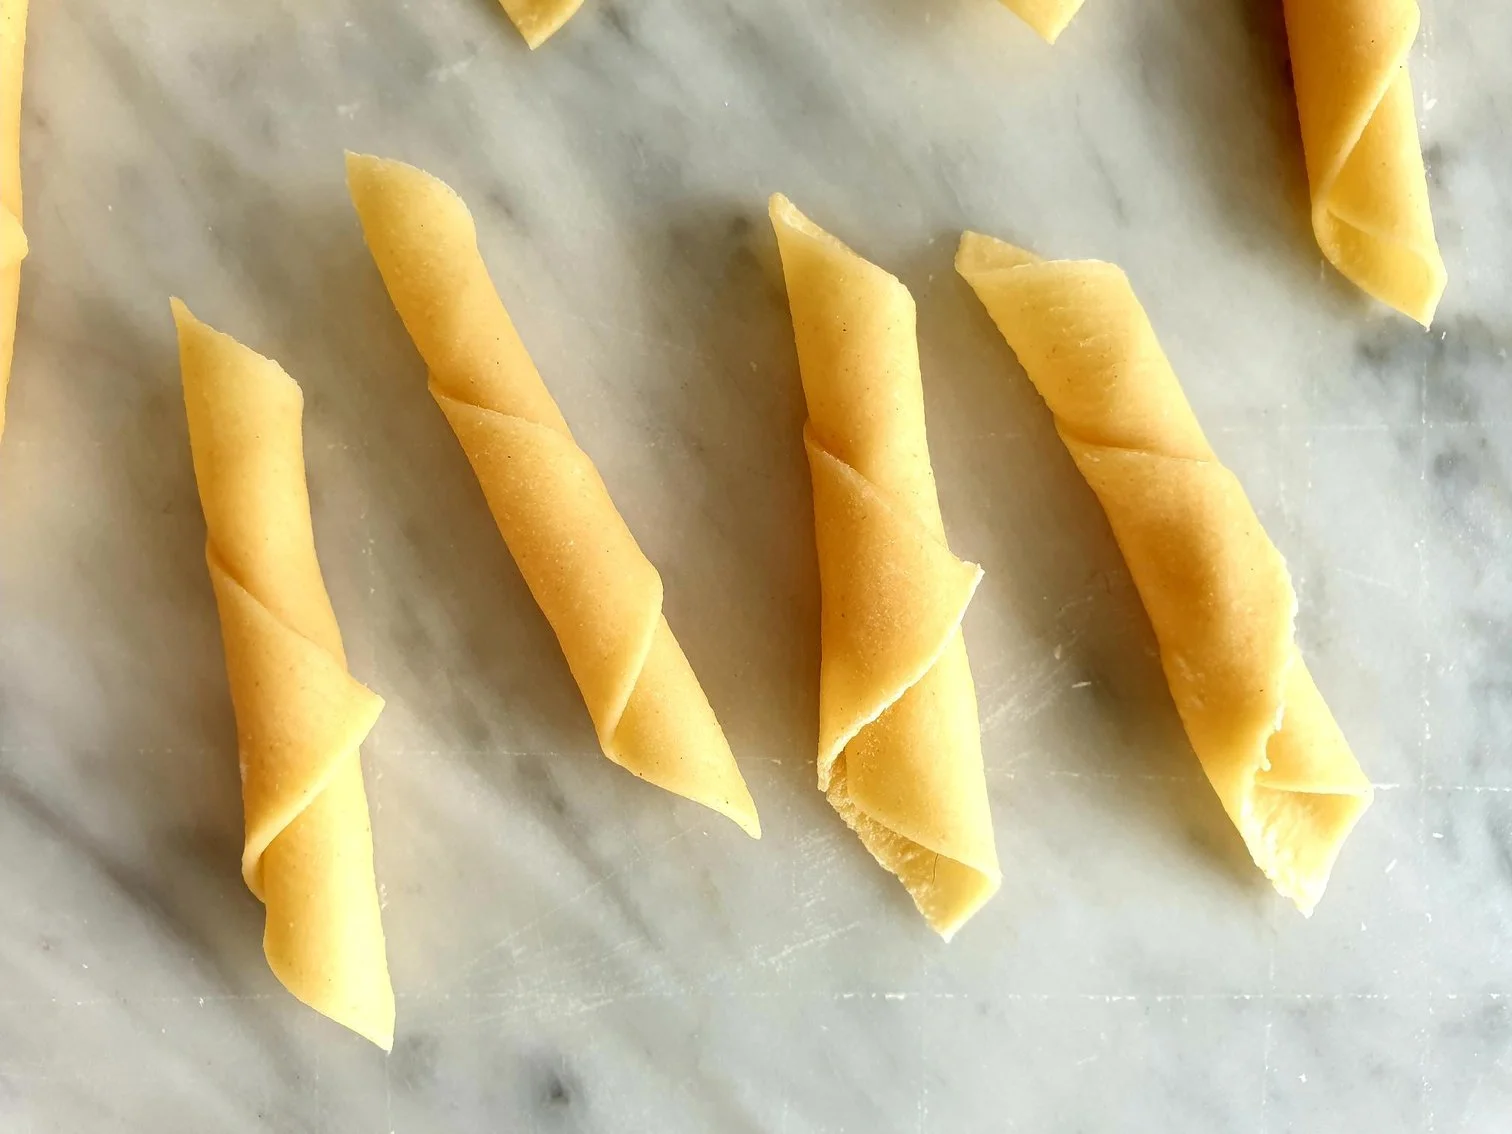
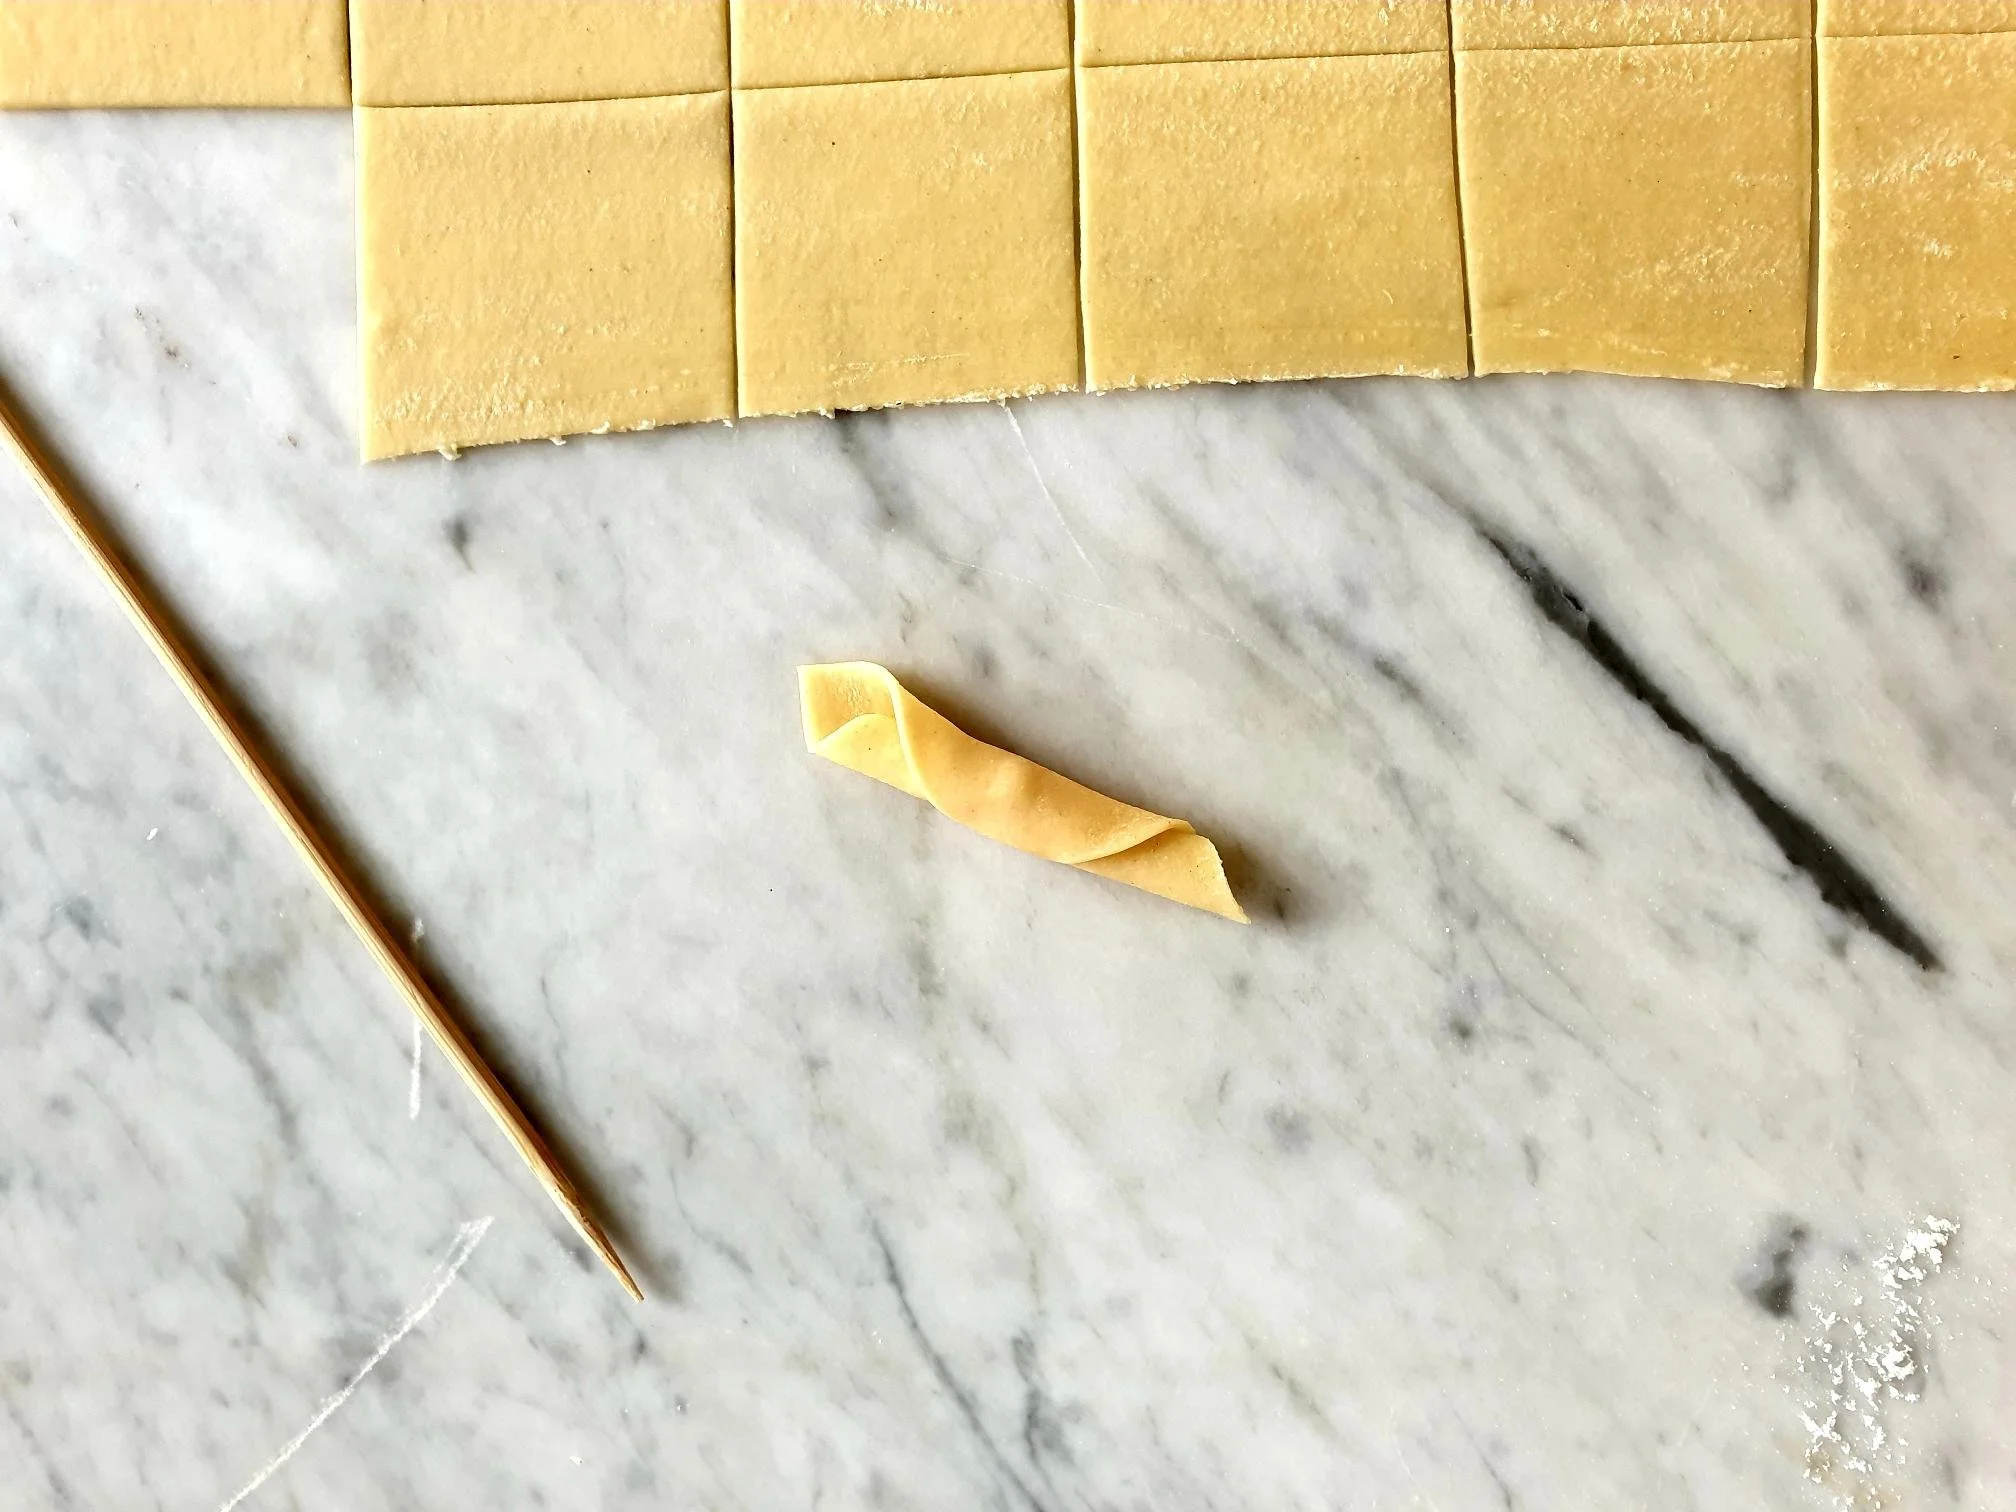
Take a wooden kebab stick (some prefer to use the handle of a wooden spoon) and place it on the edge of the pasta square.

View fullsize Fuzi 8.jpg
View fullsize Fuzi 9.jpg

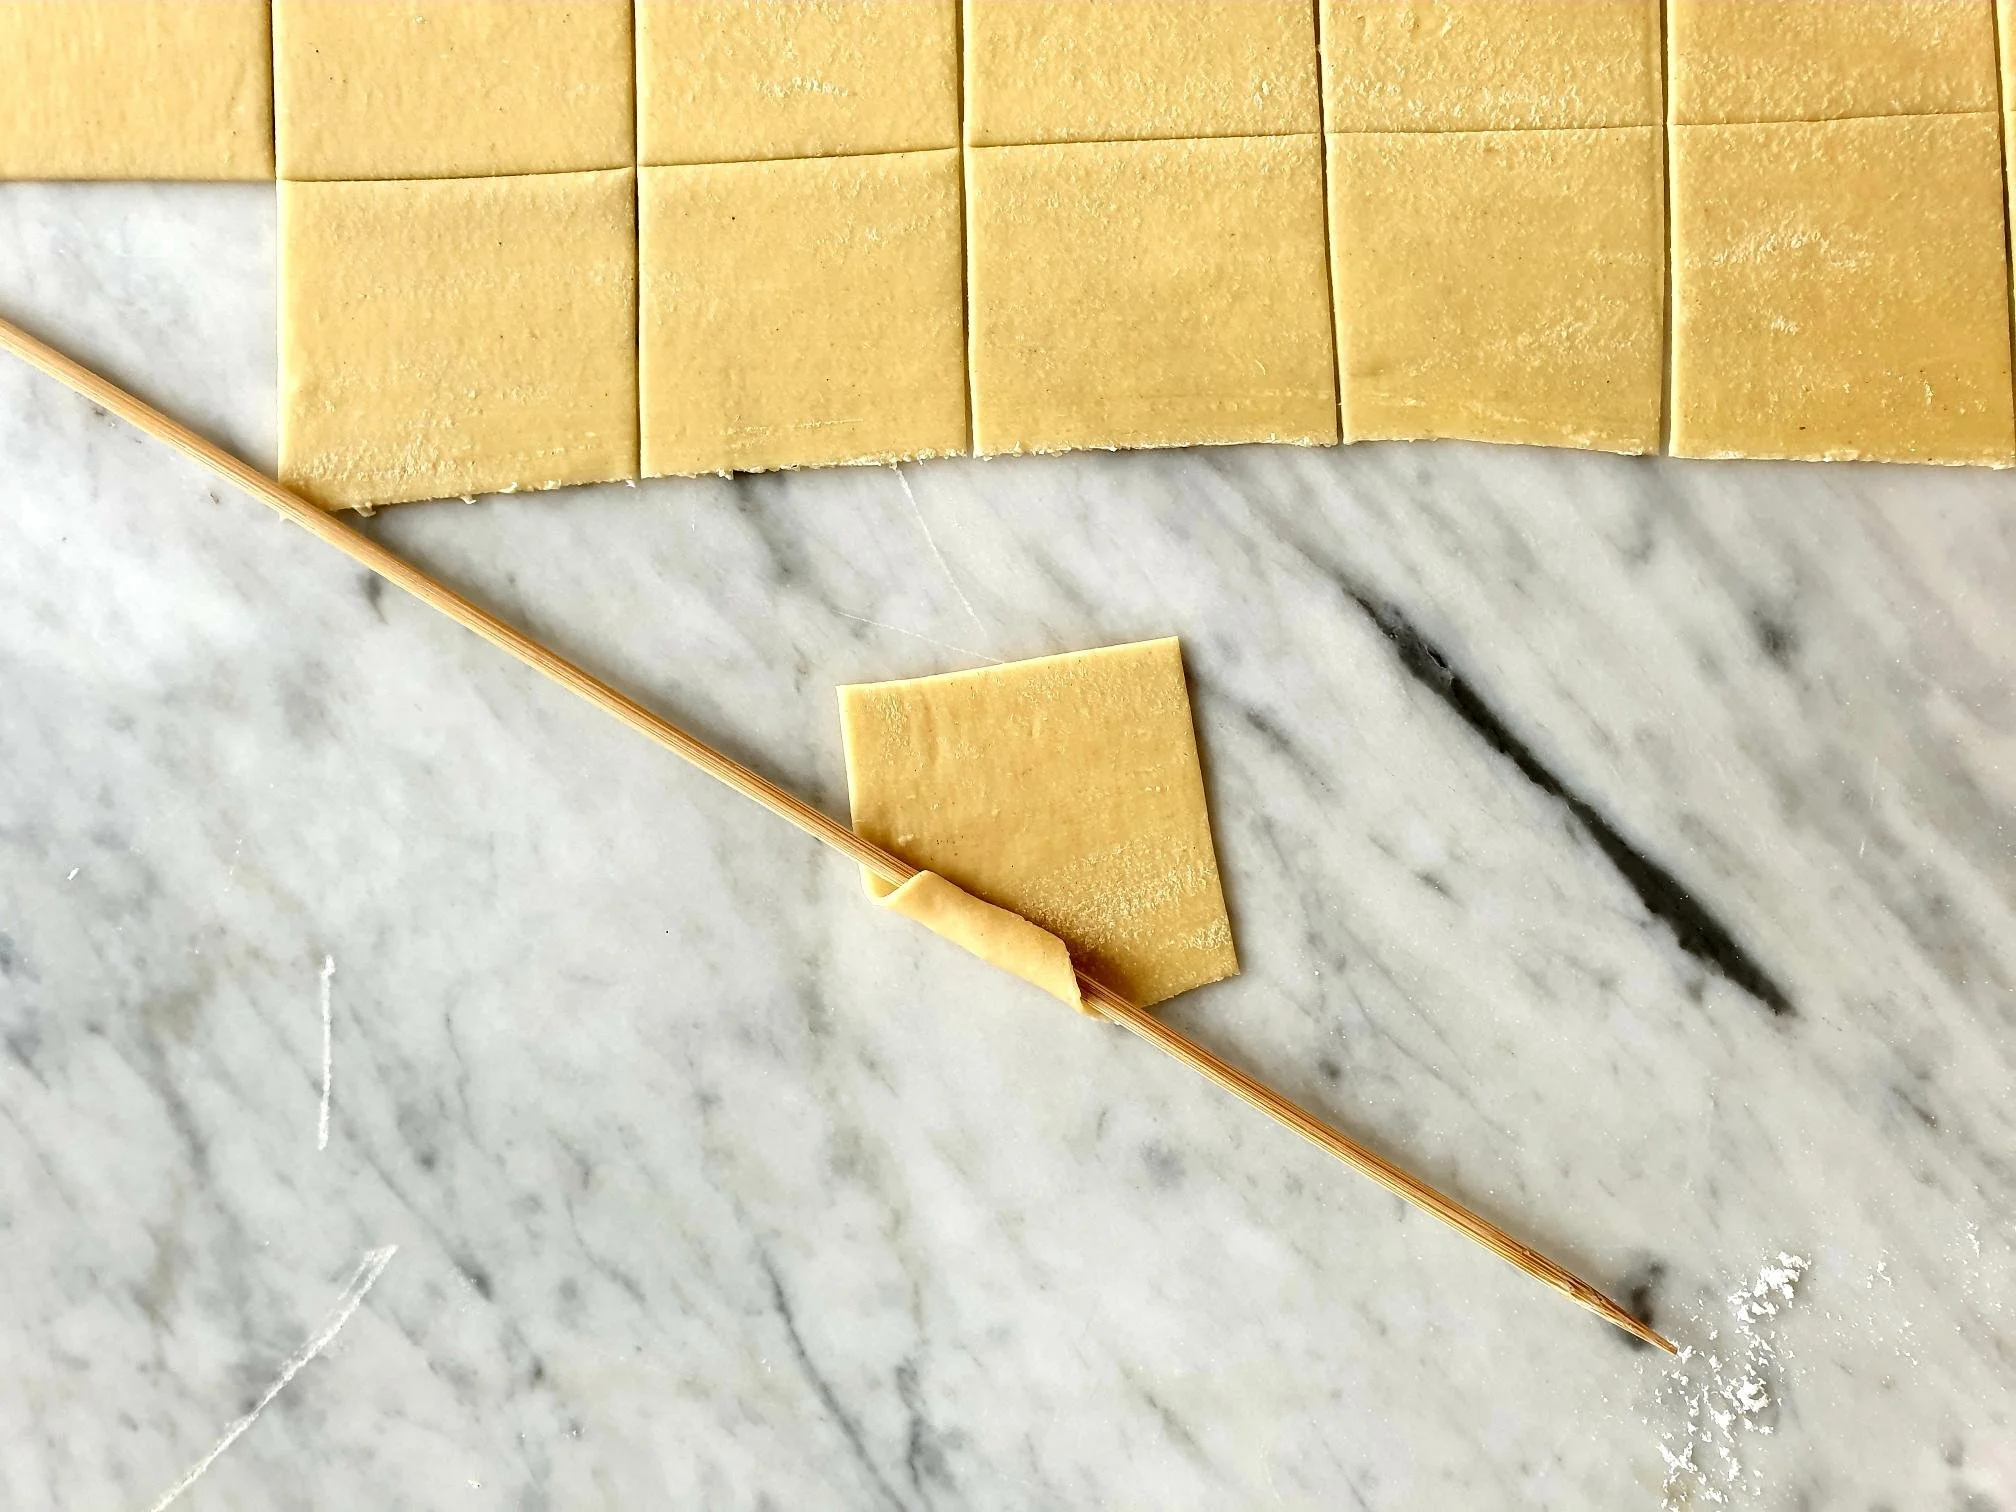
Gently roll the stick to get a shape of a fuži, then remove the stick.

View fullsize Fuzi 10.jpg
View fullsize Fuzi 11.jpg

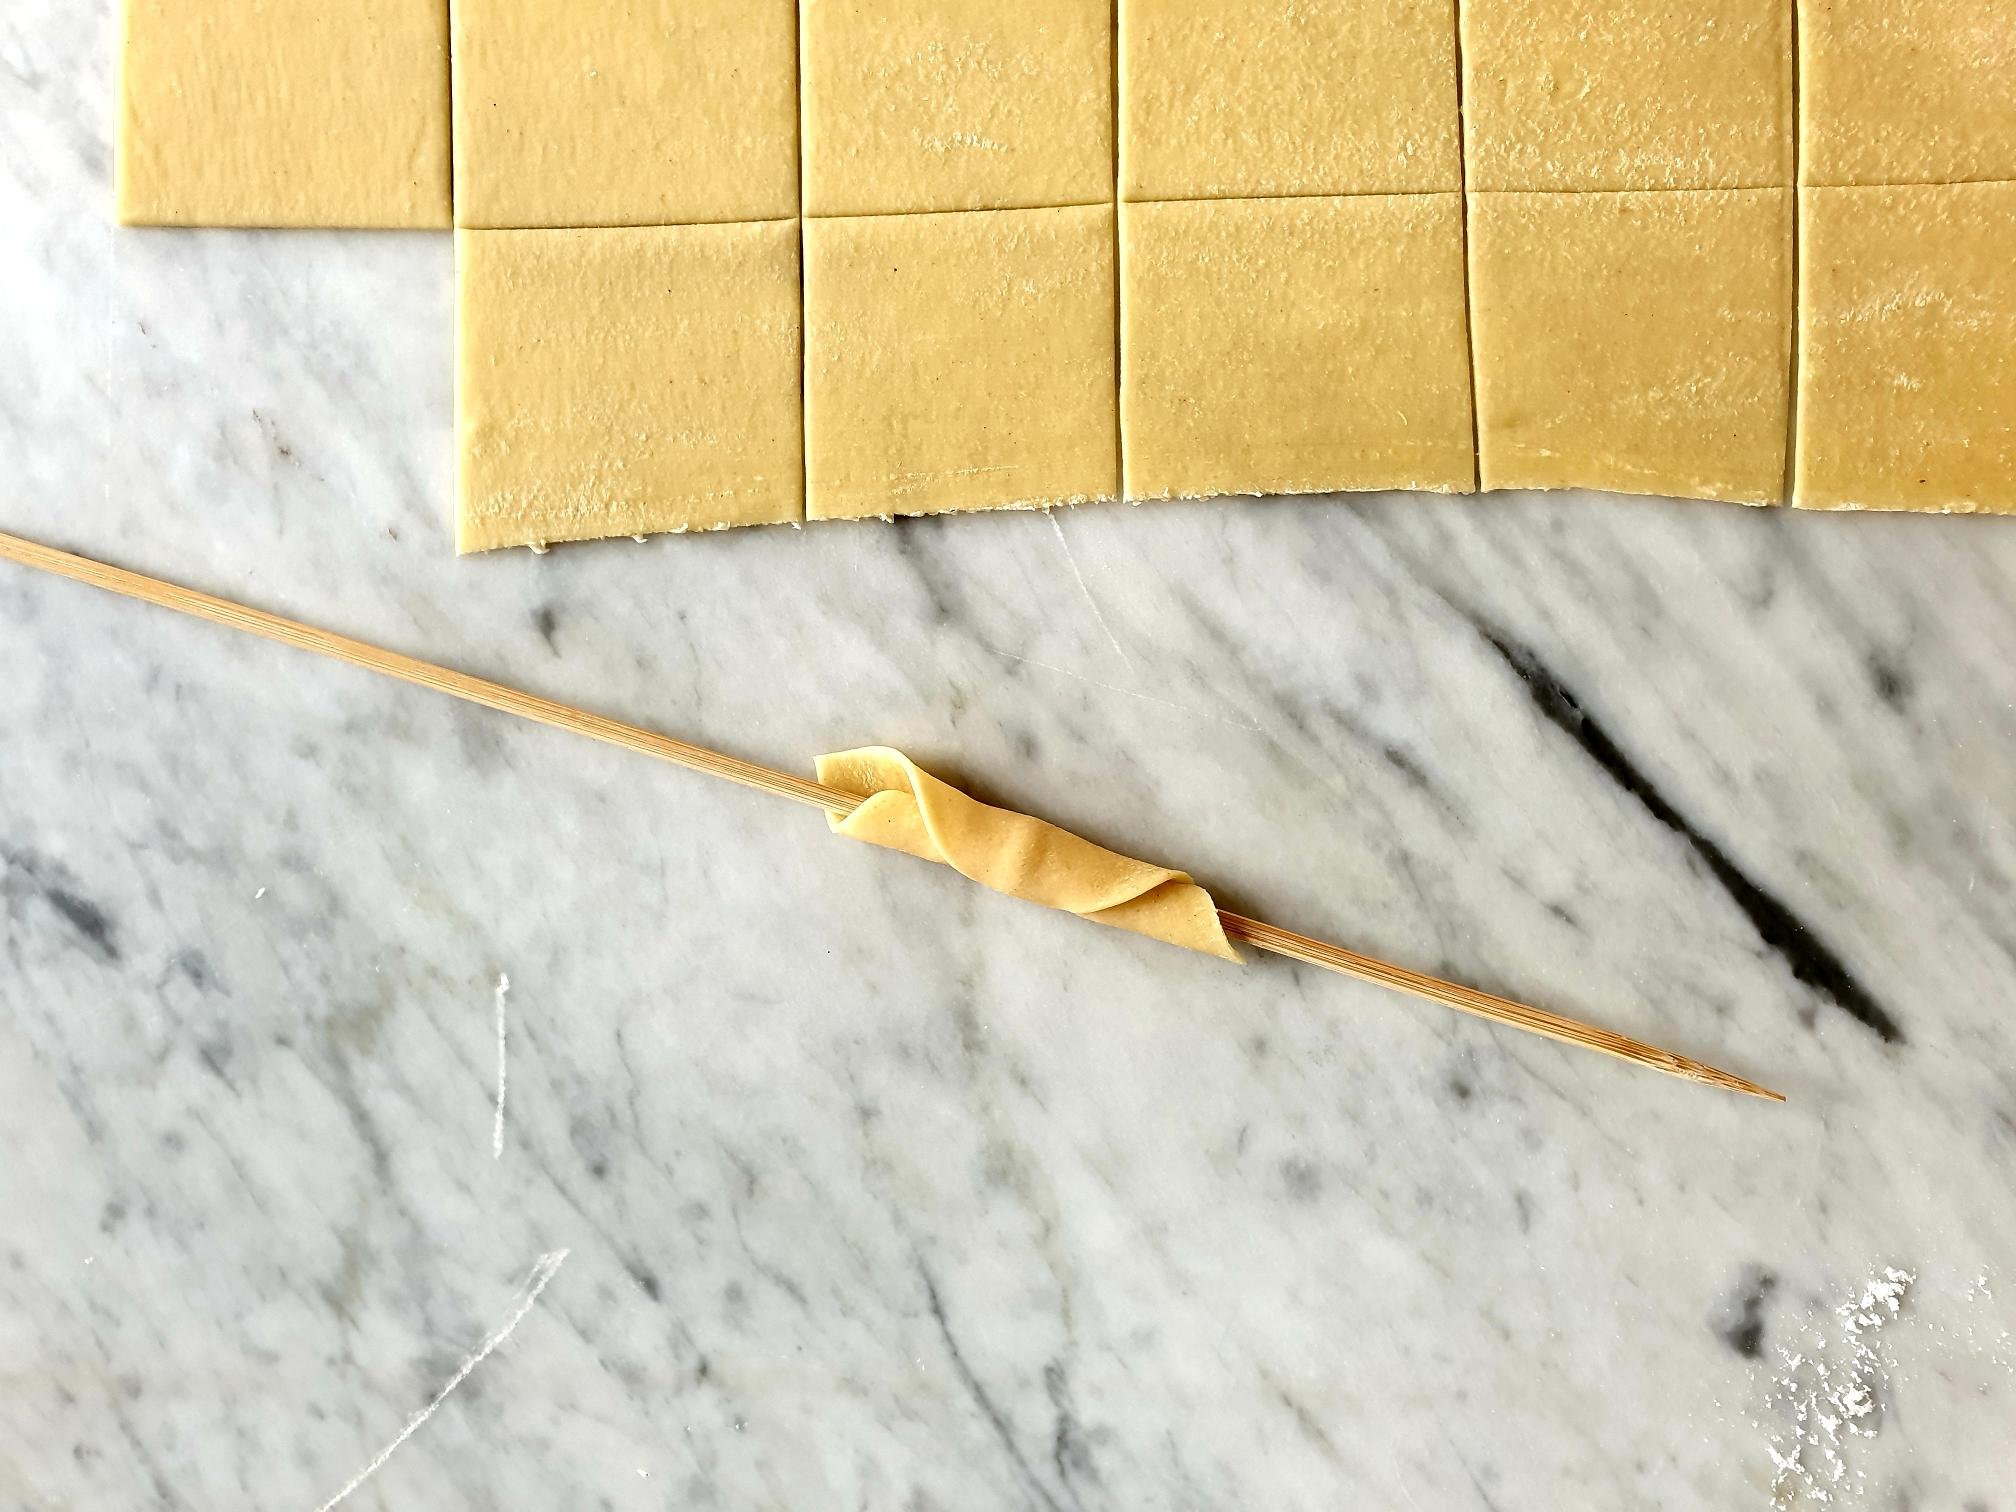
Repeat the process with other pasta squares (during this process try to avoid a lot of flour as this will prevent the opposite sides of the pasta square to stick together).

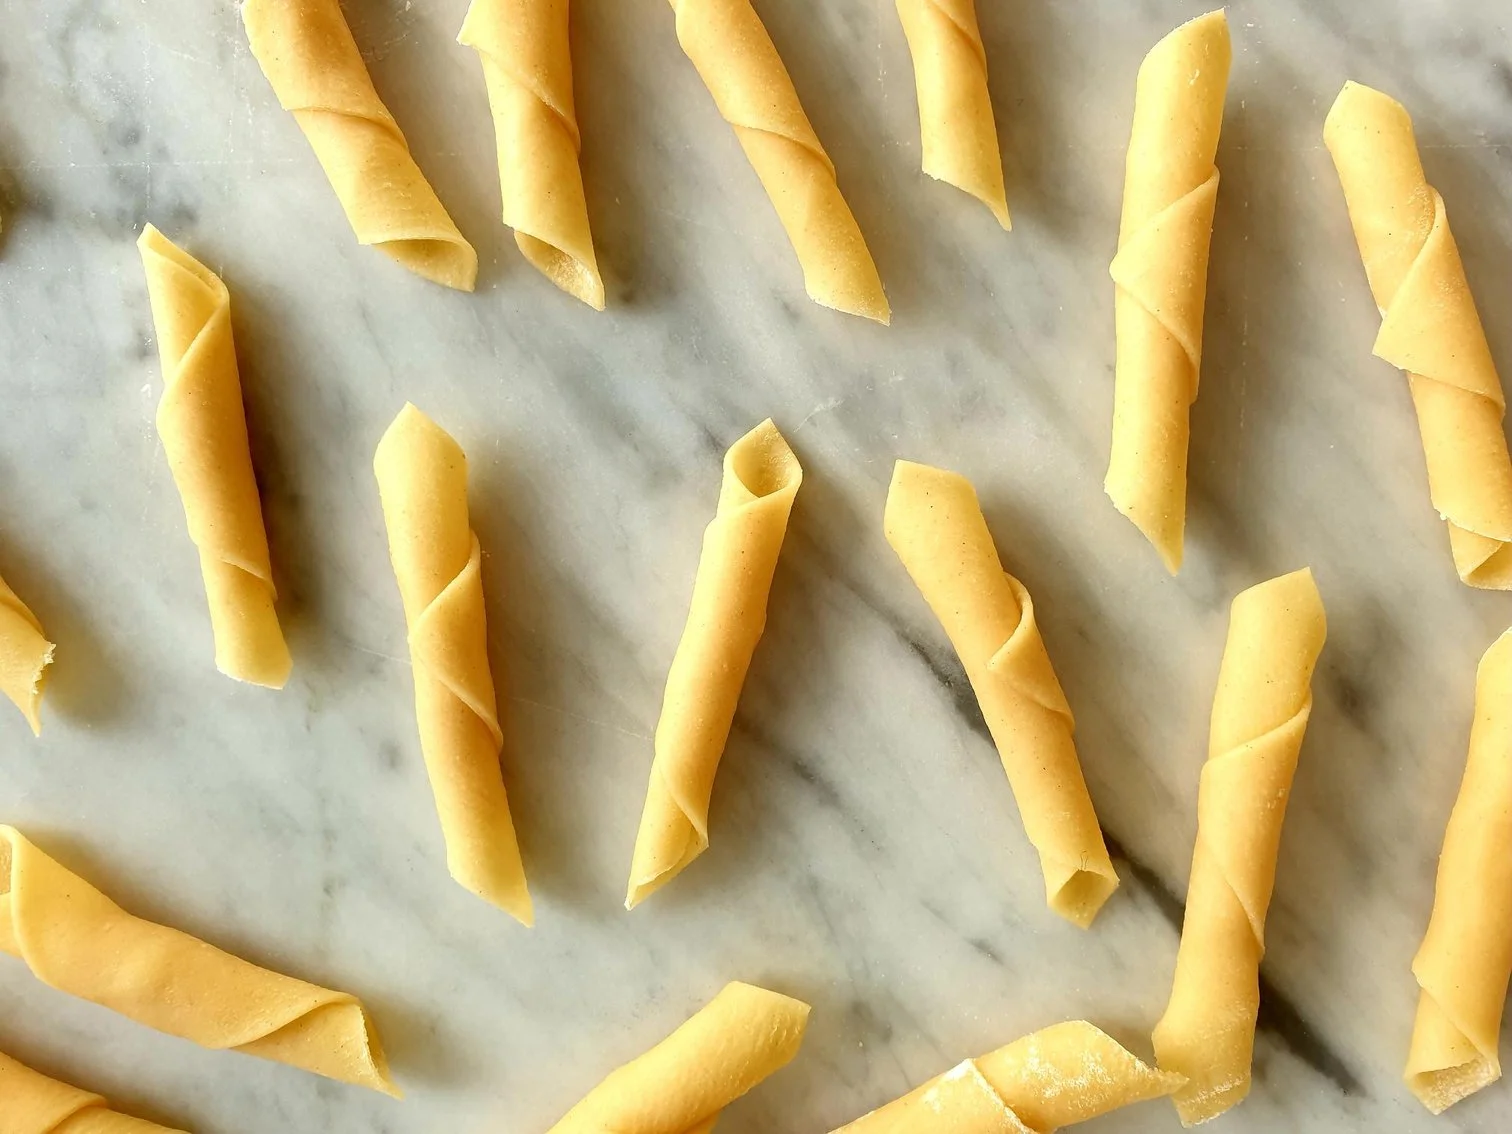
The idea behind shaping this pasta is that the opposite ends of the squares/diamonds are folded over each other, overlapping slightly, and sticking together forming a hollow shaped fuži.

Repeat the process with other pieces of dough.

Just a thought

Fuži can be made ahead of time and frozen. Make sure you place and spread the uncooked fuži in a single layer (so they do not stick together) on a floured baking tray (sheet), wooden board or similar. Place them in the freezer for at least 20-30 minutes, and once frozen separately, put them into freezing bags. When you want to cook them just drop them frozen directly into boiling salted water without defrosting them first.

You can also store already cooked fuži. Cook fresh pasta as soon you make it, drain it and place it in an airtight container, drizzle with a bit of oil and gave a container a little shake. Let it cool completely, cover with the lid, and store in the fridge for a couple of days (the pasta will turn slightly greyish in colour, do not get alarmed, this is perfectly normal).

You can also dry the pasta. Place freshly made fuži onto a floured baking sheet or wooden board and cover the shaped pasta with a clean kitchen towel and let them dry for a few days. Give fuži a gentle toss now and again. Store in a paper bag or in a jar.

November 10, 2023 /tina oblak
fresh pasta, egg based fresh pasta, handmade pasta, Handmade rolled pasta, pasta machine
Adriatic Recipe, All year round recipe, Celebratory dish, child friendly dish, child friendly meal, dinner, Easy recipe, Egg based pasta, entrée course, family friendly dish, family friendly meal, first course, first course dish, first course meal, Healthy, hearty dish, Istrian cuisine, Istrian dish, Istrian food, Istrian gastronomy, main course, main dish, Pantry, Pasta, Rustic dish, Slovenian cuisine, Slovenian food, Slovenian gastronomy, Starters, fresh pasta
Comment

Homemade Vanilla Icing Sugar Recipe

Beans and Srdines
December 01, 2022 by tina oblak in Adriatic Recipe, All year round recipe, baking, Central European recipes, condiment, cookies, dessert, Eastern Europe cakes, easy baking, Easy recipe, festive bakes, festive dessert, Pantry, Sweet Things

Vanilla icing sugar is widely used in a lot of European baking recipes. It is a very common and a staple baking ingredient. It is added to batters and dough, to whipped cream, sprinkled on top of fresh strawberries, used to dust the cakes, biscuits and other sweets treats. Could not be simpler to make at home, regular icing sugar gets infused with vanilla seeds from a vanilla bean.

On the continent, it is easily available in just about every supermarket, and is so popular that supermarkets sell their own brand of vanilla sugar. This commercially produced vanilla sugar uses vanillin, (primary substance of natural vanilla extract or bean, which is cheaper) rather than vanilla beans (vanilla bean seeds). However, here in the UK, where I currently live, this type of sugar is a bit of a struggle to find, you can almost exclusively buy it in continental food stores or speciality stores.

Vanilla extract, paste, and vanilla beans, in most cases, easily replace vanilla sugar when making custard or when baking cakes or biscuits, but there is one recipe that vanilla icing sugar simply cannot be replaced, and that is for the Austrian Vanilla Crescent Biscuits.

When making these biscuits you can easily add vanilla extract or vanilla paste or seeds from vanilla pod to the biscuit dough, but once the biscuits are baked, they need to be coated in vanilla icing sugar that simply cannot be replaced or substituted by anything else.

Preparing your own vanilla icing sugar offers a very practical solution if you cannot get hold of vanilla sugar, but also makes a lovely homemade gift for your foodie friends and family. It is very quick and easy to make, and you know exactly what goes in it.

Ingredients

  • 400g icing sugar

  • 2 vanilla pods

Method

Put icing sugar in a food processor (small food chopper or blender, coffee bean or spice grinder will work too). If you do not have any of the above, a bowl and a whisk will do just fine. Food processor helps to break up vanilla seeds that can stick together and clump up a bit.

Cut the vanilla pod in half lengthwise but try not to cut all the way through. Scrape the seeds out of the pod with a knife, keep and reserve the empty pods for later use.

Add the seeds to the sugar .

View fullsize Vanilla Icing Sugar 6.jpg
View fullsize Vanilla Icing Sugar 8.jpg

Pulse and mix, (or whisk if using a bowl and a whisk).

Put the sugar into an airtight container or divide between the glass jars with airtight lids (size and shape of your choice).

View fullsize Vanilla Icing Sugar 10.jpg
View fullsize Vanilla Icing Sugar 13.jpg

Cut the rest of the vanilla pod in pieces and add them to the sugar, this will add more flavour.

View fullsize Vanilla Icing Sugar 14.jpg
View fullsize Vanilla Icing Sugar 15.jpg

You can use the sugar immediately or leave overnight. For optimal flavour leave about two weeks for the sugar to fully absorb the vanilla flour.

Store the vanilla sugar at room temperature in a dry and cool place and give a jar a little shake now and again as the sugar can possibly clump together a bit.

Use for anything you want to add vanilla flavour and particularly indicated for coating Vanilla Crescents Biscuits.

December 01, 2022 /tina oblak
icing sugar, dusting sugar, confectionary sugar, vanilla pod, vanilla bean, vanilla extract, vanilla sugar, vanilla paste, vanilla seeds, vanillin
Adriatic Recipe, All year round recipe, baking, Central European recipes, condiment, cookies, dessert, Eastern Europe cakes, easy baking, Easy recipe, festive bakes, festive dessert, Pantry, Sweet Things
Comment
Eldelflower Syrup 1.jpg

My mum's home made elderflower syrup recipe

Beans and Sardines
May 18, 2021 by tina oblak in Pantry, Syrup, Non alcoholic drink

Making elderflower syrup could not be simpler, and it is very rewarding, especially when you want to cool down with a refreshing, non-alcoholic, low sugar drink during the hot summer months.

Just add to your Elderflower syrup cold tap or sparkling water, a few cubes of ice, a slice of lemon, and if you wish, a few leaves of fresh mint. This will really add extra flavour and freshness to any glass of water, and will for sure now make an ordinary glass of water a memorable part of any summer day.

Added to Prosecco or other fizzy wines will make a brilliant grown-up drink.

Elderflower syrup has many culinary uses and they are quite varied. You can add it to cake batter, biscuits and cookies mixture for extra flavour, drizzle over waffles, pancakes, ice cream or sorbet, (especially lemon sorbet), drizzle over fruit pavlova or over strawberries and cream. You can add elderflower syrup when making strawberry jam and put it into a yoghurt and fruit smoothies for an extra dimension of flavour.

It can be enjoyed all year round and makes a fantastic home made gift for your foodie family and friends.

My mother and my maternal grandparents were real nature lovers, and passed on to me their appreciation of the natural world. My long walks and hikes with them provided a wonderful opportunity to go foraging!

I learned how to simply stop, listen and observe what was all around me. They always pointed out to me different trees, plants, animals, birds... and even named them.

I got a real sense for the changing seasons, and what to go foraging for in different seasons, and so to eat what was in season and in this way live closer to nature.

I have very vivid memories of my grandad always carrying in his pocket a small, partially covered in rust foldable pocket knife. If I close my eyes, I have a very clear image of how the knife looked.

He was a very skillful and resourceful man, and if he found what seemed like an appropriate piece of wood, he would sit down on a rock, pulled out his knife, and make me, for example, a simple whistle ...

This will stay with me forever.

They also taught me to recognize the elderflower from other very similar looking plants, which would not make a very pleasant tasting drink.

View fullsize Elderflower Syrup 3.jpg
View fullsize Elderflower Syrup 2.jpg

When I was small and elderflower was in season my mum made quite few bottles of elderflower syrup. I will share with you in this recipe how she did it. The recipe uses citric acid that adds the extra zing but most of all it acts as a preservative so you can keep your syrup for longer.

First of all, you really want to make sure that you pick the elderflowers in areas away from roads and away from any other form of pollution.

Pick healthy looking, fully opened blossoms, place them gently in a basket, keeping them upright so you minimize to lose the pollen, which is the major source of vitamins and minerals, and that unique fragrance and flavour.

Elderflower Syrup 4.jpg

You will find elderflowers from late April to almost the end of July, depending on where you live.

Also, it is extremely important that you do not pick too many elderflower heads from the same bush. This is because the birds feed on the elderflower berries in early autumn.

This recipe will give about 3 litres of elderflower syrup.

Ingredients

  • about 30 big heads of elderflower (do not rinse them as you will loose a lot of flavour, remove bugs, insects, leaves etc.) remove the thick stems and trim off the smaller stems as much as you can

  • 3kg of granulated sugar

  • 3 lemons, preferably organic

  • 3l water

  • 70g citric acid (food-grade, looks a bit like caster sugar)

Elderflower Syrup 5.jpg

Method

In a large pot (containing about 5-6l) add water and bring to boil, then turn the heat off.

Add sugar and citric acid and stir continuously until all the sugar and citric acid have completely dissolved.

Remove from the heat and cool to room temperature.

Add elderflower heads, sliced lemons and gently stir, making sure the elderflowers are completely submerged.

Elderflower Syrup 6.jpg

Put the lid on and leave for 3-4 days but give it a gentle stir once a day so the flavour of the elderflower can diffuse into the syrup.

Strain the syrup into a bowl through a fine-meshed sieve previously lined with muslin cloth (you can use cheesecloth or simply kitchen paper towel). Preferably, the bowl should have a spout since it will be very useful and helpful when pouring the syrup into a funnel, at the later stage when you are bottling the syrup.

View fullsize Elderflower Syrup 7.jpg
View fullsize Elderflower Syrup 8.jpg
View fullsize Elderflower Syrup 9.jpg

The syrup is now ready for bottling. Sterilize your bottles and lids or other closures for glass bottles with the method that you are most familiar with. I use the dishwasher method by placing the rinsed glass bottles upside down and set it to the highest setting (or the steam setting, if you have one) and put them through a cycle. Leave the bottles to cool slightly in the dishwasher and remove each one as you need it.

With the help of the funnel, pour the syrup into your sterilized bottles. Make sure you close the bottles tightly with lids or other closures for glass bottles.

No oxygen should enter the bottles, preventing the bacteria to feed and multiply on the oxygen.

It is the multiplying of the bacteria that will form CO2 which causes bottles to “burst, or explode” and the cordial to ferment, go fizzy, and become very slightly alcoholic.

It is a good idea to put the bottles in the fridge, where the syrup will last for months, at least until Christmas, when you will be ready for that Elderflower Prosecco cocktail.

Elderflower Syrup 10.jpg
May 18, 2021 /tina oblak
elderflower, refreshing elderflower beverage
Pantry, Syrup, Non alcoholic drink
4 Comments
Herb salt 1.jpg

Herb Salt recipe

Beans and Srdines
April 20, 2021 by tina oblak in Pantry, Seasoning, condiment

I am a big fan of using fresh herbs in cooking but sometimes having a long shelf-life alternative is quite handy for adding flavour and aroma to the dishes.

Herbs are in abundance in spring and summer and this is the time to use them for making herb salt.Use the herbs from your herb garden, windowsill pot or simply buy the herbs at your greengrocer, market or supermarket. If buying the herbs you do not have to worry about their seasonality as they are available in stores all year round.

Herb salt is great to use for example on roasted potatoes, as a herb rub for meat, chicken, stake. Add to vegetables before roasting, put in soups, casseroles and many more. You can use it to season cooked food, maybe sprinkle it on chips or French fries, grilled cheese or grilled polenta, grilled vegetables, or just use it in place of regular salt.

Really easy to prepare and stored in pretty glass jars make a great little home made gift for Christmas or birthdays, thank you gift for your foodie friends and family, and it will be a fantastic addition to their collection of kitchen spices. Add a nice festive ribbon and a tag and you are ready to go. I love to store the herbs salt in quite small glass jars and used them in Christmas stockings.

Herb salt 2.jpg

For this recipe you will need a selection of fresh and dried herbs. Maybe you will want to avoid herbs with high water content like fresh basil, fresh parsley or fresh coriander, fresh dill and similar.

It is a great idea to customize your herb salts creating different blends and maybe even adding dried garlic, dried onions and other dried spices for example. The combinations are endless and you can vary the ratio of fresh herbs to sea salt depending on your own preference.

In this recipe, I use a mixture of herbs but you can make a single herb salt, using maybe just sage or rosemary for example.

Ingredients

  • 100g in total of you preferred selection of herbs (I used 100g in total, more or less equal weight of fresh sage, fresh rosemary, fresh marjoram, fresh thyme and dried oregano)

  • 200g coarse sea salt

  • 100g fine sea salt (can use pink Himalayan salt, flake, fleur de sel, etc.)

These quantities will give you about 400g of herb salt.

Method

Start by selecting you favourite herbs and make sure they are really fresh; it is the very fresh herbs that contain high levels of essentials oils.

Wash the herbs (only if they are particularly dusty or have been sprayed) with cold water, dry thoroughly with kitchen paper or cotton kitchen towel (sandwich the herbs between the paper towel) and gently pat dry.

Remove the stalks, coarse stems and any discoloured leaves and damaged areas. Leave to dry for at least 1h.

Roughly chop the herbs and put them in the food processor/ spice grinder or a blender. Add coarse sea salt and pulse several times, then process until you obtain the consistency of the herbs roughly equivalent to the size of the coarse salt. You can use pestle and mortar or simply cutting board and a sharp knife.

View fullsize Herb salt 3.jpg
View fullsize Herb salt 4.jpg

Stir and mix the herb mixture, add fine sea salt and pulse again and process until you obtain the consistency of sandy texture. You can stop pulsing and processing action sooner if you are not too keen on powdery consistency.

View fullsize Herb salt 5.jpg
View fullsize Herb salt 6.jpg

Now the salt herb mixture needs to be dried.

Spread the herb mixture on a lined baking tray, baking sheet or baking dish in a shallow layer and leave to dry in an airy and warm place for about 3 hours at least or overnight (up to 24 hours) and give it a stir now and again. Once the salt is fully dry, break up any clumps with a fork or back of a spoon.

View fullsize Herb salt 7.jpg
View fullsize Herb salt 8.jpg

Place the salt herb mixture in a clean, dry stoppered jars (glass jar with a tight fitting lid) and store in a cool, dry place.

Salt has always been used as a great natural preserver so you herb salt should last you for at least a year providing you really dried the herbs thoroughly. After this time the intensity of the flavour will gradually start to diminish and the green colour will darken further as herbs continue to dry, however it is still perfectly fine to use.

Herb salt 9.jpg
April 20, 2021 /tina oblak
Herb salt recipe, Home made herb salt recipe, Mediterranean herb salt recipe, Herb salt with fresh and dry herbs recipe
Pantry, Seasoning, condiment
Comment