Beans and Sardines

  • Home
  • About
  • Recipe of the week
  • Recipes
  • Wines
  • Contact

Venetian style Sardines in Savor (Marinated Fried Sardines)

Beans and Sardines
February 02, 2022 by tina oblak in Adriatic Recipe, Appetizers, bite-sized nibbles, brunch, Canapés, dinner, Easy recipe, entrée course, Fish & Seefood, fish starter, Healthy, healthy mael, Istrian cuisine, Istrian dish, Istrian food, Istrian gastronomy, main course, main dish, main fish meal, Nutritious, Nutritious dish, recipe from Northern Ital, Rustic dish, Slovenian cuisine, Slovenian food, Slovenian gastronomy, Small bites, Starters

Marinated sardines is a classic and quintessentially Venetian dish, where sardines are lightly fried and then marinated in onion and vinegar mixture. It is prepared and found on Venetian menus (Sarde in saòr) where typical humble dishes are served all year round The name of the dish comes from the Venetian word saòr, meaning sapore in standard Italian, which translates as flavour, and refers to the fact that the flavour of the marinated fish is elevated by the use of good quality wine vinegar.

This dish originated simply out of necessity, when the catch of the fish was particularly abundant and plentiful, people had to figure out how to preserve food to be able to eat it for days without going bad, as the refrigeration had not yet been invented.

This Venetian dish in origin is also very popular and became a staple dish along the coast of the Slovenian Istra, where local gastronomy was strongly shaped and influenced by the Venetian cuisine, and this is of no surprise, as this land was once part of The Republic of Venice who “left behind” the recipe for marinated sardines and enriched the food habits of the locals, who refer to this dish as Sardele in savor (Sardele na šavor in standard Slovenian) and serve it as a cold starter or sometimes as main. It is made all year round but particularly pleasant to eat cold during the hot summer months due to its refreshing taste.

Unlike the Venetian variety of this dish, Istrian marinated sardines do not include the use of pine nuts or raisins, testimony to the introduction of expensive and unusual ingredients in noble Venice due to a its strong trading activity with the East.

More humble and poorer Istrian variation, to offer extra flavour to this dish, introduced the use of fresh parsley and Mediterranean herbs like rosemary and bay leaves growing in abundance along the coast, instead of pine nuts and raisins, difficult to find and expensive, and therefore out of reach for most households. This variation also introduced the use of red wine vinegar, home made and produced in most households, instead of white wine vinegar, type of vinegar solely used in Venetian recipe.

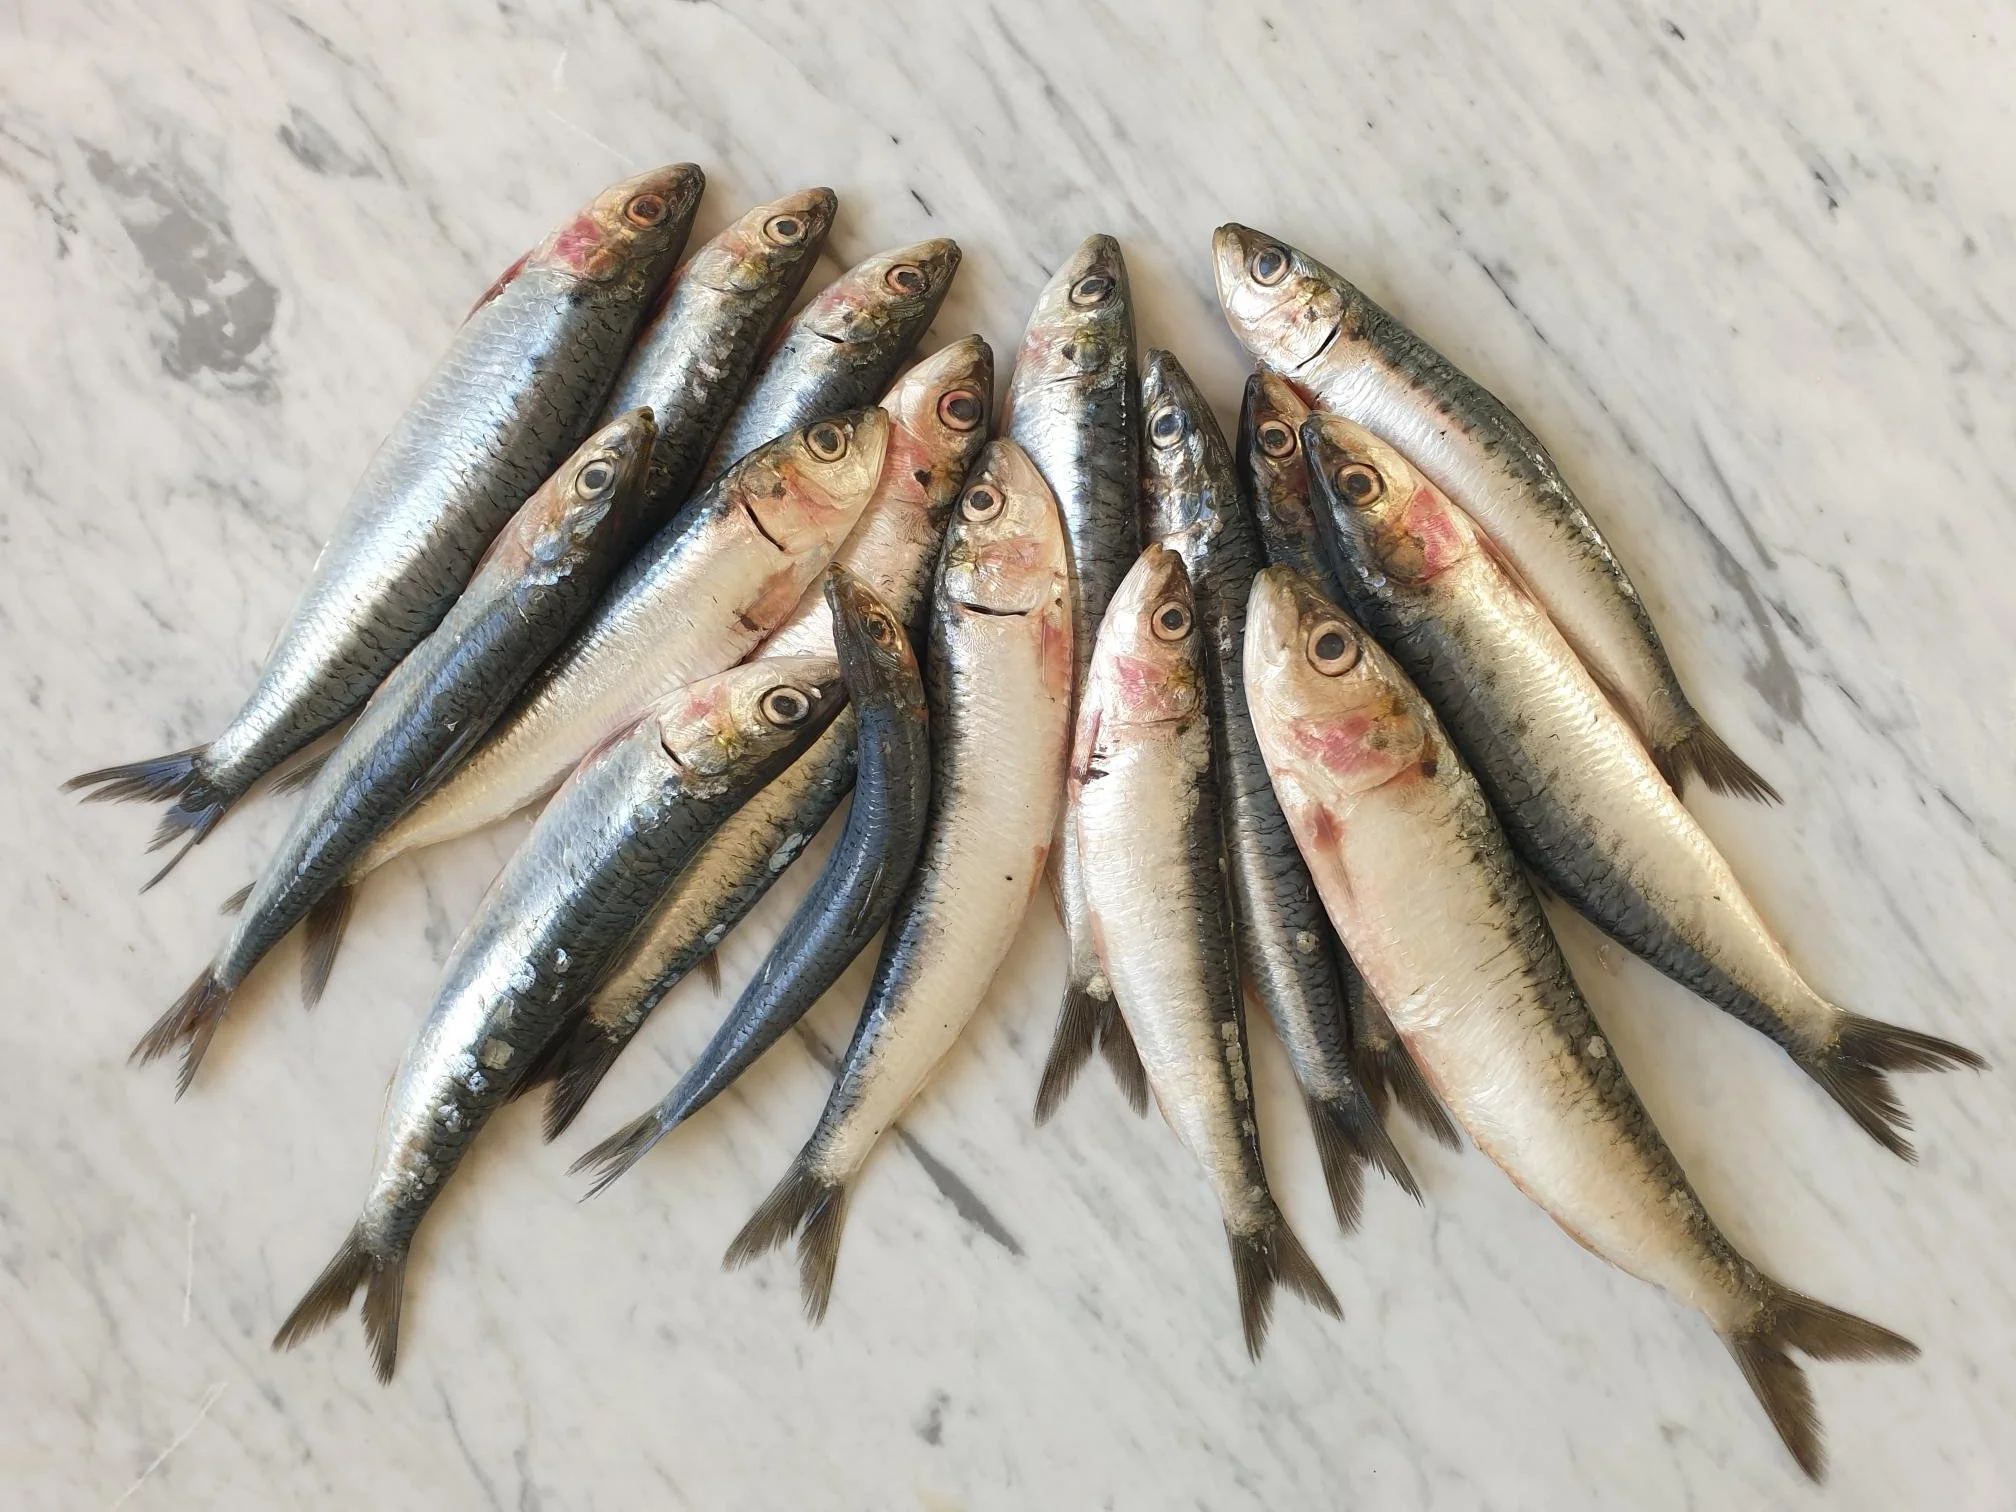
This dish is customarily made with sardines (small ones are particularly suitable) but can be made with other types of fish like sprats, called papaline (Venetian word) by the locals and mackerel being most popular and most common alternative to sardines, and fillets of more prestigious fish like sea bream and sea bass can also be considered.

Once, this was food for the poor, nowadays is a delicacy and a speciality very much appreciated for their unique flavour and highly valued for nutritional content, especially in Slovenian Istra, where, unlike in Venice, this dish, although very traditional in the area, is not easily available in the restaurants, but almost exclusively made in the households.

My nona told me a lovely story, when she was only twenty two years old and got married she moved into the house, where she still currently lives, not very far away from the sea, and during the hot summer nights, the windows would be kept wide open in the hope to get some fresh breeze from the sea to cool the bedrooms to make it easier to sleep.

She could very clearly hear, in the middle of the night, the sound of very small fishing boats leaving the port and going out in the open sea to fish, this is the sound that she remembers as a very special and nostalgic one, and this is because she can no longer hear these sounds, as the majority of those small boats were replaced by only few commercial bigger fishing boats. These days they struggle for a few big catches since over the years the the sea has been depleted of fish. Sadly, fishing has become very difficult and complicated, and so is not very appealing to the younger generations.

I am sharing here my nona's recipe, this is the dish she grew up with, and the one she recalls was also made by her grandmother. This is a traditional, local and authentic family recipe for Istrian style marinated sardines. However, if you wish to “jazz up” this recipe a bit, and make it more “noble” and Venetian, you can add 50g of pine nuts and 50g raisins (previously soaked in lukewarm water for few minutes to help them become more plump).

Ingredients

Serves 4-6

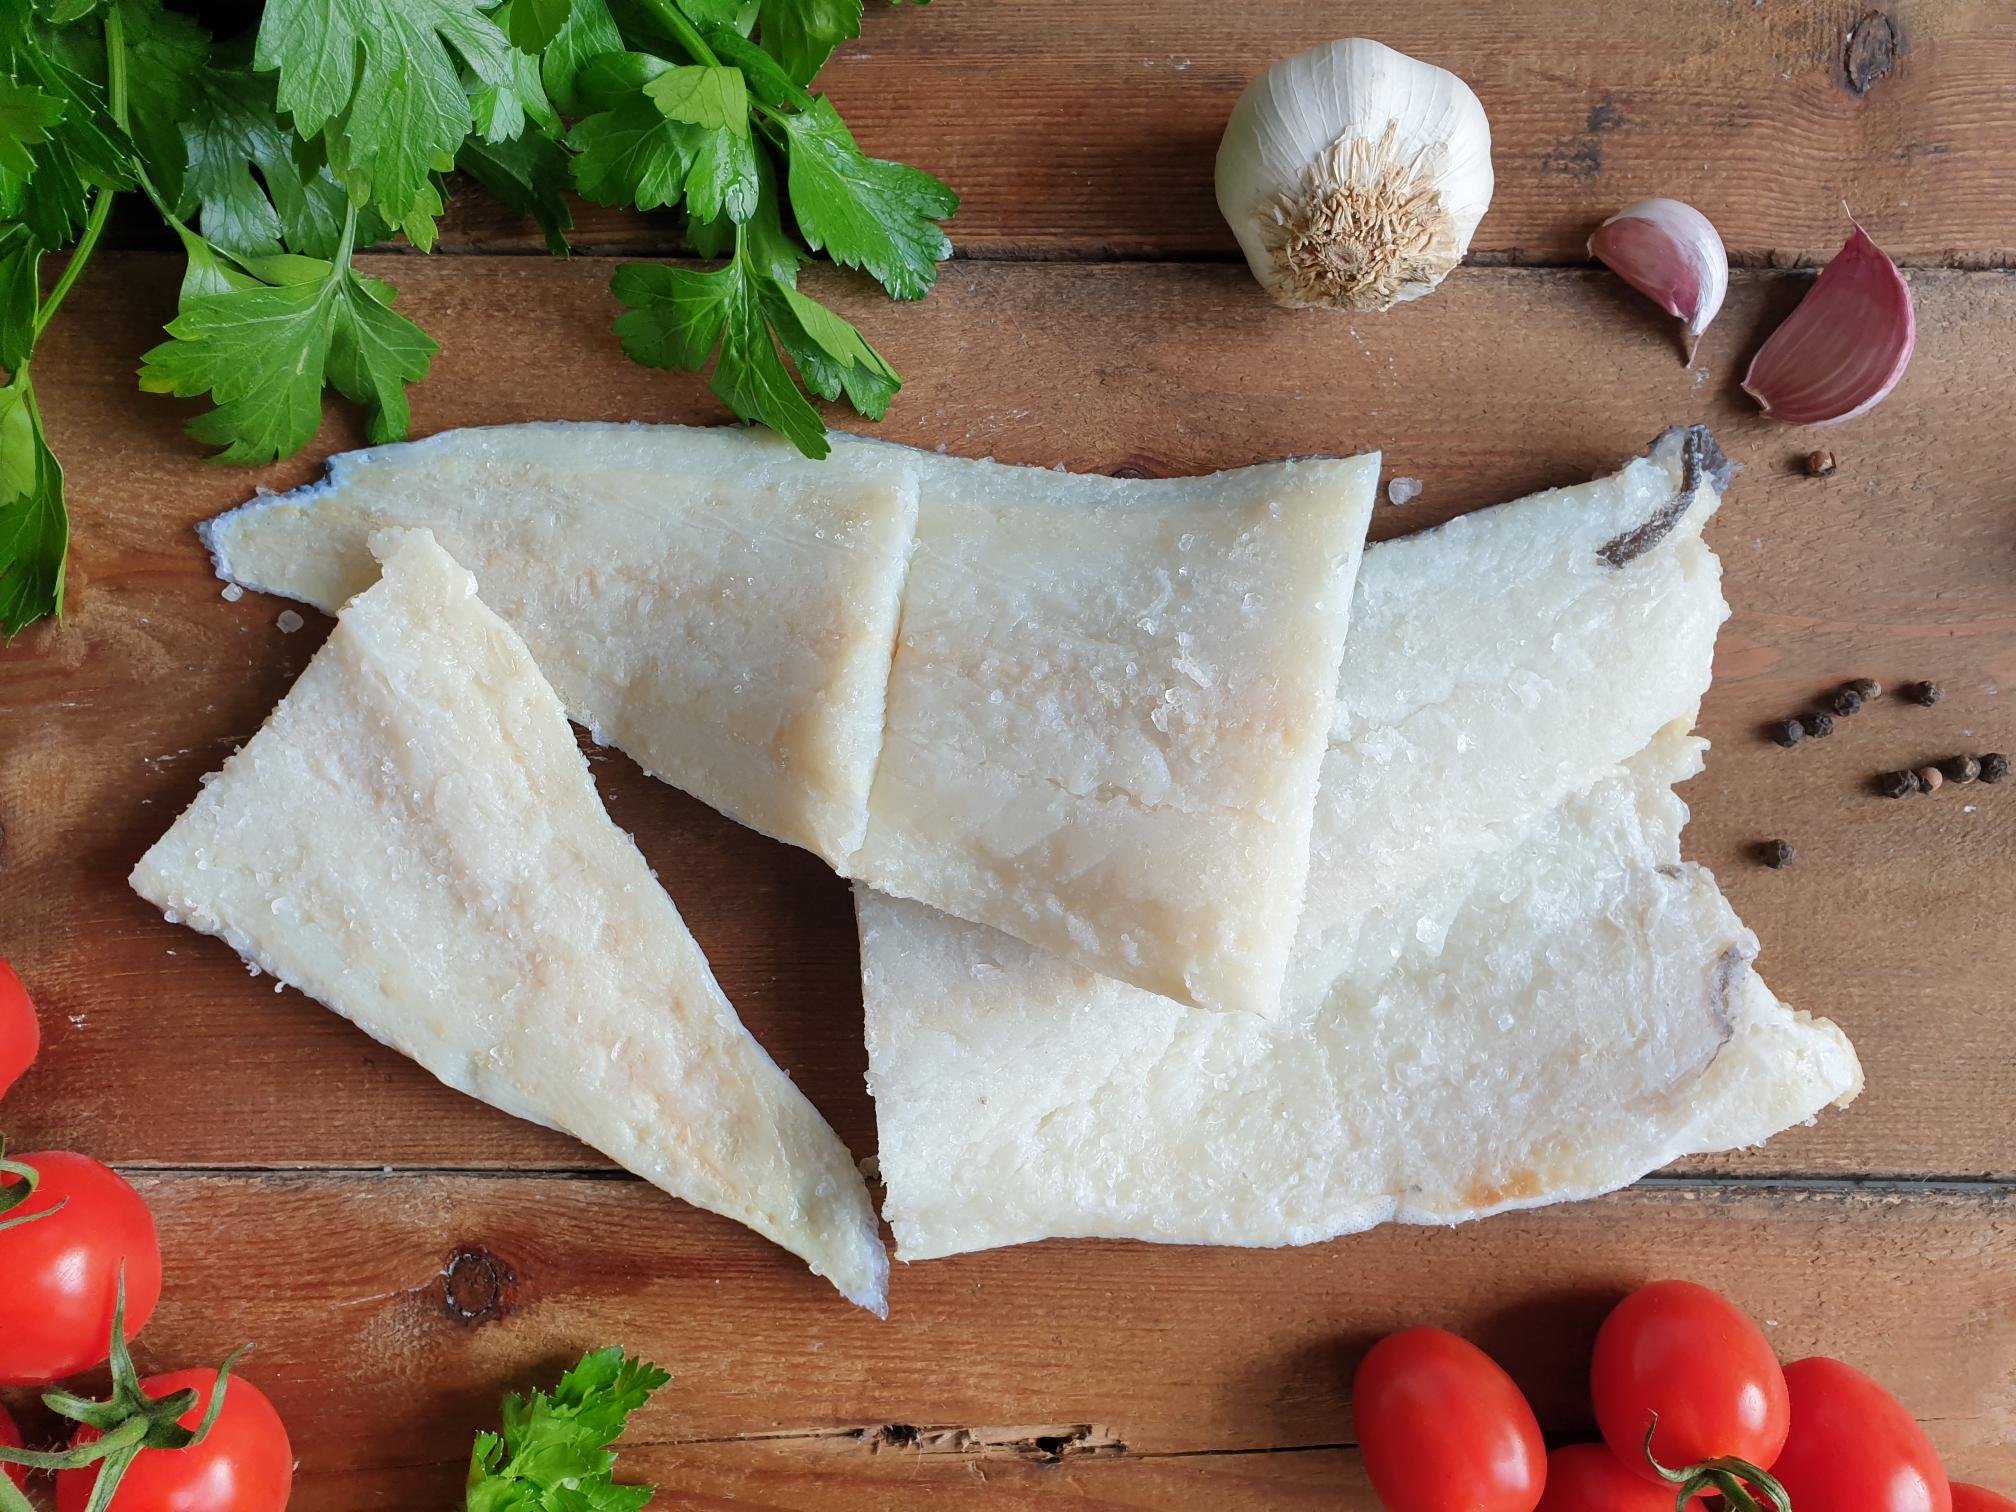
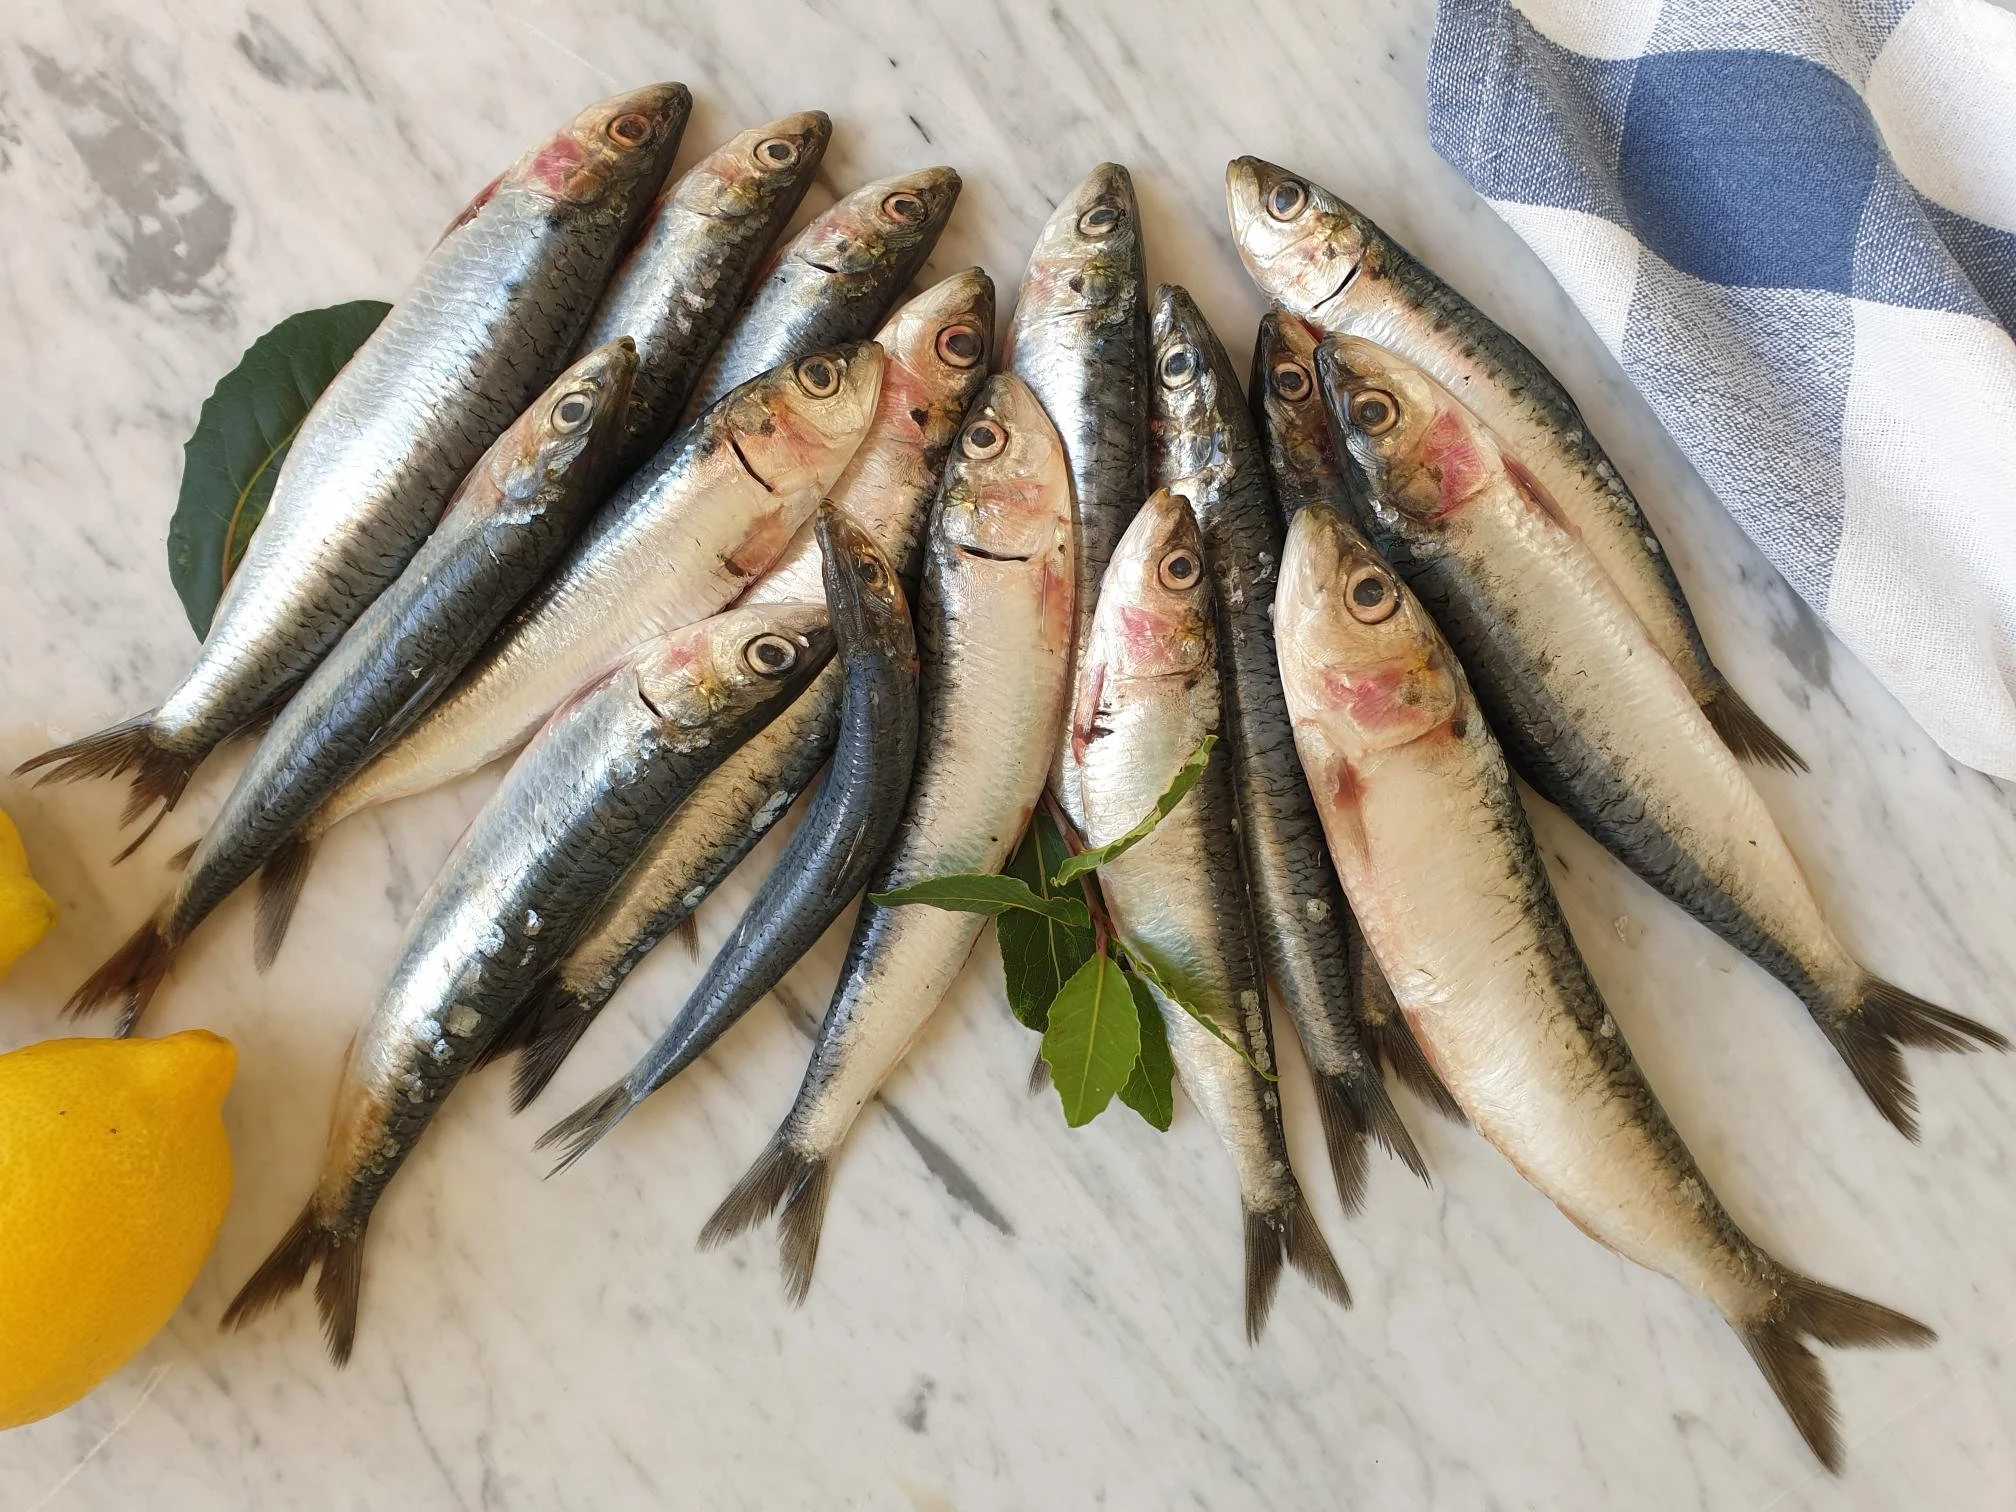
  • 1 kg very fresh sardines, cleaned (scaled, gutted, heads and central bone removed and butterflied)

    (ask fishmonger to prepare them for you if uncomfortable with the task)

  • all purpose flour (quantity enough to flour the sardines)

  • 400 ml frying oil

  • 5 Tbsp extra virgin olive oil

  • 500 g onions, peeled and thinly sliced

  • 5 whole black peppercorns

  • 1 Tbsp white dry breadcrumbs

  • 100 ml white or red wine vinegar

  • 1 bay leaf, fresh or dry

  • 1 small fresh rosemary spring

  • very generous pinch of fresh flat leaf parsley (about 2g), finely chopped

  • sea salt

Method

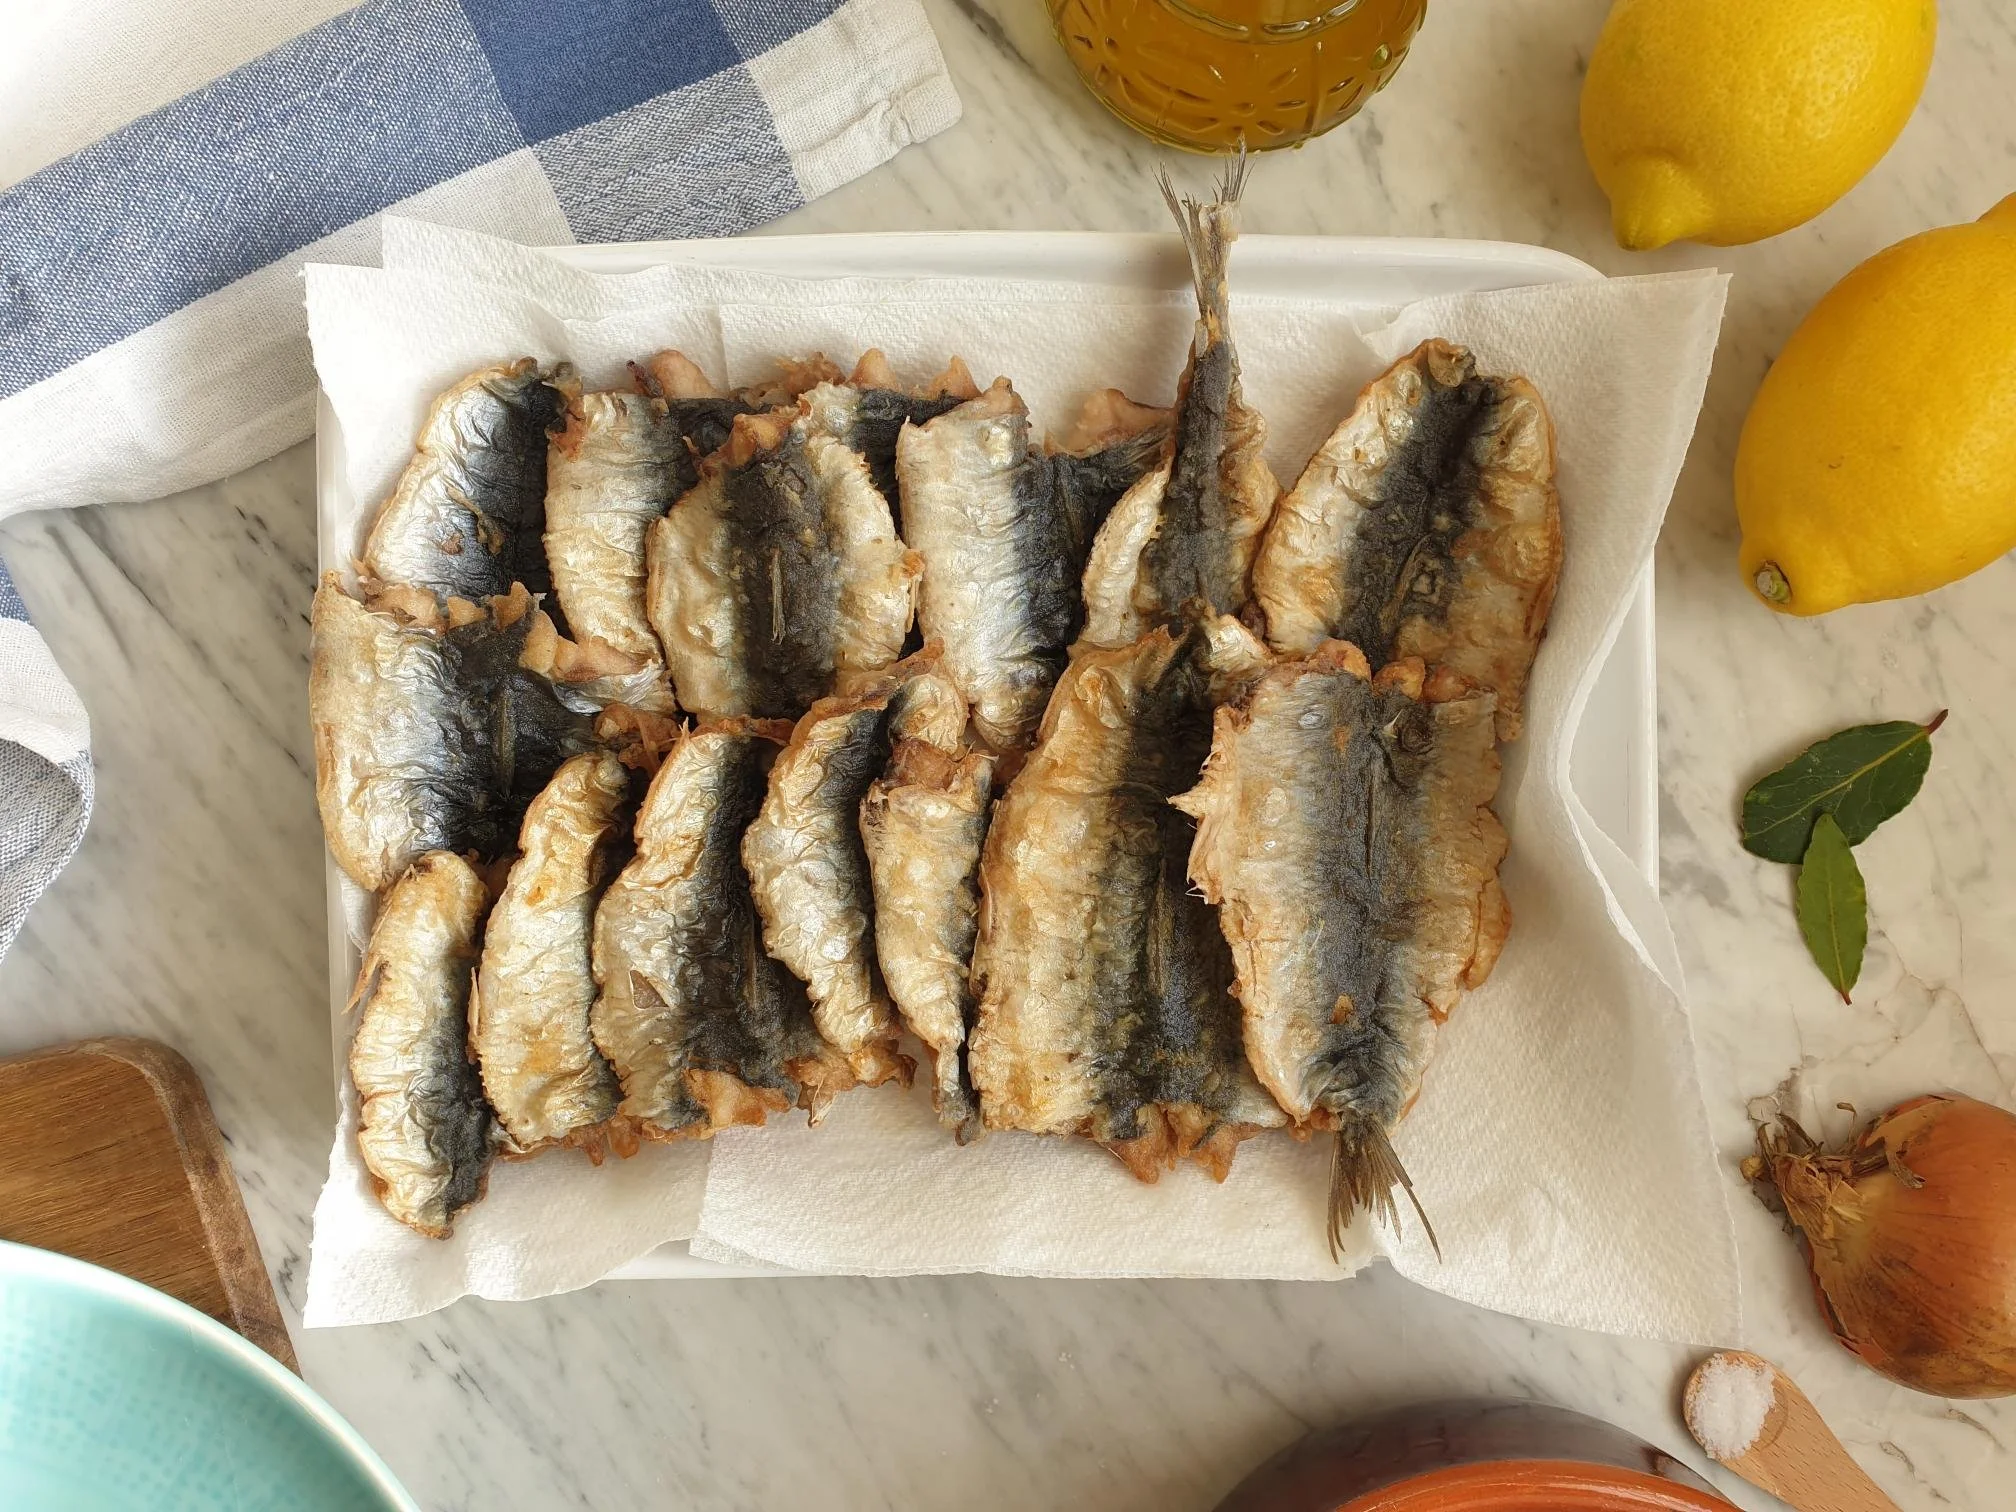
Cut the heads of the sardines, gut them and remove the central bone. Butterfly the sardines, rinse them well under cold running water and pat dry thoroughly with the kitchen paper.

View fullsize Sarde in saor 4.jpg
View fullsize Sarde in saor 5.jpg

Coat them in flour and shake off flour in excess.

View fullsize Sarde in saor 6.jpg
View fullsize Sarde in saor 7.jpg

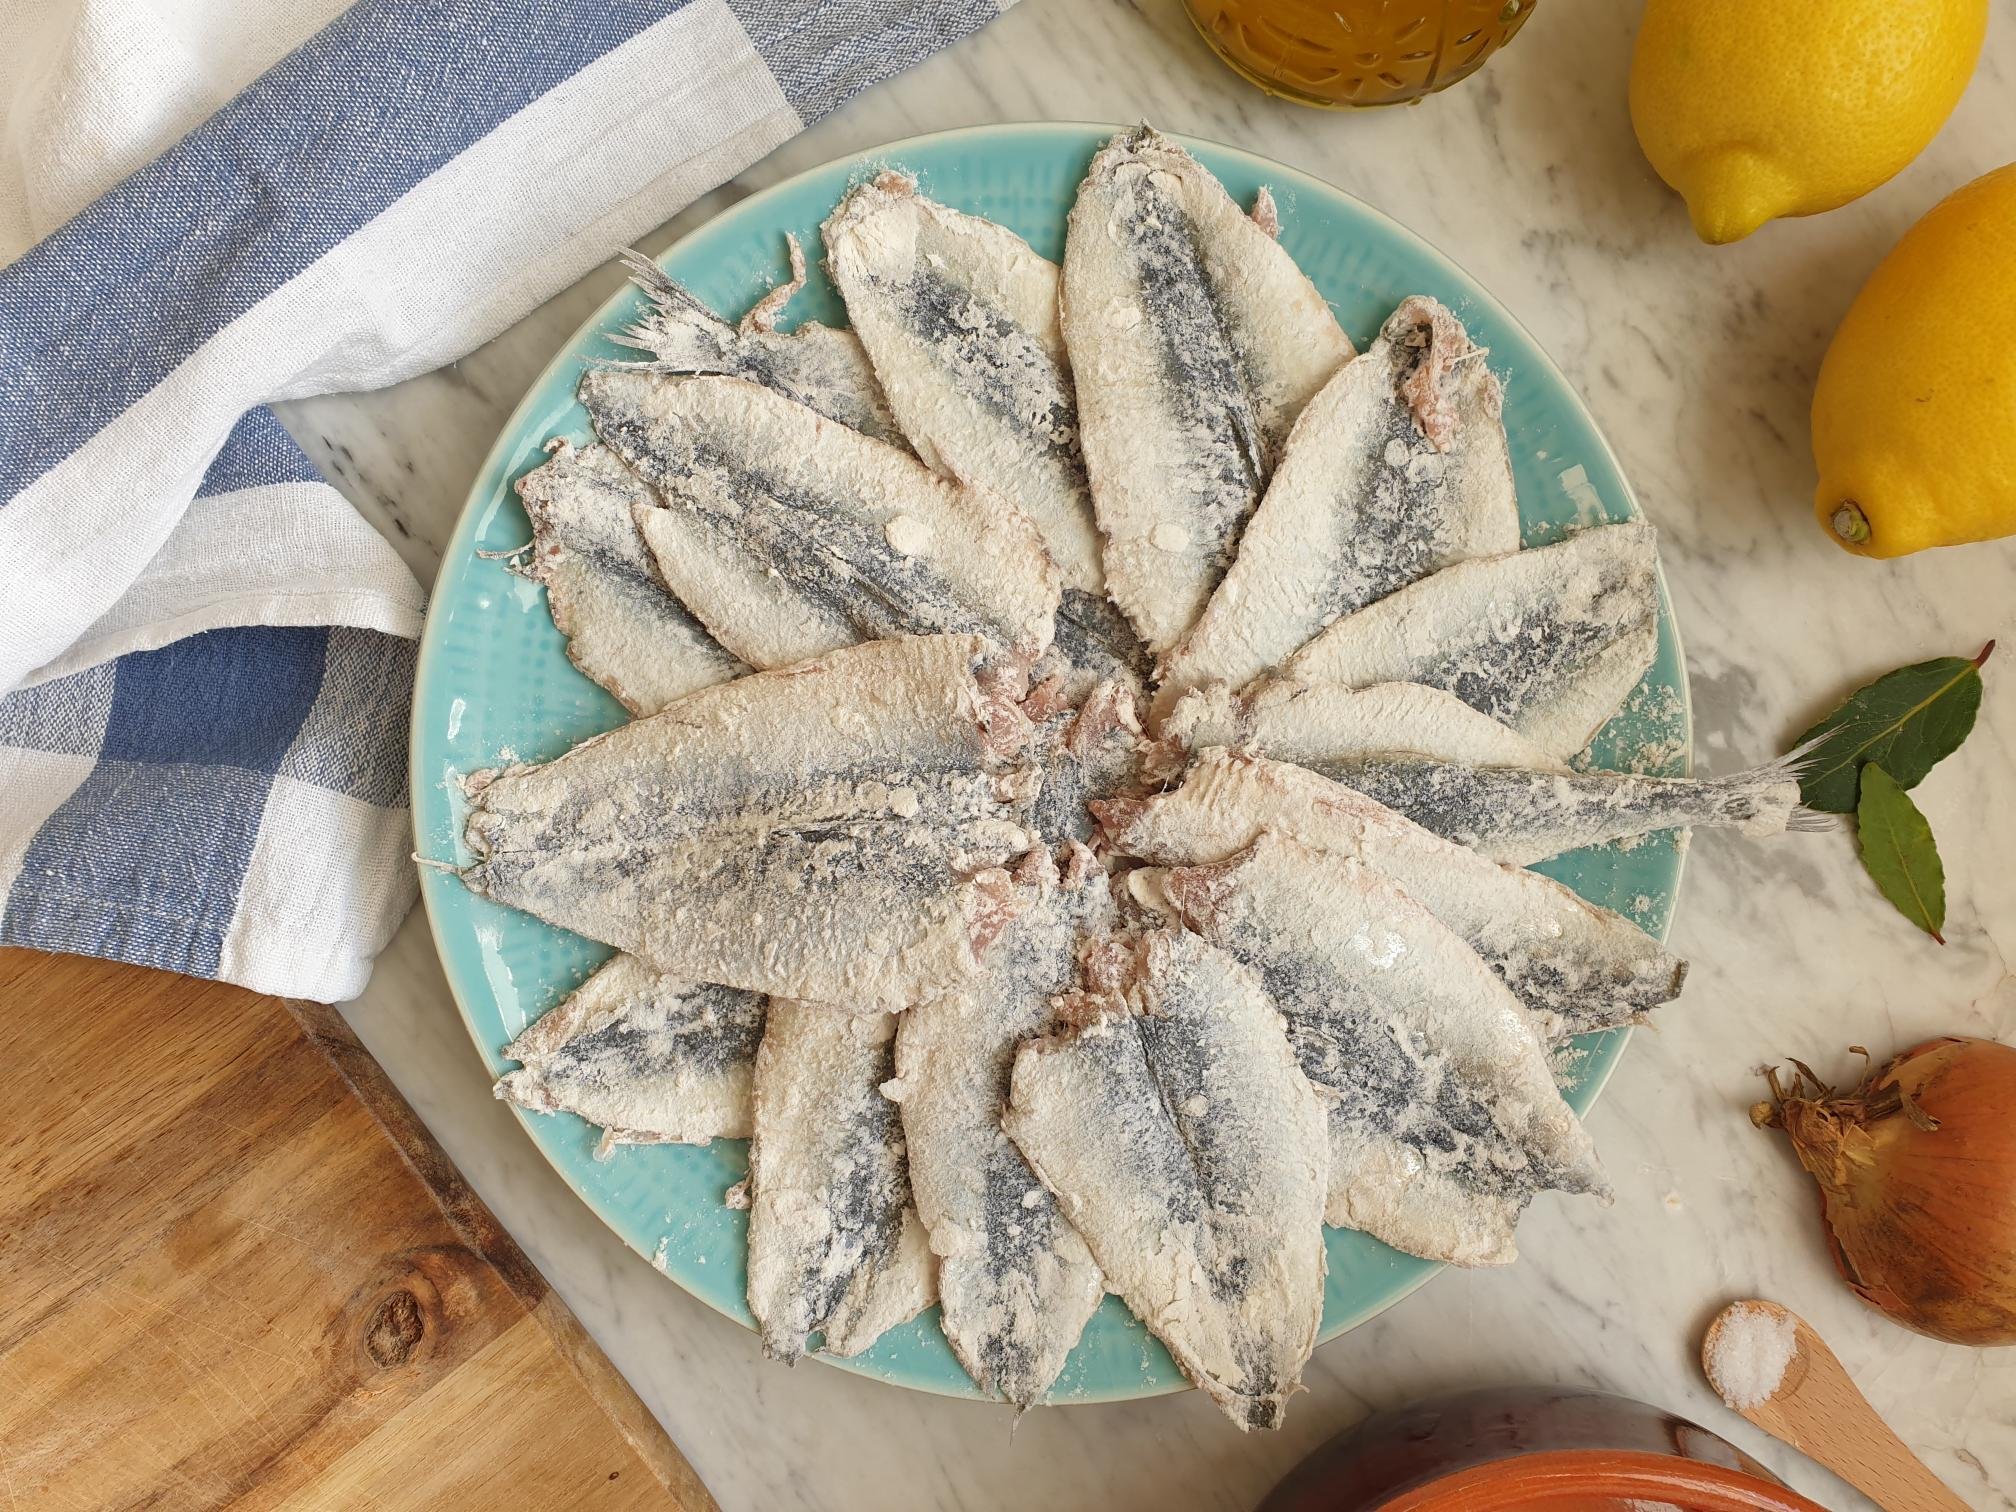
Place frying oil in a frying pan, heat it up and fry gently and quickly the sardines, 2 minutes on each side is sufficient. They should have a light, not very crunchy, coating coating.

Drain well on a kitchen paper.

Season well with sea salt and set aside.

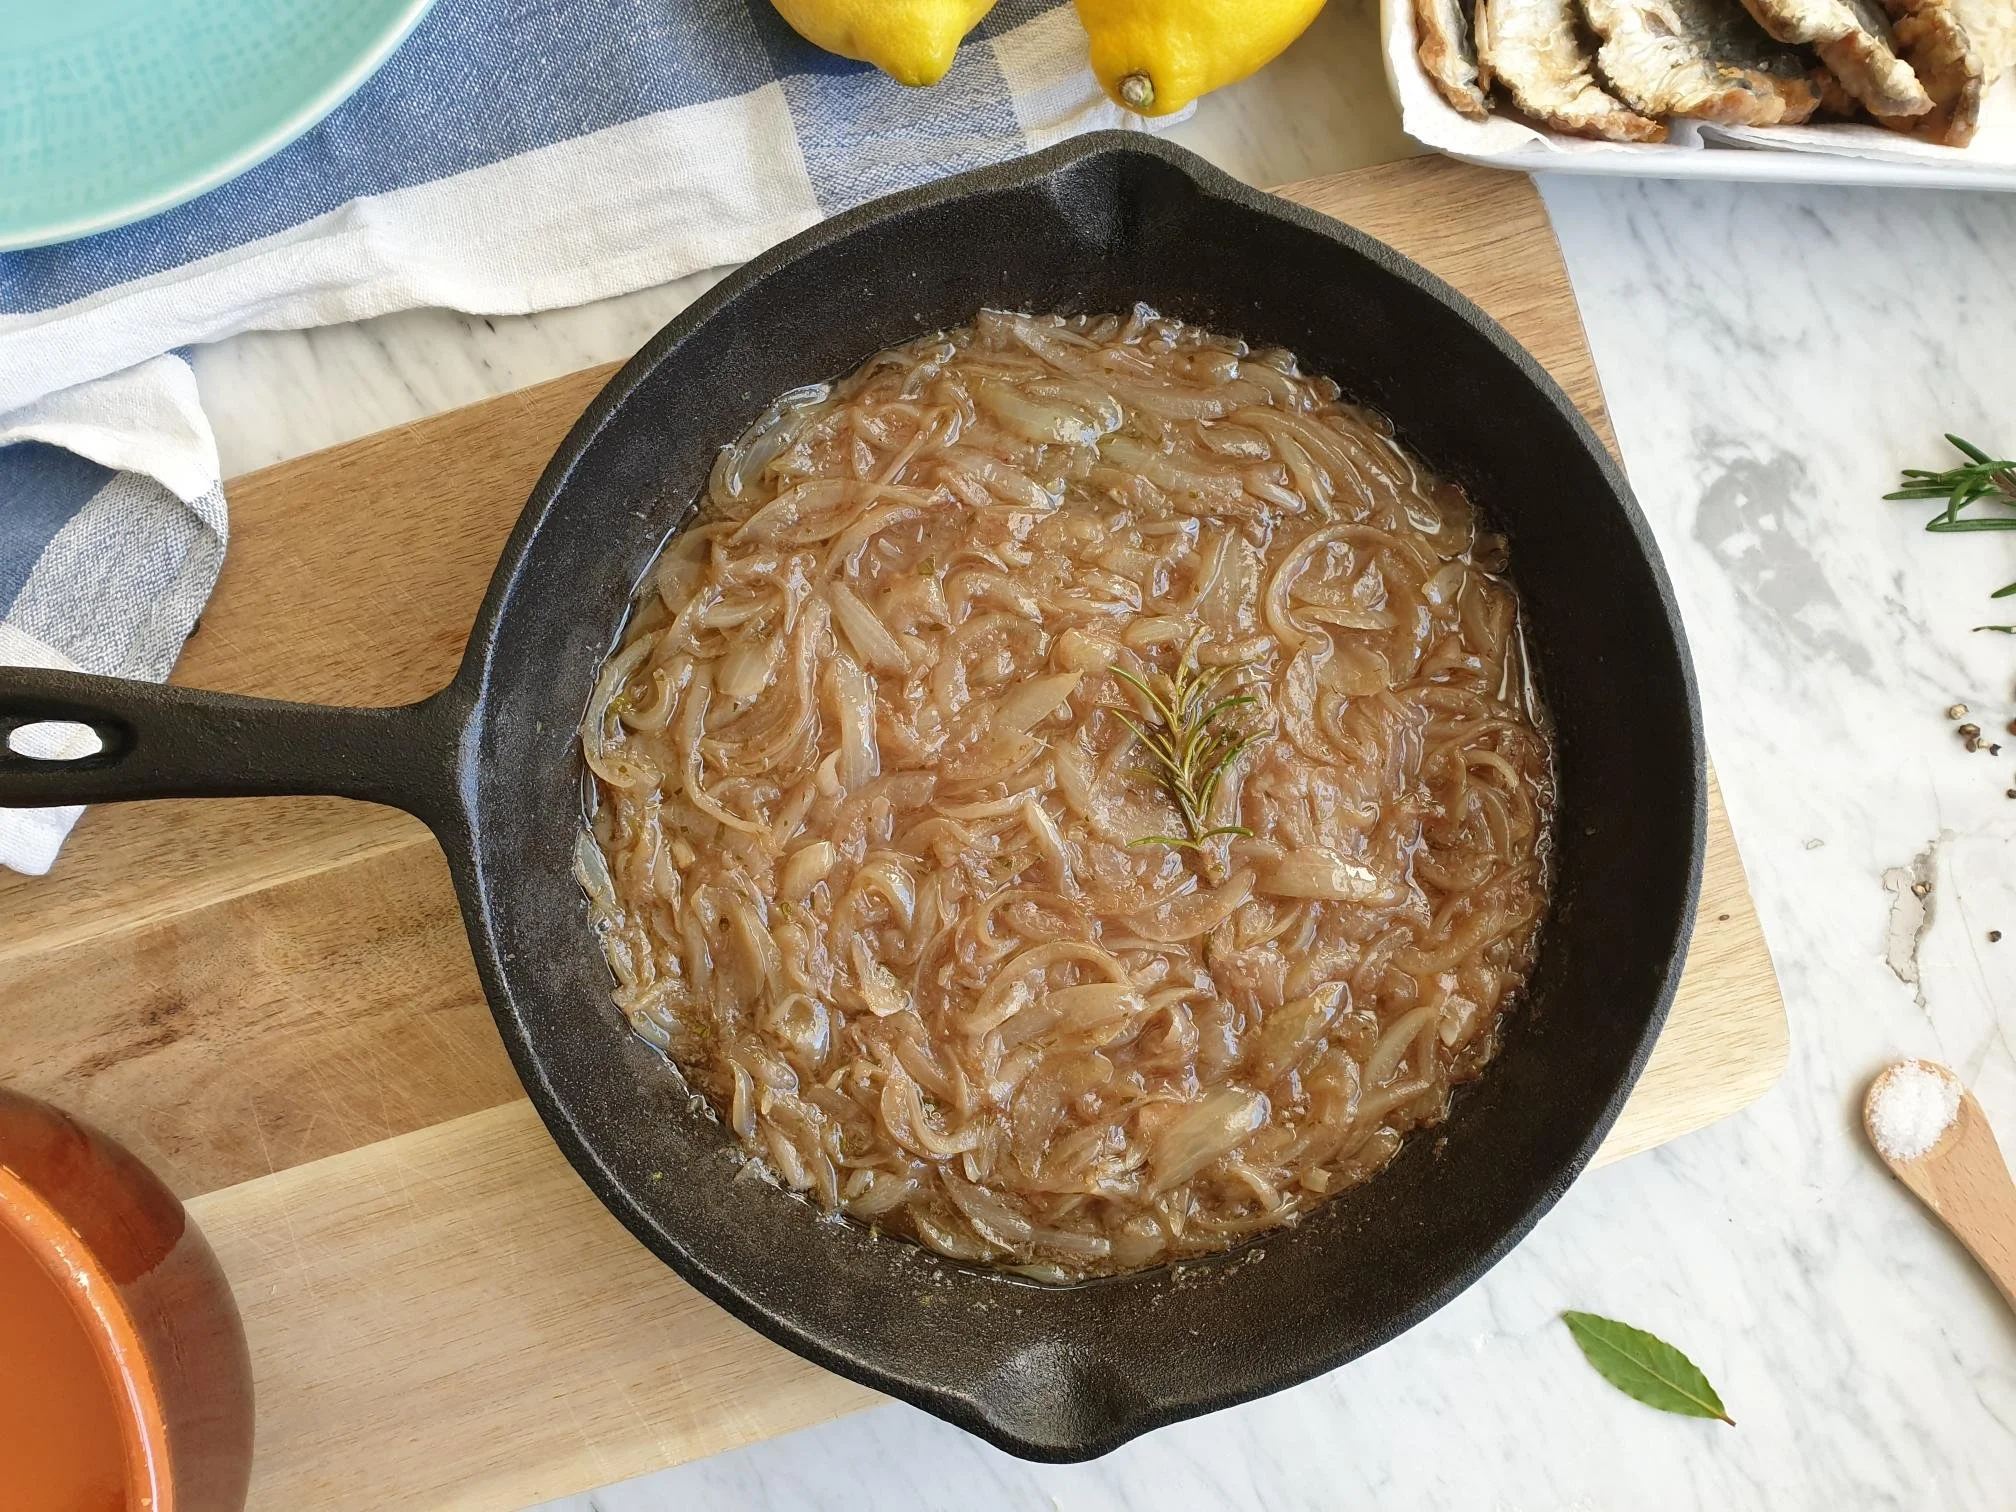
Peel the onions and slice them thinly.

View fullsize Sarde in saor 10.jpg
View fullsize Sarde in saor 11.jpg

In a separate frying pan, ideally non stick, put extra virgin olive oil and heat a bit.

Add the onions and cook them on a very gentle heat until they become very soft and translucent, stirring often to avoid getting too brown.

View fullsize Sarde in saor 12.jpg
View fullsize Sarde in saor 13.jpg

Add black peppercorns, breadcrumbs, bay leaf, small fresh rosemary spring, finely chopped fresh flat leaf parsley.

Pour in wine vinegar and enough water to completely cover the onion mixture.

View fullsize Sarde in saor 14.jpg
View fullsize Sarde in saor 15.jpg

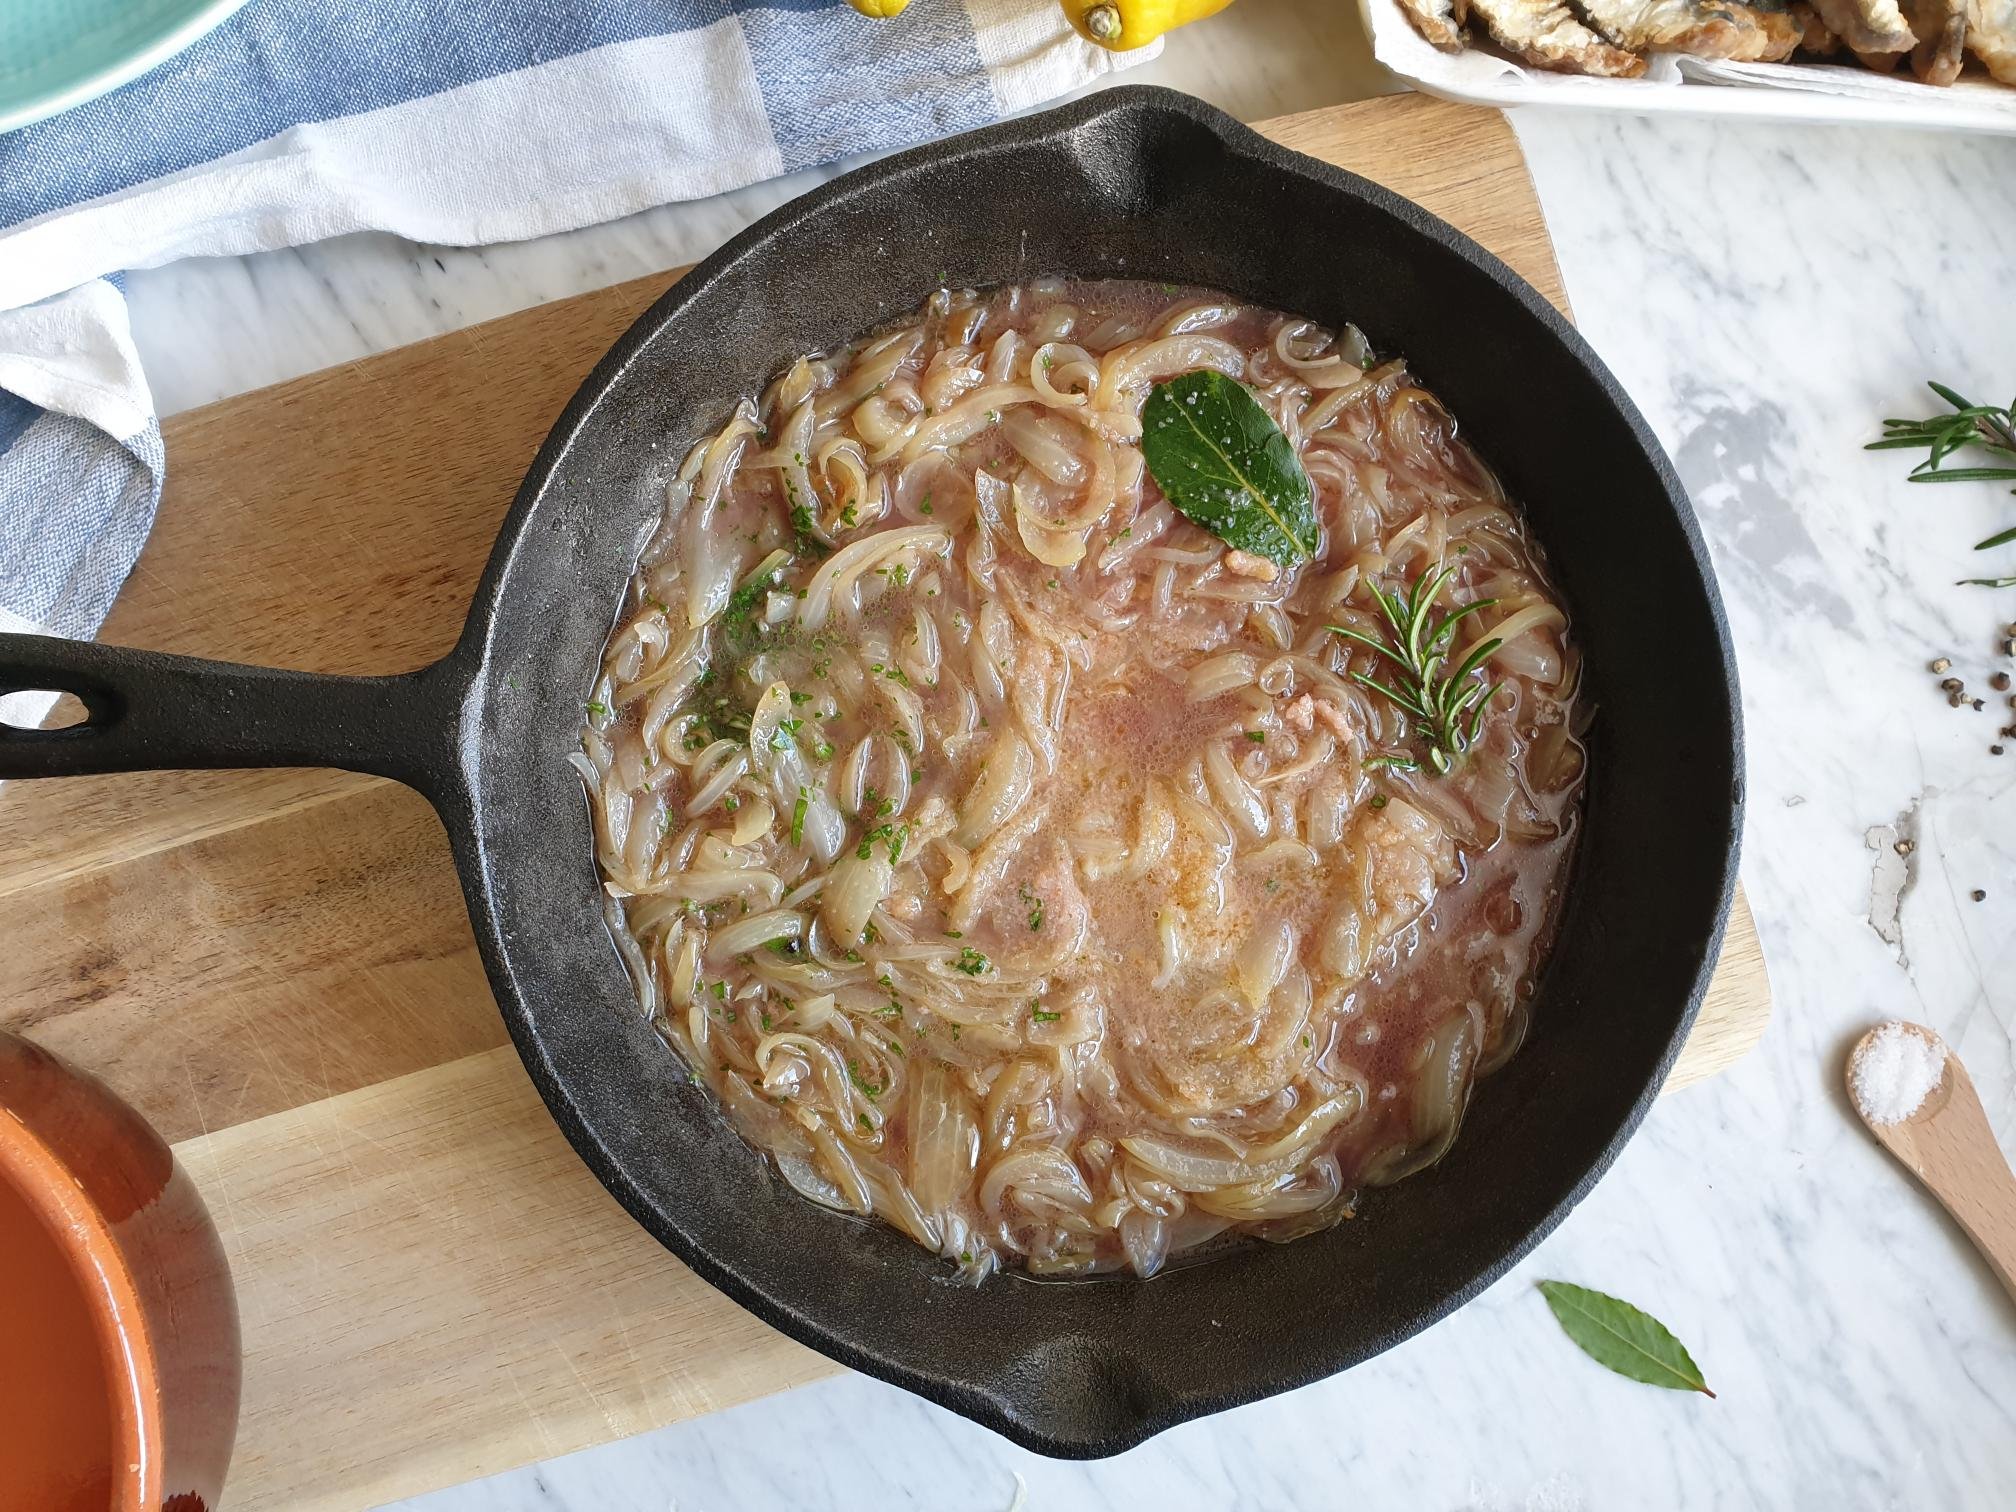
Cook the onion and vinegar mixture on a gentle heat for about 20 minutes. The sauce should slightly thicken and reduce a little, but you should still be left with quite a bit of liquid.

If too much liquid has evaporated during the cooking add a bit more water.

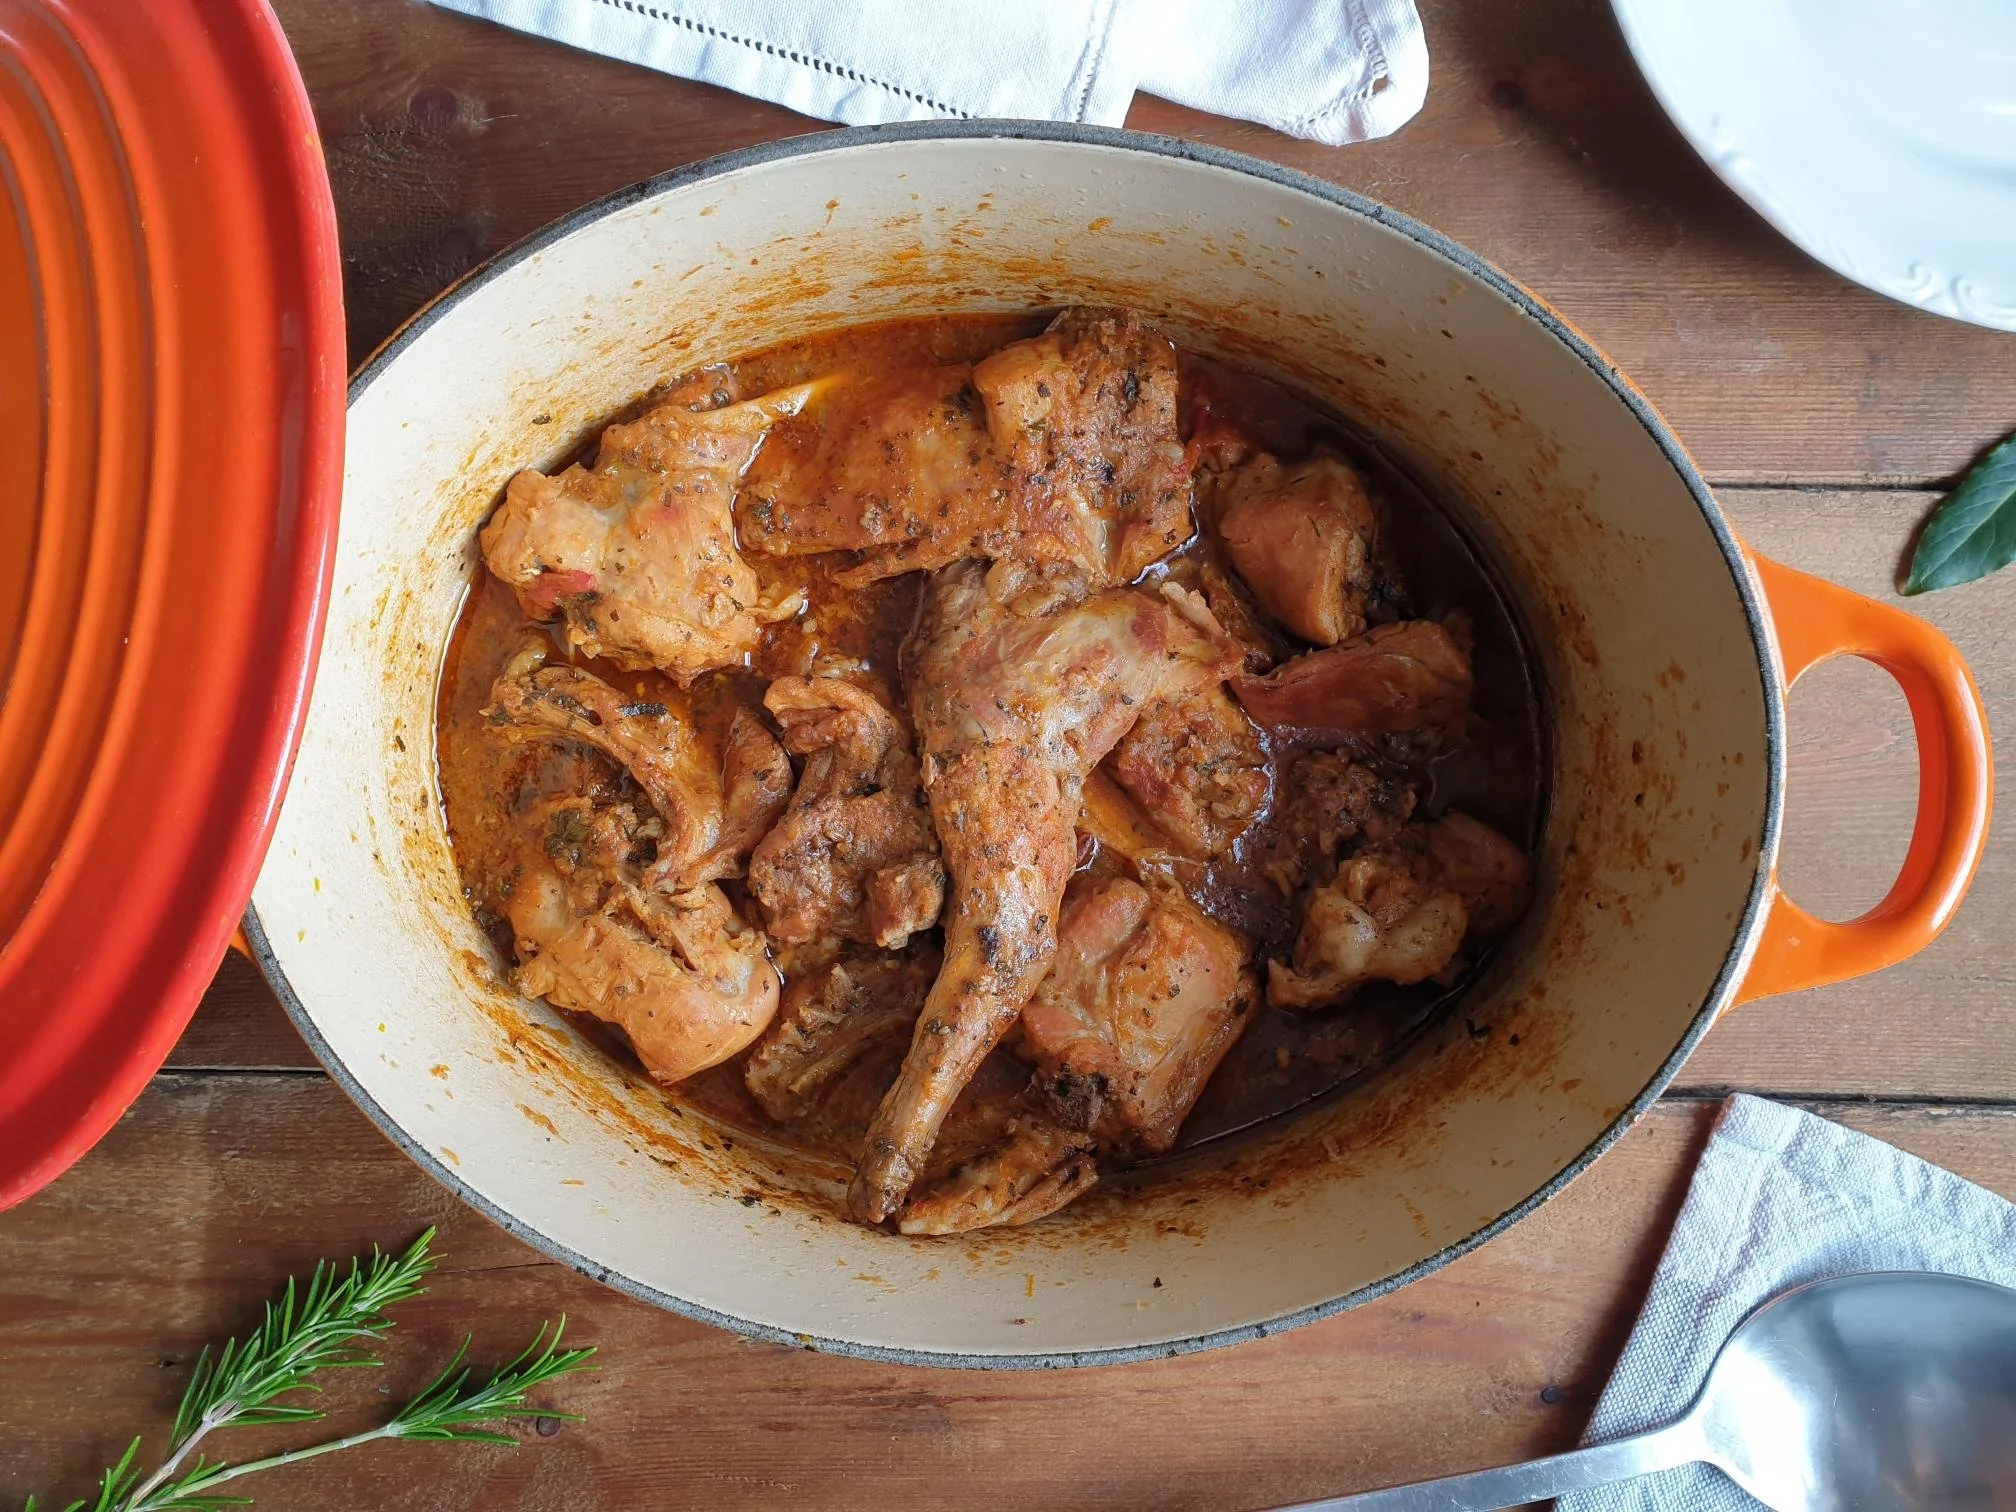
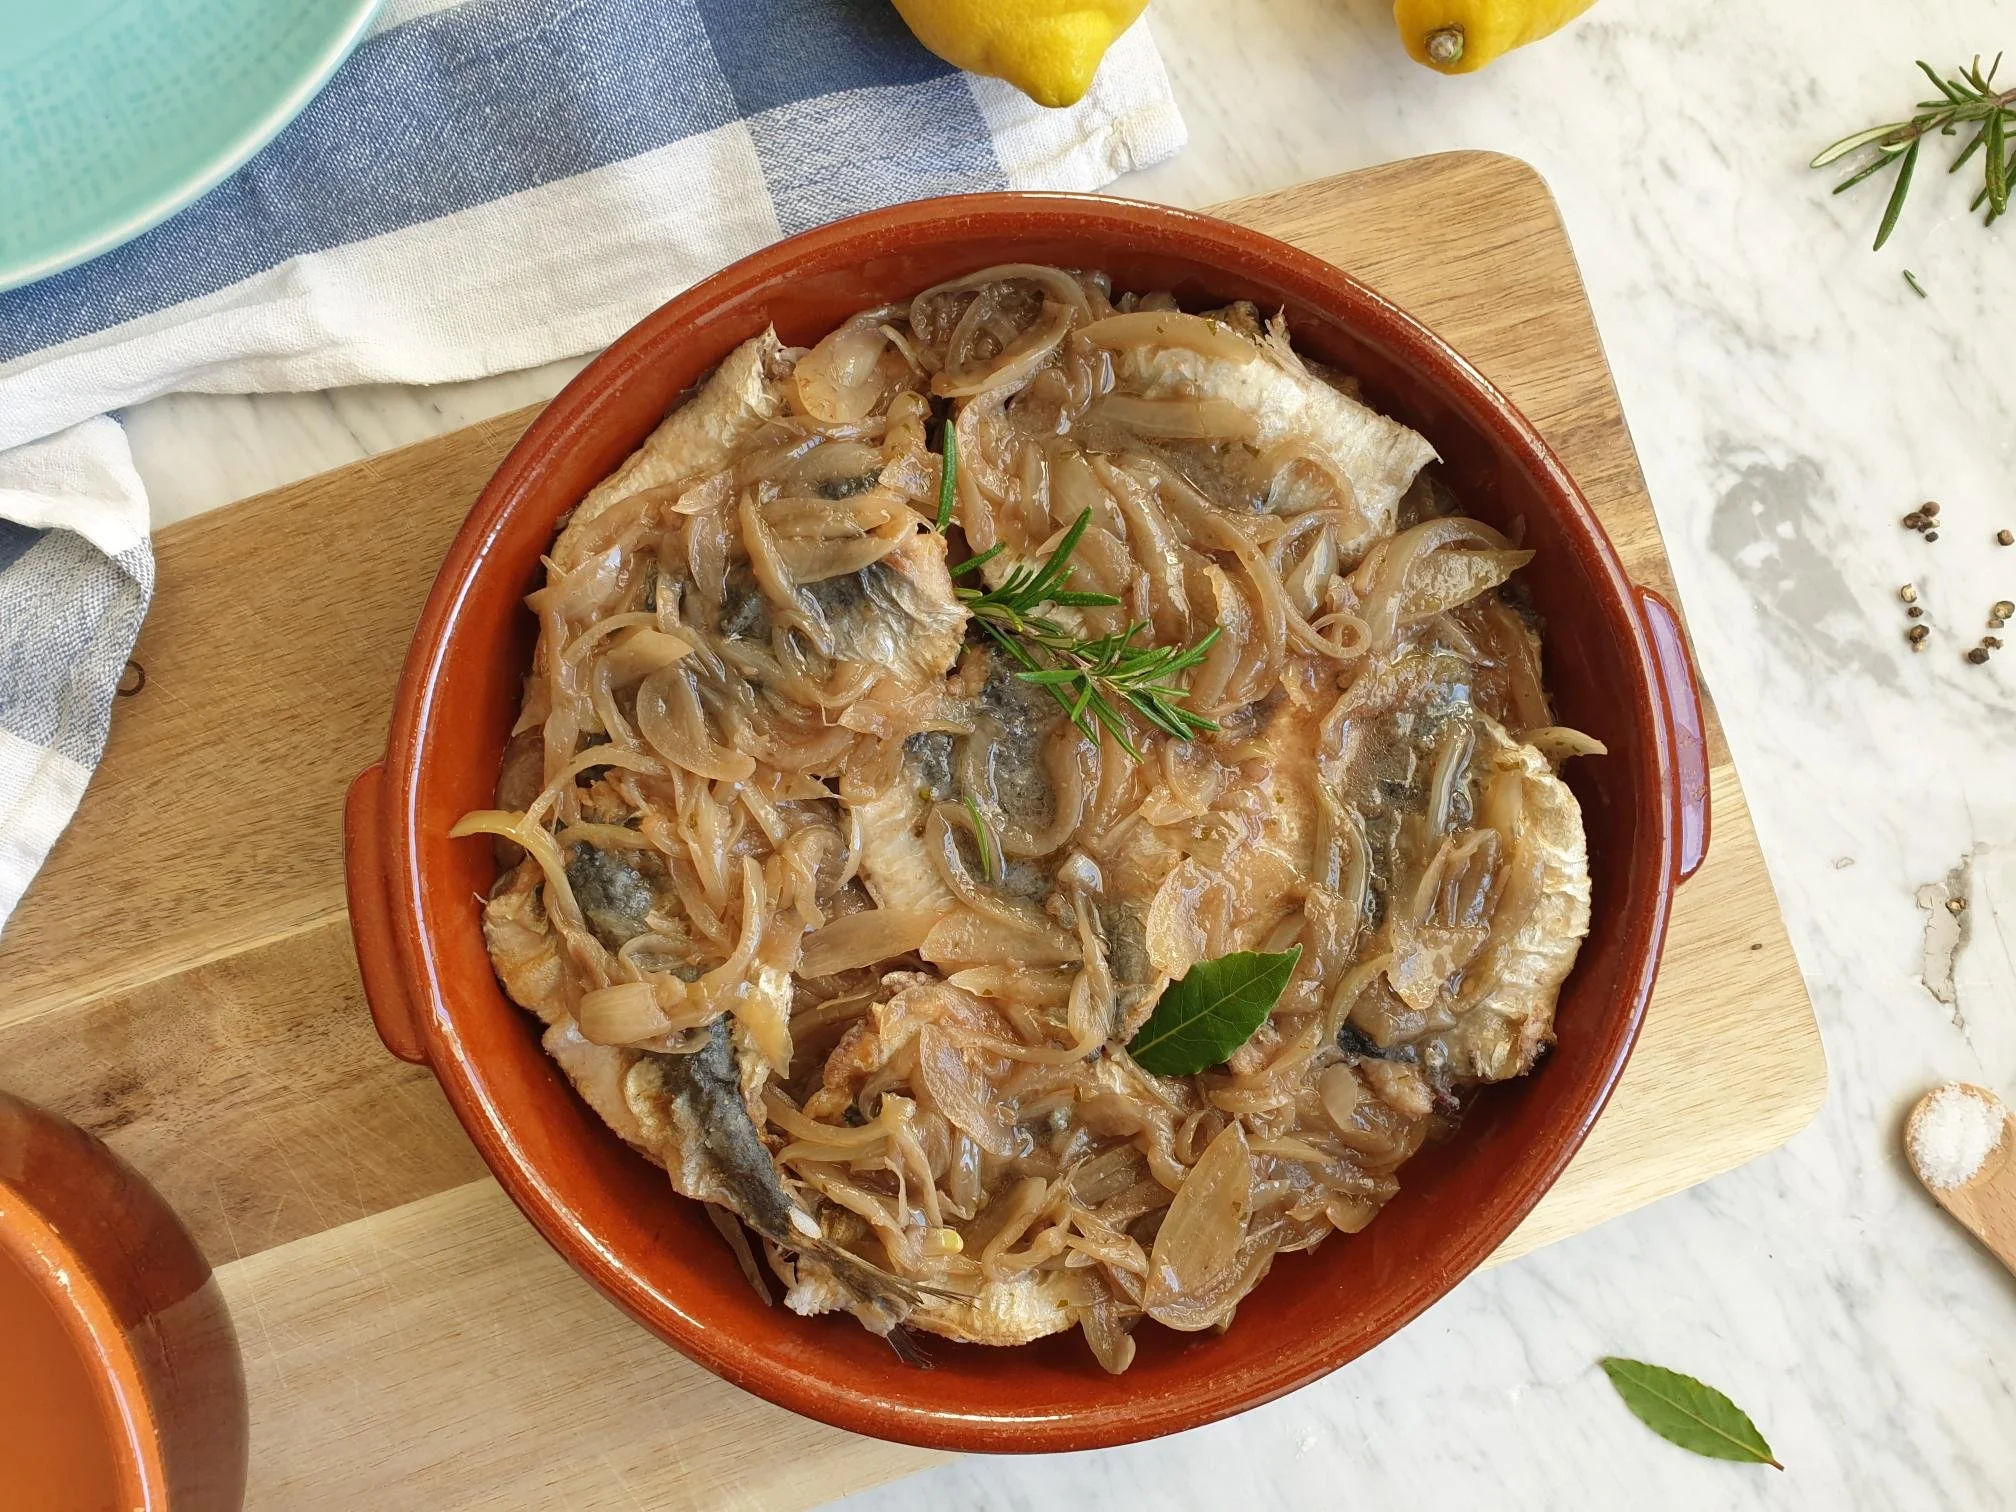
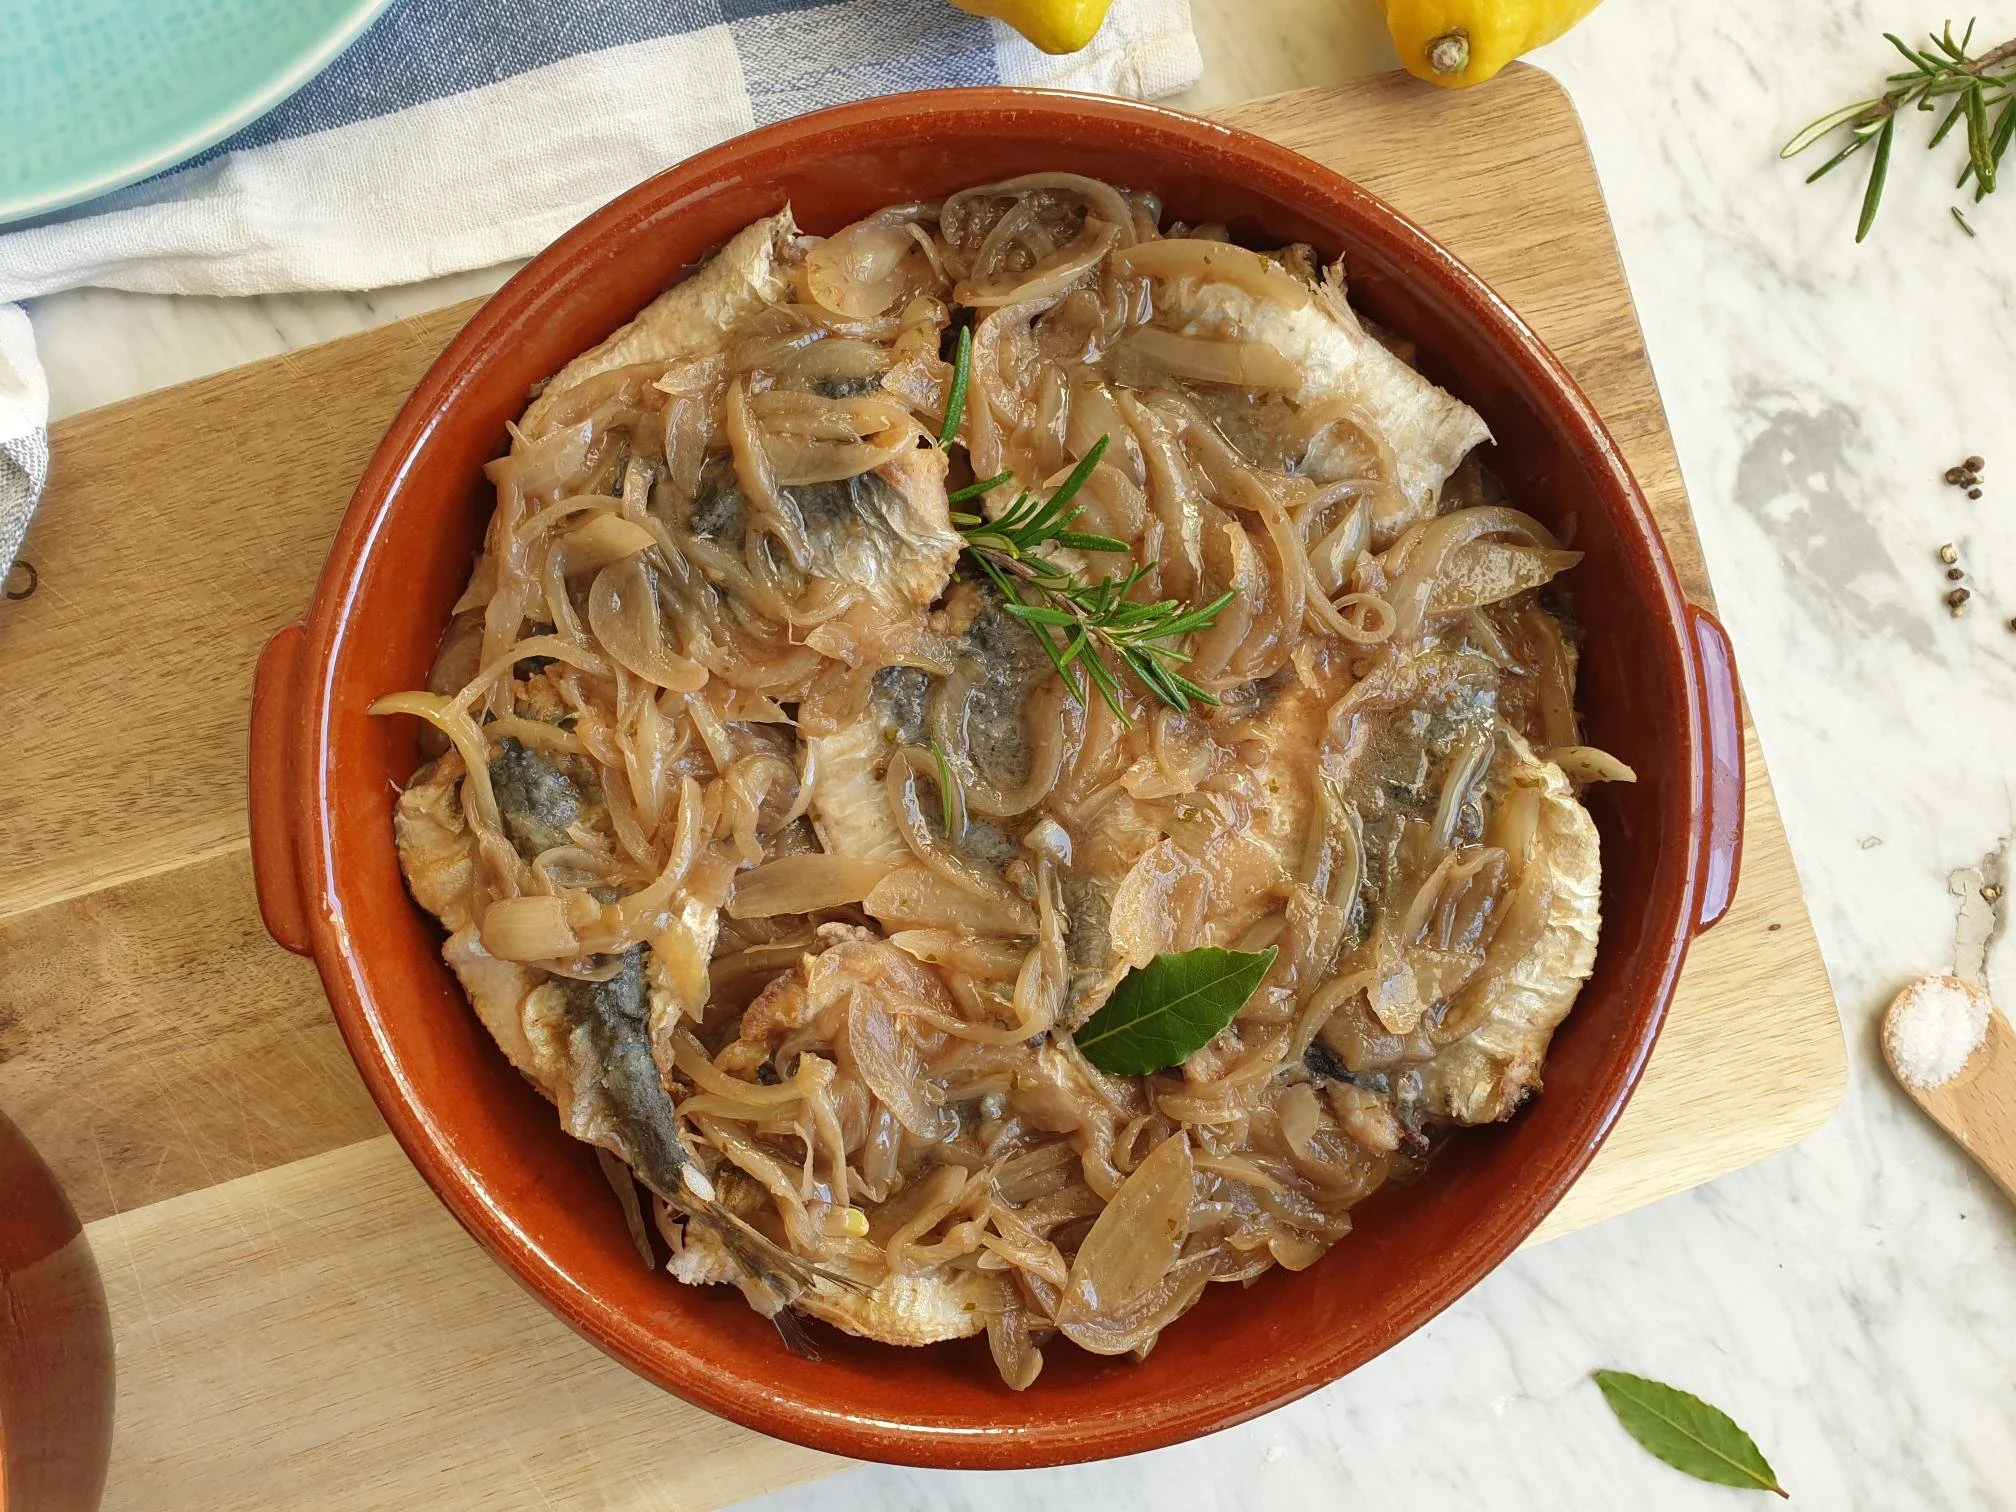
Take a serving dish and alternate layers of onions in the vinegar mix and fried sardines.

Repeat the process of layering until the dish is full. The number of layers will depend on the size of your serving dish but the last layer should be onion and vinegar mix.

If you are left with a bit of vinegary liquid from the onion mixture just pour it over the layers.

View fullsize Sarde in saor 17.jpg
View fullsize Sarde in saor 18.jpg
View fullsize Sarde in saor 19.jpg
View fullsize Sarde in saor 20.jpg

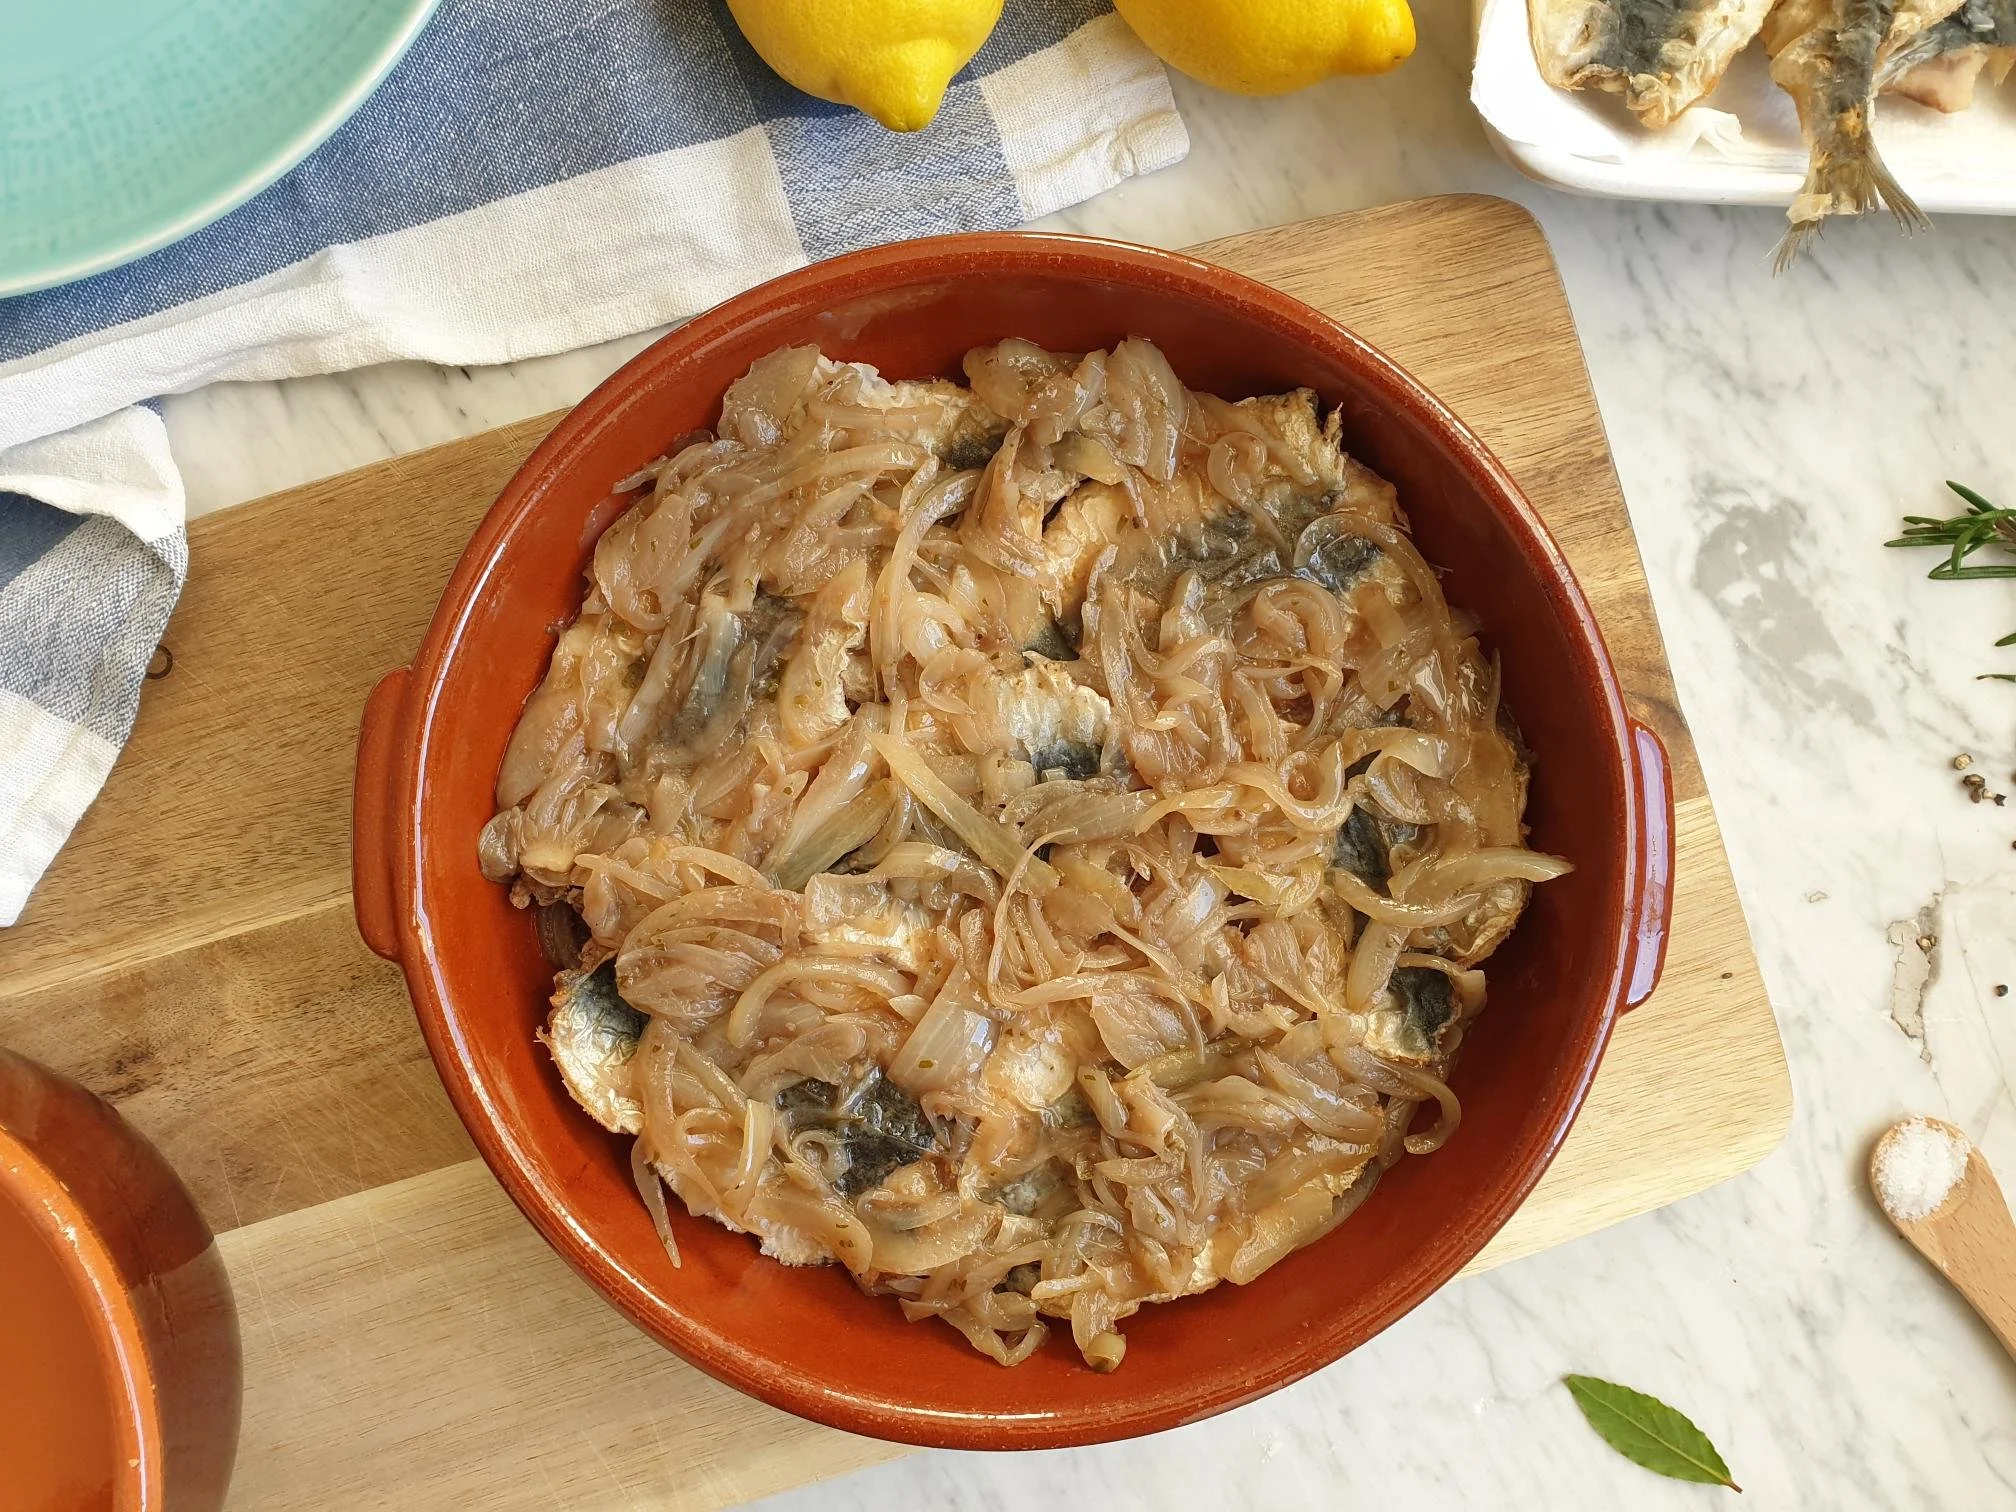
Place the dish in a fridge or a cool place for at least 24 hours or a couple of days, so the sardines marinate well and absorb all the flavours.

The longer you leave to marinate the better it will taste, but bare in mind that the fish will keep for up to a week.

Wine Suggestion

Collio Sauvignon Doc 2020 Draga

February 02, 2022 /tina oblak
Marinated sardines, sardines, papaline, mackerel, sprats, sea bream fillets, sea bass filets, marinated fresh fish, marinated fish, Sardele in Savor, Sardines in savor, Venetian sarde in savor, Sardele in savor, Sardele na šavor, Istrian sardines in savor, Istrian marinated fish
Adriatic Recipe, Appetizers, bite-sized nibbles, brunch, Canapés, dinner, Easy recipe, entrée course, Fish & Seefood, fish starter, Healthy, healthy mael, Istrian cuisine, Istrian dish, Istrian food, Istrian gastronomy, main course, main dish, main fish meal, Nutritious, Nutritious dish, recipe from Northern Ital, Rustic dish, Slovenian cuisine, Slovenian food, Slovenian gastronomy, Small bites, Starters
Comment

Home made Baked Beans Istrian Recipe

Beans and Sardines
January 26, 2022 by tina oblak in Adriatic Recipe, Appetizers, Autumnal dish, Autumnal recipe, brunch, Central European recipes, Eastern European recipes, Easy recipe, Healthy, healthy mael, Istrian cuisine, Istrian dish, Istrian food, Istrian gastronomy, main course, main dish, Nutritious dish, Nutritious, one pot meal, one pot meat recipe, Rustic dish, Side Dishes, Slovenian cuisine, Slovenian food, Slovenian gastronomy, Small bites, Starters, stew, Vegan, Vegetarian, Winter dish, Winter recipe, casserole

Home made baked beans is one of the most humble staple dishes in Slovenian Istra, the peninsula located at the head of the Adriatic Sea. This dish is nutritious, as full of fibre and protein, wholesome, super delicious, cheap and simple to make, and what it may lack in appearance it most certainly makes up in flavour.

This dish is classic comfort food, quintessentially rustic, a truly peasant food since it used to be made by farmers during colder months to help them to get warm, and to partially replenish their energy used up during the very hard, physical and laborious jobs required in the fields during the day.

This borlotti beans casserole is made with beautifully caramelized onions and sautéed pancetta and flavoured with garlic, bay leaf and a touch of tomato paste, it is typically served with polenta or crusty bread and a fantastic companion to grilled meats.

My nona grew up with this dish, as borlotti beans were consistently cooked as a part of the Mediterranean diet, the recipe was passed down to my father who adored baked beans and would prepare them regularly when there was a family barbecue, normally in such a huge quantities that we would eat them on a toasted bread for days to follow, nobody seemed to mind or complained about it, on the contrary...

This home made baked beans are known in standard Slovenian as Praženi Fižol, but the locals would refer to this dish simply in the dialect as Pražen Fežu.

This very traditional dish calls for dry borlotti beans, but you can use canned beans to cut down on time without compromising the deliciousness of the final dish, it can also be made with or without the meat component, in which case, this version makes an excellent vegetarian and vegan meal option.

I am sharing here the traditional, local family recipe which uses only few simple ingredients, however, you can take this dish slightly off the beaten track and jazz it up a bit by adding few chilli flakes or powdered sweet or smoked Hungarian paprika, which will give a more “Imperial” and “Balcanic” flavour. My father attempted this only once and was severely told off by his mother, my famous nona, for “corrupting” the traditional recipe making it too “exotic” for her to eat, this version of baked beans, although very delicious indeed, was never cooked again by my father in her presence...

Whether you go for a traditional or more exotic version of the recipe for home made baked beans, give it a go, a store bought tinned baked beans might just become a thing of a past...

Ingredients

Serves 6-8

  • 500g dry borlotti beans, (or other dry beans of your choice) soaked overnight or for about 8 hours

    For this recipe you can also use tinned borlotti beans or other tinned beans of your choice 4 x 400g)

  • 1 medium onion, (about 130g) finely chopped

  • 4 Tbsp extra virgin olive oil

  • 2 cloves of garlic, peeled and crushed

  • 100g pancetta, (smoked or unsmoked) thinly sliced and chopped

  • You can replace pancetta for smoked or unsmoked bacon or lardons

  • 1 Tsp white all purpose flour

  • 2 Tbsp tomato paste

  • 2 bay leaves (fresh or dry)

  • sea salt

  • black pepper

Method

Place dry borlotti beans, or other dry beans of your choice, in a big bowl, cover completely with plenty of cold water and soak for about 8 hours or overnight.

Drain soaked beans in a colander and rinse with cold running water.

View fullsize Baked borlotti beans 4.jpg
View fullsize Baked borlotti beans 5.jpg

Transfer soaked beans in a pot.

View fullsize Baked borlotti beans 6.jpg
View fullsize Baked borlotti beans 7.jpg

Add plenty of cold water, to completely cover the beans, a bay leaf and bring to boil.

Turn the heat down to medium-low and cook the beans for about 1 -1 ½ hour or until the beans are fully cooked and soft but not falling apart. Skim any foam if it rises to the surface. Towards the end of cooking time add sea salt.

Fish out the bay leaf and discard. Turn the heat off, leaving the pot with the beans in their liquid on the stovetop for later use.

View fullsize Baked borlotti beans 8.jpg
View fullsize Baked borlotti beans 11.jpg

Put extra virgin olive oil in a fairly large and deep skillet or casserole dish (both preferably non stick). Add finely chopped onion, crushed garlic, finely sliced and chopped pancetta or similar, if using, and sauté on a gentle heat, stirring occasionally, until the onions become soft and translucent.

Add the flour and stir well with the onion, garlic and pancetta mixture.

View fullsize Baked borlotti beans 10.jpg
View fullsize Baked borlotti beans 12.jpg

With the slotted spoon, (or a regular big serving spoon) transfer the beans to the skillet with the onion, garlic and pancetta mixture.

Pour the liquid from the beans into the skillet to completely cover the beans. If you are left with more liquid from the beans as needed at this stage, keep it aside and do not discard it. You might use it later on, if the beans during the cooking process get too dry. On the contrary, if you end up using all the liquid from the beans, and the beans get too dry, you can simply use water.

Add sea salt, black pepper, bay leaf, tomato paste and bring to a gentle boil.

View fullsize Baked borlotti beans 13.jpg
View fullsize Baked borlotti beans 14.jpg

Lower the heat and gently simmer for about 30 minutes stirring occasionally.

Taste and adjust the seasoning with sea salt and black pepper.

Serve hot or at room temperature.

Just a thought

Home made baked beans are suitable for freezing.

Wine suggestion

Schiava Alto Adige DOC "Kolbenhofer" 2020 - Hofstater

January 26, 2022 /tina oblak
borlotti beans, baked beans, baked borlotti beans, baked beans with pancetta, baked beans with lardons, baked beans with bacon, rustic baked beans, beaked beans on a hob, baked beans on stove, Stovetop baked beans, Skillet baked beans, baked beans in a frying pan, Praženi Fižol, Pražen Fežu, Istrian borlotti beans
Adriatic Recipe, Appetizers, Autumnal dish, Autumnal recipe, brunch, Central European recipes, Eastern European recipes, Easy recipe, Healthy, healthy mael, Istrian cuisine, Istrian dish, Istrian food, Istrian gastronomy, main course, main dish, Nutritious dish, Nutritious, one pot meal, one pot meat recipe, Rustic dish, Side Dishes, Slovenian cuisine, Slovenian food, Slovenian gastronomy, Small bites, Starters, stew, Vegan, Vegetarian, Winter dish, Winter recipe, casserole

Braised Pheasant with fresh herbs Recipe

Beans and Srdines
January 12, 2022 by tina oblak in Adriatic Recipe, Autumnal dish, Autumnal recipe, Celebratory dish, Central European recipes, Christmas dish, dinner, Eastern European recipes, Easy recipe, Festive dish, Istrian cuisine, Istrian dish, Istrian food, Istrian gastronomy, main dish, main meat course, Meat, one pot meal, Rustic dish, Slovenian cuisine, Slovenian food, Slovenian gastronomy, Winter dish, Winter recipe, one pot meat recipe

Braised pheasant is a fantastic winter warmer, comforting and hearty, made with only few fresh ingredients evoking seasonal flavours.

First, the pheasant meat is browned and then slowly cooked with fresh herbs in a beautiful sauce allowing the meat to be tenderised.

This simple and rustic dish offers and provides full and rich but delicate flavour and it is best made ahead of time as it improves when cooked in advance and then re-heated gently before serving.

Braised pheasant has been a very much loved traditional dish in Slovenian Istra where its gentle landscape has provided many opportunities for hunting, a pheasant representing one of the foremost preys among the local hunters.

This area was once part of The Republic of Venice, and it is believed that this gamebird with oriental plumage, was introduced to the West via Venice, as this majestic city had very close links with the Byzantine empire.

Moreover, some sources report that the name pheasant, Fasan, in venetian dialect, and Fazan, in standard Slovenian, comes from the fact that the pheasant was originally a native of the river Phasis in Colchis (in present day Western Georgia).

Cooking pheasant meat, in general, used to be a rare treat and was reserved for festivities and very special occasions, and although nowadays pheasant meat is a bit more accessible and affordable, it is still served to mark more special events, and is not presented on your plate as a average midweek dinner. Pheasant dishes can be enjoyed and found on menus in formal and informal restaurants during autumn and winter pheasant hunting months.

Braised pheasant is a very much appreciated dish in the family and here I am sharing my nona and my mother's recipe.

Ingredients

Serves 4-6

  • 2 small pheasants (about 1.5kg) jointed (your butcher will be more than happy to do this for you)

  • 3 Tbsp extra virgin olive oil

  • 1 medium onion (about 150g), roughly chopped

  • 2 celery sticks (about 40g), finely chopped

  • carrot (about 50g), finely grated

  • 2 cloves of garlic, peeled and crushed

  • sea salt

  • ground black pepper

  • 1 fresh rosemary spring (tied with the cooking string as this makes it easier to remove after cooking and prevents the needles to fall off the spring)

  • 2-3 fresh sage leafs

  • 100 ml white wine

  • chicken or vegetable stock (can use just water) It is perfectly fine to use a good quality instant stock .

Method

In a heavy, lidded casserole pan add extra virgin olive oil, chopped onions, finely grated carrot, finely chopped celery sticks, crushed garlic, jointed pheasants and mix well.

On a low and gentle heat, fry, stirring occasionally and moving around the meat. Scrape the bits off the bottom of the pan with the wooden spoon if it starts to catch to avoid burning (this will get deglazed later and become part of the sauce).

This stage of very gently frying and browning the meat on all sides can take up to one hour (the longer you brown the meat the darker the sauce will be).

View fullsize Braised pheasant 2.jpg
View fullsize Braised pheasant 3.jpg

Deglaze the pan with white wine and let it completely evaporate.

Add fresh spring of rosemary, fresh sage leafs and stock or water, just enough to cover halfway up.

Place the casserole pan over a medium heat and bring to a simmering point.

Cover with a lid, lower the heat and gently simmer for about 1 hour, stirring occasionally, until the pheasant meat is tender and cooked through. Cooking the pheasant with the lid covered partially or completely will ensure the pheasant meat stays moist as the moisture will be kept in the pan, gently steaming the meat during the simmering process.

If excess fat is formed during cooking process skim it off using a spoon.

Remove rosemary spring and sage leafs.

Taste and adjust the seasoning with sea salt and black pepper.

If the sauce is too liquidy, increase the heat allowing it to reduce and thicken slightly. On the contrary, if the sauce has a thick consistency dilute it a bit with the stock or water.

Serve hot with soft cooked or grilled polenta, mashed potato, potato gnocchi, egg based pasta like bleki or simply nice fresh crunchy rustic style bread to soak up the juices.

Just a thought

This is a great dish to make ahead of time and suitable for freezing.

Wine suggestion

Friuli Colli Orientali Merlot DOC 2017 - Livio Felluga

January 12, 2022 /tina oblak
Pheasant, Pheasant meat, game meat, Braised pheasant, Slow cooked pheasant, Istrian style braised pheasant
Adriatic Recipe, Autumnal dish, Autumnal recipe, Celebratory dish, Central European recipes, Christmas dish, dinner, Eastern European recipes, Easy recipe, Festive dish, Istrian cuisine, Istrian dish, Istrian food, Istrian gastronomy, main dish, main meat course, Meat, one pot meal, Rustic dish, Slovenian cuisine, Slovenian food, Slovenian gastronomy, Winter dish, Winter recipe, one pot meat recipe
Comment

Braised Cuttlefish Recipe

Beans and Srdines
December 30, 2021 by tina oblak in Adriatic Recipe, Autumnal dish, Autumnal recipe, dinner, Easy recipe, Festive dish, Fish & Seefood, healthy mael, Istrian cuisine, Istrian dish, Istrian food, Istrian gastronomy, main dish, Nutritious dish, one post fish recipe, one pot meal, Rustic dish, recipe from Northern Ital, Slovenian cuisine, Slovenian food, Slovenian gastronomy, stew, Winter dish, Winter recipe, main fish meal

Braised cuttlefish is a simple, comforting and rustic dish, and it uses only few ingredients. The cuttlefish is slow cooked in a light tomato sauce with white wine to the point of becoming so tender that the cuttlefish almost melts into your mouth and you hardly need a knife to cut it. It is very easy to prepare and a fantastic recipe if you want to make a seafood based meal ahead of time. Cuttlefish stew is a staple dish in Venice and a real delicacy, famous in particular for being cooked in its black ink.

Cuttlefish are plentiful in British waters but the majority are sent to the continent where there is a high demand, and it is greatly appreciated.

Braised cuttlefish is a dish that is prepared in particular in coastal towns and villages in Slovenian Istra, since there is a cuttlefish habitat along the Adriatic coast. The tides push the fish towards the sandy shallows where it becomes an easy catch for the fishermen.

Braised cuttlefish play an important role in the local gastronomy and the locals are very grateful to the Venetians to have “left behind” this aspect of the marine and coastal ecology, given the very lengthy and strong presence of the Venetian Republic in the territory. Cuttlefish is not as frequently found in local restaurants as one might expect, although it is one of the most loved meals in the family.

If you have never had cuttlefish before or had it but were put off for whatever reason, try my nona's family recipe, you might just change your mind. If you are worried about handling fresh cuttlefish, fishmongers in general, will be more than happy to prepare the cuttlefish for you, they will clean all the ink off the cuttlefish, remove the skin and wash thoroughly the tentacles.

All you will be left with is beautifully cleaned cuttlefish that only needs to be cut into bite size pieces or strips, easy!

Ingredients

Serves 4

  • 5 Tbsp extra virgin olive oil

  • 1 onion (about 130g), finely chopped

  • 1 clove garlic, peeled and crushed

  • handful of fresh flat leaf parsley, stalks included (about 10g), finely chopped, plus some extra when serving

  • 1 kg (roughly) cuttlefish, cleaned and cut into bite size pieces or strips. Already cleaned frozen cuttlefish as a alternative works well for this recipe

  • 100 ml white wine

  • 300 ml water

  • 2 Tbsp tomato purée

  • sea salt

  • finely ground black pepper

  • red chilli, a tiny bit, optional

Method

Put extra virgin olive oil in a pan or casserole dish, add finely chopped onion, crushed garlic, generous pinch of sea salt and fry gently until soft and lightly golden in colour.

Add finely chopped fresh parsley and mix together with fried onions and garlic.

View fullsize Cuttlefish 3.jpg
View fullsize Cuttlefish 4.jpg

Add the cuttlefish and fry further for about 2 minutes.

View fullsize Cuttlefish 5.jpg
View fullsize Cuttlefish in sauce 5a.jpg

Cuttlefish will start turning whitish in colour and release liquid.

Add white wine, allow it to evaporate and reduce roughly by half.

Add tomato purée, water, sea salt and black pepper and stir together to combine. Bring to boil.

View fullsize Cuttlefish in sauce 6.jpg
View fullsize Cuttlefish  in sauce 7.jpg

Turn down the heat, partially cover with the lid and gently simmer for about 45minute to 1 hour, stirring occasionally. By this time the cuttlefish should be really very tender when you insert the fork into it. The final texture of the sauce should be velvety and thick and not too runny when you spoon it onto serving plates.

If the sauce is too thick add a little a bit of water to dilute it slightly, on the contrary, if the sauce is too runny and watery in consistency, cook further until the sauce thickens a bit.

Adjust the seasoning with sea salt and black pepper.

Sprinkle with some roughly chopped fresh parsley and serve hot with crusty bread, white or yellow polenta, soft cooked or grilled, or some boiled potatoes or cooked rice.

Just a thought

Braised cuttlefish can also be used as a base for making risotto or tossed with egg based fresh pasta.

Store in the fridge in an airtight container for no longer than two day suitable for freezing.

The traditional recipe does not call for red chilli but adding a tiny bit gives this dish a real nice kick without overpowering the “sweetness” of the cuttlefish.

Wine suggestion

"Gardelin" 2016 - Aleks Klinec

December 30, 2021 /tina oblak
cuttlefish, cuttlefish in light tomato sauce, slow cooked cuttlefish, seppia in umido, seppia in rosso, sipa na rdece
Adriatic Recipe, Autumnal dish, Autumnal recipe, dinner, Easy recipe, Festive dish, Fish & Seefood, healthy mael, Istrian cuisine, Istrian dish, Istrian food, Istrian gastronomy, main dish, Nutritious dish, one post fish recipe, one pot meal, Rustic dish, recipe from Northern Ital, Slovenian cuisine, Slovenian food, Slovenian gastronomy, stew, Winter dish, Winter recipe, main fish meal
Comment

Sautéed Savoy Cabbage with potatoes, garlic and olive oil Istrian Recipe

Beans and Srdines
December 27, 2021 by tina oblak in Adriatic Recipe, Autumnal dish, Autumnal recipe, brunch, Central European recipes, Christmas dish, dinner, Easy recipe, Festive dish, Healthy, healthy mael, Istrian cuisine, Istrian dish, Istrian food, Istrian gastronomy, Nutritious dish, Rustic dish, Side Dishes, Slovenian cuisine, Slovenian food, Slovenian gastronomy, supper, Vegan, Vegetarian, Winter dish, Winter recipe, one post fish recipe

Let's face it, not a lot of people I know will get particularly excited about the cabbage, but slowly cooked down and sautéed savoy cabbage with delicate boiled potatoes, fragrant garlic, excellent olive oil and seasoned well with sea salt, will most certainly made up in the taste for what maybe lacks in appearance. This comforting and rustic vegetable side dish is simply delicious, trusted and reliable gastronomic companion to just about any meat dish, very easy to prepare, healthy, nutritious and inexpensive.

When savoy cabbage is cooked well with just a few excellent quality and fresh ingredients tastes nothing like you imagine, and it might convert the most austere cabbage 'dislikers'. This recipe can become a new classic cabbage dish for your family, changing what they have in mind when thinking about cabbage - if they ever even think about cabbage! This recipe completely changes the taste and texture of the cabbage, and it becomes “sweet”, soft, and ever so slightly mushy and velvety in a pleasant way.

I have never thought about this aspect of the dish, nor have I ever been bothered about it, as I grew up with it and have always been fully aware of the reward you get on the palate when it is cooked properly.

This dish is deeply rooted in Slovenian Istra, and is one of the most traditional dishes to be cooked as part of everyday family meals during autumn and winter when savoy cabbage is in full season and is most full of flavour. When it tastes at its best, it takes nothing less than the central place on dining tables, and as tradition wants, especially on Christmas Eve, together with salted cod spread and fritole (Istrian small doughnuts).

It is during these colder months of the year that my mother and most other households would prepare this side dish. My brother and I have always found this dish somehow reassuring, we would eat it paired with breaded, pan fried chicken escallops or pork Wiener schnitzel, which is one of the most common ways of serving it.

If there were any leftovers, my mother would reheat them, and they would be served with fried eggs - no waste, no hassle, and another meal sorted, and so happy children, and also happy, or relieved mom!

This recipe is normally made with freshly cooked cabbage and potatoes but it is made, and it can be made, using left over cooked cabbage and boiled potatoes which is a fantastic way to reduce food waste.

If you are one of those cabbage non-lovers, and managed to read up to this point about my enthusiasm for this humble vegetable, I warmly invite you to try this recipe, you might have a revolutionary moment and convert, this dish might just become one of your favourite autumn/winter vegetable side dishes.

I am sharing here my family recipe, give it a chance to see how nice it tastes

Ingredients

Serves 4 as part of meal

  • 1 savoy cabbage, cored and roughly chopped

  • 2 medium size potatoes (about 380g), peeled and cubed

  • 2 cloves of garlic, peeled and cut lengthwise

  • 6 Tbsp extra virgin olive oil (the best quality you can afford)

  • sea salt

  • ground black pepper, optional

Method

Cut up the savoy cabbage into quarters, remove core, cut roughly into smaller pieces and wash thoroughly

Peel the potatoes, cut into cubes and wash under cold running water.

Place both cabbage and the potatoes in a fairly big pot and add water to completely cover.

Bring to boil, turn the heat down, add a pinch of salt and cook for about 8-10 minutes or until potatoes and cabbage are cooked but still a bit firm.

View fullsize Savoy cabbage 4.jpg
View fullsize Savoy cabbage 5.jpg

When cooked, drain in a colander and leave for a few minutes so the extra water can drain well.

Put the extra virgin olive oil and the garlic in a pan (you can use the same pan that you cooked the cabbage and potatoes in, just dry it well) or use a skillet.

Cook the garlic in the oil until golden in colour allowing to flavour the oil, then remove and discard the garlic.

Add potatoes and the cabbage to the pan or skillet and cook down for about 20 minutes on a gentle heat stirring occasionally until a nice soft and velvety consistency.

While cooking, break the potatoes a bit with a back of wooden spoon or a fork but do not mash it completely.

Taste and adjust the seasoning with sea salt and add ground black if using.

Serve hot immediately.

Just a thought

This side dish will keep very well in fridge in the airtight container for a few days. Reheat well before serving warm.

Not particularly suitable for freezing.

December 27, 2021 /tina oblak
savoy cabbage, royal cabbage, vrzota s krompirjem, verza e patate
Adriatic Recipe, Autumnal dish, Autumnal recipe, brunch, Central European recipes, Christmas dish, dinner, Easy recipe, Festive dish, Healthy, healthy mael, Istrian cuisine, Istrian dish, Istrian food, Istrian gastronomy, Nutritious dish, Rustic dish, Side Dishes, Slovenian cuisine, Slovenian food, Slovenian gastronomy, supper, Vegan, Vegetarian, Winter dish, Winter recipe, one post fish recipe
Comment

Fritole - Istrian small doughnuts Recipe

Beans and Sardines
December 23, 2021 by tina oblak in Adriatic Recipe, Autumnal dish, Autumnal recipe, Celebratory dish, Central European recipes, Christmas dish, dessert, Easter dish, Easter treats, Eastern European recipes, Easy recipe, Enriched dough, Festive dish, Finger food, Istrian cuisine, Istrian dish, Istrian food, pudding, Rustic dish, Slovenian cuisine, Slovenian food, Slovenian gastronomy, Small bites, Snacks, sweet course, Sweet Things, Winter dish, Winter recipe, festive sweet things, festive dessert, celebratory desserts

Fritole are a type of small fried doughnuts made of thick batter-like dough enriched with raisins and served warm covered in icing sugar, they are light and crunchy on the outside and soft and aromatic on the inside, they just melt in your mouth.

This sinfully delicious and fragrant little delights have a very deep connection with Christian, especially Catholic liturgical festivities like the Carnival season, the time of the year in which eating in excess, and gastronomic indulgence was allowed by the Church before the start of fasting and austerity during Lent, and ending with Easter.

In Venice, where this sweet treats are a synonym of Carnival, fritole used to be prepared and served strictly during the days of Carnival. Nowadays, they appear not only in Venice but also in the region of Veneto and north-east region of Friuli-Venezia Giulia, Italy, and Istria where fritole are also very popular and start appearing as soon as Christmas festivities are over and remain around on offer as a irresistible sweet temptation until Ash Wednesday begins the Lent season.

However, on the coastal part of Slovenian Istra, once being part of what was called, ‘The most Serene Republic of Venice,’ fritole hold a very special place on Christmas Eve and this is when my nona would make fritole as the tradition called upon her to do.

In dialect they could also be called Fritle, Fritule or miške, meaning little mice in standard Slovenian, as when you drop the batter in hot oil, there is a little trail on the end, resembling little mice.

My father adored them and everyone in the family simply loves fritole, and whoever also grew up with fritole knows this very well. I am sure they can share with me the fact that they get eaten far faster than they can ever be made! When my nona started to get ready for the frying process, the kitchen would suddenly get crowded, we would get louder, and more excited, and our eyes would sparkle with joy just waiting in anticipation for them to be finished, and ready to eat!

My nona would be carefully scooping fritole out of hot oil and they would be disappearing in front of her yes and my nona, being incredibly experienced and fast could hardly keep up with us.

My nona made fritole with raisins but like most recipes fritole have few variation where pine nuts, cinnamon and candied fruit is added to a basic batter.

We would eventually get full, our greediness would decrease, the kitchen would be less noisy and less crowded but she kept frying, ending up layering the fritole on a big plate and dusting them with sugar looking like a snowy mountain, and this vision will stay with me forever...

She would then lovingly packed them for us to take home...

I am miles away from her kitchen, and years have passed by, but when I close my eyes I get transported immediately right back there ... I can smell and feel all of it, and in the stillness of these thoughts I can fully recollect all the nostalgic flavours, and the emotions so closely tied to my family.

My nona is now 93 years old, and her hands sadly are no longer able to make fritole, and so I feel privileged to be have learned how to make them from her, and since she gave me the family recipe, I am to able to keep making them and keep this family tradition alive.

This is why for me these sweet treats hold a very special place in my heart, they are more than just another recipe, they are part of who I am, and who I have become as a person ...

I am sharing here my nona's recipe that was passed down to her by her nona, and so try to make them, and delight your family and friends.

Ingredients

Makes about 40 small doughnuts

  • 400g plain flour

  • 3 eggs, (room temperature) beaten

  • 50g granulated sugar

  • 60-70g raisins or sultanas

  • 3 Tsp fast action dried yeast (also called instant yeast) or 40 g of fresh yeast

  • 250ml milk, lukewarm (full fat or semi skimmed)

  • 4 Tbsp of dark rum or grappa

  • finely grated lemon zest of one unwaxed lemon

  • sea salt, a pinch

  • sunflower or corn oil for frying

  • icing sugar for dusting

Method

Put the raisins in a small bowl, add warm water to completely cover and soak them for at least 20 minutes or until they plump up.

In a large bowl place the flour, beaten eggs, sugar, pinch of salt, yeast, grated lemon zest.

Gradually start adding the milk, mixing constantly until all the ingredients are well incorporated and you end up with a sticky dough that will be soft but thick resembling batter-like dough or a thick cake mix.

Adjust the dough by adding more milk if the dough is too thick, on the contrary, if you find the dough too runny add a bit more flour.

Add to the dough drained soaked raisins (squeeze out the all the excess liquid).

Cover the bowl with cling film or clean tea towel and place it in a warm place free of drafts from any open window.

Let the dough rest for at least 1 hour.

After this time the dough should rise a bit and have a bubbly surface.

Take a medium- sized deep skillet. Add the oil and heat it up over a medium heat to about 180C.

(If you do not have a thermometer, drop a cube of bread into the oil, it is ready when bread turns golden brown in 15 seconds).

Fritole are fried by dropping a small spoonfuls of dough/batter into the hot oil.

Take two tablespoons, with the first spoon scoop up the sticky dough from the bowl, with the second spoon slip off the dough from the first spoon into the hot oil.

Do not overcrowd the skillet with fritole and fry them in small batches, a few at the time, (4-6) this will obviously depend on the size of your pan. Fry them on both sides, fitole are fried in no time, about a minute on each size, so help them to flip over by using a fork or some tongs, however fritole will sometimes flip over themselves.

Whne you drop the batter/dough into a hot oil they will most probably not form perfect shaped balls but instead will leave a little trail on the end.

Fry until dark-ish brown in colour, puffed and well cooked through. I suggest you do a little test to make sure they are not raw inside. Simply open up a cooked fritola, if still gooey inside the oil is probably too hot and the heat too high.

Line a large plate with absorbent kitchen paper towels. Drain fried fritole with a slotted spoon and transfer them on a plate.

Allow the fritole to cool a bit.

Dust them with icing sugar or roll them in caster sugar.

Serve warm or at room temperature.

Just a thought

Fritole are to best enjoyed served still warm, however they are still delicious at room temperature.

Fritole can be warmed up in a microwave or in the oven. My nona put a plate of fritole on the radiator.

Wine suggestion

Moscato del Veneto IGT "Dindarello"2020 - Maculan'

December 23, 2021 /tina oblak
fritole, fritule, deep fried desserts, miske, miške, Fritle, Traditional Istrian doughnuts, small doughnuts, doughnuts, Venetian desserts, Venetian frittole
Adriatic Recipe, Autumnal dish, Autumnal recipe, Celebratory dish, Central European recipes, Christmas dish, dessert, Easter dish, Easter treats, Eastern European recipes, Easy recipe, Enriched dough, Festive dish, Finger food, Istrian cuisine, Istrian dish, Istrian food, pudding, Rustic dish, Slovenian cuisine, Slovenian food, Slovenian gastronomy, Small bites, Snacks, sweet course, Sweet Things, Winter dish, Winter recipe, festive sweet things, festive dessert, celebratory desserts
Comment

Creamed salted cod (or stockfish) Recipe

Beans and Sardines
December 16, 2021 by tina oblak in Adriatic Recipe, Appetizers, Autumnal dish, Autumnal recipe, bite-sized nibbles, brunch, Canapés, Celebratory dish, Central European recipes, Christmas dish, dinner, Easter dish, Easy recipe, entrée course, Festive dish, Finger food, Fish & Seefood, healthy mael, Istrian cuisine, Istrian dish, Istrian food, Istrian gastronomy, main course, main dish, Nutritious dish, recipe from Northern Ital, Rustic dish, Slovenian cuisine, Slovenian food, Slovenian gastronomy, Small bites, Snacks, spreads, Starters, Winter dish, Winter recipe, fish spreads, fish starter

Venetian in origin, this light and creamy, almost mousse like spread, it is one of the most loved dishes, due to its very mild fishy flavour and no bones to worry about, and so it covers the whole family from the youngest children to the oldest members.

Spread on fresh or toasted slices of bread or it can be eaten with polenta, and it is a very convenient dish since it is served cold and it is prepared in advance. Creamed salted cod is rustic but it can soon turn into very elegant canapé served with a pre dinner drink.

I think that this recipe is one of the greatest recipes ever invented! Quite frankly, it takes a bit of a genius to turn an uneatable dry stockfish, which looks utterly unappealing, and is as dry as a plank of wood, into the most luxurious and delicious dishes ever created.

Venetian creamed cod, known in Italy as Baccalà mantecato, is a real speciality and a staple dish in Venice, where it was created, and it is very much appreciated and well known in the rest of Italy. Slightly less known however in the rest of the world, creamed salted cod certainly deserves greater international praise and renown.

This dish is one of my absolute top favourites, one of those dishes I am most grateful to the Venetians to have brought with them during the time they ruled my homeland in the North Adriatic, period during which dried stockfish was first introduced in Istria in 15th century from Venetian cuisine.

In Slovenian it is called Bakala na belo or Polenovka na belo or simply called by the locals Bakala or Bakalar.

My paternal grandfather, or my nono as I called him, used to always buy stockfish at the beginning of December, I have this image in my head of the dry long stockfish sticking heavily out of the shopping bag, I knew very well that it was the start of the Christmas festivities.

This recipe is a real classic holiday and festive dish in Slovenian Istra, and holds a very special place among the locals. Dried stockfish was once a food for the poor but nowadays is a staple dish and considered a delicacy, taking central stage on household tables during Christmas and Easter as it is cooked on holy days during the fasting time and not eating meat.

Traditionally, creamed stockfish is home made and served as part of Christmas Eve dinner, together with sautéed Savoy cabbage and polenta, and Istrian fritole (small fried doughnuts), of course.

These days you can find creamed stockfish on the supermarket shelves all year round, and especially during the holiday season and Easter, but unfortunately, the sad reality is, that very often, the quality of commercially produced cod spread leaves much to be desired, as very common practice is to add lard or potatoes to increase the weight

I have very vivid memories about the process of soaking the stockfish, this huge restaurant size pot was left outside in the back garden during the night and when the temperatures plummeted below 0, the ice formed on the top, and I just loved finding the sheet of ice the following morning, and braking it into pieces. My son does the same...what is it with the children and the ice, and love for breaking it ...

My son Jakob (age 9) with his gran grandmother (age91) making creamed stockfish with the help of a standard mixer

My nono was in charge of stockfish, year, after year, after year, until he sadly passed away, then my father took over and now it is down to myself, my brother, my husband, and the children, since my father sadly is longer around. Back home, according to tradition, stockfish and the preparation of it is still a male affair, however, maybe it is time for this to change!

My nono would sit on the chair, place a big pot containing pieces of cooked cod between the legs, a bottle of olive oil would be kept very close to him for an easy and frequent reach and as tradition requests, the cooked cod would then be beaten with big and long wooden flat spoon like, known locally as polentar or bat which resembles very much a cricket bat, but in my research I have found no connection between the two types of bats!

In honour of my family but in particular in honour of my nono and my father I am sharing here this very special generational family recipe. Give it a go, you will love it!

Ingredients

Serves 4

  • 500g salted cod or 1 dry stockfish

  • 170ml extra virgin olive oil (the very best you can afford) plus a bit of extra as needed

  • 1-2 cloves of garlic, peeled

  • 1 bay leaf, fresh or dry

  • fresh flat leaf parsley (about 7g) finely chopped, optional

  • sea salt, to taste

Method

For this recipe you can use either salted cod or dry stockfish, both need to be soaked and rehydrated first.

If you are using salted cod (I used this type for the recipe) first you need to rinse well the salted cod under very cold running water and soak it. Place rinsed cod in an airtight container, fill it completely with freezing cold water, and with some ice, if you have it, so the fillets are completely submerged. Close the lid and put the container in the fridge. Change the water after 24 hours and place in the fridge for another day. After 48 hours, the cod will be completely soaked. Remove the cod from the container, rinse well with cold water and cut the fillet/s into portion size.

Place pre-soaked pieces of cod in a pan and fill it with plenty of cold water so the pieces of fish are completely submerged in the water. Add bay leaf and bring to boil.

View fullsize Creamed Salted Cod 3.jpg
View fullsize Creamed Salted Cod 4.jpg

Turn the heat down and cook further on a gentle heat for about 20 to 30 minutes and skim the foam on the surface as needed.

After the fish is cooked drain in the colander.

As soon as it is cool enough to handle carefully remove the skin and the odd bone.

With your fingers break the flesh into smaller pieces and place them in a pan or in a bowl of a standard mixer if you are using one.

View fullsize Creamed Salted Cod 5.jpg
View fullsize Creamed Salted Cod 6.jpg

If using a whole dried stockfish, this needs to be soaked and rehydrated first. Place the whole stockfish in a big stock pot and fill completely with cold water and soak for 2-3 days, changing the water every day. If you do not have a very big pot to fit the whole stockfish in, you can use a smaller pot, like a regular 5 litre stock pot, and then place the stockfish in a pot where half of it will probably stick out, and half will be submerged in the water. Soak the submerged part of stockfish for 24 hours and after this time the soaked part of the stockfish will get soft enough to bend, which will allow you to bend it in a such a way for the whole stockfish to be completely submerged into the water in order to get properly rehydrated. No need for rinsing as the dried stockfish is not salted.

Soaked and rehydrated cod needs then to be cooked. Place it in a stock pot, the same one you used for soaking, fill it with plenty of cold water (the whole fish needs to be completely submerged), add bay leaf and bring to boil. Lower the heat and cook further on a gentle heat until the fish is tender, for about 1 hour or just over.

Drain the fish and as soon as is cold enough to handle carefully remove the skin and all the bones.

With your fingers break the flesh into smaller pieces and place them back into in big pan or into a bowl of a standard mixer if you are using one.

Whether you have decided to use salted cod or stockfish you are now left with cooked cleaned small pieces of cod in a big pan or in a bowl of a standard mixer, again only if you are using one.

Place 5 Tbsp of extra virgin olive oil in a small frying pan, add the garlic previously peeled and cut in half lengthwise. Fry the garlic on a gentle heat until golden in colour to infuse the oil then discard the garlic.

Add garlic infused oil to the bowl.

Now the magic can begin.

Take a wooden spoon and start beating the pieces of fish quite vigorously. If using a standard mixer, put it on the lowest and slowest setting.

Keep beating and poring gradually the rest of the oil until you obtain a whitish paste and until the creamy mixture can no longer absorb any more oil.

This action of beating and adding very gradually small quantities of oil will eventually turn the pieces of cod into a light and fluffy cream, this process, in order to get the best result, can take up to 30 minutes.

View fullsize Creamed salted Cod 7.jpg
View fullsize Creamed salted cod 9.jpg

Add sea salt to your taste and very finely 1 chopped clove of garlic, although this optional, mix well, taste, and adjust the seasoning.

Transfer cod spread on a serving plate.

Serve it accompanied with slices of fresh rustic bread, toasted slices of bread (bruschetta) or slices of grilled yellow polenta.

Wine suggestion

Venezia Giulia Malvasia IGT 2019 - Skerk

December 16, 2021 /tina oblak
creamed salted cod, creamed stockfish, creamed salted cod mousse, baccala mantecato, Bakala na belo, Bakala, Bakalar, Istrian fish delicacy, Venetian fish specialty
Adriatic Recipe, Appetizers, Autumnal dish, Autumnal recipe, bite-sized nibbles, brunch, Canapés, Celebratory dish, Central European recipes, Christmas dish, dinner, Easter dish, Easy recipe, entrée course, Festive dish, Finger food, Fish & Seefood, healthy mael, Istrian cuisine, Istrian dish, Istrian food, Istrian gastronomy, main course, main dish, Nutritious dish, recipe from Northern Ital, Rustic dish, Slovenian cuisine, Slovenian food, Slovenian gastronomy, Small bites, Snacks, spreads, Starters, Winter dish, Winter recipe, fish spreads, fish starter
Comment

Candied Almonds Recipe

Beans and Srdines
December 14, 2021 by tina oblak in Adriatic Recipe, Autumnal dish, Autumnal recipe, Easy recipe, festive sweet things, Finger food, Istrian cuisine, Istrian food, Istrian gastronomy, Small bites, Snacks, Sweet Things, Vegan, Vegetarian, Winter recipe, sweet nibbles, sweet finger food, bite-sized nibbles

These sugar coated almonds are delicious and crunchy, and are very easy to make. It only takes a few minutes to make them, and they are ideal little sweet treats to keep in the pantry over the holidays. They also make a perfect home-made little gift for your friends and family.

Candied almonds together with the mulled wine are a reminder of the variety of offerings at Christmas markets, and are a great alternative when trying to avoid big desserts after a substantial meal, they have a “wow factor” and will impress your guests when served with tea or coffee.

My nona told me that when she was a child, sugar coated almonds, together with oranges, mandarins and other types of nuts, were very special treats, the only treats as a matter of fact, children were given during the festive season and in particular on Christmas Eve and on Christmas day.

The coast of Slovenian Istra, where I come from, is blessed with a Mediterranean climate that allows almond trees to thrive and they are commonly found in people's gardens. Almonds get harvested in autumn, then stored to be used during the winter months.

I am sharing here a basic and traditional recipe for candied almonds, how my nona's grandmother used to make them, just with sugar.

For a more “modern” and festive taste you can personalize the recipe to your liking and add a bit of cinnamon to the sugar mixture or other spices to your taste like the nutmeg, ground ginger, cardamom, and all spice, just to give you a few ideas.

Ingredients

  • 200g granulated or caster sugar

  • 200g whole almonds

  • 100ml water

  • ½ – 1 Tsp cinnamon (optional)

Method

Line a baking tray with baking parchment (or silicone sheet) and set aside.

Place the sugar, water, (and cinnamon or other spices if using) in a large pan.

Stir the mixture with the wooden spoon over a low-medium heat and let the sugar dissolve.

Bring to boil and cook gently for further 3-4 minutes or until the sugary mixture turns into a syrupy consistency.

View fullsize Candied almonds1.jpg
View fullsize Candied Almonds 2.jpg

Add the almonds and turn the heat to medium-high.

View fullsize Candied Almonds 3.jpg
View fullsize Candied Almonds 4.jpg

Stir constantly to avoid the sugar and almonds burning. During this process, it will take around 6 minutes, the water will start evaporating and the sugar will start to crystallize and stick to the almonds. You should end up with a sand like texture. When stirring make sure you go around the edged with the wooden spoon and scrape off the crystallized sugar that will form on the edge of the pan.

Candied Almonds 5.jpg
Candied Almonds 6.jpg

Continue to constantly stir and some of the crystallized sugar will start to melt, it will take roughly about 3 minutes. Try to avoid melting and caramelizing all the crystallized sugar.

You should end up with the mixture of caramelized and crystallized almonds.

Although you need medium-high heat for this process make sure the heat is not too high as it will burn the sugar and the almonds making them taste a bit bitter.

View fullsize Candied Almonds 7.jpg
View fullsize Candied Almonds 9.jpg

Transfer the almonds on the baking tray, previously laid with baking parchment.

If the almonds stick to each other separate them with the spoon.

Cool the candied almonds for at least 20 minutes before serving.

Just a thought

Store sugar coated almonds in an airtight container at room temperature where they will last up to a week.

Wine suggestion

Terre Siciliane Passito IGP "Lu Disiu" 2017

December 14, 2021 /tina oblak
almonds, toasted almonds, sugar coated almonds, candied almonds
Adriatic Recipe, Autumnal dish, Autumnal recipe, Easy recipe, festive sweet things, Finger food, Istrian cuisine, Istrian food, Istrian gastronomy, Small bites, Snacks, Sweet Things, Vegan, Vegetarian, Winter recipe, sweet nibbles, sweet finger food, bite-sized nibbles
Comment

Salted Cod in tomato sauce Istrian Recipe

Beans and Sardines
December 08, 2021 by tina oblak in Adriatic Recipe, Autumnal dish, Autumnal recipe, dinner, Easy recipe, Fish & Seefood, healthy mael, Istrian cuisine, Istrian dish, Istrian food, Istrian gastronomy, main course, main dish, Nutritious, Nutritious dish, one pot meal, Rustic dish, Slovenian cuisine, Slovenian food, Slovenian gastronomy, stew, Winter dish, Winter recipe, one post fish recipe, Christmas dish, Easter dish, Celebratory dish, Festive dish

Salted Cod in tomato sauce Istrian Recipe

This main, fish based dish is absolutely delicious and very special! It is rustic but delicate and elegant at the same time - cod is cooked in a simple tomato sauce enriched with onions, garlic, and fresh parsley. It is very easy to make but it does require a bit of organization and planning ahead since it is traditionally prepared with dried stockfish or salted cod that needs to be soaked and hydrated, although in this recipe you have the option to use fresh cod or similar.

This recipe is a real classic holiday and festive dish in Slovenian Istra, and holds a very special place among the locals. Dried stockfish was once a food for the poor but nowadays is a staple dish and considered a delicacy taking central stage on household tables during Christmas and Easter as it is cooked on holy days during the fasting from meat.

Dried stockfish was introduced in Istria in 15th century from Venetian cuisine, and this should not be surprising since the Venetians established a monopoly in the Adriatic Sea.

The origins of this fish, however, is far away from being local dish. It can be traced to the extreme north of Norway, to the Lofoten Islands where the Vikings, most probably the earliest inhabitants of the area, had to find a solution to the perpetual problem of hunger. They fished enormous cod shoals, then they dried the headed and gutted fish in the strong winds of the north, hanging them by their tails, the fish turned as hard as a plank of wood and it would last for a very, very long time.

This dried fish eventually started to be sold by the Norwegians to the rest of Europe, sometime in the eleven century. Gastronomically speaking, and perhaps surprisingly, dried stockfish has not been particularly well appreciated by the Scandinavians. On the contrary, in the Mediterranean countries, stockfish became an elevated dish, it was highly valued, and much more appreciated.

The biggest consumers of dry cod, just to mention a few, are Italy, Spain, Portugal, Brazil, West Africa, Caribbean, and many other countries.

Local people back home, on the Slovenian coast, are very traditional and conservative when it comes to the choice of the ingredients and cooking, therefore the use of dried stockfish would be the first choice to prepare this dish. The use of less traditional salted pieces of cod would be the second choice influenced mainly by simplicity, practicality and speed, and this is the type of cod I I use for this recipe.

In the recipe description below I am also giving you the option to use fresh cod or a similar fish, if you have difficulty finding dried stockfish, salted cod or pre-soaked cod, or simply prefer to use fresh fish instead.

Here, in the United Kingdom, where I currently live, you can find and buy dried stockfish or salted cod (sold vacuum packed) in Italian delicatessen shops especially around Christmas and Easter or alternatively order it from your trusted fishmonger or from an on-line specialist shop.

I am sharing here this very special family festive recipe in honour of my father, who very sadly is no longer with us, and who absolutely adored preparing and enjoying this dish.

At the start of Christmas season, my father would buy dried stockfish, soaked it, cooked it, removed the skin and all the bones to be left with bite size pieces that would get vacuum packed and I would take the pack on the plane back to the UK...

Ingredients

  • 500g salted cod or about 800g of already pre-soaked cod (soaked and rehydrated cod almost doubles its original weight) Both varieties are sold vacuum packed in form of fillets with no bones.

    (can use about 800g of fresh cod fillets or similar like haddock or pollock instead)

    Whole stockfish (unsalted, dry cod) is traditionally used for this recipe.

  • white flour (for coating the fish)

  • 2 Tbsp extra virgin oil

  • 1 medium onion (about 140g) finely chopped

  • 1 clove of garlic, peeled and crushed

  • 1 handful of fresh flat leaf parsley (about 12g)

  • 250g plum or other types of tomatoes (when in season), quartered or chopped. Use tomato passata, tinned chopped or plum tomatoes as alternative.

  • sea salt, if needed

Method

Serves 4

How you start this recipe will really depend on what type of cod you have.

1. If you have salted cod (I used this type for the recipe) first you need to rinse well the salted cod under very cold running water. Place rinsed cod in an airtight container, fill it completely with freezing cold water, and with some ice, if you have it, so the fillets are completely submerged. Close the lid and put the container in the fridge. Change the water after 24 hours and place in the fridge for another day. After 48 hours, the cod will be completely soaked. Remove the cod from the container, rinse well with cold water and tap dry with kitchen paper. Cut the fillet in portion size.

View fullsize Bacala in tomato sauce 1.jpg
View fullsize Bacala in tomato sauce 2.jpg

2. You can buy (a bit trickier to find, at least in the United Kingdom) already soaked and rehydrated cod. In this case just rinse with running cold water, tap dry and cut in portion size.

3. You can simply use fresh cod or similar like haddock or pollock fillets and cut it into portion size.

4. You can buy a whole dried stockfish. This could prove the trickiest option as the stock fish might be quite long and you need quite a big stock pot to fit it in, fill completely with very cold water and soak for at least 3 days, changing the water every day. If you do not have a very big pot to fit the whole stockfish you can use a smaller pot, like a regular 5 litre stock pot, and then place the stockfish in a pot, half of it will probably stick out, and half will be submerged in the water. Soak the submerged part of stockfish for 24 hours and after this time the soaked part of the stockfish will get soft enough to bend, which will allow you to bend it in a such a way for the whole stockfish to be completely submerged into the water in order to get properly rehydrated.

No need for rinsing as the dried stockfish is not salted. Soaked and rehydrated cod needs then to be cooked until tender, for about 1 hour or just over. When is cooked take the skin off and remove all the bones. You are left with portion size or smaller bite size piece ready to be used for this recipe.

Very lightly coat the pieces of cod in flour and shake off the excess.

Place oil in a pan (the pan should be big enough so all the pieces of cod are nicely tucked next to each other and do not overlap).

Add finely chopped onions, crashed garlic and sauté very gently until soft.

Place chopped tomatoes or passata in a pan and cook further for about 10 minutes stirring occasionally. If using fresh tomatoes make sure they are soft and use the back of a fork to squash a bit.

Place cod pieces in a tomato sauce, add finely chopped parsley and enough water to almost cover the cod fillets. If using fresh cod add the water half way up as it cooks quicker.

View fullsize Bacala in tomato sauce 3.jpg
View fullsize Bacala in tomato sauce 4.jpg

Partially cover with the lid and on a gentle heat cook for about 40 minutes, shaking the pan now and again. If using fresh cod the cooking time will be slightly reduced.

After this time you should end up with the velvety sauce that is not too thick nor too thin and liquidy.

If the the sauce, however, is too thin sprinkle a bit of flour or breadcrumbs and cook further briefly until you get the desired consistency.

Contrary, if the sauce gets too thick dilute it with a bit of water.

Taste and adjust the seasoning with sea salt especially if preparing this dish using dried stockfish or fresh fish. If using salted cod you will most probably not need any extra sea salt for seasoning, as although the fish gets soaked and desalinated, the fish still retains some of the salt, and this gets released during cooking.

Just a thought

This dish is traditionally served with soft cooked polenta or some crunchy bread to soak up the sauce.

Salted cod in tomato sauce can also be eaten with the pasta of your choice or it can be used as a base to make a risotto.

This dish will keep well in the fridge for few days in an airtight container and is suitable for freezing.

Wine suggestion

Pinot Bianco DOC 2020- Doro Princic

December 08, 2021 /tina oblak
salted cod in tomato sauce, dry stockfish in tomato sauce, pollock in tomato sauce, cod in to, cod in tomato sauce, haddock in tomato sauce, easy fish recipe, Istrian fish recipe, traditional Istrian fish recipe
Adriatic Recipe, Autumnal dish, Autumnal recipe, dinner, Easy recipe, Fish & Seefood, healthy mael, Istrian cuisine, Istrian dish, Istrian food, Istrian gastronomy, main course, main dish, Nutritious, Nutritious dish, one pot meal, Rustic dish, Slovenian cuisine, Slovenian food, Slovenian gastronomy, stew, Winter dish, Winter recipe, one post fish recipe, Christmas dish, Easter dish, Celebratory dish, Festive dish
Comment

Barley, potato and borlotti beans Istrian soup Recipe

Beans and Sardines
December 01, 2021 by tina oblak in Adriatic Recipe, Appetizers, Autumnal dish, Autumnal recipe, Central European recipes, dinner, Eastern European recipes, Easy recipe, entrée course, healthy mael, Istrian cuisine, Istrian dish, Istrian food, Istrian gastronomy, main course, main dish, Nutritious dish, one pot meal, Rustic dish, Slovenian cuisine, Slovenian food, Slovenian gastronomy, Soups, Starters, stew, supper, Vegan, Vegetarian, Winter dish, Winter recipe, winter minestrone, winter soup

This hearty and filling one pot barley soup is a traditional soup from Slovenian Istra, a perfect choice to warm you up on a cold day, delicious in its simplicity, and it could not be easier to make.

Barley soup is a very popular choice in many households and is found on the menus as Ječmenova mineštra in more rustic, informal, mountainside, and family run restaurants.

Barley soup together with other types of soups like Jota (sauerkraut, borlotti beans and potato stew), Bobići (Sweet corn soup), Pasta e fasoi (Pasta and borlotti beans soup) play an incredibly important role in Istrian cooking as the soups were eaten as a main dish and sometimes the only hot meal of the day. The choice of the ingredients to make mineštre/maneštre (Istrian dialect word, from Italian minestra, indicating thicker soup) would rely exclusively on the type of vegetables and pulses that were available during a particular season.

Barley soup is traditionally made during colder autumn and winter months using dry borlotti beans, potatoes and barley that were harvested by the end of summer and autumn and appropriately stored to be used later in the year when the cold weather did not allow you to grow a vast array of vegetables, unlike during the spring, when it was warmer, and you could grow them in abundance to make even a lighter Minetrone Primavera.

In Slovenian Istra it is very common to put in some soups, besides different pork cuts, dried ham bone or pešto or taca (smooth paste made with pancetta, crushed garlic and very finely chopped parsley) to boost the flavour of the dish.

Traditionally this recipe calls for some unsmoked or smoked pork meat cuts to be added to the soup however you can turn this soup into a vegetarian and vegan friendly dish by simply leaving out the meaty component.

This family recipe really goes back generations. I am sharing with you the recipe for barley soup from my paternal nona's grandmother.

Ingredients

Serves 8-12

  • 300g dried borlotti beans, soaked overnight

  • 300g pearl barley

  • 500g roughly of pork ribs, ham hock, pig trotters or similar (slab of pancetta or bacon, about 130g). You can use smoked version of the meats if you prefer a slightly deeper smoky flavour or a combination of both.

  • 2 medium size potatoes (about 300g), peeled and cubed

  • leaves from 2-3 sticks of celery

  • 1 medium size onion (about 130g), finely chopped

  • 1 clove of garlic, peeled and crushed

  • 1 medium size carrot (about80g) peeled and finely grated

  • handful of fresh flat leaf parsley (about 15g) finely chopped

  • 1 bay leaf, fresh or dry

  • sea salt

  • black pepper

Method

In a fairly big stock pot place all the ingredients, except the sea salt and black pepper, add 4 ½ litres of cold water and bring to boil.

Turn the heat down and skim the surface as needed.

Cover partially with the lid and cook the soup on a gentle heat for about 1h ½.

View fullsize Barley soup 2.jpg
View fullsize Barley soup 3.jpg

After this time the soup should have a nice thicker velvety consistency as the potatoes and the barley release the starch. If the soup gets too thick simply dilute it with a bit of water.

Season with sea salt and black pepper, taste and adjust the seasoning.

Just a thought

Barley soup will keep well in a fridge for few days and is suitable for freezing.

Wine suggestion

Search results for 'Refosco dal Peduncolo Rosso DOC "Villa Locatelli" 2019 - Tenuta di Angoris

December 01, 2021 /tina oblak
barley soup, barley, potato and borlotti beans soup, barley minestrone, barley potato and borlotti beans minestrone, one pot barley soup, Istrian barley soup, Istrian barley minestrone
Adriatic Recipe, Appetizers, Autumnal dish, Autumnal recipe, Central European recipes, dinner, Eastern European recipes, Easy recipe, entrée course, healthy mael, Istrian cuisine, Istrian dish, Istrian food, Istrian gastronomy, main course, main dish, Nutritious dish, one pot meal, Rustic dish, Slovenian cuisine, Slovenian food, Slovenian gastronomy, Soups, Starters, stew, supper, Vegan, Vegetarian, Winter dish, Winter recipe, winter minestrone, winter soup
Comment

Bleki – Fresh Istrian pasta Recipe

Beans and Srdines
November 25, 2021 by tina oblak in Adriatic Recipe, dinner, Easy recipe, entrée course, Istrian cuisine, Istrian dish, Istrian food, Istrian gastronomy, main course, main dish, Pasta, Rustic dish, Slovenian cuisine, Slovenian food, Slovenian gastronomy, Starters, supper, Fresh pasta, Egg based pasta

Bleki are one of the typical Istrian square shaped fresh pasta, similar to Italian Maltagliati. They are normally home made and hand rolled with a wooden rolling pin, but these days the pasta machine is often used instead.

The squares are traditionally cut from lasagna pasta sheets by hand with a sharp knife or with a fluted pastry wheel for a sightly more “modern”and decorative touch.

Due to its shape and thickness (bleki are slightly thicker compared to other types of pasta made from regular thin pasta lasagna sheets). This type of pasta is very pleasant to eat because when bleki are cooked they almost have a texture of a dumpling.

Bleki, this simple pasta, truly reflects the peasant life in Istria and represents real home rustic cooking. Bleki are very easy to make and if you have never made fresh pasta yourself at home and have been always temped, but find the task quite daunting, this is a perfect recipe to start with.

Traditional Istrian pasta holds a special place in Istrian gastronomy among other original dishes, and

changed its form and name through the journey from Italy to Istria.

There are two variations of bleki, the first made with white flour, pinch of sea salt and water. Bleki made like this are usually added to soups, like a typical Pasta e fasoi (Pasta and beans soup), to give soups thickness and velvety texture, as fresh pasta during cooking process releases the starch.

The second variation is often made with eggs, if a local family has a few chickens, so if you prefer egg-based pasta, and don’t raise your own chickens, you can buy organic eggs, or use ordinary eggs to make the pasta. However, traditionally, this egg based Bleki would only be made for special occasions like weddings, major holidays, special Sunday lunch, and other special events, as it was traditionally paired, and still is, with chicken or rabbit goulash, meat dishes equally reserved for celebratory occasions.

My paternal nona shared with me that bleki in her village and the surrounding area would be called blečiċi which is a diminutive and affectionate version of the word for bleks, which means krpica in standard Slovenian, indicating a small piece of cloth.

This type of pasta really represents a true gastronomic osmosis between Istria and Friuli, the most north-eastern region of Italy, where bleki are called blecs or referred to as biechi and are often made with a mixture of white flour and buckwheat flour.

This much loved pasta could be sometimes found on the menus in local family run restaurants on both sides of the border, but unfortunately not as frequently as a special dish of the day as I would have liked.

However, keep in mind that Bleki is a type of pasta that is made and consumed on the same day, and is not suitable for drying.

Ingredients

Serves 4-6

  • 400 g 00 pasta flour

  • 4 large free range or organic eggs

  • pinch of sea salt

Method

Place the flour directly on a working surface, wooden board or mixing bowl and make a well in the centre.

Crack the eggs directly into a well and add a pinch of salt.

Using a fork, mix the eggs with the flour, incorporating a little at a time, until everything is combined. At this stage you will end up with pieces of dough. Just keep working it until it comes together. You will get at first a rough and floury dough.

Start kneading the dough, which at first may feel a little dry, and at this stage you might think the recipe has go wrong. It could take around 10 min of kneading for the gluten to develop in the flour and to get a smooth lump of dough.

View fullsize Bleki 2.jpg
View fullsize Bleki 3.jpg

Wrap dough tightly with cling film or a clean cotton kitchen cloth and let it rest at the room temperature for about 30 minutes.

Unwrap the dough and cut it in half. Cover the half of the dough that you are not working with, with cling film to prevent it from drying and cracking.

With your hands flatten the other half of the dough to a thickness of about 0.5cm and lightly dust with flour as need it to prevent sticking.

Put the flattened half of the dough through pasta machine on the widest setting.

Fold the dough in half, keep rollers on the widest setting, and reroll the dough.

Flour as needed to prevent sticking, and keep rolling pasta dough through pasta machine reducing the width of rollers one setting at a time.

Continue rolling until pasta dough has been rolled through second thinnest setting.

View fullsize Bleki 4.jpg
View fullsize Bleki+5.jpg

Repeat the same process with the other half of pasta dough.

At this stage you should end up with a few pasta (lasagna) sheets. Place them on a lightly floured surface.

View fullsize Bleki+6.jpg
View fullsize Bleki+7.jpg

With a sharp knife (traditionally done) or fluted pastry cutter, cut pasta sheets into squares.

Place bleki on a lightly floured wooden board or baking tray making sure the pasta squares are dusted between the layers.

Pasta is ready to be cooked immediately, alternatively cover bleki well with cling and chill until ready to use, more or less up to four hours.

View fullsize Bleki+8.jpg
View fullsize Bleki 9.jpg
View fullsize Bleki 10.jpg
View fullsize Bleki+11.jpg

Just a thought

Normally, about 80-100g of pasta per person, with your choice of sauce will make a quite substantial plate of meal. If using pasta as a starter reduce the amount of pasta to 50-60g.

November 25, 2021 /tina oblak
bleki, traditional Istrian fresh pasta, Istrian pasta, bleks, blečiċi, blecs, biechi, eggs based fresh pasta, fresh pasta without eggs
Adriatic Recipe, dinner, Easy recipe, entrée course, Istrian cuisine, Istrian dish, Istrian food, Istrian gastronomy, main course, main dish, Pasta, Rustic dish, Slovenian cuisine, Slovenian food, Slovenian gastronomy, Starters, supper, Fresh pasta, Egg based pasta
Comment

Green Beans simple salad Recipe

Beans and Sardines
November 23, 2021 by tina oblak in Adriatic Recipe, Appetizers, Autumnal dish, Autumnal recipe, dinner, Easy recipe, healthy mael, Istrian cuisine, Istrian dish, Istrian food, Istrian gastronomy, Nutritious dish, Rustic dish, Side Dishes, Slovenian cuisine, Slovenian food, Slovenian gastronomy, Small bites, Starters, supper, Vegan, Vegetarian, Salads

This Green Bean salad is one of the quickest side dishes you can prepare using only four ingredients. It is incredibly simple to make, as the beans, after being cooked and still warm get tossed in delicious extra virgin olive oil and sliced garlic.

This salad, using fresh green beans, when they are in season, is an excellent choice to accompany almost any meat or fish dish.

In this recipe I slice the garlic, since this allows the option to remove it easily if someone would only like a hint of garlic flavour without a stronger one, even though traditionally the garlic is very finely chopped.

Best served still warm or at room temperature and in the summer is very refreshing dish taken out of the fridge.

This side dish is a perfect example of simplicity at its best and it has been with me as long as I can remember.

I am sharing here how it has been prepared in my family.

Ingredients

Serves 4 as part of meal

  • 500g fresh green beans

  • 3 Tbsp extra virgin olive oil (the best you can afford)

  • 1 Tbsp red or white wine vinegar (can use balsamic vinegar)

  • 1 clove of garlic(peeled and crushed or very finely sliced or chopped) You can replace garlic with finely sliced onion.

Method

Trim the stalk ends off the beans, place them in a colander and wash well with cold running water.

Place the beans in a pan with boiling unsalted water and cook the beans for about 15 minutes or just until al dente (tender but still with a bit of bite).

Drain well and place the beans in a large bowl. Add a pinch of sea salt, extra virgin olive oil, sliced, chopped or crushed garlic and toss well. Taste and adjust the seasoning.

Serve and enjoy!

November 23, 2021 /tina oblak
fresh green beans, simple salad, simple green beans salad
Adriatic Recipe, Appetizers, Autumnal dish, Autumnal recipe, dinner, Easy recipe, healthy mael, Istrian cuisine, Istrian dish, Istrian food, Istrian gastronomy, Nutritious dish, Rustic dish, Side Dishes, Slovenian cuisine, Slovenian food, Slovenian gastronomy, Small bites, Starters, supper, Vegan, Vegetarian, Salads
Comment

Rabbit Goulash Istrian Recipe

Beans and Sardines
November 18, 2021 by tina oblak in Adriatic Recipe, Autumnal dish, Autumnal recipe, Central European recipes, dinner, Eastern European recipes, Easy recipe, Istrian cuisine, Istrian dish, Istrian food, Istrian gastronomy, main course, main dish, main meat course, Meat, one pot meal, Rustic dish, Slovenian cuisine, Slovenian food, Slovenian gastronomy, stew, Winter dish, Winter recipe

Rabbit goulash is a hearty, peasant meal, and a real comfort dish for the coming cold winter evenings. It is made with only few ingredients, but when cooked well, it makes a delicious one pot meal that is fit for a king (and not only a peasant), and even for these cooler autumn days, it will warm you up nicely and make you feel cosy.

This dish is a part of Istrian žgvacet, collective term indicating traditional stew or goulash made with pieces of meat like chicken, beef, or venison, and is cooked in a sauce.

In Istria, rabbit goulash is one of the staple dishes and can also be called by locals šugo z zajcem (zajec meaning wild rabbit) or kunčji golaž (kunec meaning home bred rabbit).

My paternal nona shared with me that in rural households it was very common to keep a small holding of chickens, rabbits, and turkeys, to name just a few animals, that represented a vital source of meat, although this hearty meat dish was almost strictly reserved for special occasions and festivities, and traditionally eaten accompanied with home made potato gnocchi or home made pasta like bleki or soft cooked polenta or some crunchy bread to soak up the sauce.

Serving rabbit goulash with mashed or roasted potatoes is less traditional but quite common.

Rabbit meat, which can be a great alternative to a chicken, is available to buy fresh at speciality markets and can be ordered by your local butcher who will be more than happy to prepare it for you.

In this recipe the whole rabbit is used, even the parts that have very little or no meat on them like the ribs. They will truly add crucial flavour to the goulash, even though you can remove them, and discard these bits later on.

This dish, like most stews, tastes almost better the following day when is reheated as the all the flavours get the chance to mix and fully develop.

Rabbit goulash has always been a classic in Istria and in my family during colder autumn and winter months, served very often during the days leading up the Christmas and New Year.

I am sharing here my family traditional recipe for rabbit goulash made with wild or farmed rabbit that can be replaced by chicken if you cannot get hold of a rabbit, or are simply not keen on this type of meat.

Ingredients

Serves 4-6

  • 1-1.5kg wild or farmed rabbit, skinned and jointed (your butcher will be more than happy to do that for you), even though you can use chicken instead.

  • 1 onion, medium size (about 200g), finely chopped

  • 1 clove of garlic, peeled and crushed

  • ½ carrot (about 40g) finely grated

  • 4 Tbps extra virgin olive oil

  • fresh herbs (about a handful), finely chopped (rosemary, sage, marjoram and thyme, tip of fresh or dry bay leaf)

  • 2-3 fresh plum tomatoes, quartered, or half of tomato, roughly chopped, optional

  • 1 Tbsp tomato purée

  • sea salt

  • round black pepper

Method

Place extra virgin olive oil in a big casserole or stewing pan, add finely chopped onions, finely grated carrot, crushed garlic and jointed pieces of rabbit.

On a gentle heat, fry all together until the onions are soft and caramelised and rabbit deep golden in colour on both sides, stir occasionally.

Add finely chopped fresh herbs, quartered tomatoes, tomato purée, sea salt and ground black pepper.

View fullsize Rabbit Goulash 2.jpg
View fullsize Rabbit Goulash 3.jpg

Add about 500ml water, or enough to almost cover the rabbit meat. Scrape with the wooden spoon all the bits that stuck to the bottom of the pan. Bring to boil and then lower the heat.

Cover partially with the lid and gently simmer for 1-1½ hour.

After this time, the meat will be so tender and just fall off the bone and the sauce should of a nice consistency, not too thick nor too thin. You should end up with enough sauce to be used for potato gnocchi or pasta.

Taste and adjust seasoning with sea salt and black ground pepper.

View fullsize Rabbit Goulash 4.jpg
View fullsize Rabbit Goulash 5.jpg

There are two ways of serving this dish.

You can leave whole pieces of rabbit and serve it with soft cooked polenta, roasted or mashed potatoes or simply with nice crunchy bread.

Alternatively, you can take all the meat off the bone, put it back in a pan and mix with the sauce adding to it potato gnocchi or pasta. Reserve some of the starchy cooking liquid from pasta or gnocchi to dilute the meaty sauce to obtain a velvety consistency. Dish served like this might not look the most attractive but you will be well reworded by the taste and flavours.

Just a thought

Rabbit goulash will keep in the fridge up to 3-4 days in an airtight container. This dish also freezes very well, but before using it, defrost in the fridge overnight and reheat well.

Wine suggestion

Friuli Colli Orientali Merlot DOC "Vigne Cinquant’anni" 2016 - Le Vigne di Zamò

November 18, 2021 /tina oblak
hearty dish, wild rabbit, rabbit, rabbit meat
Adriatic Recipe, Autumnal dish, Autumnal recipe, Central European recipes, dinner, Eastern European recipes, Easy recipe, Istrian cuisine, Istrian dish, Istrian food, Istrian gastronomy, main course, main dish, main meat course, Meat, one pot meal, Rustic dish, Slovenian cuisine, Slovenian food, Slovenian gastronomy, stew, Winter dish, Winter recipe
Comment

Jota – Sauerkraut, beans and potato stew Istrian Recipe

Beans and Sardines
November 10, 2021 by tina oblak in Adriatic Recipe, Central European recipes, dinner, Eastern European recipes, Easy recipe, entrée course, healthy mael, Istrian cuisine, Istrian dish, Istrian food, Istrian gastronomy, main course, main dish, Mitteleuropean recipes, Nutritious dish, one pot meal, recipe from Northern Ital, Rustic dish, Slovenian cuisine, Slovenian food, Slovenian gastronomy, Soups, Starters, stew, supper, Vegan, Vegetarian, Autumnal recipe, Autumnal dish, Winter recipe, Winter dish

Jota, pronounced 'yota,' is a very old recipe for a stew made of sauerkraut, dried borlotti beans, potatoes and some kind of pork cuts. It is believed that the word jota derives from Celtic word “jutta” indicating a liquidy soup.

Jota is filling and makes a perfect choice for a comfort food when the first cold starts as it will warm your body and soul. It is really easy to make, healthy, inexpensive, and it has become a staple and much loved dish in Slovenian households. Jota, being also very nutritious, is served in nurseries, schools, care homes for elderly, and family run informal restaurants, as well as being one of the most requested dishes from hikers and skiers in mountainside restaurants.

This hearty stew is incredibly humble and proper peasant food as it was born out of necessity and from what was available. My paternal nona told me that most of the households in the countryside, where she was growing up (a little village called Marezige just a few kilometres from the coastal town Koper), would have a wooden barrel of home made sauerkraut, sacks of potatoes and dried borlotti beans, and if you were lucky enough, a pig or a few pigs that would eventually get slaughtered and provided a very precious meat. The better cuts of pork meat were used for drying and curing and for what was considered a very rare and luxurious roasts while less prestigious cuts were put in soups and stews to enrich the flavour.

This very poor dish comes from the region of Primorska near the Adtriatic Sea and it is considered a quintessentially, one of the most famous Istrian peasant dishes, also enormously popular in Trieste and province of Trieste in Italy.

According to Anna Gosetti della Salda, in her book, Le ricette regionali Italiane, Jota (or Jote) was widely made over the whole region of Friuli (Italy), the area bordering with Slovenia, but towards the end of last century the use of jota was limited almost exclusively to the Valli di Gorto and Pesarina in Carnia.

The use of sauerkraut in all these regions, referred to as kapus in the Istrian dialect, is a testimony to how strongly the Austro-Hungarian Empire influenced the dishes in these areas.

Like with most dishes in the culinary world, it is no surprise that there are some variations in the recipe for Jota as well. The most common variation of Jota is without potatoes, and instead, a bit of flour is used to thicken the soup, and another common variation is making jota using sour turnip (called kisla repa in Slovenian).

In some variations, also used by both my mother and my nona, besides the use of different pork cuts, pešto or taca (smooth paste made with pancetta, crushed garlic and fresh, very finely chopped parsley) would be used. This was done, once again, to boost the flavour of the dish.

In some parts of Slovenia that are geographically closer to Hungary, a small quantity of powdered smoked sweet Hungarian paprika will be added to jota.

Before serving this sauerkraut stew, different cuts of pork, that have been cooked in jota, are removed from the bone, sometimes shredded and then returned and mixed into a soup. It is also very common to remove the meats from the soup and serve it later as a separate course.

Different cuts of pork can be used to enrich the flavour of this stew, but it is equally delicious without the meaty element and so it makes a lovely vegetarian and vegan meal.

My nona also “jokingly” shared with me, that to make a really good jota you need three days. The first day for soaking the beans, the second day for cooking Jota and the third for eating it, and enjoying it after it has rested, and all the flavours had a chance to fully develop. It is up to you whether you want to follow my nona three day rule.

I do, no wonder it turns out delicious...

Here I am sharing my family recipe for jota.

Ingredients

Serves 6-8

  • 300g dry borlotti beans, soaked overnight or least for 4 hours

  • 650g -1kg sauerkraut, drained and rinsed

    (I am giving you an approximate amount of sauerkraut to be used in this recipe as it can be flexible. The amount you use will depend on what you can find in your local food store. Sauerkraut is normally sold in either glass jars or sometimes in sealed plastic bags and they will indicate on the label both total net weight (with the liquid) and drained weight, and the latter is the weight you need to look for.

  • For this recipe I bought a glass jar of sauerkraut with total weight of 680g and 650g drained weight which is the amount of sauerkraut I used for the soup).

  • 2 bay leaves, fresh or dry

  • 500g or more, pork ribs (can use ham hocks or similar)

  • 100-200g g smoked bacon lardons (can use smoked cubed pancetta, a slab of bacon or pancetta, chopped strips of smoked bacon or similar)

    (The use of combination of smoked and unsmoked meat element is quite important, as it really gives that traditional and typical Jota flavour, but it is also very flexible. You can, if you prefer, only use unsmoked meats or all smoked for a deeper smoky flavour. Traditionally a bone or outer rind of dry cured ham would be used in order not to waist anything, and it is also packed full of flavour.

  • few black peppercorns, 4-6

  • 2 cloves of garlic, peeled and crushed

  • 3 fairly big potatoes about 600-800g, peeled and cubed

  • 2 Tbsp extra virgin olive oil

  • 2 tbsp tomato paste (optional)

  • sea salt

Method

There are three simple stages to make jota.

Stage 1

Drain previously soaked beans in a colander, rinse with cold running water and drain again.

Transfer the beans to a very big pot (5 litre at least, where jota will be cooked), add the meats, bay leaf and 5 litre of cold water. Bring to boil over high heat, turn the heat down to a medium low and cook the beans, partially covered with the lid for about 1 hour until the beans are just soft. Skim any foam that rises to the surface, you might have to repeat this process few times.

Do not add sea salt at this point as this will make the skin of the beans hard causing them to crack during the cooking.

Stage 2

Place the sauerkraut in a colander and drain, rinse briefly but thoroughly with cold running water and drain again.

Transfer the sauerkraut in a pan, add a pinch of salt, peppercorns, crashed garlic, bay leaf, olive oil and cold water just enough to cover the sauerkraut.

Bring to a boil, lower the heat and cook for about 30 minutes. After this time, transfer the sauerkraut to a big bean pot.

Stage 3

Peel, wash, cube the potatoes and place them in pan. Cover completely with water, bring to boil, turn the heat down and cook for about 30 minutes until the potatoes are soft when pierced with the tip of a knife.

Drain the potatoes in a colander or with the slotted spoon transfer the potatoes to a large plate or bowl. With the back of the fork coarsely mash half of the potatoes and leave the other half cubed.

Transfer coarsely mashed and cubed potatoes in a big pot with beans.

Partially cover with a lid the big pot with beans, sauerkraut and potatoes and continue cooking on a gentle heat for another hour. All three elements will mix and blend together and the soup will start thickening. Taste and adjust seasoning with sea salt and freshly ground black pepper.

The soup should be quite thick but still have enough liquid to be able to ladle it nicely on the plate.

If jota gets too thick just add a bit of water to dilute it.

When jota is cooked, depending on what type of meats you use, take the meat of the bones, discard skin and bones and transfer pieces of shredded meat to the soup if you wish.

Discard the bay leaves before serving jota hot with a nice piece of crunchy bread.

Just a thought

Jota will keep well in a fridge for few days and is suitable for freezing.

If jota gets too thick, simply dilute it adding a bit of water, bring to boil and serve hot.

Wine suggestion

Venezia Giulia Pinot GrigioIGT 2019 – Azienda Agricola Pierpaolo Pecorari

November 10, 2021 /tina oblak
Sauerkraut recipe, Istrian sauerkraut stew, Istrian sauerkraut soup, hearty stew, comforting stew, borlotti beans, potatoes, autumnal stew, winter stew, winter dish
Adriatic Recipe, Central European recipes, dinner, Eastern European recipes, Easy recipe, entrée course, healthy mael, Istrian cuisine, Istrian dish, Istrian food, Istrian gastronomy, main course, main dish, Mitteleuropean recipes, Nutritious dish, one pot meal, recipe from Northern Ital, Rustic dish, Slovenian cuisine, Slovenian food, Slovenian gastronomy, Soups, Starters, stew, supper, Vegan, Vegetarian, Autumnal recipe, Autumnal dish, Winter recipe, Winter dish
2 Comments

Borlotti beans salad Recipe

Beans and Sardines
October 29, 2021 by tina oblak in Adriatic Recipe, Appetizers, Central European recipes, dinner, Easy recipe, healthy mael, Istrian cuisine, Istrian dish, Istrian food, Istrian gastronomy, main course, main dish, Nutritious dish, Rustic dish, Slovenian cuisine, Slovenian food, Slovenian gastronomy, Small bites, Starters, supper, Vegan, Vegetarian

This filling and substantial salad is traditionally made with either fresh borlotti beans when they are in season (mid to end summer and early autumn) or dried borlotti beans, during colder months when fresh borlotti beans are no longer available to buy as a seasonal produce. To make this dish even more convenient and fast, the use of good quality tinned borlotti beans is a common practice when you want to rustle up a quick meal.

Both my paternal and maternal grandfathers would take this salad to the vegetable garden and have it for lunch there with some bread and a small glass of red wine that they always kept in the garden shed.

I am sharing here the recipe for the salad, how has always been made in my family, traditionally using borlotti beans, (fresh, dried or tinned) however, you can use other types of beans if you prefer.

Ingredients

Serves 4 as part of meal

  • Double the quantity of the beans if you wish to make a more substantial bean salad and serve it as a main dish for 4 people.

  • 250g fresh or dried borlotti beans (when buying fresh borlotti beans in their pods you will need about 500g)

  • If using dried borlotti beans, they need to be soaked overnight in a large bowl of cold water (for at least 8 hours), then drained and rinsed and then they are ready to be cooked.

  • For this recipe you can also use tinned borlotti beans (one tin of borlotti beans weighing 400g will give you 250g of beans after they have been drained). If the liquid in the can is very thick, thin it out with a little bit of water and save it, as it makes integral part of the dressing.

  • 1 small onion, peeled and thinly sliced (you can use yellow, white or red onions, shallots or spring onions)

  • fresh flat leaf parsley, finely chopped

  • extra virgin olive oil, generous drizzle

  • white or red wine vinegar (you can use balsamic vinegar or other types of vinegar)

  • sea salt

  • black pepper

  • bay leaf (fresh or dry)

Method

Place fresh borlotti beans (previously taken out of their pods) or dried borlotti beans (previously soaked overnight) in a big pot and add plenty of cold water until about 3cm (just over an inch) from the top.

Add bay leaf and bring to boil. Turn down the heat and gently boil the beans uncovered for up to 1 hour or until tender. If using dried borlotti beans the cooking time will be slightly longer.

When the beans are cooked season with sea salt.

Drain cooked beans keeping a bit of their liquid.

Transfer the beans to a salad dish.

Add finely sliced onions, finely chopped fresh flat leaf parsley, a generous drizzle of extra virgin olive oil, vinegar, black pepper and a bit of the liquid that you kept aside.

Taste and adjust the seasoning.

Enjoy warm, at room temperature or cold.

Just a thought

You can turn this simple bean salad into a more substantial meal, adding to the beans for example some tomatoes, carrots, celery, beetroot or tinned tuna, just to mention few options.

Store the bean salad in an airtight container and keep it refrigerated, it will last between 2 and 4 days.

Wine suggestion

Friuli Colli Orientali DOC “Friulano di Jacopo”2019 - Necotium

October 29, 2021 /tina oblak
fresh borlotti beans, dry borlotti beans, borlotti beans salad, dry borlotti beans salad, bean salad with fresh parsley and onion
Adriatic Recipe, Appetizers, Central European recipes, dinner, Easy recipe, healthy mael, Istrian cuisine, Istrian dish, Istrian food, Istrian gastronomy, main course, main dish, Nutritious dish, Rustic dish, Slovenian cuisine, Slovenian food, Slovenian gastronomy, Small bites, Starters, supper, Vegan, Vegetarian
Comment
Stuffed Peppers 7.jpg

Stuffed peppers with minced meat and rice in a tomato sauce Istrian Recipe

Beans and Sardines
October 20, 2021 by tina oblak in Adriatic Recipe, Appetizers, Balkan dish, Central European recipes, Eastern European recipes, Easy recipe, Istrian cuisine, Istrian dish, Istrian food, Istrian gastronomy, main dish, Rustic dish, Slovenian cuisine, Slovenian food, Slovenian gastronomy, Starters, one pot meal, baked dish

This Balkan dish made of peppers, stuffed with a mix of minced meat and rice and cooked or baked in a rich tomato sauce is very rustic, unpretentious, hearty and traditionally made during summer months, end of summer and early autumn.

Yes, there are a few steps to this recipe, but it is very simple to make and there is absolutely nothing complicated about it.

Stuffed peppers is a dish that is common in many cuisines around the world and generally consists of peppers getting halved or hollowed and then stuffed with a variety of different fillings such as meat, rice, vegetables, cheese, fish etc.

This dish, with its many variations, can be found in Greece, Central and Southeast Europe, Scandinavian and Baltic countries, Guatemala, North America Eastern Mediterranean, India and Spain.

It is in Eastern Mediterranean that stuffed peppers are part of Dolma, a word of Turkish origin, meaning “something stuffed” and it indicates a family of stuffed dishes originating from Ottoman Cuisine. The Ottoman Empire directly administered a vast territory, and eventually reached the Balkans and the area not far from the Istrian peninsula, where I come from, and this is why they strongly shaped the local cuisine.

As a result of this historical influence, there is no surprise that in the whole of Slovenia and in coastal Istria, stuffed peppers, known as Filana paprika or Polnjena paprika become integral part of the local diet and can be found on the menus informal family run restaurants, and it is one of the most frequently made dishes in many households.

I like to call this dish “a generational dish” since it is very much loved across different generations in the family, so when stuffed peppers are on the menu, everyone leaves the table happy.

Stuffed peppers are traditionally served with plenty of creamy mashed potatoes or just a lot of rice and bread. What is not to like about this dish?

Everyone in the family makes delicious stuffed peppers but this dish tastes super special and extra delicious when my brother cooks them. They are most often made a day in advance so all the flavours can fully develop and then gently reheat it. This is when they taste at their best.

I am sharing here my brother's recipe for stuffed peppers baked in the oven.

Ingredients

Serves 4-8 (depending if you are serving one or two stuffed peppers per person)

  • 7-9 bell peppers, mixed colour or use just the ones that you prefer. The number of the peppers will depend on their size and also on the size of the dish you will use for this recipe and into which they need to fit. I used 8 medium size mixed peppers. (Babura type of peppers is a variety of peppers most commonly used for this recipe).

  • 400g mince beef

  • 400 mince pork

  • 100g rice, any risotto type rice like Arborio, Vialone Nano, Carnaroli will work well

  • bigger size onion (about 170g), finely chopped

  • 4 cloves of garlic, peeled and crushed

  • 2 Tbsp extra virgin olive oil

  • sea salt

  • black pepper, finely ground

Sauce

  • 2 tinned finely chopped tomatoes (2x400g), the best quality you can afford

  • medium size onion, finely chopped

  • 2 cloves of garlic, peeled and crushed

  • 4 Tbsp extra virgin olive oil

  • few fresh basil leaves

  • sea salt

Method

Before starting this recipe, I suggest you do a little test to see how many peppers will you actually need. Take the ovenproof dish you intend to bake the stuffed peppers in and see how many peppers will fit in it.

For this recipe you can use a deep baking tray and cover stuffed peppers with an aluminium foil.

Stuffed Peppers 1.jpg

Start by making a simple tomato sauce. Put extra virgin olive oil in a pan, add finely chopped onions, a pinch of salt and fry on a gentle heat until the onions become soft. Add crushed garlic and fry gently together with the onions just for a minute or so. Add tinned tomatoes, few fresh basil leaves, bring to the boil, turn the heat down, partially cover with the lid and gently simmer for about 30 minutes, stirring occasionally. By this time, the sauce should have a nice rich velvety consistency.

Prepare and clean the peppers. Cut off the top part and remove white little seeds from inside the peppers. Rinse the outside and the inside of the peppers with cold running water. Dry the peppers a bit with a kitchen towel or kitchen paper.

Stuffed Peppers 2.jpg

Take a griddle pan (if you have it, otherwise non stick pan will work just fine) and heat it until very hot. Place the peppers in a pan and charcoal grill them on all sides. The skin of the peppers will burst slightly and turn a bit black giving the peppers a slightly smoky flavour. Cool the peppers and set aside.

Charcoal grilling the peppers first will really give and extra dimension in terms of the flavour to the dish, however, you can skip this step.

Stuffed Peppers 5.jpg

Cook the rice, following the instruction on the packet, but only halfway through. This will avoid the rice to become too mushy in the stuffing. Rinse in a small colander, cool and keep aside.

Put extra virgin olive oil in a pan, add finely chopped onions, a pinch of salt and fry on a gentle heat until the onions become soft. Add crushed garlic and fry gently together with the onions just for a minute or so. Place mince beef and mince pork in a pan and fry until brown, stirring occasionally. With the back of wooden spoon break bigger lumps of meat. Taste and adjust the seasoning with sea salt and finely ground black pepper. Cool a bit and set aside.

Transfer cooked rice and browned mince meat in a big mixing bowl. Mix well and set aside.

View fullsize Stuffed Peppers 3.jpg
View fullsize Stuffed Peppers 4.jpg

Transfer the tomato sauce in a ovenproof dish.

Turn the oven on and preheat it to 180C static or equivalent.

With the help of a spoon, fill each pepper with meat and rice mixture. With the back of the spoon press the mixture down as you go along, this will allow you to get more mixture in a pepper.

Place each filled pepper in the ovenproof dish filled with tomato sauce.

Stuffed Peppers 6.jpg

Cover with the lid and bake for 2 hours. Check occasionally giving a dish a gentle shake.

Stuffed Peppers 8.jpg

Just a thought

If you are left with meat and rice mixture you can use it in frittata or make scrambled eggs with it and there is another meal sorted.

You can store stuffed peppers for few days in an airtight container and they also freeze very well.

Wine suggestion

Collio Cabernet Sauvignon DOC 2018 - Muzic

October 20, 2021 /tina oblak
bell peppers, stuffed peppers, mince meat and rice, pepperoni ripieni, polnjene paprike, filane paprike, one pot meal, baked peppers
Adriatic Recipe, Appetizers, Balkan dish, Central European recipes, Eastern European recipes, Easy recipe, Istrian cuisine, Istrian dish, Istrian food, Istrian gastronomy, main dish, Rustic dish, Slovenian cuisine, Slovenian food, Slovenian gastronomy, Starters, one pot meal, baked dish
Comment
Mussels all abuzara 7.jpg

Mussels buzara style with garlic, parsley and white wine Istrian Recipe

Beans and Sardines
October 13, 2021 by tina oblak in Adriatic Recipe, Appetizers, Canapés, Easy recipe, entrée course, Finger food, Fish & Seefood, healthy mael, Istrian cuisine, Istrian dish, Istrian food, Istrian gastronomy, main course, main dish, Nutritious dish, Rustic dish, Slovenian cuisine, Slovenian food, Slovenian gastronomy, Small bites, Starters

This delicious, one pot recipe for mussels, is a great way to bring restaurant style mussels to your home, as is it surprisingly easy and quick to cook yourself.

This is one of the healthiest “fast foods” filled with proteins, zing and iron, makes a great appetizer or a light meal choice, above all, it is sustainable and affordable.

Mussels alla Busara (or Buzara) or Busara mussels is one of the most traditional and common ways of preparing mussels and other type of shellfish in coastal Croatia, Istria and in Italy, in Trieste, province of Trieste and in Venice.

There are two types of busara or buzara sauce, the white variation with olive oil, garlic, white wine, fresh parsley and breadcrumbs and the red variation where finely chopped onions and tomatoes are added to the sauce, a variation very commonly used with langoustines.

This is lovely way of cooking mussels as during the steaming process they release their juices and together with the rest of the ingredients make the most delicious sauce.

This was one of my dad's favourite dishes and he used to cook it very often. When the mussels were on the menu, I knew my parents would have friends coming round, usually for a Saturday evening gathering. My dad would prepare a huge pot of mussels, placed it in the centre of the table with a big serving spoon, so everyone could help themselves, and plenty of fresh crunchy bread to dip in the sauce.

I am sharing here his recipe, but before you cook the mussels, make sure you buy them as fresh as you can, they should not have a strong “fishy” smell but should have a fragrance of the sea. As soon as you can, after purchasing, take the mussels out of the plastic bag, put them loose in a bowl, cover with the cloth and refrigerate. Drain any expelled liquid, clean and prepare them only when ready to cook.

Mussels alla buzara 1.jpg

Ingredients

Serves 4 as a starter

  • 1kg fresh mussels, cleaned with beard (fibrous darkish brown string like hanging out of the join in the shell) removed

  • 4 Tbsps extra virgin olive oil

  • fresh flat leaf parsley, a handful (about 10g), finely chopped

  • 2-3 cloves of garlic, peeled and crushed (you can use more or less garlic depending on the size and personal preference)

  • 1-2 Tbsp dry breadcrumbs

  • 200ml white wine

  • sea salt

Method

Rinse well the mussels with cold running water.

Mussels alla buzara 2.jpg

If you find the mussels particularly dirty, place them in a large bowl or sink filled with cold water, add a generous pinch of salt and leave to soak for up to 30 minutes, this will help to get rid of sand and grit. Swish them around with your hands to wash them thoroughly and then rinse well with cold water. Most of the time, when mussels are bought at the fishmonger or supermarkets, they come fairly clean and you will most probably skip this step.

Mussels normally come with beards (fibrous darkish brown string like hanging out of the join in the shell) that need removing, but not all the mussels will have beards.

Pull off the beards, they need a firm tug, the use of knife will help you.

During this process of debearding check each mussels as you go along.

It is really important to discard damaged mussels with broken shells.

Also look for any open mussels, tap them sharply with a knife, against the worktop or the side of the sink. If they don't close, mean they are dead, not edible and you need to discard them.

Rinse the mussels well with cold water and place them in a colander to drain.

View fullsize Mussels alla buzara 3.jpg
View fullsize Mussels alla buzara 4.jpg

In a large pan (Dutch oven is great if you have it) put the oil and the garlic, stir around on a gentle heat for few seconds to flavour and infuse the oil with the garlic.

Add white wine, 1 Tbsp of breadcrumbs, half the parsley and bring to boil.

Add mussels, the rest of the parsley, cover with the lid and cook the mussels on a high heat for about 6 minutes giving a pan a good shake now and again so the mussels cook evenly.

Mussels alla buzara 5.jpg

The mussels are fully cooked when they are all opened, discard the mussels that have not opened.

Taste the sauce, season with sea salt if needed and add one more tablespoon of breadcrumb if you like the sauce slightly thicker.

Sprinkle cooked mussels with some extra roughly chopped flat parsley and serve hot immediately.

Just a thought

Cooked mussels should not be made in advance and then reheated and they are not particularly suitable meal for storing.

Wine suggestion

Friuli Colli Orientali Ribolla Gialla DOC 2018 – La Viarte

October 13, 2021 /tina oblak
fresh mussels, mussels buzara style, mussels busara style, mussels alla buzara, mussels alla busara, mussels Adriatic recipe, mussels Adriatic style, mussels with no cream
Adriatic Recipe, Appetizers, Canapés, Easy recipe, entrée course, Finger food, Fish & Seefood, healthy mael, Istrian cuisine, Istrian dish, Istrian food, Istrian gastronomy, main course, main dish, Nutritious dish, Rustic dish, Slovenian cuisine, Slovenian food, Slovenian gastronomy, Small bites, Starters
Comment
Spinach or chard with garlic and olive oil Istrian way 7.jpg

Spinach or chard with potatoes garlic and olive oil Istrian way Recipe

Beans and Sardines
October 02, 2021 by tina oblak in Adriatic Recipe, brunch, Central European recipes, Easy recipe, healthy mael, Istrian cuisine, Istrian dish, Istrian food, Istrian gastronomy, Nutritious dish, Rustic dish, Side Dishes, Slovenian cuisine, Slovenian food, Slovenian gastronomy, Vegan, Vegetarian

Spinach or chard with garlic and extra virgin olive oil is a peasant dish, hearty, rustic and nutritious. It is extremely easy to make, inexpensive and with its humble appearance it most certainly offers a lot more than meets the eye.

It is a perfect side dish to any grilled or fried fish, but equally delicious with pork, lamb or chicken and accompanied with fried egg makes a great vegetarian meal option.

Back home, on the Slovenian coast, this dish is a most frequent companion to grilled fish and grilled or deep fried squid, a bit like fish and chips and mushy peas in the United Kingdom.

Spinach or chard with garlic and olive oil is very popular in Dalmatia and on Dalmatian islands (Croatia) where it is believed it originated from. It is on this islands, where tomatoes, peppers, cucumbers and other summer vegetables are abundant during the summer, that chard would be the only green leaf vegetable that could grow during the scorching summer heat therefore it has been a very treasured vegetable containing a lot of vitamins and minerals and a lot of water make it very hydrating and easy to digest.

This dish travelled north along Dalmatian coastline to Istria where it has become as popular as in Dalmatia and is found on the menus in most restaurants and cooked in almost every household.

This is another dish that is part of my childhood and adulthood, it never came into the fashion, it never went out of the fashion, it has simply always been there...

I am sharing here my family recipe.

Spinach or chard with garlic and olive oil Istrian way 1.jpg

Ingredients

Serves 4-6 as part of meal

  • 1kg spinach, baby spinach or chard

  • 400-450g potatoes, peeled and cubed

  • 4 cloves of garlic, peeled

  • 5 Tbs extra virgin olive oil (the best you can afford)

  • sea salt

Method

Wash thoroughly spinach or chard, (no need to do so if bought already washed version) cut off the stalks and chop or just tear the leafs with your hands into smaller pieces. If you are not using the stalks for this recipe you can use them for vegetable minestrone, put them on a compost or simply discard.

If using chard remove tough centre stalks.

View fullsize Spinach or chard with garlic and olive oil Istrian way 2.jpg
View fullsize Spinach or chard with garlic and olive oil Istrian way 3.jpg

Place cubed potatoes in a pan, add water, a pinch of salt and boil until just tender, for about 10 minutes. Drain and set aside.

Fill a large pot with ¼ of hot water, add spinach or chard and cook only for few minutes until wilted.

Drain very well in a colander. When the spinach is in a colander, press down with a back of a wooden spoon to remove a bit of excess water. You can use a big colander to drain both potatoes and chard.

Spinach or chard with garlic and olive oil Istrian way 4.jpg

Rinse quickly and dry the pot where you cooked the spinach, add extra virgin olive oil and garlic.

Fry the garlic on a gentle heat until it becomes softer and golden in colour. The oil will be nicely infused with the garlic.

Remove and discard the garlic.

Add spinach and potatoes to the pan with garlic infused oil and sautéed on a medium heat for about 15 minutes, stirring occasionally or until you get a nice velvety consistency and you loose most of the water from the spinach.

Adjust the seasoning with sea salt and serve hot or at the room temperature.

View fullsize Spinach or chard with garlic and olive oil Istrian way 5.jpg
View fullsize Spinach and chard with garlic and olive oil 6.jpg

Just a thought

This vegetable side dish has a delicate garlicky flavour. If you are a big fan of garlic and keen on stronger garlicky taste, add crushed garlic to extra virgin olive oil without removing it instead of adding the whole garlic and removing it after the oil has been infused like suggested in the recipe.

You can also prepare this dish by cooking the potatoes and the spinach or chard in one big pot together rather then separately. Use one big pot, boil cubed potatoes first until just tender then add spinach or chard and cook until wilted, drain both in big colander.

October 02, 2021 /tina oblak
sautéed baby spinach with potatoes, easy spinach recipe, sautéed spinach with potatoes, fresh baby spinach, baby spinach in a skillet, quick spinach recipe, potatoes and spinach
Adriatic Recipe, brunch, Central European recipes, Easy recipe, healthy mael, Istrian cuisine, Istrian dish, Istrian food, Istrian gastronomy, Nutritious dish, Rustic dish, Side Dishes, Slovenian cuisine, Slovenian food, Slovenian gastronomy, Vegan, Vegetarian
Comment
Green beans with tomatoes 13a.jpg

Green Beans with tomatoes Istrian style Recipe

Beans and Sardines
September 22, 2021 by tina oblak in Adriatic Recipe, Appetizers, brunch, Easy recipe, healthy mael, Istrian cuisine, Istrian dish, Istrian food, Istrian gastronomy, Nutritious dish, Rustic dish, Side Dishes, Slovenian cuisine, Slovenian food, Slovenian gastronomy, Vegan, Vegetarian

This comforting, rustic, vegetable side dish is super delicious and super easy to make, perfect to accompany just about any grilled or roasted meats or fish.

I am sharing with you the recipe my nona and my mother have made this dish very often when fresh green beans were in season and tasting at their best.

Green beans with tomatoes 1.jpg

This is a very popular dish during the summer and end of summer.

My maternal grandfather grew green beans at his vegetable garden, they got picked and enjoyed all the way through the summer, but somehow it would be the very last batch, at the end of the summer, that tasted the best. Did it really, or is this just an impression stored in my nostalgic box of memories? As a child I was aware that eating that last few green beans meant that the summer would very soon drew to a close...

Traditionally green beans in tomato sauce are eaten with soft polenta or just with some bread. It can also be served with cooked rice, fried eggs or on bruschetta.

Ingredients

Serves 4 as part of meal

  • 500g fresh green beans, washed and trimmed

  • 1 medium onion (about 140g), finely chopped

  • 250g tomatoes, washed and roughly chopped (I used fresh mini San Marzano tomatoes but you can use other varieties or good quality tinned tomatoes of your choice.) If using fresh tomatoes make sure the tomatoes are nicely ripe and sweet. You can change the quantity of the tomatoes according to your preference.

  • a bunch of fresh flat leaf parsley, stalks included (about 16g), finely chopped

  • 3 generous Tbsp extra virgin olive oil

  • 1 clove garlic, peeled and crushed

  • sea salt

  • 150ml water

Green beans with tomatoes 2.jpg

Method

Wash and trim green beans.

View fullsize Green beans with tomatoes 3.jpg
View fullsize Green beans with tomatoes 4.jpg

Cut them in three or four pieces.

View fullsize Green beans with tomatoes 5.jpg
View fullsize Green beans with tomatoes 6.jpg

Peel the onion and chop it finely then peel and crush the garlic.

In a fairly big pan, ideally non stick, put extra virgin olive oil.

Add the onions, a pinch of sea salt and sauté on a gentle heat for few minutes, stirring frequently, until they become soft and translucent.

Add the garlic and mix well with the onions.

Place green beans in a pan, mix well with onions and garlic and cook for about 10 minutes, stirring quite frequently.

Add chopped tomatoes, mix well with green beans and cook for further 10 minutes or until tomatoes start to break down a bit.

View fullsize Green beans with tomatoes 7.jpg
View fullsize Green beans with tomatoes 8.jpg
View fullsize Green beans with tomatoes 9.jpg
View fullsize Green beans with tomatoes 10.jpg

Season with sea salt, add fresh chopped parsley and add water.

Partially cover the pan with the lid and cook on a gentle heat for about 60minutes, stirring occasionally. After this simmering time the beans should be nice and soft.

If at any point during the cooking you feel the beans are getting too dry add a splash of water.

Season to taste and serve hot, at room temperature or cold.

Green beans with tomatoes 12.jpg

Just a thought

The quantity of the tomatoes for this recipe is a guideline only and you can adjust it according to your taste, liking and preference.

For this recipe you can use frozen green beans as well.

This is a great dish to be made ahead and refrigerated overnight.

September 22, 2021 /tina oblak
fresh green beans, green beans, frozen green beans, green beans with tomatoes, Braised green beans with tomatoes, Fagiolini al pomodoro in umido
Adriatic Recipe, Appetizers, brunch, Easy recipe, healthy mael, Istrian cuisine, Istrian dish, Istrian food, Istrian gastronomy, Nutritious dish, Rustic dish, Side Dishes, Slovenian cuisine, Slovenian food, Slovenian gastronomy, Vegan, Vegetarian
Comment
Plum Dumplings 18.jpg

Plum Dumplings Recipe

Beans and Sardines
September 16, 2021 by tina oblak in Adriatic Recipe, Appetizers, breakfast, brunch, Central European recipes, dessert, dinner, Easter treats, Eastern European recipes, Easy recipe, entrée course, Istrian cuisine, Istrian dish, Istrian food, Istrian gastronomy, main course, main dish, Mitteleuropean recipes, pudding, Rustic dish, Slovenian cuisine, Slovenian food, Slovenian gastronomy, Starters, supper, sweet course, Sweet Things, Vegetarian, Dumplings

This is a great dish for Autumn that originated in the Austro-Hungarian Empire. It is made with potato gnocchi dough in which you stuff the plums, simmer them in water, and then coat them with breadcrumbs, sugar and cinnamon mixture.

These rustic plum dumplings will become a real treat in the family since they are super delicious and easy to make! This dish is traditionally offered as a dessert, however, it is very common as a main course for lunch or dinner.

Plum dumplings are very well known and common throughout the countries that were once part of the Austro-Hungarian Empire. This dish is therefore very popular in Eastern and Central Europe as well as in Trieste and the province of Trieste in Italy.

This historical influence made plum dumplings a very appreciated meal in Slovenia, and is referred to in Slovenian as češpljevi cmoki or slivovi cmoki (češplje and slive meaning plums and cmoki meaning dumplings). They are widely available to buy frozen in bags in the supermarkets, but nothing is comparable to making them at home with this simple recipe.

This dish is very familiar to me, I grew up with it, and it was prepared frequently in the late summer and early autumn when plums are in peak season, in abundance, and with the right level of sugar and sweetness in them.

In Slovenia, where I come from, plum trees are very common to have in the back garden or in a near by orchard and the sight of these beautiful, humble, bluish purple colour fruits, almost like jewels hanging from the branches, is simply heart warming. Plums are popular to use not only for plum dumplings but also for other desserts like bake trays, tarts, jams, and compotes.

Damsons plums, being oval and small, therefore easy to handle, are the preferred and most frequently used type of plums for this recipe. Other types of plums work very well too and fresh apricots are also used frequently to make the dumplings.

If you decide to offer plum dumplings as a dessert, I would suggest to serve 2, if you decide to prepare them as a main meal then 3 or 4 depending on the size.

Plum Dumplings 1.jpg

Ingredients

Serves 6- 8 (you will get about 16 dumplings)

Ingredients for the plum dumplings

  • 16 fresh plums, Damsons plums and prune plums most commonly used, you can use other variety (plums should be sweet, ripe and fairly firm to the touch, avoid overripe with soft pulp as it gets quite difficult and messy to pit them). You can use fresh apricots instead.

  • 1kg floury, yellow-fleshed potatoes, e.g. King Edward, Maris Piper, (avoid new potatoes). I use red skin potatoes.

  • 300g all purpose flour (plus extra for flouring the board and working surface)

  • 1 egg, slightly beaten

  • sea salt, a pinch

Ingredients for the breadcrumb coating

The ingredients stated here are to coat all the dumplings, if you wish to half the quantity of dumplings half the ingredients for the breadcrumb coating

  • 100g unsalted butter

  • 5 Tbsp natural dry breadcrumbs

  • 5 Tbsp caster sugar

  • 1 Tsp cinnamon

Method

Start this recipe by making a basic potato gnocchi dough. (For more details refer to my full step by step recipe for Potato gnocchi dough)

Wash the potatoes, with the skin on, under cold running water.

Place the potatoes in a saucepan or a pot, cover with cold water and bring to boil. After the water has come to a boil, cook for about 20 minutes or until tender. Cooking time will obviously vary depending on the size of the potatoes you are using.

Don't pierce them during cooking and don't overcook them allowing the skin to burst as they will absorb too much water, alternatively you can steam them.

Remove from the pot, drain them in a colander and let them cool enough to handle, then remove the skin. If the potatoes are still quite warm to handle, the best way to remove the skin is to stick the fork though the potato and peel it using a knife.

Put the flour on a working surface, add salt and mix with the fork.

Make a well in the middle and pass the potatoes through a potato ricer while still warm as they become stickier when cooler. Allow riced potatoes to cool for few minutes and then add the egg.

With your fingers work the flour into the potato and egg, bringing the dough together, until it becomes a soft, pliable dough and do not overwork it. If the dough is too sticky, wet and soft add a bit more flour. Make sure your working surface is always well floured.

When the dough is the right consistency it should not stick to your fingers.

Shape the potato dough into a log.

Plum Dumplings 4.jpg

Prepare your plums by washing them and pat dry them. Then cut each plum lengthwise all the way round in order to get two halves and remove the pits.

View fullsize Plum Dumplings 2.jpg
View fullsize Plum Dumplings 3.jpg

Flour well your working surface and divide and cut the potato dough log roughly into 16 portions.

With your hands slightly floured, flatten and shape each portion into a round circle.

View fullsize Plum Dumplings 4a.jpg
View fullsize Plum Dumplings 5.jpg

Place one half of the plum in the centre and fill it with half Tsp of sugar, then place the other half of the plum on top of it.

If your plums are quite big in size, you might want to use only one half, as you will end up with very big dumplings which are more difficult to handle and not looking particularly elegant on a serving plate.

View fullsize Plum Dumplings 6.jpg
View fullsize Plum Dumpling 7.jpg

Wrap the dough tightly around the plums.

Seal the edges properly and tightly and shape it into a ball, roughly the size of a peach.

If the edges do not stick properly, dampen the edges with your fingers previously dipped in a bit of water, this will act a bit like a glue.

This step is quite important to prevent the dumplings from bursting and losing the juices during cooking.

Make sure you place each dumpling on a well floured surface to avoid sticking.

View fullsize Plum dumplings 8.jpg
View fullsize Plum Dumplings 9.jpg

It is quite crucial, when making dumplings, that you start and finish the process without interrupting for too long, as the sauce from inside the dumplings (the sugar inside the plum starts dissolving) will start leaking from the dumplings making it quite a mission to rescue them, and this is from the first hand experience!

Repeat the process until you use all the dough.

View fullsize Plum Dumplings 10.jpg
View fullsize Plum Dumplings 11.jpg
Plum Dumplings 12.jpg

Fill a large pot with water, add a generous pinch of salt and bring to boil.

Place gently each plum dumpling in a pot making sure they do not stick to the bottom.

Cook the plum dumplings in simmering water for about 12 minutes (not strong boiling as that can damage the dumplings).

They are fully cooked when they float on the surface.

While the plum dumplings are simmering, make the breadcrumbs sauce.

In a large pan, ideally non stick, melt gently the butter, add the breadcrumbs and toast for few minutes on a medium-low heat until slightly darker in colour.

Add sugar and cinnamon and mix until all the ingredients are well combined. Remove the pan from the heat to avoid burning the breadcrumbs mixture.

View fullsize Plum Dumplings 13.jpg
View fullsize Plum Dumplings 14.jpg

With a slotted spoon, remove plum dumplings from the simmering water.

Transfer them and place them in a pan with breadcrumbs mixture.

View fullsize Plum Dumplings 15.jpg
View fullsize Plum Dumplings 16.jpg

Shake the pan gently so the dumplings can roll around and get fully coated in the breadcrumbs mixture.

Plum Dumplings 17.jpg

Place on the serving plate, dust them with a bit of extra icing sugar and serve immediately. They are best eaten hot but equally delicious at room temperature.

Plum Dumplings 19.jpg

Just a thought

If you decide to only make half a batch of plum dumplings, you can use half of the potato dough for the plum dumplings and the other half for potato gnocchi. (see my full recipe step by step for potato gnocchi).

You can store cooked plum dumplings for up to three days in a airtight container.

If you need and desire to warm them up, putting them in a microwave is a good option as they retain the moisture.

The great thing about plum dumplings is also that they freeze very well. It is very important that you spread the uncooked dumplings in a single layer, leaving a bit of space between each dumpling, so they don't stick together, on a well floured wooden board, baking sheet, serving tray laid with baking parchment or with well floured kitchen cloth or similar.

Put the tray with the freshly made dumplings into a freezer, for at least 20- 30 minutes, and once frozen, put them into a freezing bag.

When you want to cook them just drop them frozen directly into a boiling salted water without defrosting them first, bearing in mind that the cooking time will be slightly longer, around 15 minutes. They are ready when they are floating on the surface.

Wine suggestion

Moscato Rosa delle Venezie IGT 2014 - Foffani

September 16, 2021 /tina oblak
Autumn Recipe, autumnal recipe, plums, plum puddings, plum desserts, potato gnocchi dough, češpljevi cmoki, slivovi cmoki, sweet dumplings
Adriatic Recipe, Appetizers, breakfast, brunch, Central European recipes, dessert, dinner, Easter treats, Eastern European recipes, Easy recipe, entrée course, Istrian cuisine, Istrian dish, Istrian food, Istrian gastronomy, main course, main dish, Mitteleuropean recipes, pudding, Rustic dish, Slovenian cuisine, Slovenian food, Slovenian gastronomy, Starters, supper, sweet course, Sweet Things, Vegetarian, Dumplings
Comment
  • Newer
  • Older