Beans and Sardines

  • Home
  • About
  • Recipe of the week
  • Recipes
  • Wines
  • Contact

Braised Cuttlefish Recipe

Beans and Srdines
December 30, 2021 by tina oblak in Adriatic Recipe, Autumnal dish, Autumnal recipe, dinner, Easy recipe, Festive dish, Fish & Seefood, healthy mael, Istrian cuisine, Istrian dish, Istrian food, Istrian gastronomy, main dish, Nutritious dish, one post fish recipe, one pot meal, Rustic dish, recipe from Northern Ital, Slovenian cuisine, Slovenian food, Slovenian gastronomy, stew, Winter dish, Winter recipe, main fish meal

Braised cuttlefish is a simple, comforting and rustic dish, and it uses only few ingredients. The cuttlefish is slow cooked in a light tomato sauce with white wine to the point of becoming so tender that the cuttlefish almost melts into your mouth and you hardly need a knife to cut it. It is very easy to prepare and a fantastic recipe if you want to make a seafood based meal ahead of time. Cuttlefish stew is a staple dish in Venice and a real delicacy, famous in particular for being cooked in its black ink.

Cuttlefish are plentiful in British waters but the majority are sent to the continent where there is a high demand, and it is greatly appreciated.

Braised cuttlefish is a dish that is prepared in particular in coastal towns and villages in Slovenian Istra, since there is a cuttlefish habitat along the Adriatic coast. The tides push the fish towards the sandy shallows where it becomes an easy catch for the fishermen.

Braised cuttlefish play an important role in the local gastronomy and the locals are very grateful to the Venetians to have “left behind” this aspect of the marine and coastal ecology, given the very lengthy and strong presence of the Venetian Republic in the territory. Cuttlefish is not as frequently found in local restaurants as one might expect, although it is one of the most loved meals in the family.

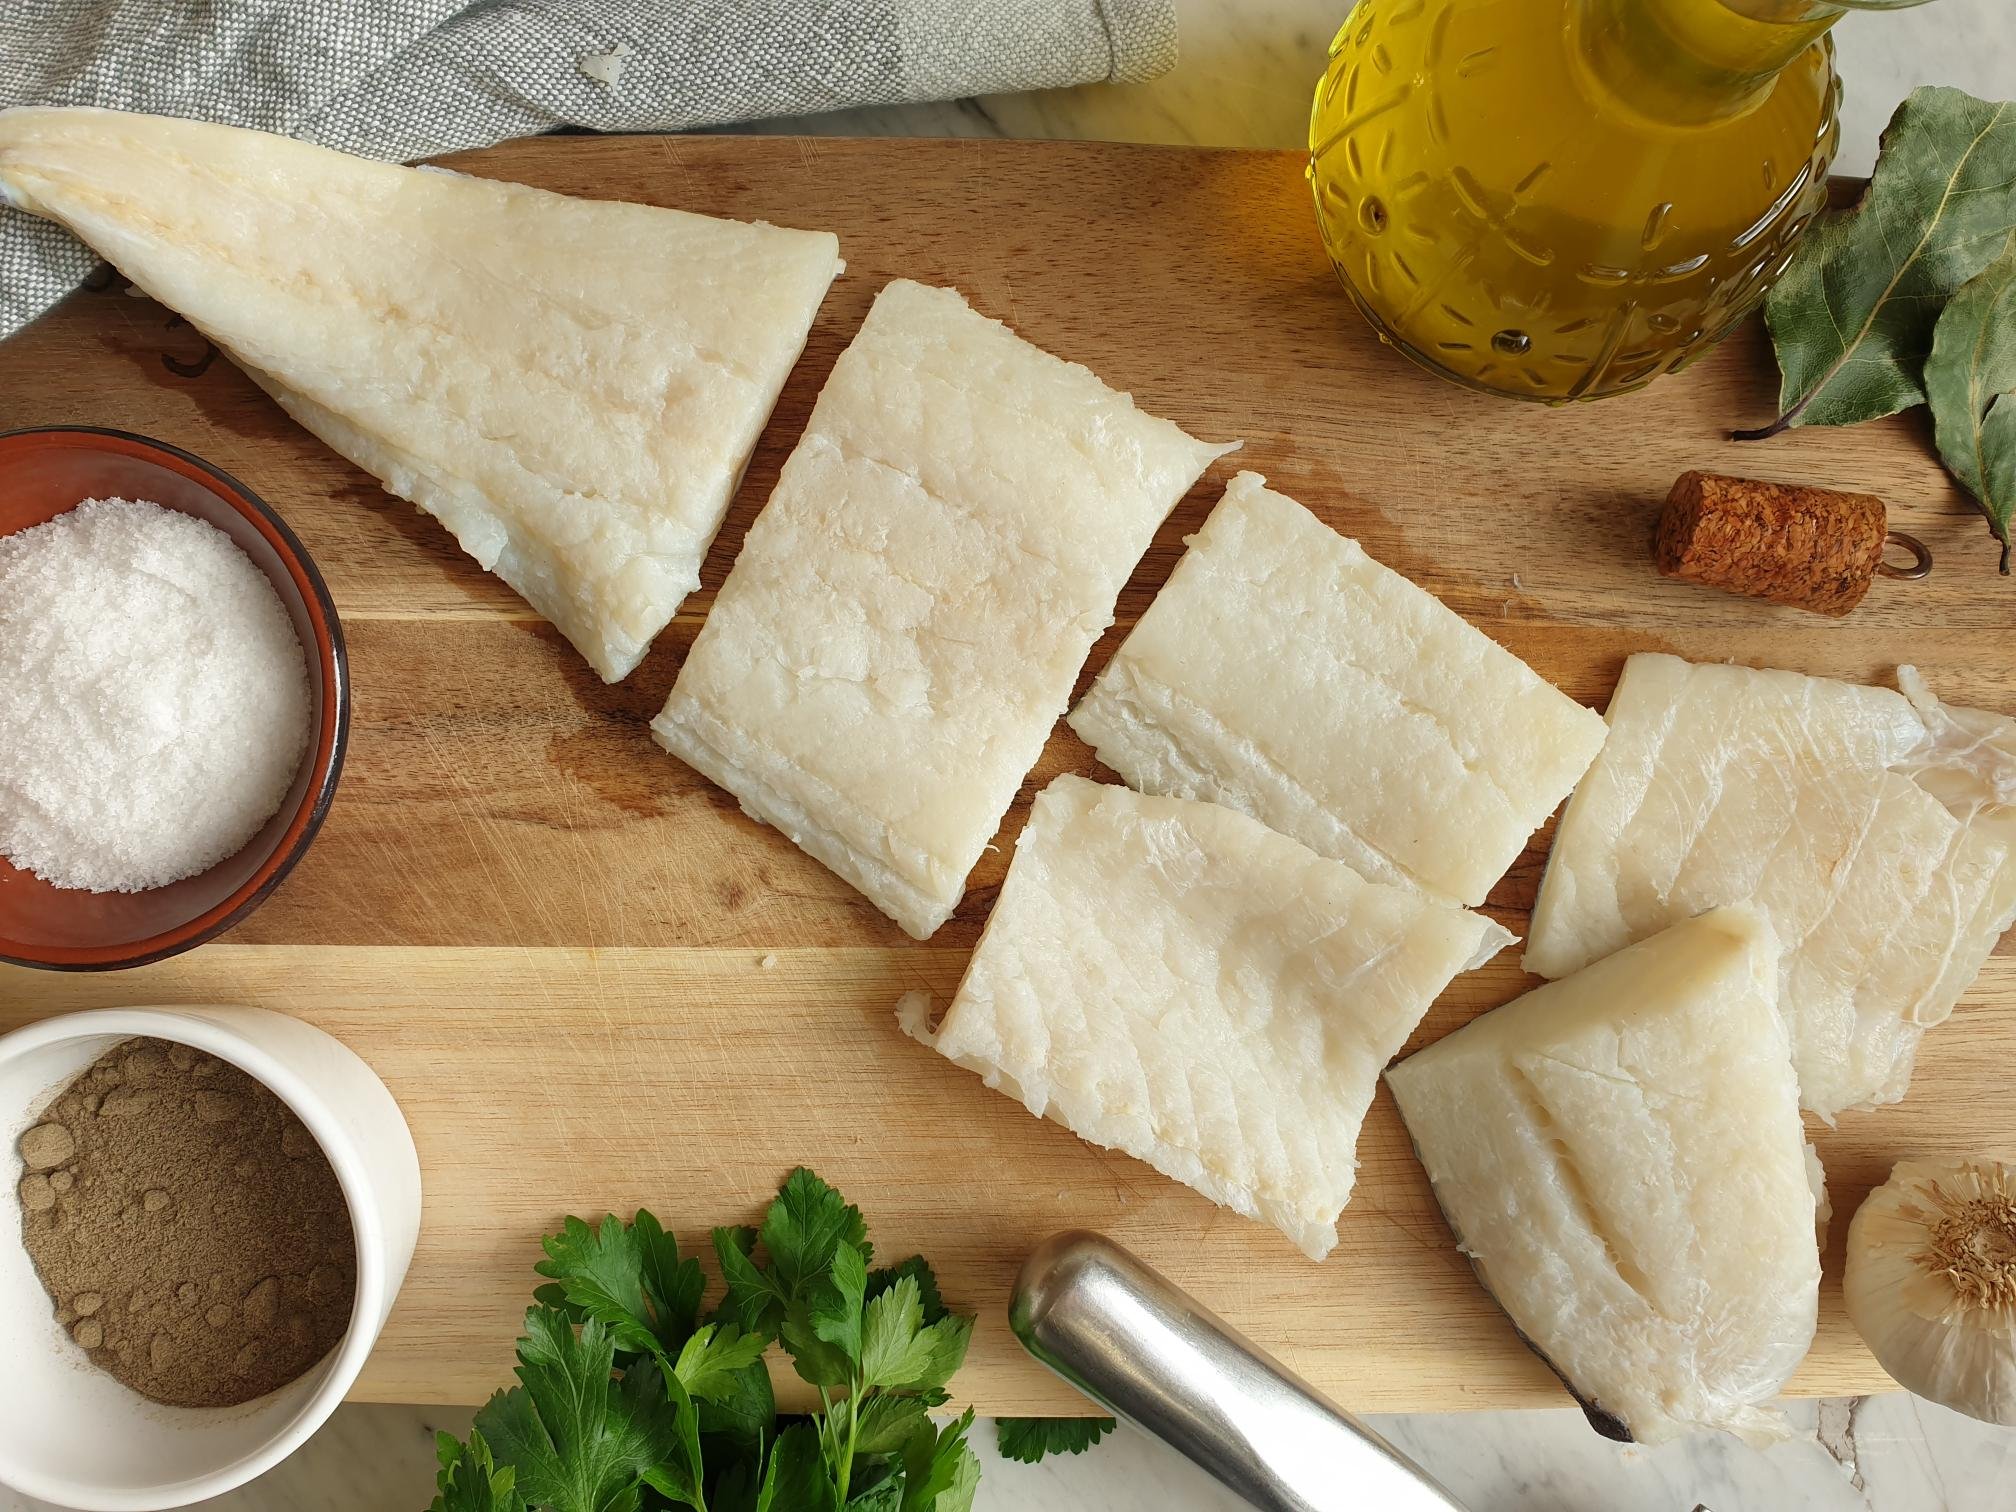
If you have never had cuttlefish before or had it but were put off for whatever reason, try my nona's family recipe, you might just change your mind. If you are worried about handling fresh cuttlefish, fishmongers in general, will be more than happy to prepare the cuttlefish for you, they will clean all the ink off the cuttlefish, remove the skin and wash thoroughly the tentacles.

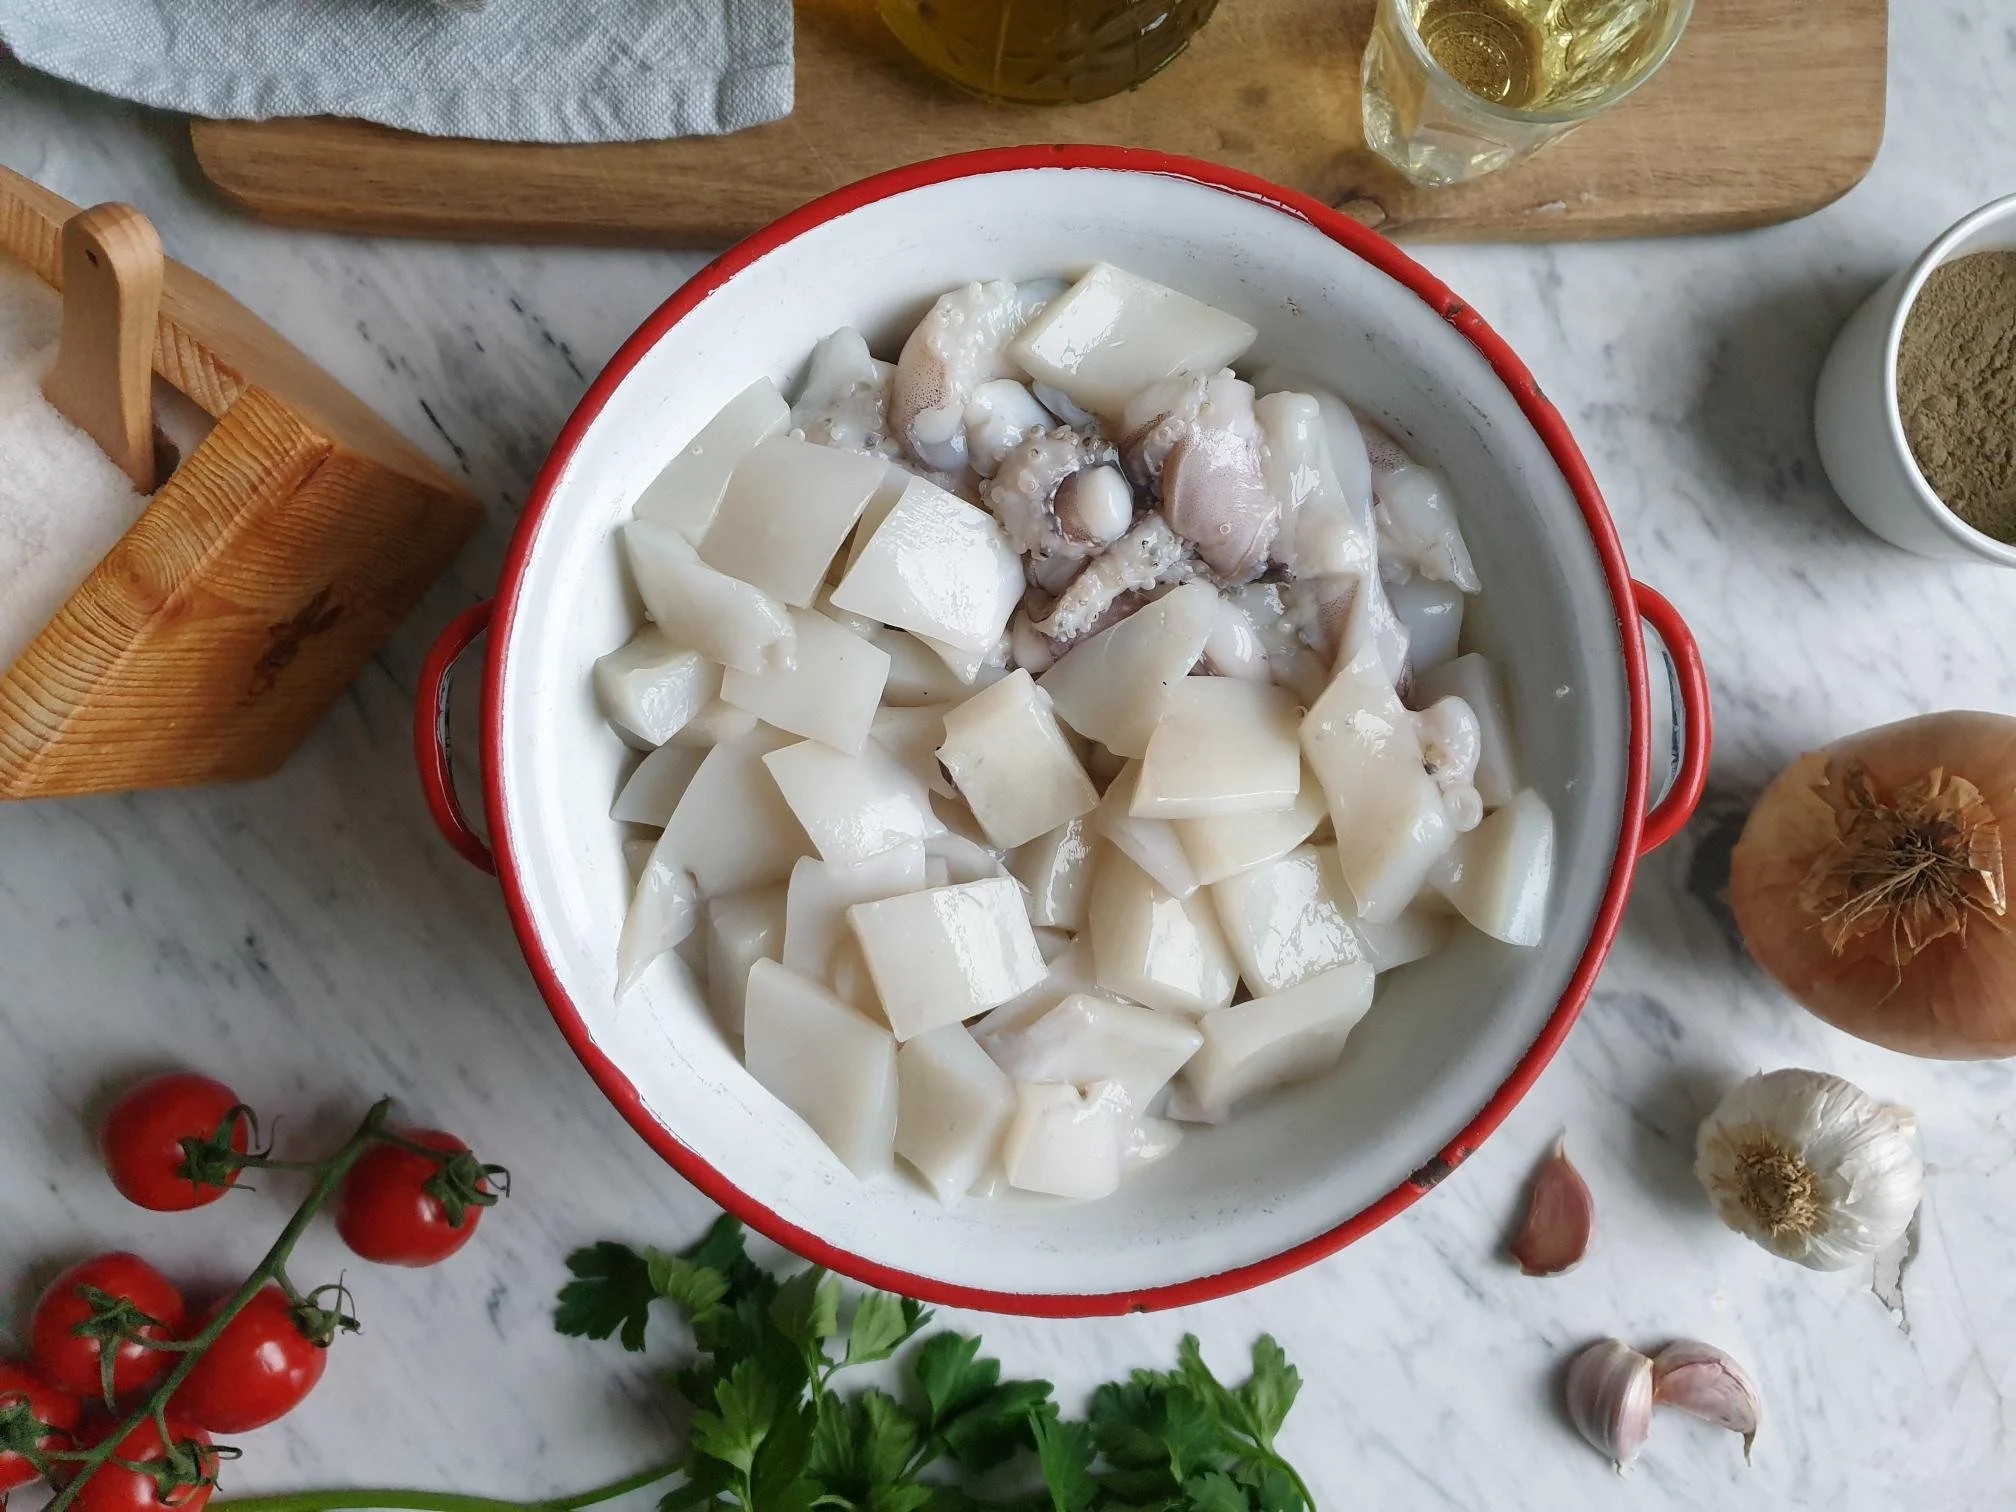
All you will be left with is beautifully cleaned cuttlefish that only needs to be cut into bite size pieces or strips, easy!

Ingredients

Serves 4

  • 5 Tbsp extra virgin olive oil

  • 1 onion (about 130g), finely chopped

  • 1 clove garlic, peeled and crushed

  • handful of fresh flat leaf parsley, stalks included (about 10g), finely chopped, plus some extra when serving

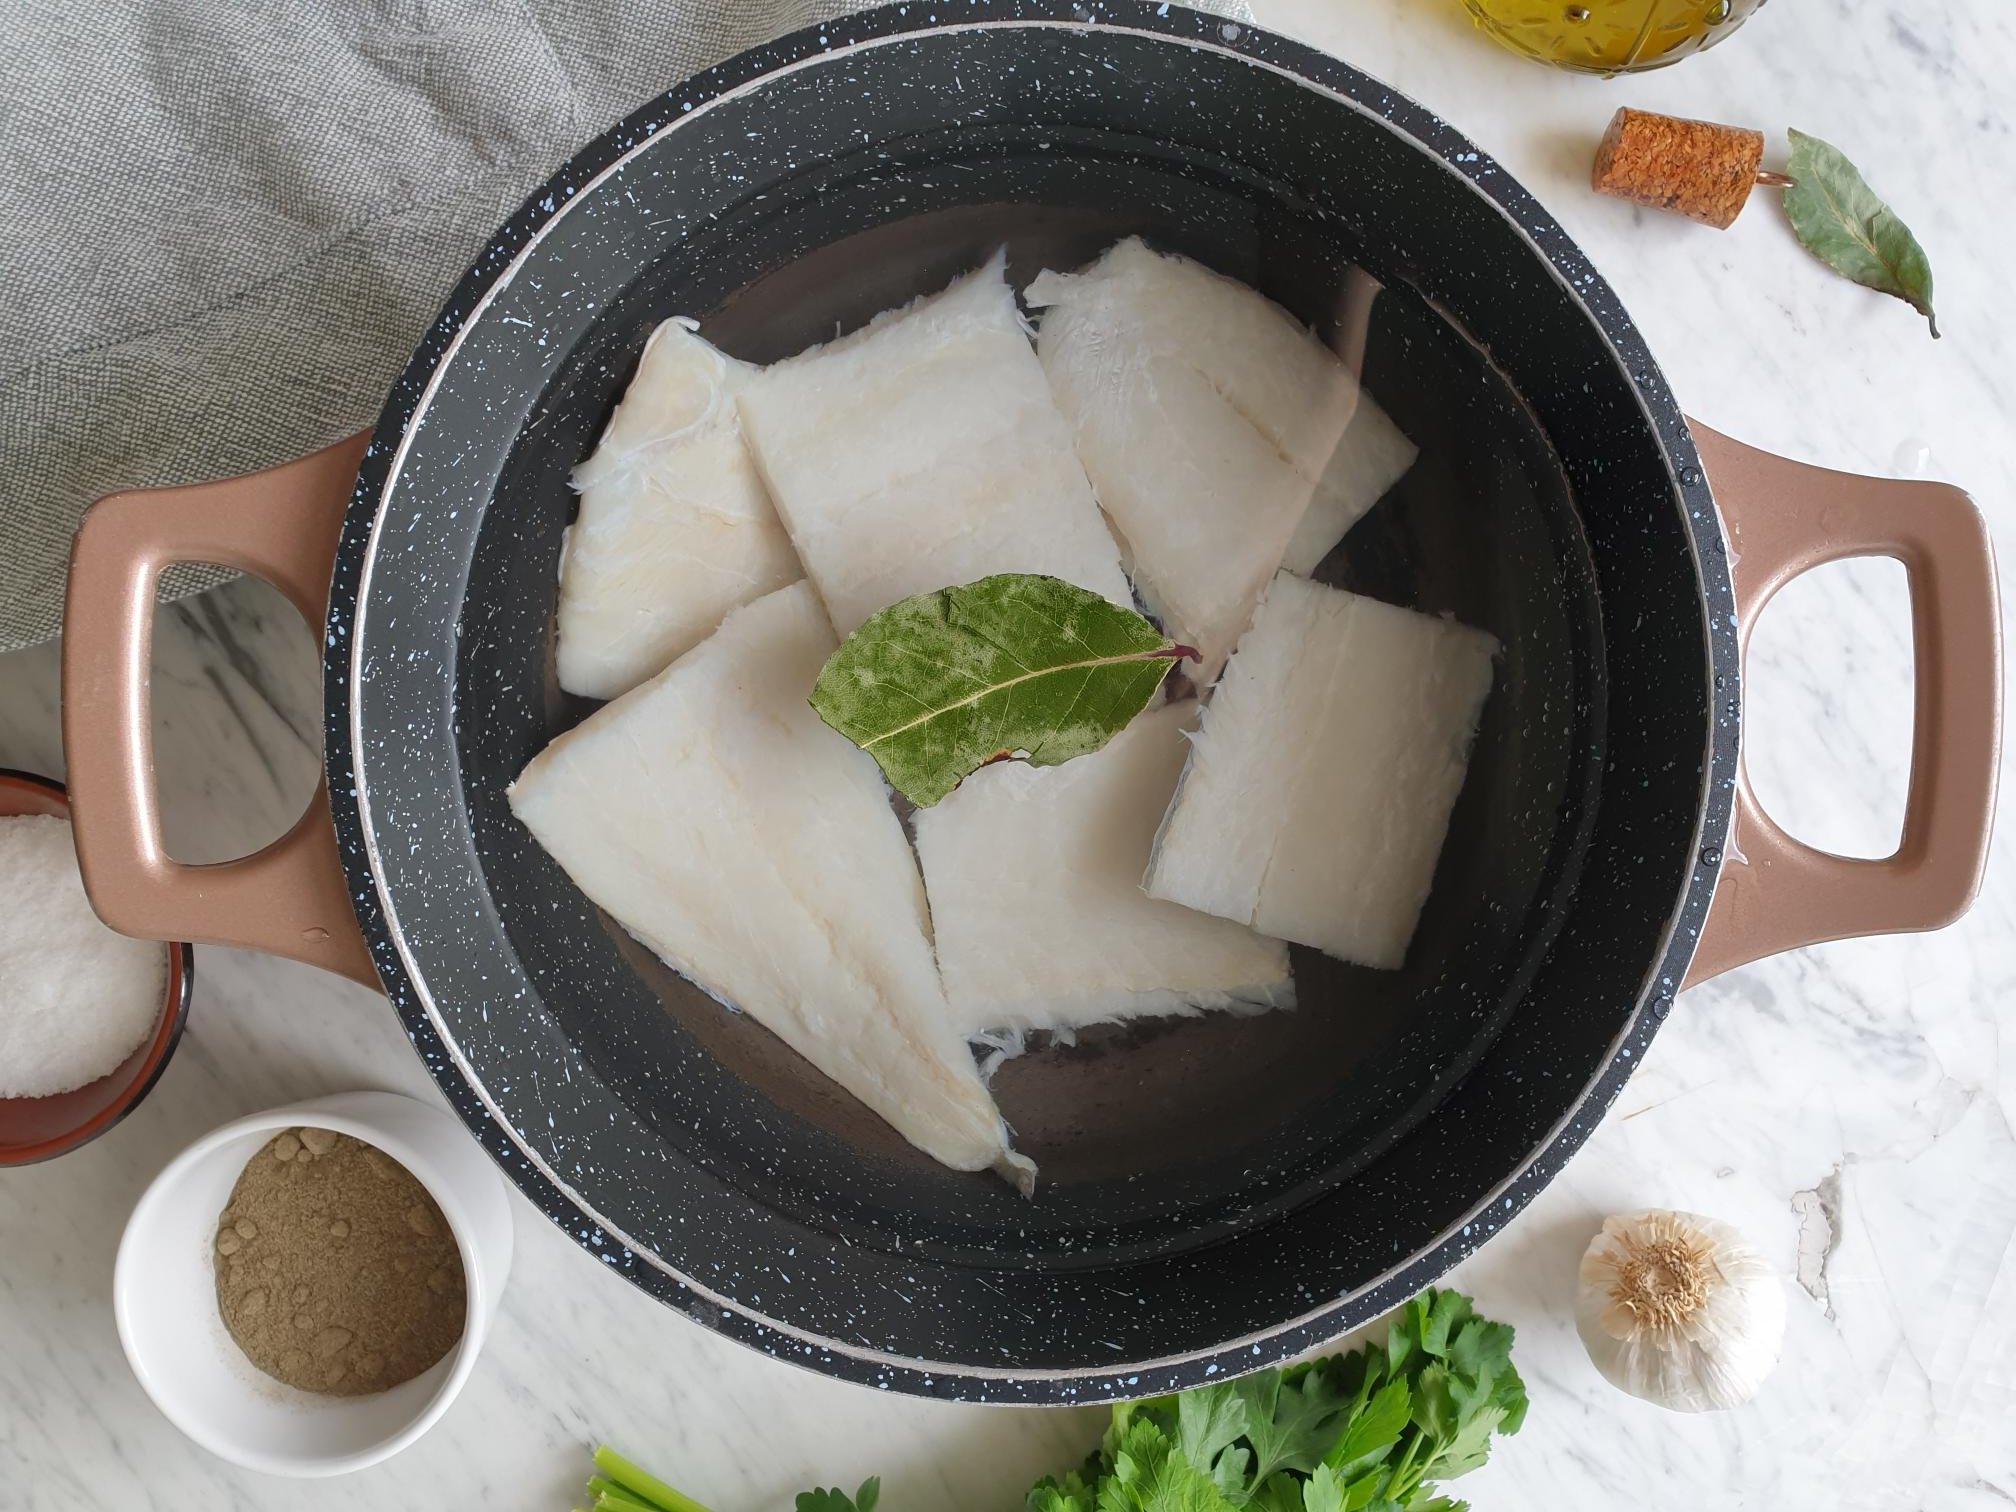
  • 1 kg (roughly) cuttlefish, cleaned and cut into bite size pieces or strips. Already cleaned frozen cuttlefish as a alternative works well for this recipe

  • 100 ml white wine

  • 300 ml water

  • 2 Tbsp tomato purée

  • sea salt

  • finely ground black pepper

  • red chilli, a tiny bit, optional

Method

Put extra virgin olive oil in a pan or casserole dish, add finely chopped onion, crushed garlic, generous pinch of sea salt and fry gently until soft and lightly golden in colour.

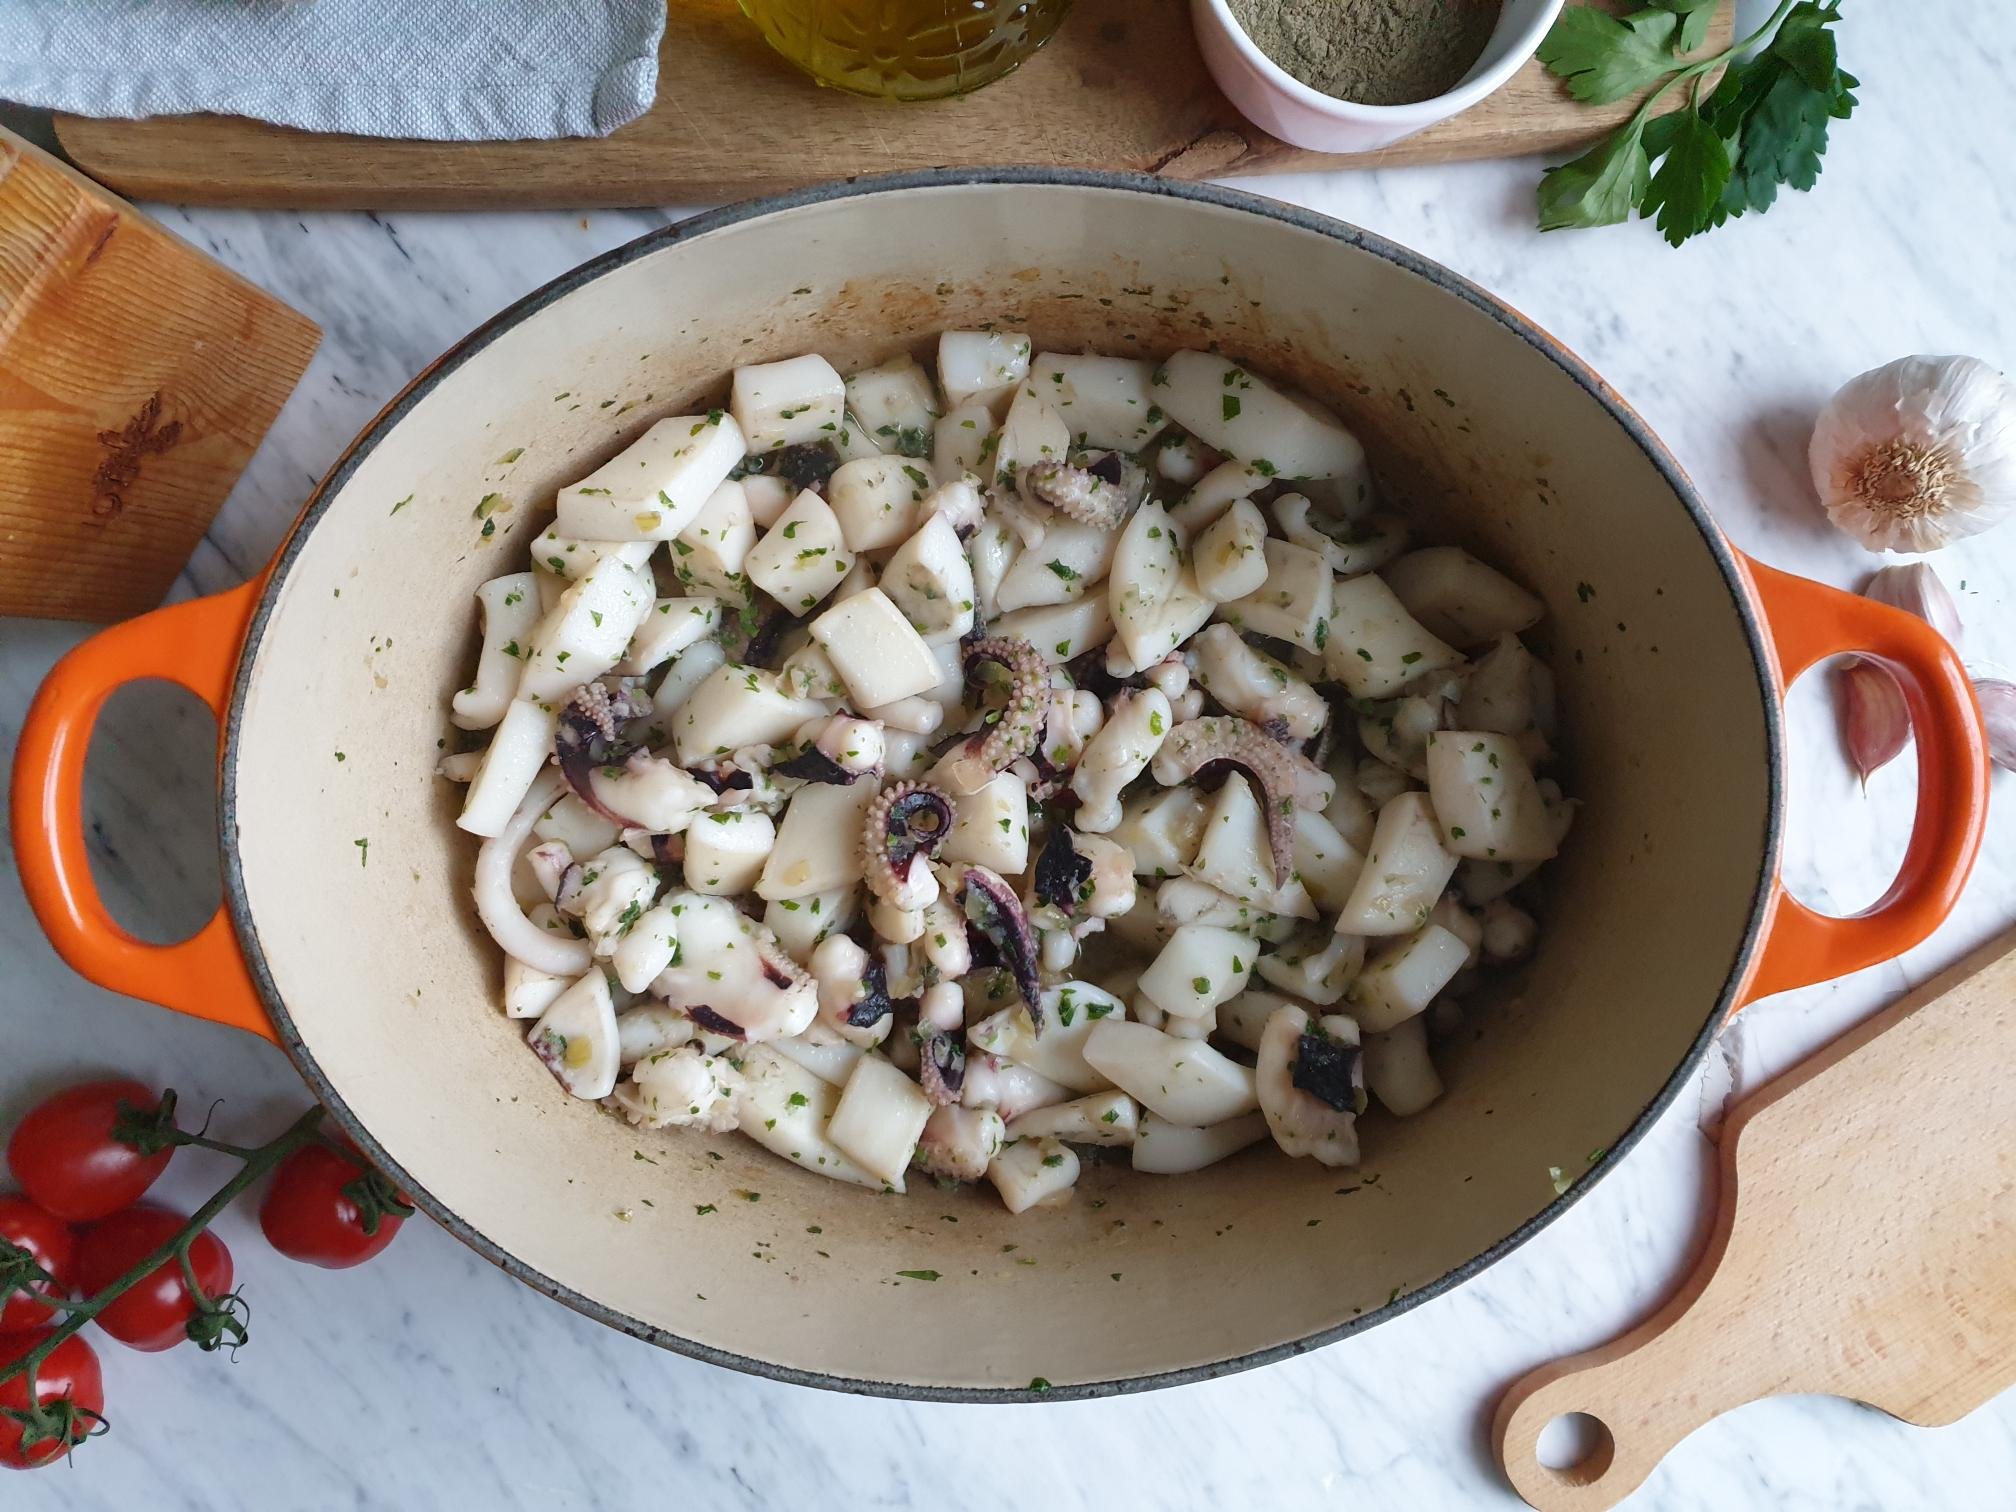
Add finely chopped fresh parsley and mix together with fried onions and garlic.

View fullsize Cuttlefish 3.jpg
View fullsize Cuttlefish 4.jpg

Add the cuttlefish and fry further for about 2 minutes.

View fullsize Cuttlefish 5.jpg
View fullsize Cuttlefish in sauce 5a.jpg

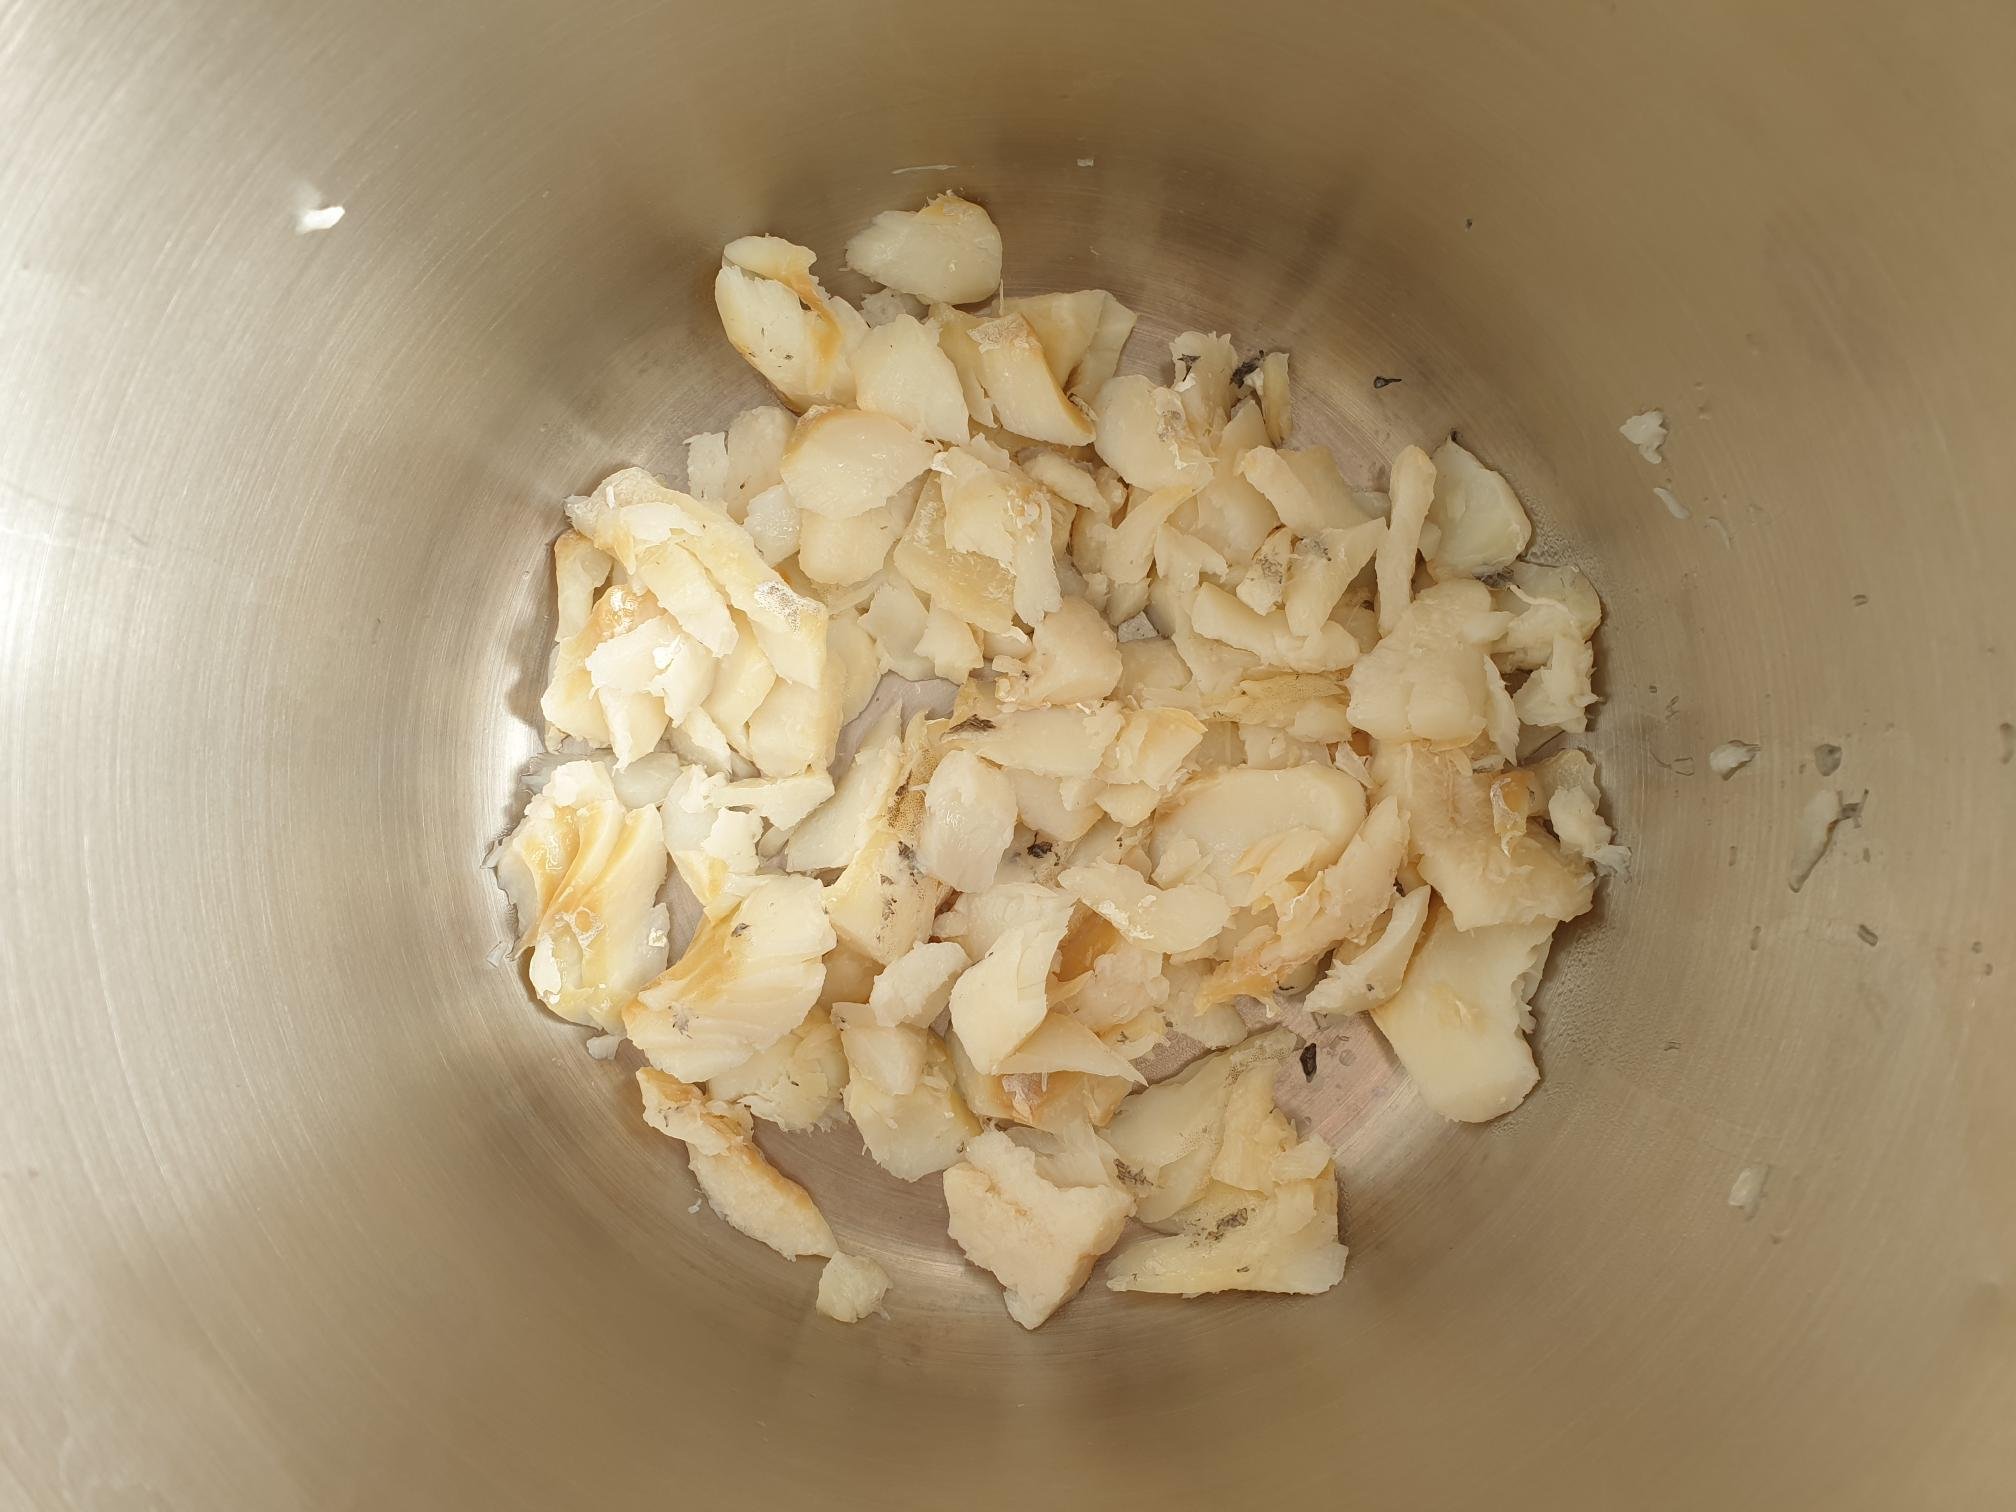
Cuttlefish will start turning whitish in colour and release liquid.

Add white wine, allow it to evaporate and reduce roughly by half.

Add tomato purée, water, sea salt and black pepper and stir together to combine. Bring to boil.

View fullsize Cuttlefish in sauce 6.jpg
View fullsize Cuttlefish  in sauce 7.jpg

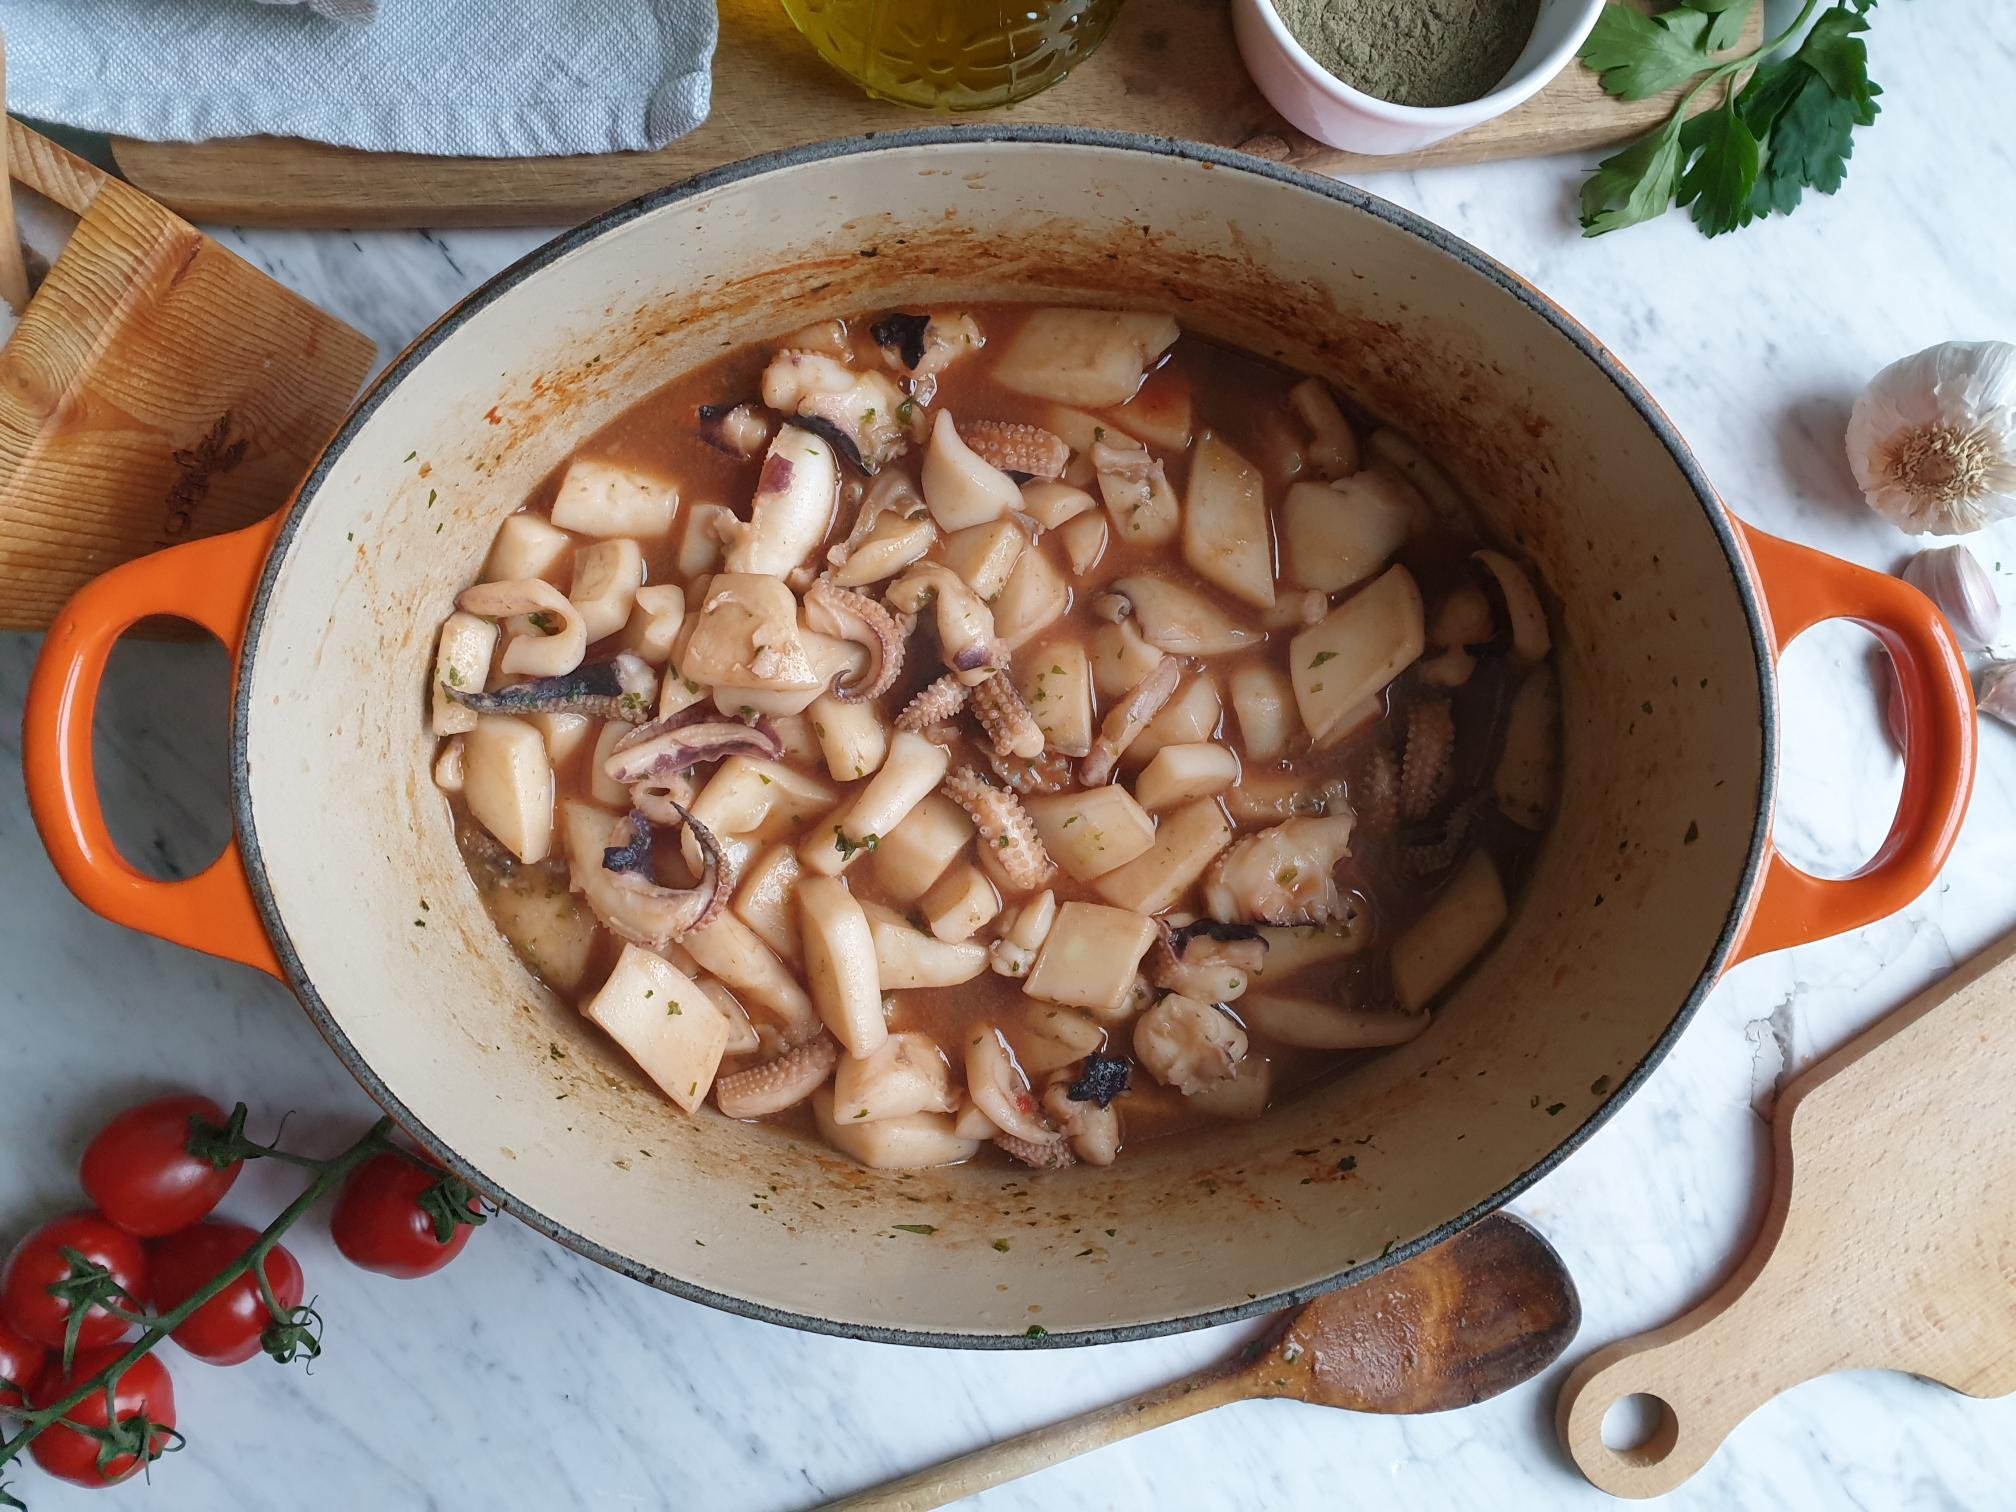
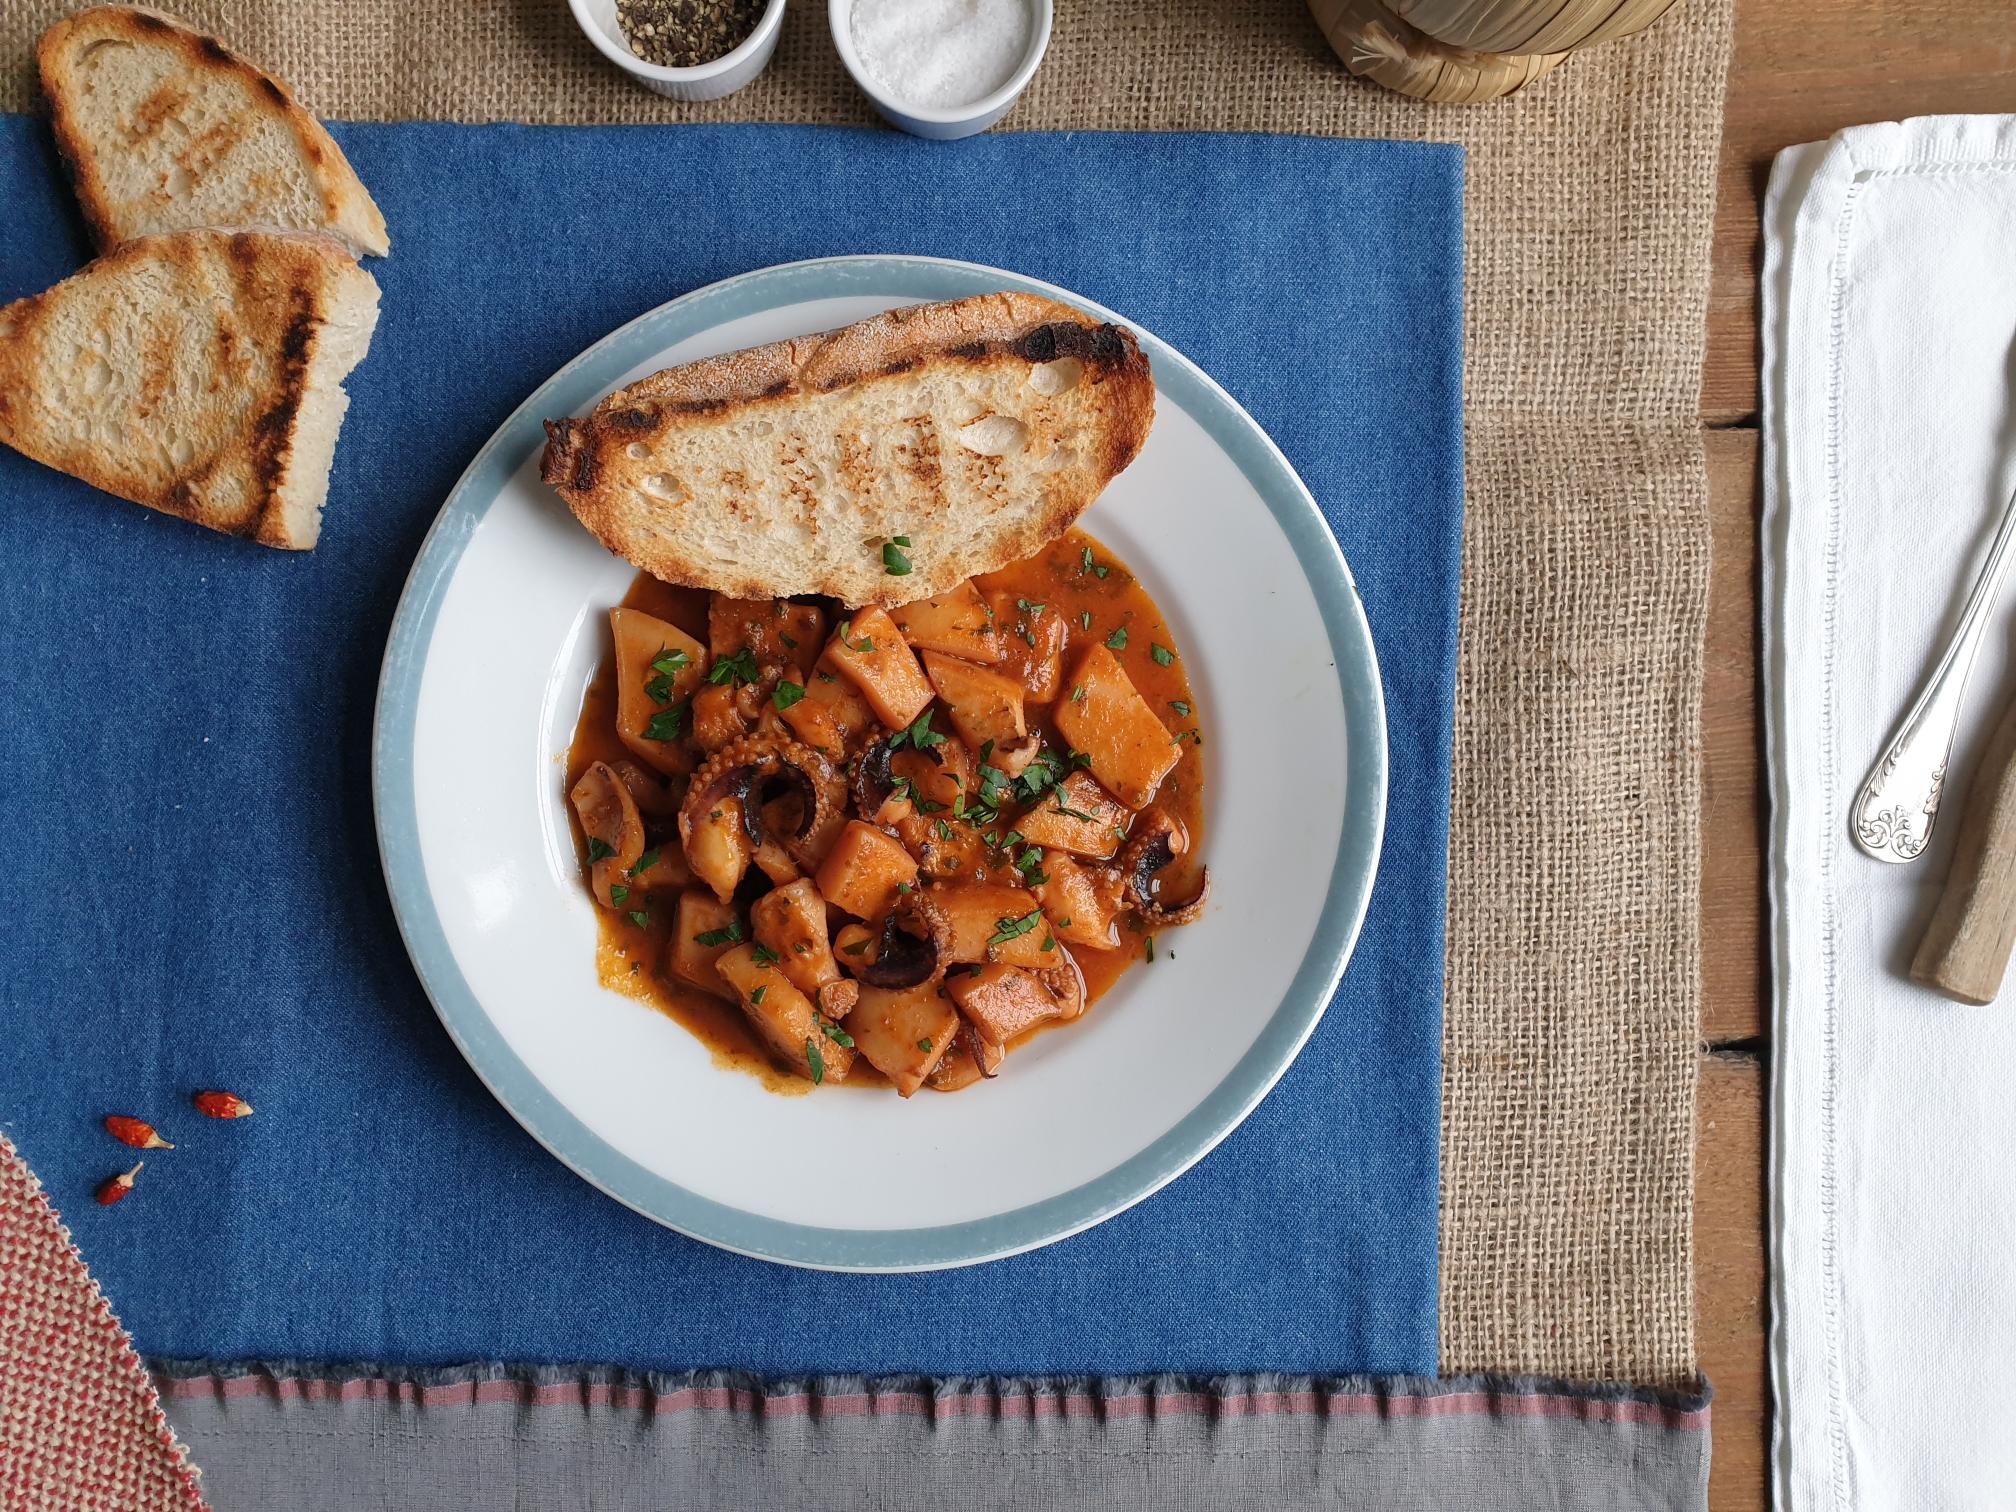
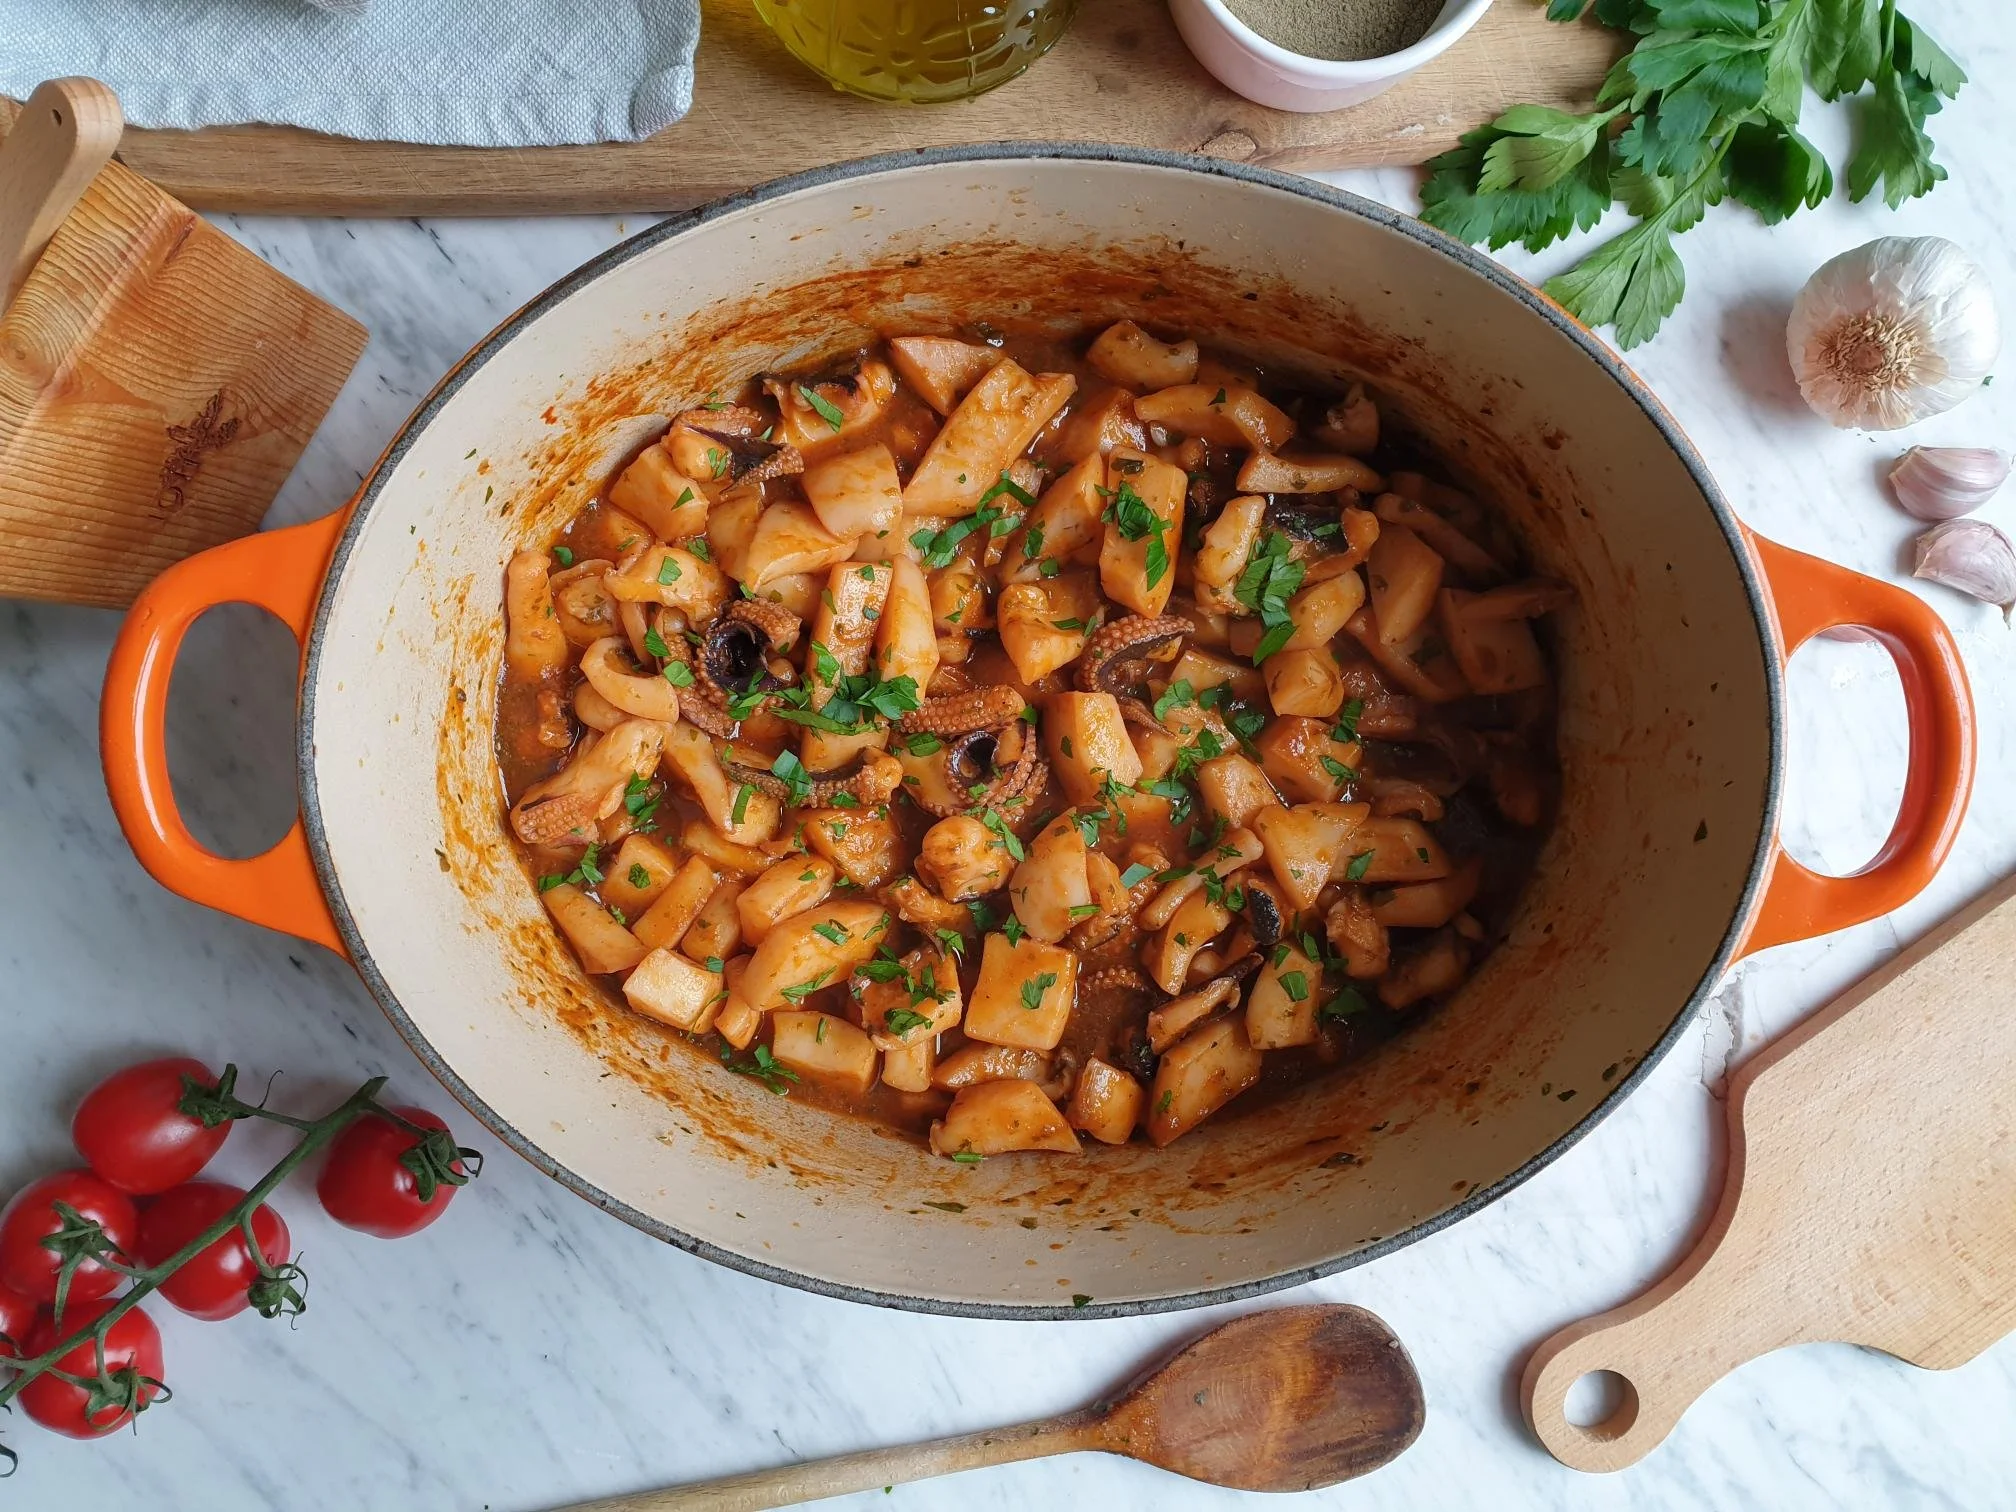
Turn down the heat, partially cover with the lid and gently simmer for about 45minute to 1 hour, stirring occasionally. By this time the cuttlefish should be really very tender when you insert the fork into it. The final texture of the sauce should be velvety and thick and not too runny when you spoon it onto serving plates.

If the sauce is too thick add a little a bit of water to dilute it slightly, on the contrary, if the sauce is too runny and watery in consistency, cook further until the sauce thickens a bit.

Adjust the seasoning with sea salt and black pepper.

Sprinkle with some roughly chopped fresh parsley and serve hot with crusty bread, white or yellow polenta, soft cooked or grilled, or some boiled potatoes or cooked rice.

Just a thought

Braised cuttlefish can also be used as a base for making risotto or tossed with egg based fresh pasta.

Store in the fridge in an airtight container for no longer than two day suitable for freezing.

The traditional recipe does not call for red chilli but adding a tiny bit gives this dish a real nice kick without overpowering the “sweetness” of the cuttlefish.

Wine suggestion

"Gardelin" 2016 - Aleks Klinec

December 30, 2021 /tina oblak
cuttlefish, cuttlefish in light tomato sauce, slow cooked cuttlefish, seppia in umido, seppia in rosso, sipa na rdece
Adriatic Recipe, Autumnal dish, Autumnal recipe, dinner, Easy recipe, Festive dish, Fish & Seefood, healthy mael, Istrian cuisine, Istrian dish, Istrian food, Istrian gastronomy, main dish, Nutritious dish, one post fish recipe, one pot meal, Rustic dish, recipe from Northern Ital, Slovenian cuisine, Slovenian food, Slovenian gastronomy, stew, Winter dish, Winter recipe, main fish meal
Comment

Creamed salted cod (or stockfish) Recipe

Beans and Sardines
December 16, 2021 by tina oblak in Adriatic Recipe, Appetizers, Autumnal dish, Autumnal recipe, bite-sized nibbles, brunch, Canapés, Celebratory dish, Central European recipes, Christmas dish, dinner, Easter dish, Easy recipe, entrée course, Festive dish, Finger food, Fish & Seefood, healthy mael, Istrian cuisine, Istrian dish, Istrian food, Istrian gastronomy, main course, main dish, Nutritious dish, recipe from Northern Ital, Rustic dish, Slovenian cuisine, Slovenian food, Slovenian gastronomy, Small bites, Snacks, spreads, Starters, Winter dish, Winter recipe, fish spreads, fish starter

Venetian in origin, this light and creamy, almost mousse like spread, it is one of the most loved dishes, due to its very mild fishy flavour and no bones to worry about, and so it covers the whole family from the youngest children to the oldest members.

Spread on fresh or toasted slices of bread or it can be eaten with polenta, and it is a very convenient dish since it is served cold and it is prepared in advance. Creamed salted cod is rustic but it can soon turn into very elegant canapé served with a pre dinner drink.

I think that this recipe is one of the greatest recipes ever invented! Quite frankly, it takes a bit of a genius to turn an uneatable dry stockfish, which looks utterly unappealing, and is as dry as a plank of wood, into the most luxurious and delicious dishes ever created.

Venetian creamed cod, known in Italy as Baccalà mantecato, is a real speciality and a staple dish in Venice, where it was created, and it is very much appreciated and well known in the rest of Italy. Slightly less known however in the rest of the world, creamed salted cod certainly deserves greater international praise and renown.

This dish is one of my absolute top favourites, one of those dishes I am most grateful to the Venetians to have brought with them during the time they ruled my homeland in the North Adriatic, period during which dried stockfish was first introduced in Istria in 15th century from Venetian cuisine.

In Slovenian it is called Bakala na belo or Polenovka na belo or simply called by the locals Bakala or Bakalar.

My paternal grandfather, or my nono as I called him, used to always buy stockfish at the beginning of December, I have this image in my head of the dry long stockfish sticking heavily out of the shopping bag, I knew very well that it was the start of the Christmas festivities.

This recipe is a real classic holiday and festive dish in Slovenian Istra, and holds a very special place among the locals. Dried stockfish was once a food for the poor but nowadays is a staple dish and considered a delicacy, taking central stage on household tables during Christmas and Easter as it is cooked on holy days during the fasting time and not eating meat.

Traditionally, creamed stockfish is home made and served as part of Christmas Eve dinner, together with sautéed Savoy cabbage and polenta, and Istrian fritole (small fried doughnuts), of course.

These days you can find creamed stockfish on the supermarket shelves all year round, and especially during the holiday season and Easter, but unfortunately, the sad reality is, that very often, the quality of commercially produced cod spread leaves much to be desired, as very common practice is to add lard or potatoes to increase the weight

I have very vivid memories about the process of soaking the stockfish, this huge restaurant size pot was left outside in the back garden during the night and when the temperatures plummeted below 0, the ice formed on the top, and I just loved finding the sheet of ice the following morning, and braking it into pieces. My son does the same...what is it with the children and the ice, and love for breaking it ...

My son Jakob (age 9) with his gran grandmother (age91) making creamed stockfish with the help of a standard mixer

My nono was in charge of stockfish, year, after year, after year, until he sadly passed away, then my father took over and now it is down to myself, my brother, my husband, and the children, since my father sadly is longer around. Back home, according to tradition, stockfish and the preparation of it is still a male affair, however, maybe it is time for this to change!

My nono would sit on the chair, place a big pot containing pieces of cooked cod between the legs, a bottle of olive oil would be kept very close to him for an easy and frequent reach and as tradition requests, the cooked cod would then be beaten with big and long wooden flat spoon like, known locally as polentar or bat which resembles very much a cricket bat, but in my research I have found no connection between the two types of bats!

In honour of my family but in particular in honour of my nono and my father I am sharing here this very special generational family recipe. Give it a go, you will love it!

Ingredients

Serves 4

  • 500g salted cod or 1 dry stockfish

  • 170ml extra virgin olive oil (the very best you can afford) plus a bit of extra as needed

  • 1-2 cloves of garlic, peeled

  • 1 bay leaf, fresh or dry

  • fresh flat leaf parsley (about 7g) finely chopped, optional

  • sea salt, to taste

Method

For this recipe you can use either salted cod or dry stockfish, both need to be soaked and rehydrated first.

If you are using salted cod (I used this type for the recipe) first you need to rinse well the salted cod under very cold running water and soak it. Place rinsed cod in an airtight container, fill it completely with freezing cold water, and with some ice, if you have it, so the fillets are completely submerged. Close the lid and put the container in the fridge. Change the water after 24 hours and place in the fridge for another day. After 48 hours, the cod will be completely soaked. Remove the cod from the container, rinse well with cold water and cut the fillet/s into portion size.

Place pre-soaked pieces of cod in a pan and fill it with plenty of cold water so the pieces of fish are completely submerged in the water. Add bay leaf and bring to boil.

View fullsize Creamed Salted Cod 3.jpg
View fullsize Creamed Salted Cod 4.jpg

Turn the heat down and cook further on a gentle heat for about 20 to 30 minutes and skim the foam on the surface as needed.

After the fish is cooked drain in the colander.

As soon as it is cool enough to handle carefully remove the skin and the odd bone.

With your fingers break the flesh into smaller pieces and place them in a pan or in a bowl of a standard mixer if you are using one.

View fullsize Creamed Salted Cod 5.jpg
View fullsize Creamed Salted Cod 6.jpg

If using a whole dried stockfish, this needs to be soaked and rehydrated first. Place the whole stockfish in a big stock pot and fill completely with cold water and soak for 2-3 days, changing the water every day. If you do not have a very big pot to fit the whole stockfish in, you can use a smaller pot, like a regular 5 litre stock pot, and then place the stockfish in a pot where half of it will probably stick out, and half will be submerged in the water. Soak the submerged part of stockfish for 24 hours and after this time the soaked part of the stockfish will get soft enough to bend, which will allow you to bend it in a such a way for the whole stockfish to be completely submerged into the water in order to get properly rehydrated. No need for rinsing as the dried stockfish is not salted.

Soaked and rehydrated cod needs then to be cooked. Place it in a stock pot, the same one you used for soaking, fill it with plenty of cold water (the whole fish needs to be completely submerged), add bay leaf and bring to boil. Lower the heat and cook further on a gentle heat until the fish is tender, for about 1 hour or just over.

Drain the fish and as soon as is cold enough to handle carefully remove the skin and all the bones.

With your fingers break the flesh into smaller pieces and place them back into in big pan or into a bowl of a standard mixer if you are using one.

Whether you have decided to use salted cod or stockfish you are now left with cooked cleaned small pieces of cod in a big pan or in a bowl of a standard mixer, again only if you are using one.

Place 5 Tbsp of extra virgin olive oil in a small frying pan, add the garlic previously peeled and cut in half lengthwise. Fry the garlic on a gentle heat until golden in colour to infuse the oil then discard the garlic.

Add garlic infused oil to the bowl.

Now the magic can begin.

Take a wooden spoon and start beating the pieces of fish quite vigorously. If using a standard mixer, put it on the lowest and slowest setting.

Keep beating and poring gradually the rest of the oil until you obtain a whitish paste and until the creamy mixture can no longer absorb any more oil.

This action of beating and adding very gradually small quantities of oil will eventually turn the pieces of cod into a light and fluffy cream, this process, in order to get the best result, can take up to 30 minutes.

View fullsize Creamed salted Cod 7.jpg
View fullsize Creamed salted cod 9.jpg

Add sea salt to your taste and very finely 1 chopped clove of garlic, although this optional, mix well, taste, and adjust the seasoning.

Transfer cod spread on a serving plate.

Serve it accompanied with slices of fresh rustic bread, toasted slices of bread (bruschetta) or slices of grilled yellow polenta.

Wine suggestion

Venezia Giulia Malvasia IGT 2019 - Skerk

December 16, 2021 /tina oblak
creamed salted cod, creamed stockfish, creamed salted cod mousse, baccala mantecato, Bakala na belo, Bakala, Bakalar, Istrian fish delicacy, Venetian fish specialty
Adriatic Recipe, Appetizers, Autumnal dish, Autumnal recipe, bite-sized nibbles, brunch, Canapés, Celebratory dish, Central European recipes, Christmas dish, dinner, Easter dish, Easy recipe, entrée course, Festive dish, Finger food, Fish & Seefood, healthy mael, Istrian cuisine, Istrian dish, Istrian food, Istrian gastronomy, main course, main dish, Nutritious dish, recipe from Northern Ital, Rustic dish, Slovenian cuisine, Slovenian food, Slovenian gastronomy, Small bites, Snacks, spreads, Starters, Winter dish, Winter recipe, fish spreads, fish starter
Comment

Jota – Sauerkraut, beans and potato stew Istrian Recipe

Beans and Sardines
November 10, 2021 by tina oblak in Adriatic Recipe, Central European recipes, dinner, Eastern European recipes, Easy recipe, entrée course, healthy mael, Istrian cuisine, Istrian dish, Istrian food, Istrian gastronomy, main course, main dish, Mitteleuropean recipes, Nutritious dish, one pot meal, recipe from Northern Ital, Rustic dish, Slovenian cuisine, Slovenian food, Slovenian gastronomy, Soups, Starters, stew, supper, Vegan, Vegetarian, Autumnal recipe, Autumnal dish, Winter recipe, Winter dish

Jota, pronounced 'yota,' is a very old recipe for a stew made of sauerkraut, dried borlotti beans, potatoes and some kind of pork cuts. It is believed that the word jota derives from Celtic word “jutta” indicating a liquidy soup.

Jota is filling and makes a perfect choice for a comfort food when the first cold starts as it will warm your body and soul. It is really easy to make, healthy, inexpensive, and it has become a staple and much loved dish in Slovenian households. Jota, being also very nutritious, is served in nurseries, schools, care homes for elderly, and family run informal restaurants, as well as being one of the most requested dishes from hikers and skiers in mountainside restaurants.

This hearty stew is incredibly humble and proper peasant food as it was born out of necessity and from what was available. My paternal nona told me that most of the households in the countryside, where she was growing up (a little village called Marezige just a few kilometres from the coastal town Koper), would have a wooden barrel of home made sauerkraut, sacks of potatoes and dried borlotti beans, and if you were lucky enough, a pig or a few pigs that would eventually get slaughtered and provided a very precious meat. The better cuts of pork meat were used for drying and curing and for what was considered a very rare and luxurious roasts while less prestigious cuts were put in soups and stews to enrich the flavour.

This very poor dish comes from the region of Primorska near the Adtriatic Sea and it is considered a quintessentially, one of the most famous Istrian peasant dishes, also enormously popular in Trieste and province of Trieste in Italy.

According to Anna Gosetti della Salda, in her book, Le ricette regionali Italiane, Jota (or Jote) was widely made over the whole region of Friuli (Italy), the area bordering with Slovenia, but towards the end of last century the use of jota was limited almost exclusively to the Valli di Gorto and Pesarina in Carnia.

The use of sauerkraut in all these regions, referred to as kapus in the Istrian dialect, is a testimony to how strongly the Austro-Hungarian Empire influenced the dishes in these areas.

Like with most dishes in the culinary world, it is no surprise that there are some variations in the recipe for Jota as well. The most common variation of Jota is without potatoes, and instead, a bit of flour is used to thicken the soup, and another common variation is making jota using sour turnip (called kisla repa in Slovenian).

In some variations, also used by both my mother and my nona, besides the use of different pork cuts, pešto or taca (smooth paste made with pancetta, crushed garlic and fresh, very finely chopped parsley) would be used. This was done, once again, to boost the flavour of the dish.

In some parts of Slovenia that are geographically closer to Hungary, a small quantity of powdered smoked sweet Hungarian paprika will be added to jota.

Before serving this sauerkraut stew, different cuts of pork, that have been cooked in jota, are removed from the bone, sometimes shredded and then returned and mixed into a soup. It is also very common to remove the meats from the soup and serve it later as a separate course.

Different cuts of pork can be used to enrich the flavour of this stew, but it is equally delicious without the meaty element and so it makes a lovely vegetarian and vegan meal.

My nona also “jokingly” shared with me, that to make a really good jota you need three days. The first day for soaking the beans, the second day for cooking Jota and the third for eating it, and enjoying it after it has rested, and all the flavours had a chance to fully develop. It is up to you whether you want to follow my nona three day rule.

I do, no wonder it turns out delicious...

Here I am sharing my family recipe for jota.

Ingredients

Serves 6-8

  • 300g dry borlotti beans, soaked overnight or least for 4 hours

  • 650g -1kg sauerkraut, drained and rinsed

    (I am giving you an approximate amount of sauerkraut to be used in this recipe as it can be flexible. The amount you use will depend on what you can find in your local food store. Sauerkraut is normally sold in either glass jars or sometimes in sealed plastic bags and they will indicate on the label both total net weight (with the liquid) and drained weight, and the latter is the weight you need to look for.

  • For this recipe I bought a glass jar of sauerkraut with total weight of 680g and 650g drained weight which is the amount of sauerkraut I used for the soup).

  • 2 bay leaves, fresh or dry

  • 500g or more, pork ribs (can use ham hocks or similar)

  • 100-200g g smoked bacon lardons (can use smoked cubed pancetta, a slab of bacon or pancetta, chopped strips of smoked bacon or similar)

    (The use of combination of smoked and unsmoked meat element is quite important, as it really gives that traditional and typical Jota flavour, but it is also very flexible. You can, if you prefer, only use unsmoked meats or all smoked for a deeper smoky flavour. Traditionally a bone or outer rind of dry cured ham would be used in order not to waist anything, and it is also packed full of flavour.

  • few black peppercorns, 4-6

  • 2 cloves of garlic, peeled and crushed

  • 3 fairly big potatoes about 600-800g, peeled and cubed

  • 2 Tbsp extra virgin olive oil

  • 2 tbsp tomato paste (optional)

  • sea salt

Method

There are three simple stages to make jota.

Stage 1

Drain previously soaked beans in a colander, rinse with cold running water and drain again.

Transfer the beans to a very big pot (5 litre at least, where jota will be cooked), add the meats, bay leaf and 5 litre of cold water. Bring to boil over high heat, turn the heat down to a medium low and cook the beans, partially covered with the lid for about 1 hour until the beans are just soft. Skim any foam that rises to the surface, you might have to repeat this process few times.

Do not add sea salt at this point as this will make the skin of the beans hard causing them to crack during the cooking.

Stage 2

Place the sauerkraut in a colander and drain, rinse briefly but thoroughly with cold running water and drain again.

Transfer the sauerkraut in a pan, add a pinch of salt, peppercorns, crashed garlic, bay leaf, olive oil and cold water just enough to cover the sauerkraut.

Bring to a boil, lower the heat and cook for about 30 minutes. After this time, transfer the sauerkraut to a big bean pot.

Stage 3

Peel, wash, cube the potatoes and place them in pan. Cover completely with water, bring to boil, turn the heat down and cook for about 30 minutes until the potatoes are soft when pierced with the tip of a knife.

Drain the potatoes in a colander or with the slotted spoon transfer the potatoes to a large plate or bowl. With the back of the fork coarsely mash half of the potatoes and leave the other half cubed.

Transfer coarsely mashed and cubed potatoes in a big pot with beans.

Partially cover with a lid the big pot with beans, sauerkraut and potatoes and continue cooking on a gentle heat for another hour. All three elements will mix and blend together and the soup will start thickening. Taste and adjust seasoning with sea salt and freshly ground black pepper.

The soup should be quite thick but still have enough liquid to be able to ladle it nicely on the plate.

If jota gets too thick just add a bit of water to dilute it.

When jota is cooked, depending on what type of meats you use, take the meat of the bones, discard skin and bones and transfer pieces of shredded meat to the soup if you wish.

Discard the bay leaves before serving jota hot with a nice piece of crunchy bread.

Just a thought

Jota will keep well in a fridge for few days and is suitable for freezing.

If jota gets too thick, simply dilute it adding a bit of water, bring to boil and serve hot.

Wine suggestion

Venezia Giulia Pinot GrigioIGT 2019 – Azienda Agricola Pierpaolo Pecorari

November 10, 2021 /tina oblak
Sauerkraut recipe, Istrian sauerkraut stew, Istrian sauerkraut soup, hearty stew, comforting stew, borlotti beans, potatoes, autumnal stew, winter stew, winter dish
Adriatic Recipe, Central European recipes, dinner, Eastern European recipes, Easy recipe, entrée course, healthy mael, Istrian cuisine, Istrian dish, Istrian food, Istrian gastronomy, main course, main dish, Mitteleuropean recipes, Nutritious dish, one pot meal, recipe from Northern Ital, Rustic dish, Slovenian cuisine, Slovenian food, Slovenian gastronomy, Soups, Starters, stew, supper, Vegan, Vegetarian, Autumnal recipe, Autumnal dish, Winter recipe, Winter dish
2 Comments

Apple Strudel with home made pastry Recipe

Beans and Sardines
November 05, 2021 by tina oblak in Adriatic Recipe, baked dish, baking, breakfast, Central European recipes, dessert, Eastern European recipes, Istrian cuisine, Istrian dish, Istrian food, Istrian gastronomy, Mitteleuropean recipes, pudding, recipe from Northern Ital, Rustic dish, Slovenian cuisine, Slovenian food, Slovenian gastronomy, sweet course, Sweet Things

Apple strudel is a traditional Viennese dessert, made of very thin elastic pastry, and the filling contains sliced apples, sugar, cinnamon, raisins (soaked in dark rum), lemon zest, lemon juice and bread crumbs. This popular pastry can also be found in the rest of Austria, Bavaria, Czech Republic, Northern Italy, and in many other countries in Europe that were once part of the Austro-Hungarian Empire.

It is believed that strudel originated from baklava, a very famous Turkish pastry based dessert, that came to Austria with the Ottoman's Empire and through Hungarian cuisine.

Records show that Strudel was first named in 1696 and gained popularity after it was served to Empress Maria Theresia who was the ruler of the Habsburg dominions and the only women to hold the position.

In Slovenia and in coastal Istria, areas that also once belonged to Austro-Hungarian Empire, apple strudel became, and today still is, a very well known sweet treat. It has gained such a high level of popularity that it is almost considered a national dessert. During autumn and winter months, this typical and very much loved dessert would be baked on a regular basis up and down the country, with little variations, and no Sunday roast lunch could be completed without a slice of strudel, dusted, of course, with a generous amount of icing sugar. When this task was left for us children, there would be so much icing sugar on the top that you could hardly see what type of dessert was hiding underneath it. Some things just never change...this is what happens when I leave my 11 year old son with the icing sugar task!

Apple strudel in Slovenia is called Jabolčni štrudelj or Jabolčni zavitek while along the coast of Northwest Istria, where the informal Istrian dialect is also spoken, it can be referred to as Strucolo de pomi.

Strudel made with apples is by far the most popular but in the North Adriatic two variations of strudel have been created and are also very well liked, strudel filled with ricotta cheese filling and strudel with cherries.

In my family we all knew when it was weekend, as apple strudel, this warming autumnal pudding, would be in the oven, and the aromas of apples and cinnamon would travel around the house. This dessert is not just part of my childhood but part of my adulthood as well. It has been the most frequently baked dessert by my mum and even today my friends and family cannot get enough of it. Now that I live abroad it is even more special, and it really does take me right back home to my childhood, and my mum's kitchen.

Apple strudel is traditionally served warm, dusted with regular icing sugar or vanilla floured icing sugar, and when accompanied with whipped cream, vanilla ice cream or vanilla sauce, this rustic pudding soon turns into a complete and very elegant dessert.

This recipe for apple strudel is made with home made pastry, however you can still indulge yourself and cut corners a bit by using a store bought ready made puff pastry, in which case only half the amount of apple filling is enough

Apples can be sliced or coarsely grated and lightly toasted walnuts can replace pine kernels.

View fullsize Apple Strudel 1.jpg
View fullsize Apple Strudel 2.jpg

In this recipe I will indicate which apples are appropriate to use for apple strudel, however, I have never used specific type of apples and that is simply because I always bake apple strudel when apples are in season and abundant in nature. Apples would be generously given from neighbours and friends with fruit orchards or apple trees in their gardens, I just make sure I taste them and pick a mixture of sweet and tart apples.

Ingredients

Serves 10-12

Dough

  • 250g all purpose flour or bread flour

  • 1 egg, lightly beaten

  • 3 Tbsp neutral tasting vegetable oil (I used sunflower oil)

  • 2 Tbsp white wine vinegar or lemon juice

  • sea salt, a pinch

  • 50ml-60ml lukewarm water, or as needed

Apple Filling

  • 1kg apples, peeled, cored, quartered and sliced (sweet-tart apples like MacIntosh and Gala in combination) Bramley

  • 1 unwaxed lemon, grated zest and juice (grate lemon zest first and then squeeze the lemon juice, trying to do it the other way round might prove a tricky task)

  • 1 Tsp ground cinnamon

  • 30g pine nut kernels, slightly toasted (can use walnuts)

  • 50g raisins or sultanas

  • 3 Tbsp dark rum or lukewarm water (for soaking the raisins)

  • 60g dry fine breadcrumbs

  • 20g unsalted butter plus extra for brushing

  • 80g caster sugar

  • icing sugar for dusting

Method

To make the dough

Place the flour in a big mixing bowl and make a well.

In a separate, smaller bowl, mix slightly beaten egg, oil, vinegar or lemon juice, (the acidity will help to relax gluten in the flour making the dough more stretchy) a pinch of sea salt and lukewarm water. Pour the mixture into a flour well.

With the fork, stir the mixture with the flour until well combined. Add a little bit of flour at a time, until the dough comes nicely together, then work the dough with your hands.

Transfer the dough on a lightly floured working surface and knead the dough for about 10 minutes or until nice and smooth.

After this time, the dough should be moist and elastic and not sticky. Add a little more flour if the dough is too sticky to knead.

In order to further encourage the development of the gluten, resulting in a very elastic dough, slam the dough onto the working surface a few times.

Shape the dough into a smooth ball and place it in a clean bowl, previously brushed with oil.

Cover the bowl with cling film and let the dough rest for about 1 hour at room temperature.

View fullsize Apple Strudel 4.jpg
View fullsize Apple Strudel 5.jpg

To make the filling

In a small pan, place pine nuts and toast them on a medium-low heat for a few minutes until golden-light brown in colour. Remove from the heat, cool and set aside.

In another pan melt the butter over medium-low heat. When the butter is melted add breadcrumbs, toast them, stirring constantly until golden-brown in colour. Remove from the heat, cool and set aside.

In a small bowl, place raisins or sultanas, add dark rum (traditionally used) or lukewarm water. Leave them to soak and plump up for at least 15 minutes, or until you need them.

Peel, core, quarter and slice the apples. Place sliced apples in a bowl, pour lemon juice over them, toss and mix well. The lemon juice will prevent apples from oxygenating and turning brown.

View fullsize Apple Strudel 6.jpg
View fullsize Apple Strudel 7.jpg

Add lemon zest, roasted pine nuts, breadcrumbs mixture, soaked raisins or sultanas (squeeze out excess rum or water), sugar and cinnamon. Mix well to incorporate all the ingredients.

Preheat the oven to 200C static or equivalent.

Place the dough on a clean and lightly floured table cloth. Flour the rolling pin and start rolling out the dough. While rolling, to prevent sticking, flour the dough and the surface every now and then.

When the dough reaches about 20 cm in diameter pick it up and keep stretching it. The best way to do so is to use the back of your hands and in particular the knuckles but make sure you remove any sharp jewellery first.

View fullsize Apple Strudel 9.jpg
View fullsize Apple Strudel 10.jpg

When the dough becomes difficult to handle as it becomes bigger and thinner, place it on a lightly floured tablecloth.

With your hands (tip of the fingers) keep stretching gently the dough on the tablecloth to paper thin consistency, from the inside to the outside working your way round the sheet of dough.

Keep stretching until the sheet of dough starts to look almost translucent and you will be able to see a pattern of your tablecloth through it.

You should end up with a thin sheet of dough stretched more or less into a rectangular shape with a diameter of approximately 40 cm which will fit into a standard 40 cm baking tray.

If you notice that the edges are still a bit thick, stretch them further very gently or cut them off. If you leave the edged thick, when rolling the strudel, they will form quite a thick layer at the very centre of the strudel risking to remain slightly underbaked.

Place and spoon evenly the apple mixture over one half of the dough sheet leaving about 2-3cm to the edge.

Fold in the side ends of the sheet to prevent filling coming out during rolling. Using the tablecloth to help you, roll the dough all the way and place the rolled strudel very gently on a baking tray previously lined with baking parchment, seam side down.

View fullsize Apple Strudel 11.jpg
View fullsize Apple Strudel 12.jpg
View fullsize Apple Strudel 13.jpg
View fullsize Apple Strudel 14.jpg

Brush it with a bit of melted butter.

View fullsize Apple Strudel 16.jpg
View fullsize Apple Strudel 17.jpg

Bake on the middle shelf for 40 45 min.

Apple Strudel is ready when the crust turns nice and golden.

Take it out of the oven, let it cool. Dust it with icing sugar, cut into slices and serve it on its own or with vanilla ice cream or cream.

Just a thought

You can make the strudel dough ahead and keep it refrigerated for up to two days. Before using the dough take it out of the fridge allowing it to come to a room temperature.

Wine suggestion

Alto Adige Gewürztraminer DOC Vendemmia Tardiva "Roen" 2019 - Cantina Tramin (0.375l)

November 05, 2021 /tina oblak
apples, strudel dough, Autumnal dessert, cinnamon, pine nuts kernels, raisins, Apple strudel home made, Strudel di mele, Jabolčni štrudelj, Jabolčni zavitek, Strucolo de pomi
Adriatic Recipe, baked dish, baking, breakfast, Central European recipes, dessert, Eastern European recipes, Istrian cuisine, Istrian dish, Istrian food, Istrian gastronomy, Mitteleuropean recipes, pudding, recipe from Northern Ital, Rustic dish, Slovenian cuisine, Slovenian food, Slovenian gastronomy, sweet course, Sweet Things
Comment
Potato gnocchi 1.jpg

Potato Gnocchi recipe

Beans and Sardines
May 04, 2021 by tina oblak in Gnocchi, recipe from Northern Ital, Easy recipe, healthy mael, Rustic dish, Side Dishes, main course, entrée course, main dish

Gnocchi are incredibly popular dish from where I come from, and again this is of no surprise, as the region is so close to Veneto and Friuli-Venezia Giulia, regions in Northern Italy where gnocchi actually originated. This is due to a cooler climate that is very well suited for growing potatoes.

I will share here with you my nona Nada's recipe for a basic homemade potato gnocchi that can be served with endless variety of sauces but the most common are probably melted butter, sage and grated Parmiggiano Reggiano cheese, bolognese sauce, classic tomato sauce, four cheeses sauce and basil pesto. Gnocchi can also be prepared in advance to use for a gnocchi bake.

In Slovenia they are frequently found on the menus in family run restaurants served with different meat roasts and the gravy; the idea behind it is to squash the gnocchi with the fork so they absorb the sauce. When you eat it like that, it is like receiving a hug.

I grew up on them, my nona Nada made tuns of them in her lifetime. I learnt how to make them directly from her, under her strictest supervision of course, apparently I passed!

A lot of people are quite daunted by the idea of making gnocchi from scratch, but I promise you they are much less complicated that is seems and once you make them yourself and realize how easy it is to make them and how much tastier they are compared to ready made once from the store, you will think twice before buying them.

Before you start, it is crucial that you chose the right type of potato, they need to be starchy with floury texture and minimum content of water, giving you a light and airy dough with gnocchi being soft, delicate with a pillowy texture.

Gnocchi are perfect for both informal or more formal lunches or dinners.

Recipe

Ingredients

Serves 4-6

  • 1kg floury, yellow-fleshed potatoes, e.g. King Edward, Maris Piper, (avoid new potatoes). I use red skin potatoes.

  • 300g all purpose flour (plus extra for flouring the board and working surface)

  • 1 egg, slightly beaten

  • sea salt, a pinch

Potato gnocchi 2.jpg

Method

Wash the potatoes, with the skin on, under cold running water.

Place the potatoes in a saucepan or a pot, cover with cold water and bring to boil. After the water has come to a boil, cook for about 20 minutes or until tender. Cooking time will obviously vary depending on the size of the potatoes you are using.

Don't pierce them during cooking and don't overcook them allowing the skin to burst as they will absorb too much water.

You might ask yourself why is it so important to use floury, low water content potato and why is it so important that the potatoes do not absorb too much water during the cooking.

It is crucial that the potatoes stay dry, in this way you will only add the necessary flour, having as a finished product a cooked gnocchi that will actually taste of potato, how they should. On the contrary, the wet potatoes will require more flour as the dough will be wetter and stickier resulting in potato gnocchi tasting floury.

There is a very simple way to avoid potatoes absorbing too much water, steam them, and this is my secret, success guaranteed.

Remove from the pot, drain them in a colander and let them cool enough to handle, then remove the skin. If the potatoes are still quite warm to handle, the best way to remove the skin is to stick the fork though the potato and peel it using a knife.

View fullsize Potato gnocchi 3.jpg
View fullsize Potato gnocchi 4.jpg

Put the flour on a working surface, add salt and mix with the fork.

Make a well in the middle and pass the potatoes through a potato ricer while still warm as they become stickier when cooler. Allow riced potatoes to cool for few minutes and then add the egg.

View fullsize Potato gnocchi 5.jpg
View fullsize Potato gnocchi 6.jpg
View fullsize Potato gnocchi 7.jpg

Cut a small piece of the dough; my nona Nada told me that the dough should cut like a loaf of bread, roll it out into a log about 2 cm thick and cut them into pieces.

It is very important that you sprinkle the gnocchi with a bit of flour and gently toss them so they don't stick together.

View fullsize Potato gnocchi 8.jpg
View fullsize Potato gnocchi 9.jpg
View fullsize Potato gnocchi 10.jpg
View fullsize Potato gnocchi 11.jpg

Repeat the process until you finish all the dough.

View fullsize Potato gnocchi 12.jpg
View fullsize Potato gnocchi 13.jpg

Cook them straight away or leave them uncooked for later use. They can stay uncooked for about a maximum of two hours providing you are covering the gnocchi with kitchen towel.

You can also freeze them, see my section Just a thought.

Potato gnocchi 14.jpg

Gnocchi really do cook in a flash. Place them in a large pot of salted boiling water and when they float to the top you know they are cooked.

Drain them in a colander or scoop them out with slotted spoon, I prefer the latter method as less aggressive with soft and delicate gnocchi.

Add your favourite sauce and serve immediately.

Potato gnocchi 15.jpg

Just a thought

The great thing about gnocchi is that they freeze very well. It is very important that you spread the uncooked gnocchi in a single layer, so they don't stick together, on a well floured wooden board, baking sheet, serving tray or similar laid with kitchen cloth and floured.

Put your tray with gnocchi into a freezer for at least 20- 30 minutes and once frozen put them into a freezing bag.

When you want to cook them just drop them frozen directly into a boiling salted water without defrosting them first.

May 04, 2021 /tina oblak
home made potato gnocchi, authentic potato gnocchi recipe, njoki
Gnocchi, recipe from Northern Ital, Easy recipe, healthy mael, Rustic dish, Side Dishes, main course, entrée course, main dish
Comment
LRM_20191017_111905 (1).jpg

Rustic Fig Jam Crostata (rustic Italian style jam tart) recipe

Beans and Sardines
March 16, 2021 by tina oblak in Sweet Things, Adriatic Recipe, baking, dessert, Easy recipe, pudding, recipe from Northern Ital, Rustic dish

When I was a child, desserts after the main meal were more of a weekend treat, and it is when my mum would bake.

And there is one simple dish she always baked in our household, and that is a jam tart or simply crostata as we call it in Italian. It is made using Italian style sweet shortcrust pastry that is enriched with eggs, which help make the dough even flakier, lemon zest, sugar, and baking powder. It is still very popular to bake at home and easily available in bakery shop and supermarkets.

My mum would use different fruit jams that she made using a variety of fruits in the season from our orchard or fruit given by friends or neighbours. Most commonly used type of jam to fill the crostata with would be the apricot jam. Crostata can be also filled with ricotta, Nutella, pastry cream and fresh fruit.

This year we had a brilliant year for figs and they were in abundance in my grandma's back garden. Most were eaten just picked directly from the tree, how luxurious. But there were just so many figs and since nothing gets ever wasted, we made a lot of jam!

View fullsize P8239632.JPG
View fullsize P8239635.JPG

There is something so comforting and homely about jam crostata, with a delicate flake crust, filled with your favourite choice of jam. Simply delicious, just melts into your mouth, and most importantly, it is easy to make, and the aroma during the baking is unmistakable.

Crostata is also great for colder days, as a dessert or snack, and is commonly served for breakfast too.

Nice accompanied with cream, vanilla ice-cream or natural Greek yogurt, just to tone down a bit the sweetness of the the fig jam.

LRM_20191017_114606.jpg

Ingredients

  • 250g all purpose flour

  • 105g diced butter, room temperature

  • 1 egg and 1 egg yolk (slightly beaten), keep the egg white for brushing the crostata just before putting it in the oven for baking

  • 50g caster sugar (optional if you use fig jam as it is quite sweet already)

  • lemon zest of one small unwaxed lemon, finely grated

  • 1 Tsp of liquor like grappa or rum ( I used rum)

  • ¼ Tsp baking powder

  • jar of fig jam or any other jam of your choice, home made or a good quality one from the food store

Method

To make the pastry, measure the flour into a large bowl and add the butter.

Using just your fingertips, rub the butter into the flour until the mixture resembles fine breadcrumbs.

Make a well in the centre of the flour, then add the sugar, the eggs, lemon zest, liquor, and baking powder. First stir gently with the fork to combine all the ingredients and for the mixture to come together.

LRM_20191016_103910.jpg
View fullsize LRM_20191016_105737.jpg
View fullsize LRM_20191016_110609.jpg

Gently gather the dough together with your hands and transfer it onto a floured work surface.

Gently press the dough, without kneading it, until it comes together to form a firm ball.

Press the dough into a flat disc, wrap it in cling film and refrigerate for about 30min.

View fullsize LRM_20191016_111346 (1).jpg
View fullsize LRM_20191016_111840.jpg
View fullsize LRM_20191016_112034.jpg

Preheat the oven to 180C static or equivalent.

Lightly flour the surface and the rolling pin. Take about 2/3 of the pastry and with the rolling pin roll it out on a surface, then roll the pastry back over the rolling pin, so it is hanging, and ease it into the 23cm loose bottom non stick flan tin.

Press the pastry shell into the side of the tin.

Allow the excess to hang over the side and roll the rolling pin over the top of the flan tin, to cut off the excess pastry.

View fullsize LRM_20191016_120752 (2).jpg
View fullsize LRM_20191016_121132 (2).jpg
View fullsize LRM_20191016_121512.jpg
View fullsize LRM_20191016_121652.jpg
View fullsize LRM_20191016_121805.jpg
View fullsize LRM_20191016_123009.jpg

Spoon the jam of your choice into the pastry case.

On a lightly floured surface roll out the remaining pastry, cut it in strips with pastry wheel cutter or with the knife and decorate your tart.

If you happen to have a bit of left pastry, just take your favourite cookie cutter and make few biscuits.

Brush the pastry with a slightly beaten egg white, put it in the oven and bake for 30-40min until nice and golden in colour.

View fullsize LRM_20191016_125219.jpg
View fullsize LRM_20191016_130654.jpg
View fullsize LRM_20191016_131203.jpg
View fullsize LRM_20191016_131635.jpg

When baked, let it cool in a tin, dust with little icing sugar and serve warm or cold.

LRM_20191016_152518 (1).jpg
View fullsize LRM_20191017_104058 (3).jpg
View fullsize LRM_20191017_114606 (1).jpg

Wine suggestion

Verduzzo Friulano Passito DOC 2019 by La Tunella, Colli Orientali del Friuli.

March 16, 2021 /tina oblak
Rustic Fig Jam Crostata (rustic Italian style jam tart) recipe, classic jam crostata recipe, Italian style jam filled tart recipe, Rustic Italin style jam tart recipe, crostata recipe, Italian sweet pastry
Sweet Things, Adriatic Recipe, baking, dessert, Easy recipe, pudding, recipe from Northern Ital, Rustic dish
1 Comment
Leek Risotto 10.jpg

Leek Risotto recipe

Beans and sardines
February 09, 2021 by tina oblak in Risotti, Adriatic Recipe, Easy recipe, entrée course, healthy mael, main course, recipe from Northern Ital, Side Dishes, Healthy

Leek is a humble vegetable of great potential but it is sadly often overlooked. It is a relative of the onion with long green leaves and a white bulbous root. As we know it today, leeks were first grown by the ancient Egyptians.

These alliums (the type of plants that belong to the group that includes onions, shallots, scallions, chives and garlic) are almost inedible when raw but when cooked slow and low they become mellow, sweet, creamy and taste delicious. Fantastically versatile, full of flavour, and it should be no surprise the humble leek is used in risotto where it takes central stage.

Leeks are omnipresent at the vegetable markets but at its best during the coldest months of the year from October through May.

They are packed with nutrients and anti-oxidants, and so make the best use out of them especially during autumn and winter months when less native vegetables are available. They will help fight colds and flu.

Leek Risotto 2.jpg

Back home we will use just about anything to make risotto, a very much liked and loved dish. This should be no surprise since my hometown is less than a two hours drive to Venice, and the region of Veneto (Northern Italy), especially the Po Valley, where growing rice is very popular, and is a major agricultural industry.

The valley offers a constant supply of water for the rice fields since there are many large non-seasonal rivers.

It is in this region of Italy, the Veneto region, with its colder climate compared to the warmer South of Italy, that the dishes had to be warming, hearty, and filling, and although risotto is found in the whole of Italy, it is in the Veneto that the greatest variety, and number of risotto recipes can be found.

My mum would go to the vegetable market and made risotto with the vegetables there were in season, and when the leeks were at their best, leek risotto would be on the table for lunch or dinner.

This very simple, comforting leek risotto is perfect solution for mid week quick nutritious lunch or dinner, but equally great for more formal entertaining since it is also presentable as a delicate and elegant dish.

Ingredients

Serves 4

  • 500g leeks, cleaned and chopped (Do buy more than you think you will need to allow for losses caused by trimmings)

  • 4 Tbsp extra virgin olive oil

  • 1 clove of garlic (peeled)

  • 300g risotto rice (like Vialone Nano, Arborio, Carnaroli) In this recipe I used Vialone Nano.

  • 1l vegetable or chicken stock (you can use good quality instant stock powder or boiling water)

  • 40g Parmiggiano Reggiano (finely grated)

  • knob of butter (1-2 Tbsp)

Method

Rinse your leeks under cold running water and pat dry with a paper towel.

Put your rinsed leeks on a chopping board and with a sharp knife cut off the dark green leaf ends of the leek and the muddy tips of the roots. Keep the green ends for the stock if you wish or discard.

Slice each leek in half from top to bottom and slice further the halves into thin stripes (julienne cut), then chop.

View fullsize Leek Risotto 3.jpg
View fullsize Leek Risotto 4.jpg
View fullsize Leek Risotto 5.jpg
Leek Risotto 6.jpg

Wash chopped leeks thoroughly under running cold water. Leeks need a good cleaning before using, as dirt often gets stuck between the layers of leaves as they grow.

Before starting making risotto, it is a good idea to have your boiling hot stock or water ready to hand for later.

Now, let's start making risotto by putting the oil in a pan and heat it with the garlic clove. When the garlic has turned golden in colour and infused the oil, remove it. Pay attention not to burn the garlic.

Add chopped leeks and cook them slowly on a gentle heat for about 20-30min until they reach a very soft consistency, almost disintegrating.

Season with sea salt, add risotto rice, mix well with the leeks and toast it together for few minutes stirring constantly to avoid sticking to the bottom of a pan.

View fullsize Leek Risotto 7.jpg
View fullsize Leek Risotto 8.jpg
View fullsize Leek Risotto 9.jpg

After toasting the rice, cover it completely with boiling stock or water and cook over medium heat.

Start adding gradually the ladles of stock or water, one at a time, to keep the risotto moist, allow liquid to be absorbed before adding more. Stir constantly and cook until the rice is cooked al dente (fully cooked but still firm when bitten) and the stock almost completely absorbed but make sure you do not dry the risotto too much.

If the risotto gets too dry just add a bit more stock. There should always be enough liquid just to cover the risotto, the Italians say that risotto should be smooth and runny enough to be described as all'onda (on the wave).

Generally it will take at least about 15 to 18 min for risotto to be cooked.

The risotto is now ready to be finished with a typical Italian mantecare phase which is quite essential when making risotto. Mantecare simply means that you remove the saucepan from the heat, add grated cheese and cold butter or cream to the risotto when is almost finished and stir with a wooden spoon quite vigorously in order to develop that delicious creamy texture.

Leek Risotto 1.jpg

Serve immediately garnished with extra grated or shaved Parmiggiano Reggiano if desired.

Wine suggestion

Pinot Grigio DOC 2019 by Le vigne di Zamò, Friuli Colli Orientali.

February 09, 2021 /tina oblak
leeks, creamy leek risotto, simple leek risotto, Vialone nano rice
Risotti, Adriatic Recipe, Easy recipe, entrée course, healthy mael, main course, recipe from Northern Ital, Side Dishes, Healthy
Comment
  • Newer
  • Older